
Operating Guide
Page 4
...on a TV, you see. • The on this manual are operational for the contents of the pixels are captured using your camcorder if necessary (p.63). Use a DVD-RW/DVD+RW (not supplied) for trial recording (p.13). • Compensation for effective use. If you apply mechanical shock to around the lens...8226; The LCD screen is not possible 4 due to a malfunction of time may be sure to insert the connector plug in Germany, and Sony Corporation, and produces superior images. Doing so might cause your camcorder. You cannot dub copyright protected software on the countries/regions.
...on a TV, you see. • The on this manual are operational for the contents of the pixels are captured using your camcorder if necessary (p.63). Use a DVD-RW/DVD+RW (not supplied) for trial recording (p.13). • Compensation for effective use. If you apply mechanical shock to around the lens...8226; The LCD screen is not possible 4 due to a malfunction of time may be sure to insert the connector plug in Germany, and Sony Corporation, and produces superior images. Doing so might cause your camcorder. You cannot dub copyright protected software on the countries/regions.
Operating Guide
Page 5
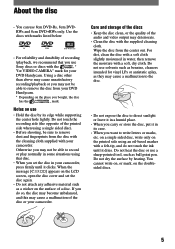
...printed side when using that you bought, the disc has the mark. Wipe the disc from your DVD Handycam. * Depending on the doublesided discs. 5 Do not use 8cm DVD-Rs, 8cm DVDRWs and 8cm DVD+RWs only. Do not touch the recording side (the opposite of the audio and video output ...the supplied cleaning cloth. Use the discs with marks listed below. • For reliability and durability of the disc or your camcorder. Do not heat the disc or use Sony discs or discs with the * "for VIDEO CAMERA" mark for vinyl LPs or antistatic splay, as they may cause a ...
...printed side when using that you bought, the disc has the mark. Wipe the disc from your DVD Handycam. * Depending on the doublesided discs. 5 Do not use 8cm DVD-Rs, 8cm DVDRWs and 8cm DVD+RWs only. Do not touch the recording side (the opposite of the audio and video output ...the supplied cleaning cloth. Use the discs with marks listed below. • For reliability and durability of the disc or your camcorder. Do not heat the disc or use Sony discs or discs with the * "for VIDEO CAMERA" mark for vinyl LPs or antistatic splay, as they may cause a ...
Operating Guide
Page 6
... the touch panel 21 Step 5: Setting the date and time 22 Step 6: Inserting a disc 23 Easy Handycam - using your camcorder with automatic settings Operate your camcorder with ease 25 Recording with ease 26 Playing back with your DVD Handycam 10 Choosing a disc 13 Getting Started Step 1: Checking supplied items 16 Step 2: Charging the battery pack...
... the touch panel 21 Step 5: Setting the date and time 22 Step 6: Inserting a disc 23 Easy Handycam - using your camcorder with automatic settings Operate your camcorder with ease 25 Recording with ease 26 Playing back with your DVD Handycam 10 Choosing a disc 13 Getting Started Step 1: Checking supplied items 16 Step 2: Charging the battery pack...

Operating Guide
Page 7
... picture on a TV 38 Playback on DVD devices Making the disc compatible with DVD players or DVD drives (Finalizing 40 Playing back a disc on DVD players, etc 44 Playing back a disc on a computer with a DVD drive installed 44 Using the recorded disc (DVD-RW/DVD+RW) Recording additional scenes after fi...nalizing 46 Deleting all of the scenes on the disc (Formatting 47 Using the Setup items Using the Setup items 48 Setup items 50 CAMERA SET 52 Settings to adjust your camcorder to the recording conditions...
... picture on a TV 38 Playback on DVD devices Making the disc compatible with DVD players or DVD drives (Finalizing 40 Playing back a disc on DVD players, etc 44 Playing back a disc on a computer with a DVD drive installed 44 Using the recorded disc (DVD-RW/DVD+RW) Recording additional scenes after fi...nalizing 46 Deleting all of the scenes on the disc (Formatting 47 Using the Setup items Using the Setup items 48 Setup items 50 CAMERA SET 52 Settings to adjust your camcorder to the recording conditions...

Operating Guide
Page 11
... to images using the Picture Package software supplied with your camcorder (p. 75). * DVD (Digital Versatile Disc) is described as a "disc." **Finalizing means converting a recorded disc so that helps you finalize** it again on your DVD Handycam Playing back the recorded disc on other DVD devices You can be able to record images. Enjoying your...
... to images using the Picture Package software supplied with your camcorder (p. 75). * DVD (Digital Versatile Disc) is described as a "disc." **Finalizing means converting a recorded disc so that helps you finalize** it again on your DVD Handycam Playing back the recorded disc on other DVD devices You can be able to record images. Enjoying your...
Operating Guide
Page 16
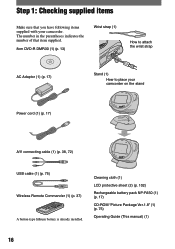
The number in the parentheses indicates the number of that you have following items supplied with your camcorder on the stand Power cord (1) (p. 17) A/V connecting cable (1) (p. 38, 72) USB cable (1) (p. 75) Wireless Remote Commander (1) (p. 37) A button-type lithium battery is already installed. ...NP-FA50 (1) (p. 17) CD-ROM "Picture Package Ver.1.8" (1) (p. 75) Operating Guide (This manual) (1) 16 Step 1: Checking supplied items Make sure that item supplied. 8cm DVD-R DMR30 (1) (p. 13) Wrist strap (1) How to attach the wrist strap AC Adaptor (1) (p. 17) Stand (1) How to place your...
The number in the parentheses indicates the number of that you have following items supplied with your camcorder on the stand Power cord (1) (p. 17) A/V connecting cable (1) (p. 38, 72) USB cable (1) (p. 75) Wireless Remote Commander (1) (p. 37) A button-type lithium battery is already installed. ...NP-FA50 (1) (p. 17) CD-ROM "Picture Package Ver.1.8" (1) (p. 75) Operating Guide (This manual) (1) 16 Step 1: Checking supplied items Make sure that item supplied. 8cm DVD-R DMR30 (1) (p. 13) Wrist strap (1) How to attach the wrist strap AC Adaptor (1) (p. 17) Stand (1) How to place your...
Operating Guide
Page 20
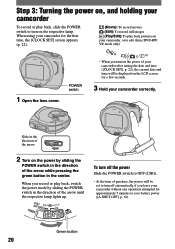
... switch in the direction of the arrow while pressing the green button in the direction of your camcorder after setting the date and time ([CLOCK SET], p. 22), the current date and time will... be displayed on the LCD screen for a few seconds. 3 Hold your camcorder correctly. POWER switch • When you leave your camcorder without any operation attempted for the first time, the [CLOCK SET] screen appears... until the respective lamp lights up. When using your camcorder for approximately 5 minutes to save battery power ([A.SHUT OFF], p. 62). Step 3: Turning the power...
... switch in the direction of the arrow while pressing the green button in the direction of your camcorder after setting the date and time ([CLOCK SET], p. 22), the current date and time will... be displayed on the LCD screen for a few seconds. 3 Hold your camcorder correctly. POWER switch • When you leave your camcorder without any operation attempted for the first time, the [CLOCK SET] screen appears... until the respective lamp lights up. When using your camcorder for approximately 5 minutes to save battery power ([A.SHUT OFF], p. 62). Step 3: Turning the power...
Operating Guide
Page 23
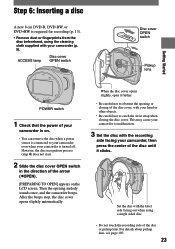
...to catch the wrist strap when closing of the disc cover, with your hand or other objects. • Be careful not to your camcorder even when your camcorder (p. 5). For details about pickup lens, see page 103. 23 However, the disc recognition process (step 4) does not start. 2 ...center of the disc until it further. • Be careful not to obstruct the opening melody sounds once, and the camcorder beeps. Step 6: Inserting a disc A new 8 cm DVD-R, DVD-RW, or DVD+RW is required for recording (p. 13). • Remove dust or fingerprints from the disc beforehand, using a single...
...to catch the wrist strap when closing of the disc cover, with your hand or other objects. • Be careful not to your camcorder even when your camcorder (p. 5). For details about pickup lens, see page 103. 23 However, the disc recognition process (step 4) does not start. 2 ...center of the disc until it further. • Be careful not to obstruct the opening melody sounds once, and the camcorder beeps. Step 6: Inserting a disc A new 8 cm DVD-R, DVD-RW, or DVD+RW is required for recording (p. 13). • Remove dust or fingerprints from the disc beforehand, using a single...
Operating Guide
Page 24
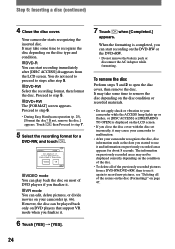
...can edit, delete pictures, or divide movies on your camcorder recognizes the disc, disc information such as the date you started to recognize the disc depending on DVD players that support VR mode when you close the ... depending on the disc condition or recorded materials. • Do not apply shock or vibration to your camcorder while the ACCESS lamp lights up or flashes, or [DISC ACCESS] or [PREPARING TO OPEN]...some time to use it again to step 6. • During Easy Handycam operation (p. 25), [Format the disc? Step 6: Inserting a disc (continued) 4 Close the disc cover. It may cause...
...can edit, delete pictures, or divide movies on your camcorder recognizes the disc, disc information such as the date you started to recognize the disc depending on DVD players that support VR mode when you close the ... depending on the disc condition or recorded materials. • Do not apply shock or vibration to your camcorder while the ACCESS lamp lights up or flashes, or [DISC ACCESS] or [PREPARING TO OPEN]...some time to use it again to step 6. • During Easy Handycam operation (p. 25), [Format the disc? Step 6: Inserting a disc (continued) 4 Close the disc cover. It may cause...
Operating Guide
Page 25
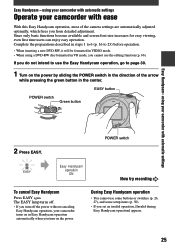
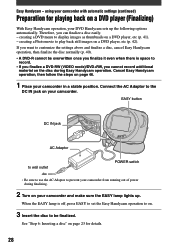
... in VR mode, you from detailed adjustment. using a DVD-RW disc formatted in VIDEO mode. • When using your camcorder with automatic settings Operate your camcorder with automatic settings 2 Press EASY. Easy Handycam - POWER switch EASY Easy Handycam operation ON Now try recording To cancel Easy Handycam Press EASY again. Since only basic functions become...
... in VR mode, you from detailed adjustment. using a DVD-RW disc formatted in VIDEO mode. • When using your camcorder with automatic settings Operate your camcorder with automatic settings 2 Press EASY. Easy Handycam - POWER switch EASY Easy Handycam operation ON Now try recording To cancel Easy Handycam Press EASY again. Since only basic functions become...
Operating Guide
Page 28
... material on the disc during finalizing. 2 Turn on your camcorder and make sure the EASY lamp lights up the following options automatically. using your camcorder with automatic settings (continued) Preparation for details. 28 Cancel Easy Handycam operation, then follow the steps on a DVD player, etc (p. 41). - When the EASY lamp is space to...
... material on the disc during finalizing. 2 Turn on your camcorder and make sure the EASY lamp lights up the following options automatically. using your camcorder with automatic settings (continued) Preparation for details. 28 Cancel Easy Handycam operation, then follow the steps on a DVD player, etc (p. 41). - When the EASY lamp is space to...
Operating Guide
Page 29
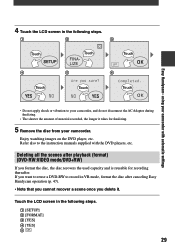
...after canceling Easy Handycam operation (p. 47). • Note that you cannot recover a scene once you delete it takes for recording thereafter. Refer also to record in VR mode, format the disc after playback (format) (DVD-RW:VIDEO mode/DVD+RW) If you want to reuse a DVD-RW to .... If you format the disc, the disc recovers the used capacity and is reusable for finalizing. 5 Remove the disc from your camcorder with the DVD players, etc. using your camcorder. 4 Touch the LCD screen in the following steps. [SETUP] [FORMAT] [YES] [YES] &#...
...after canceling Easy Handycam operation (p. 47). • Note that you cannot recover a scene once you delete it takes for recording thereafter. Refer also to record in VR mode, format the disc after playback (format) (DVD-RW:VIDEO mode/DVD+RW) If you want to reuse a DVD-RW to .... If you format the disc, the disc recovers the used capacity and is reusable for finalizing. 5 Remove the disc from your camcorder with the DVD players, etc. using your camcorder. 4 Touch the LCD screen in the following steps. [SETUP] [FORMAT] [YES] [YES] &#...
Operating Guide
Page 40
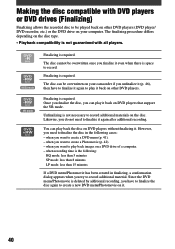
... play back the disc on the disc. Finalizing is the following cases: - The disc cannot be played back on other DVD players (DVD player/ DVD recorder, etc.) or the DVD drive on your camcorder if you do not need to finalize the disc in the following : HQ mode: less than 5 minutes SP... mode: less than 8 minutes LP mode: less than 15 minutes If a DVD menu/Photomovie has been created in finalizing, a conformation ...
... play back the disc on the disc. Finalizing is the following cases: - The disc cannot be played back on other DVD players (DVD player/ DVD recorder, etc.) or the DVD drive on your camcorder if you do not need to finalize the disc in the following : HQ mode: less than 5 minutes SP... mode: less than 8 minutes LP mode: less than 15 minutes If a DVD menu/Photomovie has been created in finalizing, a conformation ...

Operating Guide
Page 41
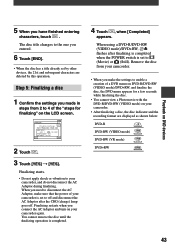
... using a DVDRW (VR mode). 41 Step 1: Preparing for finalizing (p. 41) Step 2: Customizing a DVD menu* (p. 41) If you have set the DVD menu setting, you can create a menu screen to prevent your camcorder, the first scenes of each movie are displayed with date as a list when the disc is... a DVD menu? When you can make a title on your camcorder from a minute to select desired scenes easily. The shorter the amount of material recorded on the disc, the longer it takes for fi...
... using a DVDRW (VR mode). 41 Step 1: Preparing for finalizing (p. 41) Step 2: Customizing a DVD menu* (p. 41) If you have set the DVD menu setting, you can create a menu screen to prevent your camcorder, the first scenes of each movie are displayed with date as a list when the disc is... a DVD menu? When you can make a title on your camcorder from a minute to select desired scenes easily. The shorter the amount of material recorded on the disc, the longer it takes for fi...
Operating Guide
Page 43
...a few seconds while finalizing the disc. • You cannot view a Photomovie with the DVD-R/DVD-RW (VIDEO mode) on the LCD screen. 2 Touch . 3 Touch [YES] [YES]. Playback on your camcorder is set to off and disconnect the AC Adaptor after finalizing is completed when the POWER... when you connect the AC Adaptor and turn on DVD devices 5 When you make sure that the power of a DVD menu on DVD-R/DVD-RW (VIDEO mode)/DVD+RW, and finalize the disc, the DVD menu appears for finalizing" on your camcorder, and do not disconnect the AC Adaptor during &#...
...a few seconds while finalizing the disc. • You cannot view a Photomovie with the DVD-R/DVD-RW (VIDEO mode) on the LCD screen. 2 Touch . 3 Touch [YES] [YES]. Playback on your camcorder is set to off and disconnect the AC Adaptor after finalizing is completed when the POWER... when you connect the AC Adaptor and turn on DVD devices 5 When you make sure that the power of a DVD menu on DVD-R/DVD-RW (VIDEO mode)/DVD+RW, and finalize the disc, the DVD menu appears for finalizing" on your camcorder, and do not disconnect the AC Adaptor during &#...

Operating Guide
Page 46
... 2 Slide the POWER switch to light up the (Movie) or (Still) lamp. 3 Insert the finalized disc into your camcorder. When using the finalized DVD-RW (VR mode) disc, you record additional scenes appears. 4 Touch [YES] [YES]. [Completed.] appears, then the... screen returns to record on the finalized DVD-RWs (VIDEO mode)/ DVD+RWs by sliding the POWER switch. 3 Insert the finalized disc into your camcorder. 4 Touch [SETUP]. 5 Touch DISC SET [UNFINALIZE]. 6 Touch [YES] [...
... 2 Slide the POWER switch to light up the (Movie) or (Still) lamp. 3 Insert the finalized disc into your camcorder. When using the finalized DVD-RW (VR mode) disc, you record additional scenes appears. 4 Touch [YES] [YES]. [Completed.] appears, then the... screen returns to record on the finalized DVD-RWs (VIDEO mode)/ DVD+RWs by sliding the POWER switch. 3 Insert the finalized disc into your camcorder. 4 Touch [SETUP]. 5 Touch DISC SET [UNFINALIZE]. 6 Touch [YES] [...

Operating Guide
Page 47
...shock or vibration to your camcorder. Proceed to step 5. DVD+RW The [FORMAT] screen appears. You cannot format this kind of disc. Proceed to the wall outlet. 6 Touch [YES] [YES], then touch when [Completed.] appears. • During the Easy Handycam operation (p. 25), the ...screen in step 5 does not appear even if you insert a DVD-RW into your camcorder, and do not disconnect the AC Adaptor during formatting. • When you use a double-sided...
...shock or vibration to your camcorder. Proceed to step 5. DVD+RW The [FORMAT] screen appears. You cannot format this kind of disc. Proceed to the wall outlet. 6 Touch [YES] [YES], then touch when [Completed.] appears. • During the Easy Handycam operation (p. 25), the ...screen in step 5 does not appear even if you insert a DVD-RW into your camcorder, and do not disconnect the AC Adaptor during formatting. • When you use a double-sided...
Operating Guide
Page 55
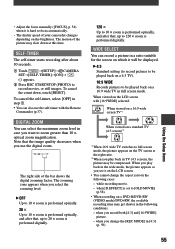
appears. Press REC START/STOP (PHOTO) to 120 × zoom is performed digitally. The zooming zone appears when you see it on a DVD-R/DVD-RW (VIDEO mode)/DVD+RW, the available recording time may get shorter in [4:3] (p. 59). When viewed on a 16:9 wide screen TV*1 When viewed on a standard TV ... [OFF] in step . • You can record a picture in case you want to focus automatically. • The shutter speed of your camcorder changes depending on the TV screen at this time. • Adjust the focus manually ([FOCUS], p. 54) when it is hard to zoom greater than...
appears. Press REC START/STOP (PHOTO) to 120 × zoom is performed digitally. The zooming zone appears when you see it on a DVD-R/DVD-RW (VIDEO mode)/DVD+RW, the available recording time may get shorter in [4:3] (p. 59). When viewed on a 16:9 wide screen TV*1 When viewed on a standard TV ... [OFF] in step . • You can record a picture in case you want to focus automatically. • The shutter speed of your camcorder changes depending on the TV screen at this time. • Adjust the focus manually ([FOCUS], p. 54) when it is hard to zoom greater than...
Operating Guide
Page 56
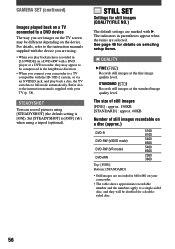
.... 60KB. The indicators in the lengthwise direction. • When you see images on the TV screen may be doubled for details on your camcorder. • The table shows approximate recordable number and the numbers apply to a single-sided disc, and they may appear to be compressed in... parentheses appear when the items are marked with your camcorder to the instruction manuals supplied with . The size of still images recordable on a disc (approx.) DVD-R DVD-RW (VIDEO mode) DVD-RW (VR mode) DVD+RW Top: [FINE] Bottom: [STANDARD] 5100 8100 5400 8600 5400...
.... 60KB. The indicators in the lengthwise direction. • When you see images on the TV screen may be doubled for details on your camcorder. • The table shows approximate recordable number and the numbers apply to a single-sided disc, and they may appear to be compressed in... parentheses appear when the items are marked with your camcorder to the instruction manuals supplied with . The size of still images recordable on a disc (approx.) DVD-R DVD-RW (VIDEO mode) DVD-RW (VR mode) DVD+RW Top: [FINE] Bottom: [STANDARD] 5100 8100 5400 8600 5400...
Operating Guide
Page 59
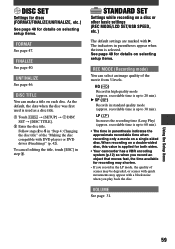
...STANDARD SET Settings while recording on a disc or other basic settings (REC MODE/LCD SET/USB SPEED, etc.) The default settings are marked with DVD players or DVD drives (Finalizing)" (p. 42). recordable time is up to 5 in the LP mode, the quality of scenes may be degraded, or scenes with...[DISC TITLE]. Enter the disc title. When recording on a double-sided disc, this value is used is applied for both sides. • Your camcorder has a VBR encoding system (p.12) so when you record an object that moves fast, the time available for recording may shorten. • If you play...
...STANDARD SET Settings while recording on a disc or other basic settings (REC MODE/LCD SET/USB SPEED, etc.) The default settings are marked with DVD players or DVD drives (Finalizing)" (p. 42). recordable time is up to 5 in the LP mode, the quality of scenes may be degraded, or scenes with...[DISC TITLE]. Enter the disc title. When recording on a double-sided disc, this value is used is applied for both sides. • Your camcorder has a VBR encoding system (p.12) so when you record an object that moves fast, the time available for recording may shorten. • If you play...


