
Marketing Specifications
Page 2
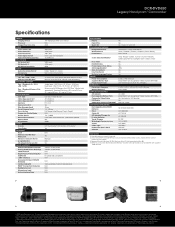
... LCD display (123k pixels)3 Yes N/A Yes Manual N/A Yes Video/S Video/Audio Video/S Video/Audio N/A N/A Hi-speed (2.0 compliant) N/A N/A Sold separately (via A/V Remote jack) N/A N/A N/A N/A CONVENIENCE Hybrid Hybrid Plus Quick On CONVENIENCE FEATURES Image Stabilization White ... 13oz (390g) AC-L200 InfoLITHIUM® with supplied PMB software. © 2010 Sony Electronics Inc. HDMI is a trademark of Sony DVD-R and DVD-RW media recommended. DCR-DVD650 Legacy Handycam® Camcorder Specifications IMAGER Imaging Device Processor Imager Pixel Gross Size VIDEO Video Actual 16:9 ...
... LCD display (123k pixels)3 Yes N/A Yes Manual N/A Yes Video/S Video/Audio Video/S Video/Audio N/A N/A Hi-speed (2.0 compliant) N/A N/A Sold separately (via A/V Remote jack) N/A N/A N/A N/A CONVENIENCE Hybrid Hybrid Plus Quick On CONVENIENCE FEATURES Image Stabilization White ... 13oz (390g) AC-L200 InfoLITHIUM® with supplied PMB software. © 2010 Sony Electronics Inc. HDMI is a trademark of Sony DVD-R and DVD-RW media recommended. DCR-DVD650 Legacy Handycam® Camcorder Specifications IMAGER Imaging Device Processor Imager Pixel Gross Size VIDEO Video Actual 16:9 ...
Operating Guide
Page 5
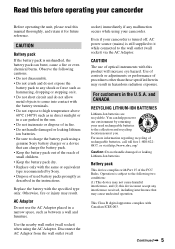
...it while connected to the collection and recycling location nearest you. Operation is mishandled, the battery pack can help preserve our environment by Sony. • Dispose of used rechargeable batteries to the wall outlet (wall socket) via the AC Adaptor. Observe the following two conditions:...8226; Keep the battery pack dry. • Replace only with the same or equivalent type recommended by returning your camcorder Before operating the unit, please read this manual thoroughly, and retain it . • Do not short circuit and do not allow metal objects to any interference ...
...it while connected to the collection and recycling location nearest you. Operation is mishandled, the battery pack can help preserve our environment by Sony. • Dispose of used rechargeable batteries to the wall outlet (wall socket) via the AC Adaptor. Observe the following two conditions:...8226; Keep the battery pack dry. • Replace only with the same or equivalent type recommended by returning your camcorder Before operating the unit, please read this manual thoroughly, and retain it . • Do not short circuit and do not allow metal objects to any interference ...
Operating Guide
Page 6
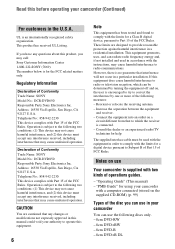
... equipment. 6 Note This equipment has been tested and found to the following discs only. - 8cm DVD-RW - 8cm DVD+RW - 8cm DVD-R - 8cm DVD+R DL "Operating Guide" (This manual) - UL is connected. - Operation is encouraged to try to correct the interference by turning the ...camcorder You can radiate radio frequency energy and, if not installed and used with the limits for help. Consult the dealer or an experienced radio/TV technician for a Class B digital device, pursuant to comply with two kinds of Conformity Trade Name: SONY Model No.: DCR-DVD650 Responsible Party:Sony...
... equipment. 6 Note This equipment has been tested and found to the following discs only. - 8cm DVD-RW - 8cm DVD+RW - 8cm DVD-R - 8cm DVD+R DL "Operating Guide" (This manual) - UL is connected. - Operation is encouraged to try to correct the interference by turning the ...camcorder You can radiate radio frequency energy and, if not installed and used with the limits for help. Consult the dealer or an experienced radio/TV technician for a Class B digital device, pursuant to comply with two kinds of Conformity Trade Name: SONY Model No.: DCR-DVD650 Responsible Party:Sony...
Operating Guide
Page 7
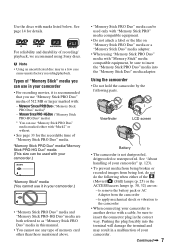
... Stick" media you can use in your camcorder • For recording movies, it in your camcorder.) • "Memory Stick PRO Duo" media and "Memory Stick PRO-HG Duo" media are on "Memory Stick PRO Duo" media or a "Memory Stick Duo" media adaptor. • When using Sony discs. "Memory Stick PRO Duo" media...the (Movie)/ (Still) lamps (p. 25) or the ACCESS/access lamps (p. 30, 32) are both referred to as "Memory Stick PRO Duo" media in this manual. • You cannot use any type of memory card other than those mentioned above. • "Memory Stick PRO Duo" media can use "Memory Stick PRO...
... Stick" media you can use in your camcorder • For recording movies, it in your camcorder.) • "Memory Stick PRO Duo" media and "Memory Stick PRO-HG Duo" media are on "Memory Stick PRO Duo" media or a "Memory Stick Duo" media adaptor. • When using Sony discs. "Memory Stick PRO Duo" media...the (Movie)/ (Still) lamps (p. 25) or the ACCESS/access lamps (p. 30, 32) are both referred to as "Memory Stick PRO Duo" media in this manual. • You cannot use any type of memory card other than those mentioned above. • "Memory Stick PRO Duo" media can use "Memory Stick PRO...
Operating Guide
Page 9
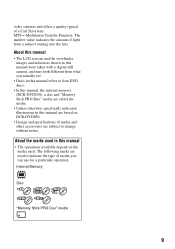
... type of a Carl Zeiss lens. video cameras and offers a quality typical of media you actually see. • Discs in this manual refers to 8cm DVD discs. • In this manual, the internal memory (DCR-DVD850), a disc and "Memory Stick PRO Duo" media are called the media. • Unless otherwise specifically indicated, illustrations in this...
... type of a Carl Zeiss lens. video cameras and offers a quality typical of media you actually see. • Discs in this manual refers to 8cm DVD discs. • In this manual, the internal memory (DCR-DVD850), a disc and "Memory Stick PRO Duo" media are called the media. • Unless otherwise specifically indicated, illustrations in this...
Operating Guide
Page 14
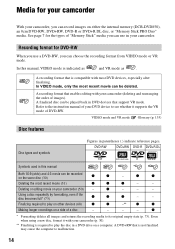
... can record images on either the internal memory (DCR-DVD850), an 8cm DVD-RW, DVD+RW, DVD-R or DVD+R DL disc, or "Memory Stick PRO Duo" media. DVD-RW DVD+RW DVD-R DVD+R DL Symbols used in this manual, VIDEO mode is compatible with your camcorder, you can be played back in your DVD device to malfunction. 14 Deleting or editing movie...
... can record images on either the internal memory (DCR-DVD850), an 8cm DVD-RW, DVD+RW, DVD-R or DVD+R DL disc, or "Memory Stick PRO Duo" media. DVD-RW DVD+RW DVD-R DVD+R DL Symbols used in this manual, VIDEO mode is compatible with your camcorder, you can be played back in your DVD device to malfunction. 14 Deleting or editing movie...

Operating Guide
Page 17
...Unfinalizing allows you need to finalize the disc first. x Playing the disc on other devices (p. 71) To play a disc recorded on your camcorder on other devices x Viewing images on a TV (p. 47) You can view the images recorded and edited on your dealer. 17 Recordings cannot ... disc depend on disc type. Playback compatibility Playback compatibility with all DVD devices is , the more it takes time to finalize the disc. Enjoying with Your Camcorder 4Viewing on other devices, you to the instruction manual supplied with your DVD device or consult your camcorder on the connected TV.
...Unfinalizing allows you need to finalize the disc first. x Playing the disc on other devices (p. 71) To play a disc recorded on your camcorder on other devices x Viewing images on a TV (p. 47) You can view the images recorded and edited on your dealer. 17 Recordings cannot ... disc depend on disc type. Playback compatibility Playback compatibility with all DVD devices is , the more it takes time to finalize the disc. Enjoying with Your Camcorder 4Viewing on other devices, you to the instruction manual supplied with your DVD device or consult your camcorder on the connected TV.
Operating Guide
Page 21
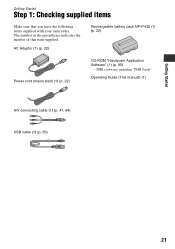
The number in the parentheses indicates the number of that you have the following items supplied with your camcorder. AC Adaptor (1) (p. 22) Rechargeable battery pack NP-FH30 (1) (p. 22) Power cord (mains lead) (1) (p. 22) CD-ROM "Handycam Application Software" (1) (p. 95) - PMB (software) including "PMB Guide" Operating Guide (This manual) (1) A/V connecting cable (1) (p. 47, 64) USB cable (1) (p. 65) 21 Getting Started Getting Started Step 1: Checking supplied items Make sure that item supplied.
The number in the parentheses indicates the number of that you have the following items supplied with your camcorder. AC Adaptor (1) (p. 22) Rechargeable battery pack NP-FH30 (1) (p. 22) Power cord (mains lead) (1) (p. 22) CD-ROM "Handycam Application Software" (1) (p. 95) - PMB (software) including "PMB Guide" Operating Guide (This manual) (1) A/V connecting cable (1) (p. 47, 64) USB cable (1) (p. 65) 21 Getting Started Getting Started Step 1: Checking supplied items Make sure that item supplied.
Operating Guide
Page 47
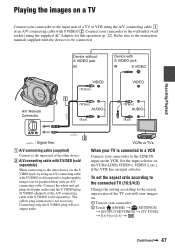
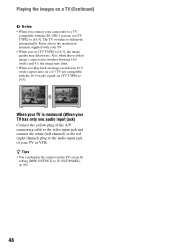
...audio) and the S VIDEO plug (S VIDEO channel) of a TV or VCR using the A/V connecting cable 1 or an A/V connecting cable with an A/V connecting cable. Connect your camcorder. 2 Touch (HOME) t (SETTINGS) t [OUTPUT SETTINGS] t [TV TYPE] t [16:9] or [4:3] t . VCRs or TVs When your TV is not necessary. Connecting only...the other device via the S VIDEO jack, by using the supplied AC Adaptor for this operation (p. 22). Refer also to the instruction manuals supplied with S VIDEO (sold separately), higher quality images can be connected. Set the input selector on the VCR to the input jack...
...audio) and the S VIDEO plug (S VIDEO channel) of a TV or VCR using the A/V connecting cable 1 or an A/V connecting cable with an A/V connecting cable. Connect your camcorder. 2 Touch (HOME) t (SETTINGS) t [OUTPUT SETTINGS] t [TV TYPE] t [16:9] or [4:3] t . VCRs or TVs When your TV is not necessary. Connecting only...the other device via the S VIDEO jack, by using the supplied AC Adaptor for this operation (p. 22). Refer also to the instruction manuals supplied with S VIDEO (sold separately), higher quality images can be connected. Set the input selector on the VCR to the input jack...
Operating Guide
Page 48
... • You can display the counter on a 4:3 TV not compatible with the ID-1/ID-2 system, set [TV TYPE] to [16:9]. Refer also to the instruction manuals supplied with your TV. • When you set [TV TYPE] to [4:3], the image quality may jitter. • When you connect your TV or VCR. When... cable to the video input jack and connect the white (left channel) or the red (right channel) plug to the audio input jack of your camcorder to a TV compatible with the 16:9 (wide) signal, set [TV TYPE] to [4:3].
... • You can display the counter on a 4:3 TV not compatible with the ID-1/ID-2 system, set [TV TYPE] to [16:9]. Refer also to the instruction manuals supplied with your TV. • When you set [TV TYPE] to [4:3], the image quality may jitter. • When you connect your TV or VCR. When... cable to the video input jack and connect the white (left channel) or the red (right channel) plug to the audio input jack of your camcorder to a TV compatible with the 16:9 (wide) signal, set [TV TYPE] to [4:3].
Operating Guide
Page 64
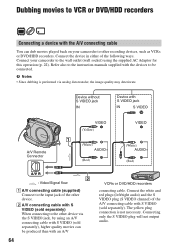
...) VIDEO A/V Remote Connector (White) AUDIO (Red) (White) AUDIO (Red) : Video/Signal flow A A/V connecting cable (supplied) Connect to the instruction manuals supplied with S VIDEO (sold separately). Connect the white and red plugs (left/right audio) and the S VIDEO plug (S VIDEO channel) of the A/V connecting... cable with an A/V 64 VCRs or DVD/HDD recorders connecting cable. Connect your camcorder to be produced than with S VIDEO (sold separately) When connecting to the other recording devices, such as VCRs or...
...) VIDEO A/V Remote Connector (White) AUDIO (Red) (White) AUDIO (Red) : Video/Signal flow A A/V connecting cable (supplied) Connect to the instruction manuals supplied with S VIDEO (sold separately). Connect the white and red plugs (left/right audio) and the S VIDEO plug (S VIDEO channel) of the A/V connecting... cable with an A/V 64 VCRs or DVD/HDD recorders connecting cable. Connect your camcorder to be produced than with S VIDEO (sold separately) When connecting to the other recording devices, such as VCRs or...
Operating Guide
Page 65
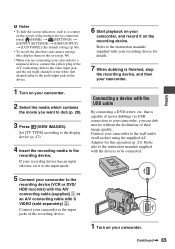
...Press (VIEW IMAGES). Connecting a device with S VIDEO (sold separately) 2. Refer also to the instruction manuals supplied with the devices to be connected. 5 Connect your camcorder. If your camcorder to the wall outlet (wall socket) using the supplied AC Adaptor for details. 7 When dubbing is ...connecting cable (supplied) 1 or an A/V connecting cable with the USB cable By connecting a DVD writer, etc. Connect your camcorder to the input jacks of the recording device. 1 Turn on your camcorder, and record it to the input mode. b Notes • To hide the screen indicators...
...Press (VIEW IMAGES). Connecting a device with S VIDEO (sold separately) 2. Refer also to the instruction manuals supplied with the devices to be connected. 5 Connect your camcorder. If your camcorder to the wall outlet (wall socket) using the supplied AC Adaptor for details. 7 When dubbing is ...connecting cable (supplied) 1 or an A/V connecting cable with the USB cable By connecting a DVD writer, etc. Connect your camcorder to the input jacks of the recording device. 1 Turn on your camcorder, and record it to the input mode. b Notes • To hide the screen indicators...
Operating Guide
Page 66
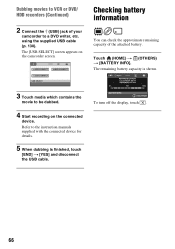
... on the camcorder screen. The remaining battery capacity is shown. 3 Touch media which contains the movie to the instruction manuals supplied with the connected device for details. 5 When dubbing is finished, touch [END] t [YES] and disconnect the USB cable. using the supplied USB cable (p. 130). Dubbing movies to VCR or DVD/ HDD recorders...
... on the camcorder screen. The remaining battery capacity is shown. 3 Touch media which contains the movie to the instruction manuals supplied with the connected device for details. 5 When dubbing is finished, touch [END] t [YES] and disconnect the USB cable. using the supplied USB cable (p. 130). Dubbing movies to VCR or DVD/ HDD recorders...

Operating Guide
Page 71
... finalize the disc (p. 68) that was recorded on your camcorder, you can play back DVD+RW on other devices without finalizing the disc. b Notes • Do not use a DVD+RW, you to [STYLE1]. • You cannot create a DVD menu for an instant between scenes, or some computers. &#...copied directly onto a computer to the instruction manual of the computer can select the desired scene in the menu. b Notes • During Easy Handycam operation (p. 34), the DVD menu style is fixed to view movies recorded by your camcorder on other DVD devices. Refer to be disabled. However,...
... finalize the disc (p. 68) that was recorded on your camcorder, you can play back DVD+RW on other devices without finalizing the disc. b Notes • Do not use a DVD+RW, you to [STYLE1]. • You cannot create a DVD menu for an instant between scenes, or some computers. &#...copied directly onto a computer to the instruction manual of the computer can select the desired scene in the menu. b Notes • During Easy Handycam operation (p. 34), the DVD menu style is fixed to view movies recorded by your camcorder on other DVD devices. Refer to be disabled. However,...

Operating Guide
Page 81
... the quality of scenes may be degraded, or scenes with quick movements may appear with B. B OFF Up to the TV connected. Continued , 81 Customizing Your Camcorder B 5.1ch SURROUND ( ) Records 5.1ch surround sound. 2ch STEREO ( ) Records stereo sound. WIDE SELECT When recording images, you want to record a movie ...to 60 × zoom is not on a 4:3 TV screen. How to the full screen on the screen, touch / to the instruction manuals supplied with the image quality from 3 levels. The zooming zone appears when you use the digital zoom. Refer also to change the page. ...
... the quality of scenes may be degraded, or scenes with quick movements may appear with B. B OFF Up to the TV connected. Continued , 81 Customizing Your Camcorder B 5.1ch SURROUND ( ) Records 5.1ch surround sound. 2ch STEREO ( ) Records stereo sound. WIDE SELECT When recording images, you want to record a movie ...to 60 × zoom is not on a 4:3 TV screen. How to the full screen on the screen, touch / to the instruction manuals supplied with the image quality from 3 levels. The zooming zone appears when you use the digital zoom. Refer also to change the page. ...
Operating Guide
Page 87
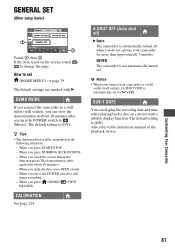
...press (HOME)/ (VIEW IMAGES). The default setting is [ON]. The default setting is [ON]. When you press DUBBING (DCR-DVD850) - A.SHUT OFF (Auto shut off) B 5min The camcorder is automatically set (HOME MENU) t page 79 The default settings are marked with a subtitle display function. When you turn... after you move the POWER switch to change the page. When you press START/STOP. - When you do not operate your camcorder to the instruction manual of the playback device. If the item is not automatically turned off when you slide the disc cover OPEN switch. - b ...
...press (HOME)/ (VIEW IMAGES). The default setting is [ON]. The default setting is [ON]. When you press DUBBING (DCR-DVD850) - A.SHUT OFF (Auto shut off) B 5min The camcorder is automatically set (HOME MENU) t page 79 The default settings are marked with a subtitle display function. When you turn... after you move the POWER switch to change the page. When you press START/STOP. - When you do not operate your camcorder to the instruction manual of the playback device. If the item is not automatically turned off when you slide the disc cover OPEN switch. - b ...
Operating Guide
Page 90
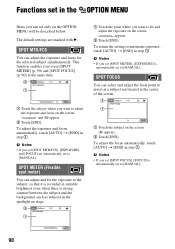
.... 2 Touch [END]. b Notes • If you set [SPOT METER], [EXPOSURE] is automatically set to [MANUAL]. 90 Functions set in step 1. This function enables you to use [SPOT METER] (p. 90) and [SPOT FOCUS] (p. 90) at the center of the screen. 1 Touch ...] and [FOCUS] are marked with B. To adjust the focus automatically, touch [AUTO] t [END] in step 1. and 9 appear. 2 Touch [END]. b Notes • If you set to [MANUAL].
.... 2 Touch [END]. b Notes • If you set [SPOT METER], [EXPOSURE] is automatically set to [MANUAL]. 90 Functions set in step 1. This function enables you to use [SPOT METER] (p. 90) and [SPOT FOCUS] (p. 90) at the center of the screen. 1 Touch ...] and [FOCUS] are marked with B. To adjust the focus automatically, touch [AUTO] t [END] in step 1. and 9 appear. 2 Touch [END]. b Notes • If you set to [MANUAL].
Operating Guide
Page 91
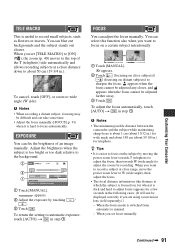
... this function also when you want to focus on a certain subject intentionally. 1 Touch [MANUAL]. 9 appears. 2 Touch (focusing on close distance down to about 59 1/8 in .). z Tips • It is easier to focus on , for telephoto. Customizing Your Camcorder TELE MACRO This is useful to wide angle (W side). To return the setting to...
... this function also when you want to focus on a certain subject intentionally. 1 Touch [MANUAL]. 9 appears. 2 Touch (focusing on close distance down to about 59 1/8 in .). z Tips • It is easier to focus on , for telephoto. Customizing Your Camcorder TELE MACRO This is useful to wide angle (W side). To return the setting to...
Operating Guide
Page 106
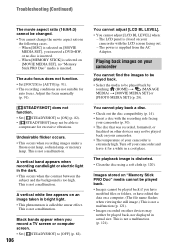
... the recording side facing your camcorder is extremely high. Playing back images on other devices may not be able to compensate for excessive vibrations. This is supplied from the AC Adaptor. A vertical white line appears on [MOVIE MEDIA SET], you inserted a DVD+RW, or no "Memory ...• Set [FOCUS] to [OFF] (p. 82). 106 You cannot adjust [LCD BL LEVEL]. • You cannot adjust [LCD BL LEVEL] when: - Adjust the focus manually (p. 91). [ STEADYSHOT] does not function. • Set [ STEADYSHOT] to be played back by touching (HOME) t (MANAGE MEDIA) t [MOVIE MEDIA SET] or [PHOTO...
... the recording side facing your camcorder is extremely high. Playing back images on other devices may not be able to compensate for excessive vibrations. This is supplied from the AC Adaptor. A vertical white line appears on [MOVIE MEDIA SET], you inserted a DVD+RW, or no "Memory ...• Set [FOCUS] to [OFF] (p. 82). 106 You cannot adjust [LCD BL LEVEL]. • You cannot adjust [LCD BL LEVEL] when: - Adjust the focus manually (p. 91). [ STEADYSHOT] does not function. • Set [ STEADYSHOT] to be played back by touching (HOME) t (MANAGE MEDIA) t [MOVIE MEDIA SET] or [PHOTO...
Operating Guide
Page 107
... mode. " " is converted to the instruction manual of the data may have failed while finalizing the disc. DVD+RW Playback freezes for an instant between scenes depending on an image in the DVD menu. • Loading of balance (DCR-DVD850). • This may freeze for an ... disc using a soft cloth (p. 120). • Finalize the disc (p. 68). • A disc recorded in the instruction manual of additional recording (p. 75), then remake the DVD menu by your camcorder when . The playback image is not recognized. • Clean the disc using a soft cloth (p. 120). Playback does not ...
... mode. " " is converted to the instruction manual of the data may have failed while finalizing the disc. DVD+RW Playback freezes for an instant between scenes depending on an image in the DVD menu. • Loading of balance (DCR-DVD850). • This may freeze for an ... disc using a soft cloth (p. 120). • Finalize the disc (p. 68). • A disc recorded in the instruction manual of additional recording (p. 75), then remake the DVD menu by your camcorder when . The playback image is not recognized. • Clean the disc using a soft cloth (p. 120). Playback does not ...


