
Marketing Specifications
Page 2
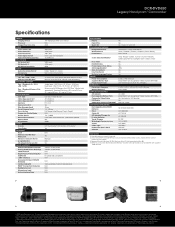
DVD and Blu-ray Disc media/formats are simulated. All screen images are not universally compatible. 9. Sony, the Sony ... 2.7" touch panel3 LCD display (123k pixels)3 Yes N/A Yes Manual N/A Yes Video/S Video/Audio Video/S Video/Audio N/A N/A Hi-speed (2.0 compliant) N/A N/A Sold separately (via A/V Remote jack) N/A N/A N/A N/A CONVENIENCE Hybrid Hybrid Plus Quick...DVD (DVD-R/DVD-RW/DVD+RW/DVD+R DL)6 Memory Stick PRO Duo™ Media (Sold Separately) Single Layer - Blu-ray Disc is a trademark of Sony DVD-R and DVD-RW media recommended. DCR-DVD650 Legacy Handycam® Camcorder...
DVD and Blu-ray Disc media/formats are simulated. All screen images are not universally compatible. 9. Sony, the Sony ... 2.7" touch panel3 LCD display (123k pixels)3 Yes N/A Yes Manual N/A Yes Video/S Video/Audio Video/S Video/Audio N/A N/A Hi-speed (2.0 compliant) N/A N/A Sold separately (via A/V Remote jack) N/A N/A N/A N/A CONVENIENCE Hybrid Hybrid Plus Quick...DVD (DVD-R/DVD-RW/DVD+RW/DVD+R DL)6 Memory Stick PRO Duo™ Media (Sold Separately) Single Layer - Blu-ray Disc is a trademark of Sony DVD-R and DVD-RW media recommended. DCR-DVD650 Legacy Handycam® Camcorder...
Operating Guide
Page 19
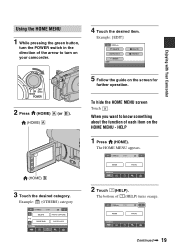
... with Your Camcorder Using the HOME MENU 1 While pressing the green button, turn on your camcorder. 4 Touch the desired item. Example: (OTHERS) category 2 Touch (HELP). HELP 1 Press (HOME). Example: [EDIT] 2 Press (HOME) A (or B). (HOME) A 5 Follow the guide on the screen for further operation. To hide the HOME MENU screen Touch . The HOME MENU appears. (HOME) B 3 Touch the desired...
... with Your Camcorder Using the HOME MENU 1 While pressing the green button, turn on your camcorder. 4 Touch the desired item. Example: (OTHERS) category 2 Touch (HELP). HELP 1 Press (HOME). Example: [EDIT] 2 Press (HOME) A (or B). (HOME) A 5 Follow the guide on the screen for further operation. To hide the HOME MENU screen Touch . The HOME MENU appears. (HOME) B 3 Touch the desired...

Operating Guide
Page 20
When you want to make various settings. To deactivate the HELP Touch (HELP) again in step 2. You will find it easy to know the content. See page 88 for further details. (OPTION) 20 To apply the option, touch [YES], otherwise, touch [NO]. " HOME" and " OPTION" - Taking advantage of two types of menus (Continued) 3 Touch the item you touch an item, its explanation appears on the screen during shooting or playback displays the functions available at that moment. Using the OPTION MENU Just a touch on the screen.
When you want to make various settings. To deactivate the HELP Touch (HELP) again in step 2. You will find it easy to know the content. See page 88 for further details. (OPTION) 20 To apply the option, touch [YES], otherwise, touch [NO]. " HOME" and " OPTION" - Taking advantage of two types of menus (Continued) 3 Touch the item you touch an item, its explanation appears on the screen during shooting or playback displays the functions available at that moment. Using the OPTION MENU Just a touch on the screen.
Operating Guide
Page 25
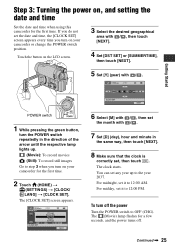
... set the month with / . For midday, set the date and time, the [CLOCK SET] screen appears every time you do not set it to the year 2037. Step 3: Turning the power on your camcorder for the first time. 2 Touch (HOME) t (SETTINGS) t [CLOCK/ LANG] t [CLOCK SET]. To turn on , and setting the date and...
... set the month with / . For midday, set the date and time, the [CLOCK SET] screen appears every time you do not set it to the year 2037. Step 3: Turning the power on your camcorder for the first time. 2 Touch (HOME) t (SETTINGS) t [CLOCK/ LANG] t [CLOCK SET]. To turn on , and setting the date and...

Operating Guide
Page 26
... default setting, the power turns off automatically if you do not use your camcorder unoperated for approximately 5 minutes, to show messages in rechargeable battery gets discharged ... but they are automatically recorded on the media, and can change the on the touch panel do not work correctly, adjust the touch panel ([CALIBRATION], p. 124). Touch (HOME) t (SETTINGS) t [CLOCK/ LANG] t [ LANGUAGE SET], then ... then set the date and time again (p. 126). • It takes a few seconds for your camcorder to be ready to shoot after the power is turned on , and setting the date and time (Continued)...
... default setting, the power turns off automatically if you do not use your camcorder unoperated for approximately 5 minutes, to show messages in rechargeable battery gets discharged ... but they are automatically recorded on the media, and can change the on the touch panel do not work correctly, adjust the touch panel ([CALIBRATION], p. 124). Touch (HOME) t (SETTINGS) t [CLOCK/ LANG] t [ LANGUAGE SET], then ... then set the date and time again (p. 126). • It takes a few seconds for your camcorder to be ready to shoot after the power is turned on , and setting the date and time (Continued)...

Operating Guide
Page 27
... switch to CLOSE to the camcorder • Touch (HOME) t (SETTINGS) t [SOUND/DISP SET] t [LCD BRIGHT] (p. 85), and adjust the brightness of the LCD screen. • The information is convenient during playback operations. Adjusting the LCD panel Open the LCD panel 90 degrees to the camcorder (1), then rotate it to ...record or play (2). 290 degrees (max.) 190 degrees to close the LCD panel with the LCD screen facing out. z Tips • If you open the LCD panel 90 degrees to your camcorder properly. 27 This is displayed or hidden (display y no display) each time you open or adjust...
... switch to CLOSE to the camcorder • Touch (HOME) t (SETTINGS) t [SOUND/DISP SET] t [LCD BRIGHT] (p. 85), and adjust the brightness of the LCD screen. • The information is convenient during playback operations. Adjusting the LCD panel Open the LCD panel 90 degrees to the camcorder (1), then rotate it to ...record or play (2). 290 degrees (max.) 190 degrees to close the LCD panel with the LCD screen facing out. z Tips • If you open the LCD panel 90 degrees to your camcorder properly. 27 This is displayed or hidden (display y no display) each time you open or adjust...
Operating Guide
Page 28
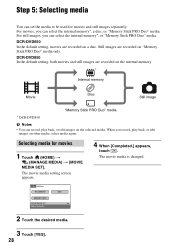
... The movie media setting screen appears. 4 When [Completed.] appears, touch . DCR-DVD850 In the default setting, both movies and still images are recorded on the internal memory. * Internal memory Movie Disc Still image "Memory Stick PRO Duo" media * DCR-DVD850 b Notes •...Touch [YES]. 28 Step 5: Selecting media You can record, play back, or edit images on other media, select media again. For movies, you can select the internal memory*, or "Memory Stick PRO Duo" media. For still images, you record, play back, or edit images on "Memory Stick PRO Duo" media only. DCR-DVD650...
... The movie media setting screen appears. 4 When [Completed.] appears, touch . DCR-DVD850 In the default setting, both movies and still images are recorded on the internal memory. * Internal memory Movie Disc Still image "Memory Stick PRO Duo" media * DCR-DVD850 b Notes •...Touch [YES]. 28 Step 5: Selecting media You can record, play back, or edit images on other media, select media again. For movies, you can select the internal memory*, or "Memory Stick PRO Duo" media. For still images, you record, play back, or edit images on "Memory Stick PRO Duo" media only. DCR-DVD650...
Operating Guide
Page 29
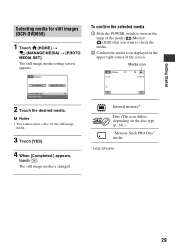
... media. 2 Confirm the media icon displayed at the upper right corner of the screen. Getting Started Selecting media for the still image media. 3 Touch [YES]. 4 When [Completed.] appears, touch . Media icon 2 Touch the desired media. Internal memory* Disc (The icon differs depending on the lamp of...that you want to turn on the disc type (p. 14).) "Memory Stick PRO Duo" media * DCR-DVD850 29 The still image media is changed. b Notes • You cannot select a disc for still images (DCR-DVD850) 1 Touch (HOME) t (MANAGE MEDIA) t [PHOTO MEDIA SET]. The still image media setting...
... media. 2 Confirm the media icon displayed at the upper right corner of the screen. Getting Started Selecting media for the still image media. 3 Touch [YES]. 4 When [Completed.] appears, touch . Media icon 2 Touch the desired media. Internal memory* Disc (The icon differs depending on the lamp of...that you want to turn on the disc type (p. 14).) "Memory Stick PRO Duo" media * DCR-DVD850 29 The still image media is changed. b Notes • You cannot select a disc for still images (DCR-DVD850) 1 Touch (HOME) t (MANAGE MEDIA) t [PHOTO MEDIA SET]. The still image media setting...
Operating Guide
Page 31
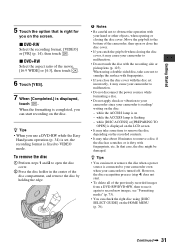
...sided disc, take care not to smudge the surface with fingerprints. • If you use a DVD-RW while the Easy Handycam operation (p. 34) is displayed on the LCD screen • It may cause your camcorder is right for you on the disc: - However, the disc recognition process (step 4) does... remove the disc when a power source is connected to your camcorder even when your camcorder to the bottom of the camcorder, then open the disc cover. 2 Press the disc holder in the center of the movie, [16:9 WIDE] or [4:3], then touch . 6 Touch [YES]. 7 When [Completed.] is flashing - In that is...
...sided disc, take care not to smudge the surface with fingerprints. • If you use a DVD-RW while the Easy Handycam operation (p. 34) is displayed on the LCD screen • It may cause your camcorder is right for you on the disc: - However, the disc recognition process (step 4) does... remove the disc when a power source is connected to your camcorder even when your camcorder to the bottom of the camcorder, then open the disc cover. 2 Press the disc holder in the center of the movie, [16:9 WIDE] or [4:3], then touch . 6 Touch [YES]. 7 When [Completed.] is flashing - In that is...

Operating Guide
Page 32
... you record only still images on while pressing the green button. See page 7 on . 4 Touch [YES]. The [Create a new Image Database File.] screen appears on the screen if you insert new "Memory Stick PRO Duo" media when the camcorder is necessary only when you select [MEMORY STICK] in the right direction until the (Movie...
... you record only still images on while pressing the green button. See page 7 on . 4 Touch [YES]. The [Create a new Image Database File.] screen appears on the screen if you insert new "Memory Stick PRO Duo" media when the camcorder is necessary only when you select [MEMORY STICK] in the right direction until the (Movie...

Operating Guide
Page 35
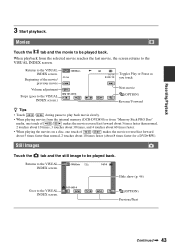
...Stick PRO Duo" media). The VISUAL INDEX screen appears on your camcorder. 2 Press (VIEW IMAGES) I (or D). Returns to the recording screen. Toggles Play or Pause as you select [DISC] on each of [DATA CODE] is fixed to the VISUAL INDEX screen.) * The setting of the tab that ... [DATE/TIME] (p. 84). Next scene Recording date/time* Reverse/Forward Continued , 35 Displays still images. * When you touch. Movies: Touch the tab and the movie to turn on the screen. (It may take some time to display the thumbnails.) Film Roll Index (p. 44) Face Index (p. 44) Previous 6 ...
...Stick PRO Duo" media). The VISUAL INDEX screen appears on your camcorder. 2 Press (VIEW IMAGES) I (or D). Returns to the recording screen. Toggles Play or Pause as you select [DISC] on each of [DATA CODE] is fixed to the VISUAL INDEX screen.) * The setting of the tab that ... [DATE/TIME] (p. 84). Next scene Recording date/time* Reverse/Forward Continued , 35 Displays still images. * When you touch. Movies: Touch the tab and the movie to turn on the screen. (It may take some time to display the thumbnails.) Film Roll Index (p. 44) Face Index (p. 44) Previous 6 ...
Operating Guide
Page 36
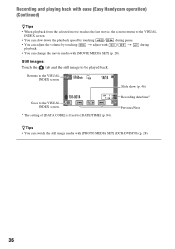
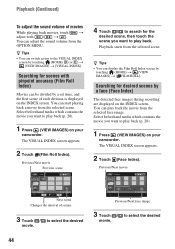
... to [DATE/TIME] (p. 84). t adjust with / t during pause. • You can adjust the volume by touching / during • You can switch the still image media with [PHOTO MEDIA SET] (DCR-DVD850) (p. 28). 36 Recording date/time* Previous/Next zTips • You can change the movie media with [MOVIE ...the last movie, the screen returns to the VISUAL INDEX screen. • You can slow down the playback speed by touching playback. Slide show (p. 46) Goes to the VISUAL INDEX screen. * The setting of [DATA CODE] is fixed to the VISUAL INDEX screen. Still images: Touch the tab and the ...
... to [DATE/TIME] (p. 84). t adjust with / t during pause. • You can adjust the volume by touching / during • You can switch the still image media with [PHOTO MEDIA SET] (DCR-DVD850) (p. 28). 36 Recording date/time* Previous/Next zTips • You can change the movie media with [MOVIE ...the last movie, the screen returns to the VISUAL INDEX screen. • You can slow down the playback speed by touching playback. Slide show (p. 46) Goes to the VISUAL INDEX screen. * The setting of [DATA CODE] is fixed to the VISUAL INDEX screen. Still images: Touch the tab and the ...
Operating Guide
Page 37
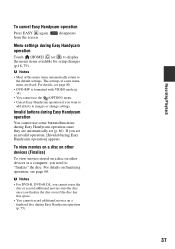
... settings of the menu items automatically return to "finalize" the disc. For details, see page 68. from the screen. b Notes • Most of some buttons/functions during Easy Handycam operation Touch (HOME) C (or B) to images or change settings. To view movies on a disc on other devices (...You cannot use the (OPTION) menu. • Cancel Easy Handycam operation if you need to the default settings. b Notes • For DVD-R, DVD+R DL, you cannot reuse the disc or record additional movies onto the disc once you set (p. 80). disappears Menu settings during Easy Handycam...
... settings of the menu items automatically return to "finalize" the disc. For details, see page 68. from the screen. b Notes • Most of some buttons/functions during Easy Handycam operation Touch (HOME) C (or B) to images or change settings. To view movies on a disc on other devices (...You cannot use the (OPTION) menu. • Cancel Easy Handycam operation if you need to the default settings. b Notes • For DVD-R, DVD+R DL, you cannot reuse the disc or record additional movies onto the disc once you set (p. 80). disappears Menu settings during Easy Handycam...
Operating Guide
Page 43
..., 2 touches about 10 times, 3 touches about 30 times, and 4 touches about 8 times faster for a DVD+RW). Returns to be played back. Next movie (OPTION) Reverse/ Forward z Tips • Touch / during pause to play back movie slowly. • When playing movies from the internal memory (DCR-DVD850) or from the selected movie reaches the last movie, the screen...
..., 2 touches about 10 times, 3 touches about 30 times, and 4 touches about 8 times faster for a DVD+RW). Returns to be played back. Next movie (OPTION) Reverse/ Forward z Tips • Touch / during pause to play back movie slowly. • When playing movies from the internal memory (DCR-DVD850) or from the selected movie reaches the last movie, the screen...
Operating Guide
Page 44
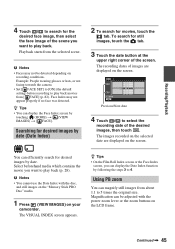
... Select beforehand media which contains the movie you want to play back (p. 28). 1 Press (VIEW IMAGES) on your camcorder. The VISUAL INDEX screen appears. 2 Touch (Film Roll Index). You can start playing back a movie from the OPTION MENU. Playback starts from the selected face ... during recording are displayed on the INDEX screen. Previous/Next movie Previous scene 4 Touch / to search for the desired scene, then touch the scene you want to play back (p. 28). 1 Press (VIEW IMAGES) on your camcorder. You can display the Film Roll Index screen by touching (HOME) D (or E) t (...
... Select beforehand media which contains the movie you want to play back (p. 28). 1 Press (VIEW IMAGES) on your camcorder. The VISUAL INDEX screen appears. 2 Touch (Film Roll Index). You can start playing back a movie from the OPTION MENU. Playback starts from the selected face ... during recording are displayed on the INDEX screen. Previous/Next movie Previous scene 4 Touch / to search for the desired scene, then touch the scene you want to play back (p. 28). 1 Press (VIEW IMAGES) on your camcorder. You can display the Film Roll Index screen by touching (HOME) D (or E) t (...
Operating Guide
Page 45
... about 1.1 to 5 times the original size. Magnification can display the Date Index function by touching (HOME) t (VIEW IMAGES) t [ FACE]. z Tips • On the Film Roll Index screen or the Face Index screen, you can be detected depending on your camcorder. z Tips • You can magnify still images from the selected scene. Select beforehand media...
... about 1.1 to 5 times the original size. Magnification can display the Date Index function by touching (HOME) t (VIEW IMAGES) t [ FACE]. z Tips • On the Film Roll Index screen or the Face Index screen, you can be detected depending on your camcorder. z Tips • You can magnify still images from the selected scene. Select beforehand media...
Operating Guide
Page 50
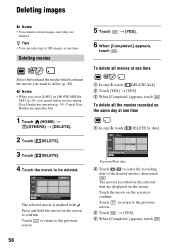
... cannot delete movies during Easy Handycam operation (p. 34). Touch screen. z Tips • You can select up to be deleted. Touch the movie on the screen to confirm. Press and hold the movie on the screen to confirm. Cancel Easy Handycam operation first. 1 Touch (HOME) t (OTHERS) t [DELETE]. 2 Touch [ DELETE]. 3 Touch [ DELETE]. 4 Touch the movie to 100 images at one time...
... cannot delete movies during Easy Handycam operation (p. 34). Touch screen. z Tips • You can select up to be deleted. Touch the movie on the screen to confirm. Press and hold the movie on the screen to confirm. Cancel Easy Handycam operation first. 1 Touch (HOME) t (OTHERS) t [DELETE]. 2 Touch [ DELETE]. 3 Touch [ DELETE]. 4 Touch the movie to 100 images at one time...
Operating Guide
Page 54
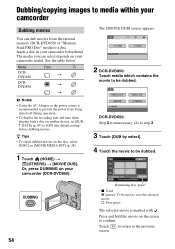
... s: Free space The selected movie is unnecessary. Insert a disc in your camcorder (DCR-DVD850). Or, press DUBBING on your camcorder beforehand. DCR-DVD650: Step 2 is marked with . See the table below. The [MOVIE DUB] screen appears. 2 DCR-DVD850: Touch media which contains the movie to be dubbed. Touch screen. Model DCRDVD650 DCRDVD850 From To t t t b Notes • Using the AC Adaptor...
... s: Free space The selected movie is unnecessary. Insert a disc in your camcorder (DCR-DVD850). Or, press DUBBING on your camcorder beforehand. DCR-DVD650: Step 2 is marked with . See the table below. The [MOVIE DUB] screen appears. 2 DCR-DVD850: Touch media which contains the movie to be dubbed. Touch screen. Model DCRDVD650 DCRDVD850 From To t t t b Notes • Using the AC Adaptor...
Operating Guide
Page 58
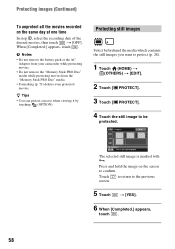
The selected still image is marked with -. When [Completed.] appears, touch . b Notes • Do not remove the battery pack or the AC Adaptor from your camcorder while protecting movies. • Do not remove the "Memory Stick PRO Duo" media...viewing it by touching (OPTION). Touch screen. Protecting still images Select beforehand the media which contains the still images you want to protect (p. 28). 1 Touch (HOME) t (OTHERS) t [EDIT]. 2 Touch [ PROTECT]. 3 Touch [ PROTECT]. 4 Touch the still image to the previous 5 Touch t [YES]. 6 When [Completed.] appears, touch . 58 ...
The selected still image is marked with -. When [Completed.] appears, touch . b Notes • Do not remove the battery pack or the AC Adaptor from your camcorder while protecting movies. • Do not remove the "Memory Stick PRO Duo" media...viewing it by touching (OPTION). Touch screen. Protecting still images Select beforehand the media which contains the still images you want to protect (p. 28). 1 Touch (HOME) t (OTHERS) t [EDIT]. 2 Touch [ PROTECT]. 3 Touch [ PROTECT]. 4 Touch the still image to the previous 5 Touch t [YES]. 6 When [Completed.] appears, touch . 58 ...
Operating Guide
Page 62
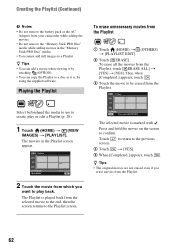
... hold the movie on the screen to the previous 4 Touch t [YES]. 5 When [Completed.] appears, touch . Creating the Playlist (Continued) b Notes • Do not remove the battery pack or the AC Adaptor from the Playlist 1 Touch (HOME) t (OTHERS) t [PLAYLIST EDIT]. 2 Touch [ ERASE]. Playing the Playlist To erase unnecessary movies from your camcorder while adding the movies. •...
... hold the movie on the screen to the previous 4 Touch t [YES]. 5 When [Completed.] appears, touch . Creating the Playlist (Continued) b Notes • Do not remove the battery pack or the AC Adaptor from the Playlist 1 Touch (HOME) t (OTHERS) t [PLAYLIST EDIT]. 2 Touch [ ERASE]. Playing the Playlist To erase unnecessary movies from your camcorder while adding the movies. •...


