
Operating Guide
Page 10
... items 20 Step 2: Charging the battery pack 21 Step 3: Turning the power on a DVD player (Finalizing 38 Recording/Playback Recording 40 Playback 42 Functions used for playing back on , and holding your camcorder with automatic settings Using Easy Handycam operation 33 Recording with ease 34 Playing back with ease 36 Preparation for recording...
... items 20 Step 2: Charging the battery pack 21 Step 3: Turning the power on a DVD player (Finalizing 38 Recording/Playback Recording 40 Playback 42 Functions used for playing back on , and holding your camcorder with automatic settings Using Easy Handycam operation 33 Recording with ease 34 Playing back with ease 36 Preparation for recording...
Operating Guide
Page 16
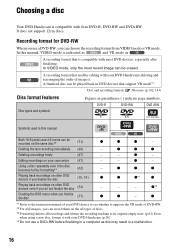
...16 Choosing a disc Your DVD Handycam is compatible with most recent image can be played back in DVD devices that support VR mode*1. A recording format that enables editing with your DVD Handycam (p.28). *4 Do not use a DVD-RW, you can record them on your DVD device to see whether it ... original empty state. (p.62) Even when using a new disc, format it with your DVD Handycam (deleting and rearranging the order of your camcorder (87) - Recording format for DVD-RW When you use a DVD+RW before finalizing in parentheses ( ) indicate page numbers. In this manual, VIDEO mode ...
...16 Choosing a disc Your DVD Handycam is compatible with most recent image can be played back in DVD devices that support VR mode*1. A recording format that enables editing with your DVD Handycam (p.28). *4 Do not use a DVD-RW, you can record them on your DVD device to see whether it ... original empty state. (p.62) Even when using a new disc, format it with your DVD Handycam (deleting and rearranging the order of your camcorder (87) - Recording format for DVD-RW When you use a DVD+RW before finalizing in parentheses ( ) indicate page numbers. In this manual, VIDEO mode ...
Operating Guide
Page 29
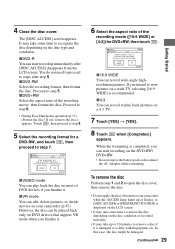
...TV, selecting [16:9 WIDE] is dirty with fingerprints, etc. Cannot edit in Camcorder VIDEO VR OK xVIDEO mode You can play back pictures on most of the recording movie ([16:9 WIDE] or [4:3]) for a DVD-RW, and touch , then proceed to steps after [DISC ACCESS] disappears from ...disc condition or recorded materials. • It may take some time to step 6. • During Easy Handycam operation (p.33), [Format the disc? When the formatting is displayed on DVD devices that case, the disc might be recorded. xDVD-R You can record wide-angle highresolution pictures. xDVD...
...TV, selecting [16:9 WIDE] is dirty with fingerprints, etc. Cannot edit in Camcorder VIDEO VR OK xVIDEO mode You can play back pictures on most of the recording movie ([16:9 WIDE] or [4:3]) for a DVD-RW, and touch , then proceed to steps after [DISC ACCESS] disappears from ...disc condition or recorded materials. • It may take some time to step 6. • During Easy Handycam operation (p.33), [Format the disc? When the formatting is displayed on DVD devices that case, the disc might be recorded. xDVD-R You can record wide-angle highresolution pictures. xDVD...
Operating Guide
Page 33
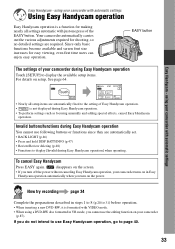
... focusing manually and adding special effects, cancel Easy Handycam operation. using a DVD-RW disc formatted in Easy Handycam operation automatically when you turn off the power without canceling Easy Handycam operation, your camcorder turns on in VR mode, you cannot use the editing function on your camcorder with just one press of the EASY button. To...
... focusing manually and adding special effects, cancel Easy Handycam operation. using a DVD-RW disc formatted in Easy Handycam operation automatically when you turn off the power without canceling Easy Handycam operation, your camcorder turns on in VR mode, you cannot use the editing function on your camcorder with just one press of the EASY button. To...
Operating Guide
Page 35
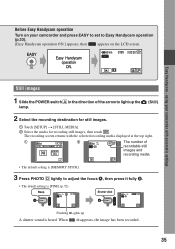
... press EASY to set to adjust the focus A, then press it fully B. • The deault setting is heard. Before Easy Handycam operation Turn on your camcorder with the selected recording media displayed at the top right. 1 2 The number of the arrow to light up A shutter sound is [...the direction of recordable still images and recording media • The default setting is [MEMORY STICK]. 3 Press PHOTO D lightly to Easy Handycam operation (p.33). [Easy Handycam operation ON.] appears, then appears on the LCD screen. When disappears, the image has been recorded. 35
... press EASY to set to adjust the focus A, then press it fully B. • The deault setting is heard. Before Easy Handycam operation Turn on your camcorder with the selected recording media displayed at the top right. 1 2 The number of the arrow to light up A shutter sound is [...the direction of recordable still images and recording media • The default setting is [MEMORY STICK]. 3 Press PHOTO D lightly to Easy Handycam operation (p.33). [Easy Handycam operation ON.] appears, then appears on the LCD screen. When disappears, the image has been recorded. 35
Operating Guide
Page 37
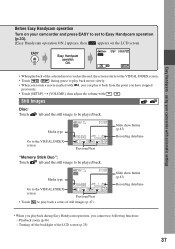
...play back a series of still images (p.47). Playback zoom (p.46) - Easy Handycam - using your camcorder and press EASY to set to Easy Handycam operation (p.33). [Easy Handycam operation ON.] appears, then appears on your camcorder with automatic settings • When playback of the LCD screen (p.25) 37 Slide... the backlight of the selected movie reaches the end, the screen returns to the VISUAL INDEX screen. • Touch / during Easy Handycam operation, you cannot use following functions: - Media type Go to the VISUAL INDEX screen Previous/Next "Memory Stick Duo": Touch tab ...
...play back a series of still images (p.47). Playback zoom (p.46) - Easy Handycam - using your camcorder and press EASY to set to Easy Handycam operation (p.33). [Easy Handycam operation ON.] appears, then appears on your camcorder with automatic settings • When playback of the LCD screen (p.25) 37 Slide... the backlight of the selected movie reaches the end, the screen returns to the VISUAL INDEX screen. • Touch / during Easy Handycam operation, you cannot use following functions: - Media type Go to the VISUAL INDEX screen Previous/Next "Memory Stick Duo": Touch tab ...
Operating Guide
Page 38
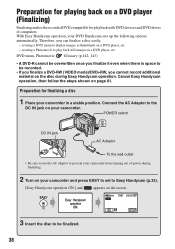
..., then follow the steps shown on a DVD player, etc. Therefore, you cannot record additional material on a DVD player, etc. - With Easy Handycam operation, your camcorder. DVD menu, Photomovie Glossary (p.142, 143) • A DVD-R cannot be recorded. • If you finalize a DVD-RW (VIDEO mode)/DVD+RW, you can finalize a disc easily. - creating a DVD menu to be overwritten once you...
..., then follow the steps shown on a DVD player, etc. Therefore, you cannot record additional material on a DVD player, etc. - With Easy Handycam operation, your camcorder. DVD menu, Photomovie Glossary (p.142, 143) • A DVD-R cannot be recorded. • If you finalize a DVD-RW (VIDEO mode)/DVD+RW, you can finalize a disc easily. - creating a DVD menu to be overwritten once you...
Operating Guide
Page 39
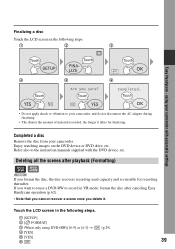
.... 1 [SETUP] 2 [ FORMAT] 3 (When only using your camcorder with the DVD device, etc. If you want to reuse a DVD-RW to your camcorder. Touch the LCD screen in VR mode, format the disc after playback (Formatting) DVD +RW If you delete it takes for recording thereafter. using... DVD+RW)[16:9] or [4:3] t (p.29) 4 [YES] 5 [YES] 6 39 Completed a disc Remove the disc from your camcorder, and do not disconnect the AC adaptor during finalizing. • The shorter the amount of material recorded, the longer it . Deleting all the scenes after canceling Easy Handycam operation...
.... 1 [SETUP] 2 [ FORMAT] 3 (When only using your camcorder with the DVD device, etc. If you want to reuse a DVD-RW to your camcorder. Touch the LCD screen in VR mode, format the disc after playback (Formatting) DVD +RW If you delete it takes for recording thereafter. using... DVD+RW)[16:9] or [4:3] t (p.29) 4 [YES] 5 [YES] 6 39 Completed a disc Remove the disc from your camcorder, and do not disconnect the AC adaptor during finalizing. • The shorter the amount of material recorded, the longer it . Deleting all the scenes after canceling Easy Handycam operation...
Operating Guide
Page 63
Proceed to step 7. • You cannot format a disc that has been protected on other devices. Cancel the protection with the original devices, and then format it. 63 Using the Recorded disc (DVD-RW/DVD+RW) • During Easy Handycam operation (p.33), the screen in step 5 does not appear even if you insert a DVD-RW in your camcorder.
Proceed to step 7. • You cannot format a disc that has been protected on other devices. Cancel the protection with the original devices, and then format it. 63 Using the Recorded disc (DVD-RW/DVD+RW) • During Easy Handycam operation (p.33), the screen in step 5 does not appear even if you insert a DVD-RW in your camcorder.
Operating Guide
Page 67
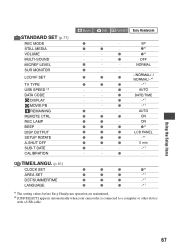
... A.SHUT OFF SUB-T DATE CALIBRATION Movie Still PLAY/EDIT Easy Handycam z - - z OFF z - - AUTO z z z ON z z - SP z z - z z*1 - - z DATE/TIME - - z AUTO - - TIME/LANGU. (p.81) CLOCK SET z z z z*1 AREA SET z z z -*1 DST/SUMMERTIME z z z -*1 LANGUAGE z z z -*1 *1 The setting values before Easy Handycam operation are maintained. *2 [USB SELECT] appears automatically when your camcorder is connected to a computer or other device with a USB...
... A.SHUT OFF SUB-T DATE CALIBRATION Movie Still PLAY/EDIT Easy Handycam z - - z OFF z - - AUTO z z z ON z z - SP z z - z z*1 - - z DATE/TIME - - z AUTO - - TIME/LANGU. (p.81) CLOCK SET z z z z*1 AREA SET z z z -*1 DST/SUMMERTIME z z z -*1 LANGUAGE z z z -*1 *1 The setting values before Easy Handycam operation are maintained. *2 [USB SELECT] appears automatically when your camcorder is connected to a computer or other device with a USB...
Operating Guide
Page 84
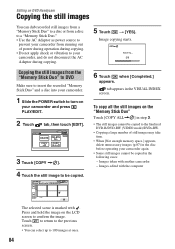
... of power during operation during copying. • Do not apply shock or vibration to be copied. 6 Touch when [Completed.] appears. Editing on DVD Handycam Copying the still images You can select up to 100 images at once. 84 Copying the still images from running out of still images may... step 3. • The still images cannot be copied in the VISUAL INDEX screen. Images edited with the computer The selected scene is marked with another camcorder - Touch to return to the previous screen. • You can dub recorded still images from a "Memory Stick Duo" to a disc or from a...
... of power during operation during copying. • Do not apply shock or vibration to be copied. 6 Touch when [Completed.] appears. Editing on DVD Handycam Copying the still images You can select up to 100 images at once. 84 Copying the still images from running out of still images may... step 3. • The still images cannot be copied in the VISUAL INDEX screen. Images edited with the computer The selected scene is marked with another camcorder - Touch to return to the previous screen. • You can dub recorded still images from a "Memory Stick Duo" to a disc or from a...
Operating Guide
Page 85
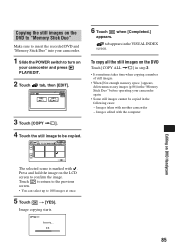
Press and hold the image on your camcorder and press PLAY/EDIT. 2 Touch tab, then [EDIT]. 3 Touch [COPY ]. 4 Touch the still image to be copied in the following cases: - Images taken with . Images edited with the computer Editing on the DVD Touch [COPY ALL ] in step 3. • It sometimes takes ... the still images on the DVD to "Memory Stick Duo" Make sure to insert the recorded DVD and "Memory Stick Duo" into your camcorder. 1 Slide the POWER switch to turn on the LCD screen to confirm the image. To copy all the still images on DVD Handycam The selected scene is marked with...
Press and hold the image on your camcorder and press PLAY/EDIT. 2 Touch tab, then [EDIT]. 3 Touch [COPY ]. 4 Touch the still image to be copied in the following cases: - Images taken with . Images edited with the computer Editing on the DVD Touch [COPY ALL ] in step 3. • It sometimes takes ... the still images on the DVD to "Memory Stick Duo" Make sure to insert the recorded DVD and "Memory Stick Duo" into your camcorder. 1 Slide the POWER switch to turn on the LCD screen to confirm the image. To copy all the still images on DVD Handycam The selected scene is marked with...
Operating Guide
Page 87
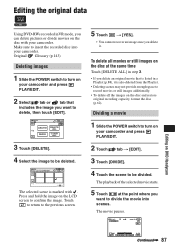
...divided. The movie pauses. Editing on the LCD screen to be deleted. Original Glossary (p.143) Deleting images 1 Slide the POWER switch to turn on your camcorder and press PLAY/EDIT. 2 Touch tab t [EDIT]. 3 Touch [DIVIDE]. 4 Touch the scene to confirm the image. The playback of the selected movie...To delete all the images on the disc with . Press and hold the image on DVD Handycam 87 The selected scene is listed in a Playlist (p.88), it . Editing the original data Using DVD-RWs recorded inVR mode, you can delete pictures or divide movies on the disc and restore...
...divided. The movie pauses. Editing on the LCD screen to be deleted. Original Glossary (p.143) Deleting images 1 Slide the POWER switch to turn on your camcorder and press PLAY/EDIT. 2 Touch tab t [EDIT]. 3 Touch [DIVIDE]. 4 Touch the scene to confirm the image. The playback of the selected movie...To delete all the images on the disc with . Press and hold the image on DVD Handycam 87 The selected scene is listed in a Playlist (p.88), it . Editing the original data Using DVD-RWs recorded inVR mode, you can delete pictures or divide movies on the disc and restore...
Operating Guide
Page 89
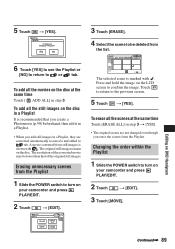
...The original scenes are converted automatically to a movie and added to tab. The resolution of the original still images. Press and hold the image on DVD Handycam 89 Editing on the LCD screen to confirm the image. 5 Touch t [YES]. 3 Touch [ERASE]. 4 Select the scene to be lower... deleted from the Playlist. Changing the order within the Playlist 1 Slide the POWER switch to turn on your camcorder and press PLAY/EDIT. 2 Touch t [EDIT]. Touch to return to turn on your camcorder and press PLAY/EDIT. 2 Touch t [EDIT]. 3 Touch [MOVE]. A movie converted from the Playlist...
...The original scenes are converted automatically to a movie and added to tab. The resolution of the original still images. Press and hold the image on DVD Handycam 89 Editing on the LCD screen to confirm the image. 5 Touch t [YES]. 3 Touch [ERASE]. 4 Select the scene to be lower... deleted from the Playlist. Changing the order within the Playlist 1 Slide the POWER switch to turn on your camcorder and press PLAY/EDIT. 2 Touch t [EDIT]. Touch to return to turn on your camcorder and press PLAY/EDIT. 2 Touch t [EDIT]. 3 Touch [MOVE]. A movie converted from the Playlist...
Operating Guide
Page 91
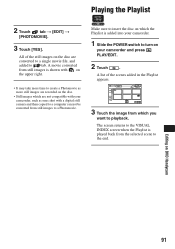
... images to turn on which you want to the end. Editing on the disc are not compatible with your camcorder and press PLAY/EDIT. 2 Touch . A list of the still images on DVD Handycam 91 The screen returns to the VISUAL INDEX screen when the Playlist is played back from which the Playlist is...
... images to turn on which you want to the end. Editing on the disc are not compatible with your camcorder and press PLAY/EDIT. 2 Touch . A list of the still images on DVD Handycam 91 The screen returns to the VISUAL INDEX screen when the Playlist is played back from which the Playlist is...
Operating Guide
Page 105
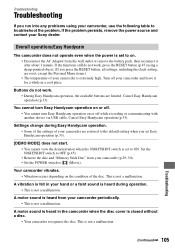
... and "Memory Stick Duo" from the wall outlet or remove the battery pack, then reconnect it for a while in the camcorder when the disc cover is set Easy Handycam operation (p.33). [DEMO MODE] does not start. • You cannot view the demonstration when the NIGHTSHOT switch is extremely ... the power is closed without a disc. • Your camcorder recognizes the disc. If the functions still do not work , press the RESET button (p.47) using a sharp-pointed object. (If you run into any problems using your Sony dealer. Turn off while recording or communicating with another device ...
... and "Memory Stick Duo" from the wall outlet or remove the battery pack, then reconnect it for a while in the camcorder when the disc cover is set Easy Handycam operation (p.33). [DEMO MODE] does not start. • You cannot view the demonstration when the NIGHTSHOT switch is extremely ... the power is closed without a disc. • Your camcorder recognizes the disc. If the functions still do not work , press the RESET button (p.47) using a sharp-pointed object. (If you run into any problems using your Sony dealer. Turn off while recording or communicating with another device ...
Operating Guide
Page 107
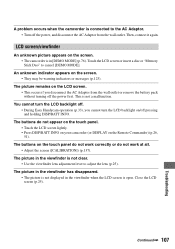
... MODE] (p.76). LCD screen/viewfinder An unknown picture appears on /off the power first. You cannot turn the LCD backlight on the screen. • The camcorder is in the viewfinder when the LCD screen is open. The buttons on the LCD screen. • This occurs if you cannot turn the LCD... backlight off. • During Easy Handycam operation (p.33), you disconnect the AC Adaptor from the wall outlet. Touch the LCD screen or insert a disc or "Memory Stick Duo" to adjust the...
... MODE] (p.76). LCD screen/viewfinder An unknown picture appears on /off the power first. You cannot turn the LCD backlight on the screen. • The camcorder is in the viewfinder when the LCD screen is open. The buttons on the LCD screen. • This occurs if you cannot turn the LCD... backlight off. • During Easy Handycam operation (p.33), you disconnect the AC Adaptor from the wall outlet. Touch the LCD screen or insert a disc or "Memory Stick Duo" to adjust the...
Operating Guide
Page 113
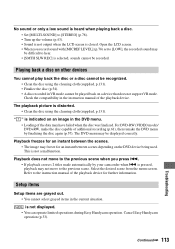
.... • Loading of the playback device. Refer to the instruction manual of additional recording (p.61), then remake the DVD menu by your camcorder when . Cancel Easy Handycam operation (p.33). 113 Troubleshooting No sound or only a low sound is heard when playing back a disc. • Set [MULTI-SOUND] to [STEREO] (p.78). • Turn ...
.... • Loading of the playback device. Refer to the instruction manual of additional recording (p.61), then remake the DVD menu by your camcorder when . Cancel Easy Handycam operation (p.33). 113 Troubleshooting No sound or only a low sound is heard when playing back a disc. • Set [MULTI-SOUND] to [STEREO] (p.78). • Turn ...
Operating Guide
Page 118
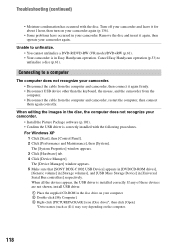
.... 5 Make sure that [SONY DDX-C1002 USB Device] appears in [DVD/CD-ROM drives], [Generic volume] in [Storage volumes], and [USB Mass Storage Device] in Easy Handycam operation. If any of these devices are not shown, install USB driver. 1 Place the supplied CD-ROM in your camcorder. Turn off your camcorder and leave it again...
.... 5 Make sure that [SONY DDX-C1002 USB Device] appears in [DVD/CD-ROM drives], [Generic volume] in [Storage volumes], and [USB Mass Storage Device] in Easy Handycam operation. If any of these devices are not shown, install USB driver. 1 Place the supplied CD-ROM in your camcorder. Turn off your camcorder and leave it again...

Operating Guide
Page 121
... the computer. • Confirm the OS that supports Picture Package (p.100). The images or sound of your camcorder. • You cannot start Easy Handycam] or [Cannot cancel Easy Handycam] appears on a disc in your camcorder to a computer not compatible with Hi-Speed USB (USB 2.0), it may not be able to be played ..., the played back image or sound may not be able to be played back correctly. You cannot copy the disc to the 12cm DVD using the USB cable. • The disc is not written to the instruction manual supplied with your computer. Disconnect the USB cable from your...
... the computer. • Confirm the OS that supports Picture Package (p.100). The images or sound of your camcorder. • You cannot start Easy Handycam] or [Cannot cancel Easy Handycam] appears on a disc in your camcorder to a computer not compatible with Hi-Speed USB (USB 2.0), it may not be able to be played ..., the played back image or sound may not be able to be played back correctly. You cannot copy the disc to the 12cm DVD using the USB cable. • The disc is not written to the instruction manual supplied with your computer. Disconnect the USB cable from your...


