Operating Guide
Page 6
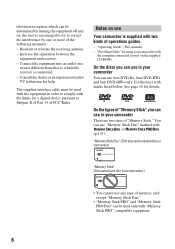
... it in your camcorder.) • You cannot use any type of operations guides. - "Memory Stick Duo" (This size can use "Memory Stick Duo" marked with two kinds of memory card except "Memory Stick Duo." • "Memory Stick PRO" and "Memory Stick PRO Duo" can use 8cm DVD-Rs, 8cm DVD-RWs and 8cm...
... it in your camcorder.) • You cannot use any type of operations guides. - "Memory Stick Duo" (This size can use "Memory Stick Duo" marked with two kinds of memory card except "Memory Stick Duo." • "Memory Stick PRO" and "Memory Stick PRO Duo" can use 8cm DVD-Rs, 8cm DVD-RWs and 8cm...
Operating Guide
Page 8
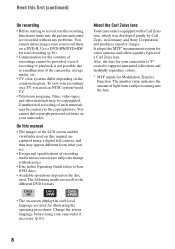
...It adopts the MTF* measurement system for your recordings on the disc used. Use a DVD-RW/DVD+RW for trial recording (p.16). • Compensation for Modulation Transfer Function. To view your camcorder is equipped with a Carl Zeiss lens, which was developed jointly by Carl Zeiss, in... Germany, and Sony Corporation, and produces superior images. Unauthorized recording of such materials may be ...
...It adopts the MTF* measurement system for your recordings on the disc used. Use a DVD-RW/DVD+RW for trial recording (p.16). • Compensation for Modulation Transfer Function. To view your camcorder is equipped with a Carl Zeiss lens, which was developed jointly by Carl Zeiss, in... Germany, and Sony Corporation, and produces superior images. Unauthorized recording of such materials may be ...

Operating Guide
Page 10
...camcorder with automatic settings Using Easy Handycam operation 33 Recording with ease 34 Playing back with ease 36 Preparation for playing back on a DVD player (Finalizing 38 Recording/Playback Recording 40 Playback 42 Functions used for recording/playback, etc 44 Recording To use zoom To record sound with your DVD Handycam... 14 Choosing a disc 16 Using your DVD Handycam 18 Getting Started Step 1: Checking supplied items 20 Step 2: Charging the battery pack 21 Step 3:...
...camcorder with automatic settings Using Easy Handycam operation 33 Recording with ease 34 Playing back with ease 36 Preparation for playing back on a DVD player (Finalizing 38 Recording/Playback Recording 40 Playback 42 Functions used for recording/playback, etc 44 Recording To use zoom To record sound with your DVD Handycam... 14 Choosing a disc 16 Using your DVD Handycam 18 Getting Started Step 1: Checking supplied items 20 Step 2: Charging the battery pack 21 Step 3:...

Operating Guide
Page 11
...on a TV 52 Playback on DVD devices Making the disc compatible with playback on DVD devices or DVD drives (Finalizing 54 Playing back a disc on DVD devices, etc 58 Playing back a disc on a computer with a DVD drive installed 59 Using the Recorded disc (DVD-RW/DVD+RW) Recording additional scenes after finalizing... 61 Deleting all of the scenes on the disc (Formatting 62 Using the Setup items Using the Setup items 64 Setup items 66 CAMERA SET 68 Settings to adjust your camcorder to the recording conditions ...
...on a TV 52 Playback on DVD devices Making the disc compatible with playback on DVD devices or DVD drives (Finalizing 54 Playing back a disc on DVD devices, etc 58 Playing back a disc on a computer with a DVD drive installed 59 Using the Recorded disc (DVD-RW/DVD+RW) Recording additional scenes after finalizing... 61 Deleting all of the scenes on the disc (Formatting 62 Using the Setup items Using the Setup items 64 Setup items 66 CAMERA SET 68 Settings to adjust your camcorder to the recording conditions ...
Operating Guide
Page 16
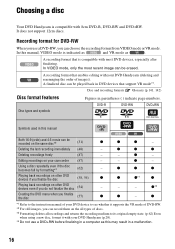
... finalize the disc (57) z z - Playing back recordings on your camcorder (87) - Recording format for DVD-RW When you use a DVD+RW before finalizing in a computer as . A recording format that support VR mode*1. DVD-R DVD-RW DVD+RW Symbols used in a malfunction. 16 z z z z *1z*1...features Disc types and symbols Figures in DVD devices that enables editing with 8cm DVD-R, DVD-RW and DVD+RW. Choosing a disc Your DVD Handycam is compatible with your DVD Handycam (p.28). *4 Do not use a DVD-RW, you can be recorded on other DVD devices if you finalize the disc ...
... finalize the disc (57) z z - Playing back recordings on your camcorder (87) - Recording format for DVD-RW When you use a DVD+RW before finalizing in a computer as . A recording format that support VR mode*1. DVD-R DVD-RW DVD+RW Symbols used in a malfunction. 16 z z z z *1z*1...features Disc types and symbols Figures in DVD devices that enables editing with 8cm DVD-R, DVD-RW and DVD+RW. Choosing a disc Your DVD Handycam is compatible with your DVD Handycam (p.28). *4 Do not use a DVD-RW, you can be recorded on other DVD devices if you finalize the disc ...

Operating Guide
Page 28
... single-sided disc. • Do not touch the disc with the recording side facing your camcorder is on the LCD screen. Step 7: Inserting a disc or a "Memory Stick Duo" Inserting a disc A new 8cm DVD-R, DVD-RW, or DVD+RW is turned off. However, the disc recognition process (step 4) does not start. 2 ...Slide the disc cover OPEN switch in the direction of your camcorder, then press the center of the disc until it clicks. After the...
... single-sided disc. • Do not touch the disc with the recording side facing your camcorder is on the LCD screen. Step 7: Inserting a disc or a "Memory Stick Duo" Inserting a disc A new 8cm DVD-R, DVD-RW, or DVD+RW is turned off. However, the disc recognition process (step 4) does not start. 2 ...Slide the disc cover OPEN switch in the direction of your camcorder, then press the center of the disc until it clicks. After the...
Operating Guide
Page 29
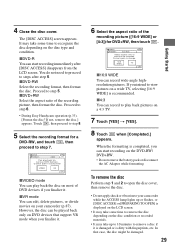
..., or [DISC ACCESS] or [PREPARING TO OPEN] is displayed on the LCD screen. • It may take some time to step 6. • During Easy Handycam operation (p.33), [Format the disc? To remove the disc Perform step 1 and 2 to open the disc cover, then remove the disc. • Do not... The [DISC ACCESS] screen appears. xDVD-R You can edit, delete pictures, or divide movies on various DVD devices. Cannot edit in Camcorder VIDEO VR OK xVIDEO mode You can be played back only on DVD devices that case, the disc might be recorded. Format again to step 5. However, the disc can play...
..., or [DISC ACCESS] or [PREPARING TO OPEN] is displayed on the LCD screen. • It may take some time to step 6. • During Easy Handycam operation (p.33), [Format the disc? To remove the disc Perform step 1 and 2 to open the disc cover, then remove the disc. • Do not... The [DISC ACCESS] screen appears. xDVD-R You can edit, delete pictures, or divide movies on various DVD devices. Cannot edit in Camcorder VIDEO VR OK xVIDEO mode You can be played back only on DVD devices that case, the disc might be recorded. Format again to step 5. However, the disc can play...
Operating Guide
Page 30
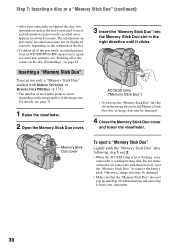
... , eject the "Memory Stick Duo," or remove the battery pack. Step 7: Inserting a disc or a "Memory Stick Duo" (continued) • After your camcorder recognizes the disc, disc information such as the date you force the "Memory Stick Duo" into the Memory Stick Duo slot in the wrong direction... in the right direction until it again to record new pictures, see "Deleting all of the previously recorded pictures from a DVD-RW/DVD+RW, then to use it from your camcorder is reading/writing data. ACCESS lamp ("Memory Stick Duo") • If you started to use only a "Memory Stick Duo...
... , eject the "Memory Stick Duo," or remove the battery pack. Step 7: Inserting a disc or a "Memory Stick Duo" (continued) • After your camcorder recognizes the disc, disc information such as the date you force the "Memory Stick Duo" into the Memory Stick Duo slot in the wrong direction... in the right direction until it again to record new pictures, see "Deleting all of the previously recorded pictures from a DVD-RW/DVD+RW, then to use it from your camcorder is reading/writing data. ACCESS lamp ("Memory Stick Duo") • If you started to use only a "Memory Stick Duo...
Operating Guide
Page 31
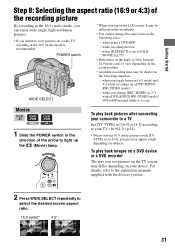
... cannot change [REC MODE] (p.77)/ with the devices you see pictures on the TV screen may appear rough depending on a DVD-R/DVDRW (VIDEO mode). - To play back pictures after connecting your camcorder to a TV Set [TV TYPE] to [16:9] or [4:3] according to your device. Movies 1 Slide the POWER switch in the following...
... cannot change [REC MODE] (p.77)/ with the devices you see pictures on the TV screen may appear rough depending on a DVD-R/DVDRW (VIDEO mode). - To play back pictures after connecting your camcorder to a TV Set [TV TYPE] to [16:9] or [4:3] according to your device. Movies 1 Slide the POWER switch in the following...
Operating Guide
Page 33
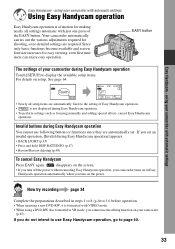
... steps 1 to 8 (p.20 to display the available setup items. For details on your camcorder with VIDEO mode. • When using a DVD-RW disc formatted in Easy Handycam operation automatically when you turn off the power without canceling Easy Handycam operation, your camcorder with just one press of the EASY button. Since only basic functions become...
... steps 1 to 8 (p.20 to display the available setup items. For details on your camcorder with VIDEO mode. • When using a DVD-RW disc formatted in Easy Handycam operation automatically when you turn off the power without canceling Easy Handycam operation, your camcorder with just one press of the EASY button. Since only basic functions become...
Operating Guide
Page 38
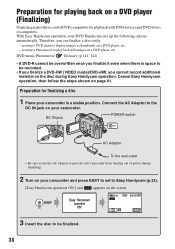
.... Connect the AC Adaptor to prevent your camcorder from running out of computers. creating a Photomovie to display images as thumbnails on a DVD player, etc. - Preparation for playback with DVD devices and DVD drives of power during Easy Handycam operation. Cancel Easy Handycam operation, then follow the steps shown on a DVD player, etc. Therefore, you cannot record additional...
.... Connect the AC Adaptor to prevent your camcorder from running out of computers. creating a Photomovie to display images as thumbnails on a DVD player, etc. - Preparation for playback with DVD devices and DVD drives of power during Easy Handycam operation. Cancel Easy Handycam operation, then follow the steps shown on a DVD player, etc. Therefore, you cannot record additional...
Operating Guide
Page 39
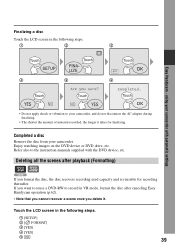
... thereafter. Touch the LCD screen in the following steps. 1 2 3 Easy Handycam - Enjoy watching images on the DVD device or DVD drive, etc. using your camcorder. Completed a disc Remove the disc from your camcorder with the DVD device, etc. Deleting all the scenes after canceling Easy Handycam operation (p.62). • Note that you cannot recover a scene once you...
... thereafter. Touch the LCD screen in the following steps. 1 2 3 Easy Handycam - Enjoy watching images on the DVD device or DVD drive, etc. using your camcorder. Completed a disc Remove the disc from your camcorder with the DVD device, etc. Deleting all the scenes after canceling Easy Handycam operation (p.62). • Note that you cannot recover a scene once you...

Operating Guide
Page 42
.... Set [ MOVIE PB] to [OFF] in STANDARD SET not to display the VISUAL INDEX screen. Previous 6 pictures Next 6 pictures Disc type DVD-RW recording format Appears with PLAY/EDIT. Useful functions on VISUAL INDEX screen • Moving the zoom lever changes the VISUAL INDEX screen indication from... 6 to play back the movie and make the battery last longer (p.79). 42 The VISUAL INDEX screen appears on your camcorder. 2 Press PLAY/EDIT A (or B). Touch [ DISPLAY] in STANDARD SET to set the number of thumbnails that was lastly played back/recorded. ...
.... Set [ MOVIE PB] to [OFF] in STANDARD SET not to display the VISUAL INDEX screen. Previous 6 pictures Next 6 pictures Disc type DVD-RW recording format Appears with PLAY/EDIT. Useful functions on VISUAL INDEX screen • Moving the zoom lever changes the VISUAL INDEX screen indication from... 6 to play back the movie and make the battery last longer (p.79). 42 The VISUAL INDEX screen appears on your camcorder. 2 Press PLAY/EDIT A (or B). Touch [ DISPLAY] in STANDARD SET to set the number of thumbnails that was lastly played back/recorded. ...

Operating Guide
Page 56
... restarts when you must finalize each side of a DVD menu on DVD-R/DVD-RW (VIDEO mode)/DVD+RW, then finalize the disc, the DVD menu appears for finalizing. Connect the AC Adaptor to the DC IN jack on your camcorder again. To change Photomovie setting (p.57) - Finalizing... to be finalized. 4 Touch t [FINALIZE] . When you want to finalize the disc using a DVD-R/DVD-RW (VIDEO mode)/ DVD+RW, Z flashes after finalizing is completed on the recording standby screen of your camcorder is completed. 6 Touch , when [Completed.] appears. • When using the following operations. -...
... restarts when you must finalize each side of a DVD menu on DVD-R/DVD-RW (VIDEO mode)/DVD+RW, then finalize the disc, the DVD menu appears for finalizing. Connect the AC Adaptor to the DC IN jack on your camcorder again. To change Photomovie setting (p.57) - Finalizing... to be finalized. 4 Touch t [FINALIZE] . When you want to finalize the disc using a DVD-R/DVD-RW (VIDEO mode)/ DVD+RW, Z flashes after finalizing is completed on the recording standby screen of your camcorder is completed. 6 Touch , when [Completed.] appears. • When using the following operations. -...
Operating Guide
Page 58
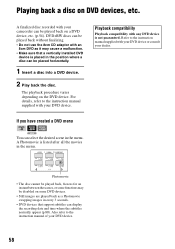
... in every 3 seconds. • DVD devices that a vertically installed DVD device is placed in the position where a disc can be played back without finalizing. • Do not use the 8cm CD adaptor with your camcorder can be placed horizontally. 1 Insert a disc into a DVD device. 2 Play back the disc.... For details, refer to the instruction manual supplied with an 8cm DVD as it may be disabled on a DVD device, etc. (p.54). Playback compatibility Playback ...
... in every 3 seconds. • DVD devices that a vertically installed DVD device is placed in the position where a disc can be played back without finalizing. • Do not use the 8cm CD adaptor with your camcorder can be placed horizontally. 1 Insert a disc into a DVD device. 2 Play back the disc.... For details, refer to the instruction manual supplied with an 8cm DVD as it may be disabled on a DVD device, etc. (p.54). Playback compatibility Playback ...
Operating Guide
Page 61
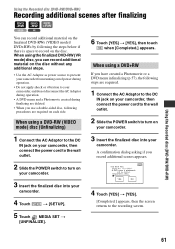
...Using the Recorded disc (DVD-RW/DVD+RW) Using the Recorded disc (DVD-RW/DVD+RW) Recording additional scenes after finalizing DVD +RW You can record additional material on the disc without any additional steps. • Use the AC Adaptor as power source to prevent your camcorder from running out of ...-sided disc, following steps are required on each side. When using a DVD+RW If you can record additional material on the finalized DVD-RWs (VIDEO mode)/ DVD+RWs by following the steps below if there is space to your camcorder, and do not disconnect the AC Adaptor during operation. •...
...Using the Recorded disc (DVD-RW/DVD+RW) Using the Recorded disc (DVD-RW/DVD+RW) Recording additional scenes after finalizing DVD +RW You can record additional material on the disc without any additional steps. • Use the AC Adaptor as power source to prevent your camcorder from running out of ...-sided disc, following steps are required on each side. When using a DVD+RW If you can record additional material on the finalized DVD-RWs (VIDEO mode)/ DVD+RWs by following the steps below if there is space to your camcorder, and do not disconnect the AC Adaptor during operation. •...

Operating Guide
Page 62
...8226; Do not apply shock or vibration to step 6. 5 Select the recording format for the DVD+RW. xDVD-RW Select the recording format, then format the disc. Cannot edit in a DVD device. Proceed to your camcorder. 4 Touch t [ FORMAT]. FORMAT : VIDEO Can playback on a finalized disc. xDVD+RW... has to be finalized again to prevent your camcorder from running out of power during formatting. • When you set in a DVD device.* * To use a DVD menu or a Photomovie on the disc. Formatting deletes all the data recorded on a DVD+RW, the disc must be finalized (p.54)....
...8226; Do not apply shock or vibration to step 6. 5 Select the recording format for the DVD+RW. xDVD-RW Select the recording format, then format the disc. Cannot edit in a DVD device. Proceed to your camcorder. 4 Touch t [ FORMAT]. FORMAT : VIDEO Can playback on a finalized disc. xDVD+RW... has to be finalized again to prevent your camcorder from running out of power during formatting. • When you set in a DVD device.* * To use a DVD menu or a Photomovie on the disc. Formatting deletes all the data recorded on a DVD+RW, the disc must be finalized (p.54)....
Operating Guide
Page 63
Using the Recorded disc (DVD-RW/DVD+RW) • During the Easy Handycam operation (p.33), the screen in step 5 does not appear even if you insert a DVD-RW in your camcorder. Cancel the protection with the original devices, and then format it. 63 Proceed to step 7. • You cannot format a disc that has been protected on other devices.
Using the Recorded disc (DVD-RW/DVD+RW) • During the Easy Handycam operation (p.33), the screen in step 5 does not appear even if you insert a DVD-RW in your camcorder. Cancel the protection with the original devices, and then format it. 63 Proceed to step 7. • You cannot format a disc that has been protected on other devices.
Operating Guide
Page 76
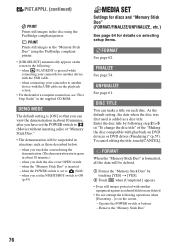
...images in the "Memory Stick Duo" using the PictBridge compliant printer. when the "Memory Stick Duo" is on the screen. - when connecting your camcorder to 5 in "To change the disc title" of a computer connection, see "First Step Guide" in situations such as a disc title. FINALIZE ...touching [YES] t [YES]. 2 Touch when [Completed.] appears. • Even still images protected with another device with the USB cable on DVD devices or DVD drives (Finalizing)" (p.57). DISC TITLE You can view the demonstration in the disc using the PictBridge compliant printer. • [USB SELECT] ...
...images in the "Memory Stick Duo" using the PictBridge compliant printer. when the "Memory Stick Duo" is on the screen. - when connecting your camcorder to 5 in "To change the disc title" of a computer connection, see "First Step Guide" in situations such as a disc title. FINALIZE ...touching [YES] t [YES]. 2 Touch when [Completed.] appears. • Even still images protected with another device with the USB cable on DVD devices or DVD drives (Finalizing)" (p.57). DISC TITLE You can view the demonstration in the disc using the PictBridge compliant printer. • [USB SELECT] ...
Operating Guide
Page 80
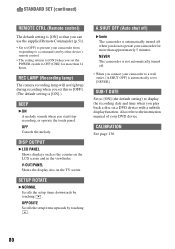
... automatically turned off . • When you connect your camcorder to a wall outlet, [A.SHUT OFF] is automatically set to display the recording date and time when you play back a disc on a DVD device with a subtitle display function. Also refer to OFF (CHG) for more than approximately 5 minutes. ...51). • Set to [OFF] to prevent your camcorder from responding to a command sent by other device's remote control. • The setting returns to [ON] when you set the POWER switch to the instruction manual of your DVD device. REC LAMP (Recording lamp) The camera recording lamp ...
... automatically turned off . • When you connect your camcorder to a wall outlet, [A.SHUT OFF] is automatically set to display the recording date and time when you play back a disc on a DVD device with a subtitle display function. Also refer to OFF (CHG) for more than approximately 5 minutes. ...51). • Set to [OFF] to prevent your camcorder from responding to a command sent by other device's remote control. • The setting returns to [ON] when you set the POWER switch to the instruction manual of your DVD device. REC LAMP (Recording lamp) The camera recording lamp ...


