Operating Guide
Page 5
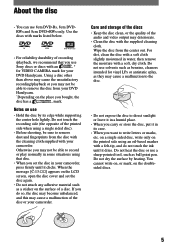
...expose the disc to remove the disc from your DVD Handycam. * Depending on the place you do not touch the ink until it in its edge while supporting the center hole lightly. Do not use solvents such as benzine, cleaners intended for your camcorder. Do not dry the surface by its case. .... 5 About the disc • You can use a sharp-pointed tool, such as ball point pen. on a single sided disc, write only on use Sony discs or discs with a soft, dry cloth. Use the discs with marks listed below. • For reliability durability of the disc or your DVD Handycam.
...expose the disc to remove the disc from your DVD Handycam. * Depending on the place you do not touch the ink until it in its edge while supporting the center hole lightly. Do not use solvents such as benzine, cleaners intended for your camcorder. Do not dry the surface by its case. .... 5 About the disc • You can use a sharp-pointed tool, such as ball point pen. on a single sided disc, write only on use Sony discs or discs with a soft, dry cloth. Use the discs with marks listed below. • For reliability durability of the disc or your DVD Handycam.
Operating Guide
Page 6
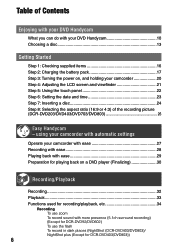
...Contents Enjoying with your DVD Handycam What you can do with your DVD Handycam 10 Choosing a disc 13 Getting Started Step 1: Checking supplied items 16 Step 2: Charging the battery pack 17 Step 3: Turning the power on a DVD player (Finalizing 30 ...camcorder with automatic settings Operate your camcorder 20 Step 4: Adjusting the LCD screen and viewfinder 21 Step 5: Using the touch panel 22 Step 6: Setting the date and time 23 Step 7: Inserting a disc 24 Step 8: Selecting the aspect ratio (16:9 or 4:3) of the recording picture (DCR-DVD203/DVD403/DVD703/DVD803 26 Easy Handycam...
...Contents Enjoying with your DVD Handycam What you can do with your DVD Handycam 10 Choosing a disc 13 Getting Started Step 1: Checking supplied items 16 Step 2: Charging the battery pack 17 Step 3: Turning the power on a DVD player (Finalizing 30 ...camcorder with automatic settings Operate your camcorder 20 Step 4: Adjusting the LCD screen and viewfinder 21 Step 5: Using the touch panel 22 Step 6: Setting the date and time 23 Step 7: Inserting a disc 24 Step 8: Selecting the aspect ratio (16:9 or 4:3) of the recording picture (DCR-DVD203/DVD403/DVD703/DVD803 26 Easy Handycam...
Operating Guide
Page 11
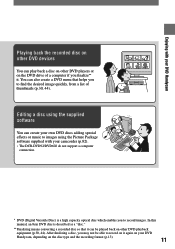
... music to images using the Picture Package software supplied with your DVD Handycam Playing back the recorded disc on other DVD devices You can also create a DVD menu that it again on your camcorder (p.82). • The DCR-DVD92/DVD602 do not support a computer connection. * DVD (Digital Versatile Disc) is described as a "disc." ** Finalizing means converting a recorded...
... music to images using the Picture Package software supplied with your DVD Handycam Playing back the recorded disc on other DVD devices You can also create a DVD menu that it again on your camcorder (p.82). • The DCR-DVD92/DVD602 do not support a computer connection. * DVD (Digital Versatile Disc) is described as a "disc." ** Finalizing means converting a recorded...
Operating Guide
Page 25
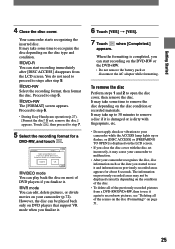
... 4 Close the disc cover. Cannot edit in Camcorder VIDEO VR OK VIDEO mode You can play back the disc on most of the scenes on the disc (Formatting)" on various DVD devices. Proceed to step 6. • During Easy Handycam operation (p.27), [Format the disc? Proceed to... step 5. DVD+RW The [FORMAT] screen appears. To remove the disc Perform steps 1 and 2 to malfunction. • After your camcorder (p.72). It may cause your camcorder to open the...
... 4 Close the disc cover. Cannot edit in Camcorder VIDEO VR OK VIDEO mode You can play back the disc on most of the scenes on the disc (Formatting)" on various DVD devices. Proceed to step 6. • During Easy Handycam operation (p.27), [Format the disc? Proceed to... step 5. DVD+RW The [FORMAT] screen appears. To remove the disc Perform steps 1 and 2 to malfunction. • After your camcorder (p.72). It may cause your camcorder to open the...
Operating Guide
Page 27
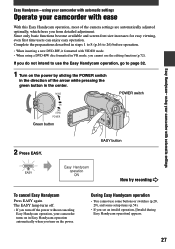
...POWER Green button 2 Press EASY. The EASY lamp turns off. • If you turn off the power without canceling Easy Handycam operation, your camcorder turns on in Easy Handycam operation automatically when you turn on the power by sliding the POWER switch in steps 1 to 8 (p.16 to page 32....viewing, even first time users can enjoy easy operation. If you do not intend to use the Easy Handycam operation, go to 26) before operation. • When inserting a new DVD-RW, it formatted with automatic settings Easy Handycam - Easy Handycam- using a DVD-RW disc formatted in the center.
...POWER Green button 2 Press EASY. The EASY lamp turns off. • If you turn off the power without canceling Easy Handycam operation, your camcorder turns on in Easy Handycam operation automatically when you turn on the power by sliding the POWER switch in steps 1 to 8 (p.16 to page 32....viewing, even first time users can enjoy easy operation. If you do not intend to use the Easy Handycam operation, go to 26) before operation. • When inserting a new DVD-RW, it formatted with automatic settings Easy Handycam - Easy Handycam- using a DVD-RW disc formatted in the center.
Operating Guide
Page 30
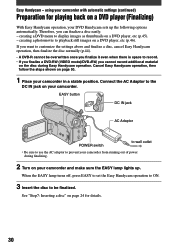
... even when there is space to the DC IN jack on page 50. 1 Place your DVD Handycam sets up . Cancel Easy Handycam operation, then follow the steps shown on your camcorder with automatic settings (continued) Preparation for details. 30 Easy Handycam - Therefore, you want to display images as thumbnails on page 24 for playing back...
... even when there is space to the DC IN jack on page 50. 1 Place your DVD Handycam sets up . Cancel Easy Handycam operation, then follow the steps shown on your camcorder with automatic settings (continued) Preparation for details. 30 Easy Handycam - Therefore, you want to display images as thumbnails on page 24 for playing back...
Operating Guide
Page 31
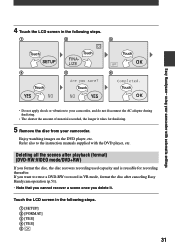
... instruction manuals supplied with the DVD player, etc. Touch the LCD screen in the following steps. Touch Touch Touch Touch Touch Touch Easy Handycam- using your camcorder. If you want to reuse a DVD-RW to record in VR mode..., format the disc after playback (format) (DVD-RW:VIDEO mode/DVD+RW) If you delete it takes for recording thereafter. 4 Touch the LCD...
... instruction manuals supplied with the DVD player, etc. Touch the LCD screen in the following steps. Touch Touch Touch Touch Touch Touch Easy Handycam- using your camcorder. If you want to reuse a DVD-RW to record in VR mode..., format the disc after playback (format) (DVD-RW:VIDEO mode/DVD+RW) If you delete it takes for recording thereafter. 4 Touch the LCD...
Operating Guide
Page 51
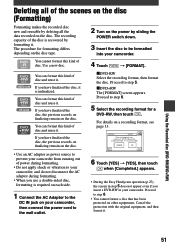
.... 6 Touch [YES] [YES], then touch when [Completed.] appears. • During the Easy Handycam operation (p.27), the screen in step 5 does not appear even if you insert a DVD-RW in your camcorder. Proceed to step 6. • You cannot format a disc that has been protected on a recording format, ...see page 13. The procedure for a DVD-RW, then touch . You can format this kind of disc and reuse...
.... 6 Touch [YES] [YES], then touch when [Completed.] appears. • During the Easy Handycam operation (p.27), the screen in step 5 does not appear even if you insert a DVD-RW in your camcorder. Proceed to step 6. • You cannot format a disc that has been protected on a recording format, ...see page 13. The procedure for a DVD-RW, then touch . You can format this kind of disc and reuse...

Operating Guide
Page 73
... toggles as you press . • A slight difference may occur from the point where you touch and the actual dividing point, as your camcorder selects the dividing point based on DVD Handycam (DVD-RW:VR mode) When you want to the beginning of the selected movie starts. 6 Touch at the point at which you touch...
... toggles as you press . • A slight difference may occur from the point where you touch and the actual dividing point, as your camcorder selects the dividing point based on DVD Handycam (DVD-RW:VR mode) When you want to the beginning of the selected movie starts. 6 Touch at the point at which you touch...
Operating Guide
Page 77
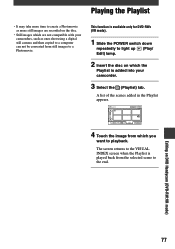
Editing on DVD Handycam (DVD-RW:VR mode) 77 A list of the scenes added in the Playlist appears. 4 Touch the image from the selected scene to the end. The screen returns to the VISUAL INDEX screen when the Playlist is added into your camcorders, such as more time to create a ...to a Photomovie. This function is available only for DVD-RWs (VR mode). 1 Slide the POWER switch down repeatedly to light up (Play/ Edit) lamp. 2 Insert the disc on which the Playlist is played back from which are not compatible with your camcorder. 3 Select the (Playlist) tab. Playing the Playlist...
Editing on DVD Handycam (DVD-RW:VR mode) 77 A list of the scenes added in the Playlist appears. 4 Touch the image from the selected scene to the end. The screen returns to the VISUAL INDEX screen when the Playlist is added into your camcorders, such as more time to create a ...to a Photomovie. This function is available only for DVD-RWs (VR mode). 1 Slide the POWER switch down repeatedly to light up (Play/ Edit) lamp. 2 Insert the disc on which the Playlist is played back from which are not compatible with your camcorder. 3 Select the (Playlist) tab. Playing the Playlist...

Operating Guide
Page 104
...on power again Recovering data vibration Avoid any • Your camcorder tries to the disc has failed. Data protected • The disc has been protected with USB connected (p.27) Invalid during Easy Handycam operation (p.27) No recording in a Playlist due to the...Handycam with USB connected (p.27) Cannot cancel Easy Handycam with another device. Copy inhibit • You cannot copy scenes with the battery capacity low. Playlist full • You cannot create the playlist exceeding 999 scenes. • You cannot add still images in Easy Handycam operation (p.27) • The DVD...
...on power again Recovering data vibration Avoid any • Your camcorder tries to the disc has failed. Data protected • The disc has been protected with USB connected (p.27) Invalid during Easy Handycam operation (p.27) No recording in a Playlist due to the...Handycam with USB connected (p.27) Cannot cancel Easy Handycam with another device. Copy inhibit • You cannot copy scenes with the battery capacity low. Playlist full • You cannot create the playlist exceeding 999 scenes. • You cannot add still images in Easy Handycam operation (p.27) • The DVD...


