
Operating Instructions
Page 91
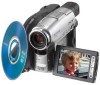
... MENU) in the SETUP display. •Depending on your computer. System requirements OS: Microsoft Windows Me, Microsoft Windows 2000 Professional, Microsoft Windows XP Home Edition or Microsoft Windows XP Professional. Viewing/duplicating discs/editing the recordings on your computer - Viewing/duplicating discs/editing ... a disc •Making an original DVD using a computer compatible with Hi-Speed USB. •When you open a still image file. •Communications between your camcorder and your computer may not be found on connectors and editing software of USB 1.1 (USB full speed...
... MENU) in the SETUP display. •Depending on your computer. System requirements OS: Microsoft Windows Me, Microsoft Windows 2000 Professional, Microsoft Windows XP Home Edition or Microsoft Windows XP Professional. Viewing/duplicating discs/editing the recordings on your computer - Viewing/duplicating discs/editing ... a disc •Making an original DVD using a computer compatible with Hi-Speed USB. •When you open a still image file. •Communications between your camcorder and your computer may not be found on connectors and editing software of USB 1.1 (USB full speed...

Operating Instructions
Page 92
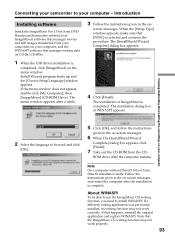
... 4 Click [Next]. Connecting your camcorder to your computer. Introduction Installing the USB driver Start the following the steps in "If you are using Windows 2000 Professional or Windows XP Home Edition/Professional Log on as administrator. 1 Turn on , close all the software. 2 Insert the supplied CD-ROM... into the CD-ROM drive of your computer. The installation menu window appears. 3 Move the cursor to ...
... 4 Click [Next]. Connecting your camcorder to your computer. Introduction Installing the USB driver Start the following the steps in "If you are using Windows 2000 Professional or Windows XP Home Edition/Professional Log on as administrator. 1 Turn on , close all the software. 2 Insert the supplied CD-ROM... into the CD-ROM drive of your computer. The installation menu window appears. 3 Move the cursor to ...
Operating Instructions
Page 93
... messages. Note On a computer without DirectX 8.0a or later, DirectX installation starts. Introduction Installing software Install the ImageMixer Ver.1.5 for Sony DVD Handycam (hereinafter referred to install WINASPI. If the menu window does not appear, double-click [My Computer], then [ImageMixer] (CD-ROM Drive). The [... click [Finish]. 7 Take out the CD-ROM from your camcorder on your computer, and the WINASPI software that the ImageMixer CD writing function may not work properly. 93 Connecting your camcorder to your computer 2 Select the language to be able to use...
... messages. Note On a computer without DirectX 8.0a or later, DirectX installation starts. Introduction Installing software Install the ImageMixer Ver.1.5 for Sony DVD Handycam (hereinafter referred to install WINASPI. If the menu window does not appear, double-click [My Computer], then [ImageMixer] (CD-ROM Drive). The [... click [Finish]. 7 Take out the CD-ROM from your camcorder on your computer, and the WINASPI software that the ImageMixer CD writing function may not work properly. 93 Connecting your camcorder to your computer 2 Select the language to be able to use...
Operating Instructions
Page 94
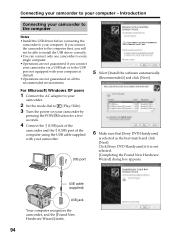
... guaranteed on all the recommended environments. 5 Select [Install the software automatically (Recommended)] and click [Next]. Click [Sony DVD Handycam] if it is selected as the best match and click [Next]. Connecting your camcorder to your computer. For Microsoft Windows XP users 1 Connect the AC adaptor to your camcorder. 2 Set the mode dial to (Play/Edit). 3 Turn the...
... guaranteed on all the recommended environments. 5 Select [Install the software automatically (Recommended)] and click [Next]. Click [Sony DVD Handycam] if it is selected as the best match and click [Next]. Connecting your camcorder to your computer. For Microsoft Windows XP users 1 Connect the AC adaptor to your camcorder. 2 Set the mode dial to (Play/Edit). 3 Turn the...

Operating Instructions
Page 98
... driver installation and the connection between your camcorder to the computer" (page 94). Connecting your camcorder to your camcorder. 98 Perform the following "Connecting your camcorder and the computer is a product of contents. The ImageMixer Help window appears. 2 Find the information you can find detailed operating instructions for ImageMixer software. 1 Click located at the top right...
... driver installation and the connection between your camcorder to the computer" (page 94). Connecting your camcorder to your camcorder. 98 Perform the following "Connecting your camcorder and the computer is a product of contents. The ImageMixer Help window appears. 2 Find the information you can find detailed operating instructions for ImageMixer software. 1 Click located at the top right...
Operating Instructions
Page 99
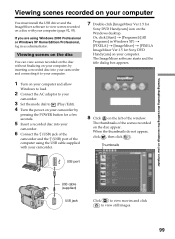
...-click [ImageMixer Ver.1.5 for Sony DVD Handycam] on your computer. Viewing/duplicating discs/editing the recordings on your computer Viewing scenes recorded on your computer You must install the USB driver and the ImageMixer software to view scenes recorded on a disc with your camcorder. 8 Click on the left of the window. If you are using the...
...-click [ImageMixer Ver.1.5 for Sony DVD Handycam] on your computer. Viewing/duplicating discs/editing the recordings on your computer Viewing scenes recorded on your computer You must install the USB driver and the ImageMixer software to view scenes recorded on a disc with your camcorder. 8 Click on the left of the window. If you are using the...

Operating Instructions
Page 100
... a unit to register and to manage the saved movies and still images saved from your camcorder during displaying the thumbnails on your computer and is displayed in "If you have selected ...on your computer display. •When anything goes wrong with the operation, close all the software and restart the computer. To save the scene on your computer 9 Double-click the ...to the thumbnails list, click below right of the window. The selected scene is temporarily copied to the thumbnails list, click at the top right of the window. Viewing scenes recorded on your computer 1 Click the...
... a unit to register and to manage the saved movies and still images saved from your camcorder during displaying the thumbnails on your computer and is displayed in "If you have selected ...on your computer display. •When anything goes wrong with the operation, close all the software and restart the computer. To save the scene on your computer 9 Double-click the ...to the thumbnails list, click below right of the window. The selected scene is temporarily copied to the thumbnails list, click at the top right of the window. Viewing scenes recorded on your computer 1 Click the...
Operating Instructions
Page 101
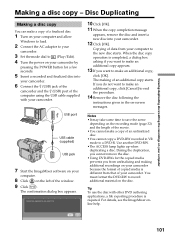
... software on your computer. 8 Click on -screen messages. When the disc copy operation is completed, a dialog box asking if you want to make an additional copy, click [OK]. If you do not want to a DVD-R....make a copy of an unfinalized disc. •You cannot copy a DVD-RW recorded in the on the left of data from your camcorder. 3 Set the mode dial to the new disc starts. Notes •...a finalized disc. 1 Turn on your computer and allow Windows to load. 2 Connect the AC adaptor to your computer to (Play/Edit). 4 Turn the power on the disc. Copying of the window. 9 Click .
... software on your computer. 8 Click on -screen messages. When the disc copy operation is completed, a dialog box asking if you want to make an additional copy, click [OK]. If you do not want to a DVD-R....make a copy of an unfinalized disc. •You cannot copy a DVD-RW recorded in the on the left of data from your camcorder. 3 Set the mode dial to the new disc starts. Notes •...a finalized disc. 1 Turn on your computer and allow Windows to load. 2 Connect the AC adaptor to your computer to (Play/Edit). 4 Turn the power on the disc. Copying of the window. 9 Click .


