Operating Instructions
Page 11
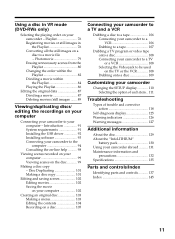
...76 Converting all the still images on a disc to a movie file - Introduction 91 System requirements 91 Installing the USB driver 92 Installing software 93 Connecting your camcorder to the computer 94 Consulting the on-line help .......... 98 Viewing scenes recorded on your computer 99 Viewing scenes on ...the disc 99 Making a disc copy - Playlist 76 Registering movies or still images in VR mode (DVD-RWs only) Selecting the playing order on your computer Connecting your camcorder to your camcorder to a TV or a VCR 108 Selecting the Video jack to a tape 107 Dubbing a TV program...
...76 Converting all the still images on a disc to a movie file - Introduction 91 System requirements 91 Installing the USB driver 92 Installing software 93 Connecting your camcorder to the computer 94 Consulting the on-line help .......... 98 Viewing scenes recorded on your computer 99 Viewing scenes on ...the disc 99 Making a disc copy - Playlist 76 Registering movies or still images in VR mode (DVD-RWs only) Selecting the playing order on your computer Connecting your camcorder to your camcorder to a TV or a VCR 108 Selecting the Video jack to a tape 107 Dubbing a TV program...

Operating Instructions
Page 91
... discs/editing the recordings on your computer. Introduction A USB driver and application software installation is compatible with Hi-Speed USB (the USB 2.0 Specification).You can enjoy the following with your camcorder by connecting the camcorder to your computer using the USB cable: •Copying recorded...copied to your computer •Duplicating a disc •Making an original DVD using a computer compatible with Hi-Speed USB. •When you open a still image file. •Communications between your camcorder and your computer may not be provided as standard. The above or...
... discs/editing the recordings on your computer. Introduction A USB driver and application software installation is compatible with Hi-Speed USB (the USB 2.0 Specification).You can enjoy the following with your camcorder by connecting the camcorder to your computer using the USB cable: •Copying recorded...copied to your computer •Duplicating a disc •Making an original DVD using a computer compatible with Hi-Speed USB. •When you open a still image file. •Communications between your camcorder and your computer may not be provided as standard. The above or...

Operating Instructions
Page 92
Install the USB driver to control your camcorder from your computer - If you are using Windows 2000 Professional or Windows XP Home Edition/Professional Log on as administrator. 1 Turn on , close all the software. 2 Insert the supplied CD-ROM into the CD-ROM drive of your computer. The installation menu window appears. 3 Move the...
Install the USB driver to control your camcorder from your computer - If you are using Windows 2000 Professional or Windows XP Home Edition/Professional Log on as administrator. 1 Turn on , close all the software. 2 Insert the supplied CD-ROM into the CD-ROM drive of your computer. The installation menu window appears. 3 Move the...
Operating Instructions
Page 93
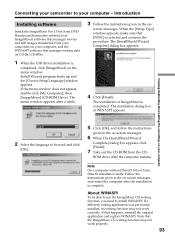
... follow the instructions given in the on - Connecting your camcorder to your computer, and the WINASPI software that manages writing data on CD-Rs/CD-RWs. 1 When the USB driver installation is completed, click [ImageMixer] on -screen messages.... 6 When The [InstallShield Wizard Complete] dialog box appears, click [Finish]. 7 Take out the CD-ROM from your camcorder on your computer - Introduction Installing software Install the ImageMixer Ver.1.5 for Sony DVD Handycam (hereinafter referred to as ImageMixer) software...
... follow the instructions given in the on - Connecting your camcorder to your computer, and the WINASPI software that manages writing data on CD-Rs/CD-RWs. 1 When the USB driver installation is completed, click [ImageMixer] on -screen messages.... 6 When The [InstallShield Wizard Complete] dialog box appears, click [Finish]. 7 Take out the CD-ROM from your camcorder on your computer - Introduction Installing software Install the ImageMixer Ver.1.5 for Sony DVD Handycam (hereinafter referred to as ImageMixer) software...
Operating Instructions
Page 94
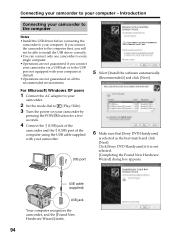
...driver before connecting the camcorder to your computer - USB port 6 Make sure that [Sony DVD Handycam] is not selected. [Completing the Found New Hardware Wizard] dialog box appears. Connecting your camcorder to your computer. USB cable (supplied) USB jack Your computer recognizes the camcorder, and the [Found New Hardware Wizard] starts. 94 Click [Sony DVD Handycam... the software automatically (Recommended)] and click [Next]. If you connect the camcorder to the computer first, you will not be able to install the USB driver correctly. •You can connect only one camcorder to...
...driver before connecting the camcorder to your computer - USB port 6 Make sure that [Sony DVD Handycam] is not selected. [Completing the Found New Hardware Wizard] dialog box appears. Connecting your camcorder to your computer. USB cable (supplied) USB jack Your computer recognizes the camcorder, and the [Found New Hardware Wizard] starts. 94 Click [Sony DVD Handycam... the software automatically (Recommended)] and click [Next]. If you connect the camcorder to the computer first, you will not be able to install the USB driver correctly. •You can connect only one camcorder to...

Operating Instructions
Page 98
... window. Consulting the on-line help An ImageMixer on -line help is completed. Connecting your camcorder to the computer" (page 94). Introduction If you can find detailed operating instructions for ImageMixer software. 1 Click located at the top right of the window. Or, click [Start] t ...[Programs] ([All Programs] in Windows XP) t [PIXELA] t [ImageMixer] t [Help]. For details, refer to your camcorder and the computer is available where you cannot install the USB driver The USB driver has...
... window. Consulting the on-line help An ImageMixer on -line help is completed. Connecting your camcorder to the computer" (page 94). Introduction If you can find detailed operating instructions for ImageMixer software. 1 Click located at the top right of the window. Or, click [Start] t ...[Programs] ([All Programs] in Windows XP) t [PIXELA] t [ImageMixer] t [Help]. For details, refer to your camcorder and the computer is available where you cannot install the USB driver The USB driver has...
Operating Instructions
Page 99
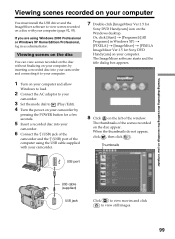
... POWER button for Sony DVD Handycam] on your computer. The thumbnails of the scenes recorded on the disc appear. Viewing/duplicating discs/editing the recordings on your computer Viewing scenes recorded on your computer You must install the USB driver and the ImageMixer software to view scenes recorded on a disc with your camcorder. 8 Click on the...
... POWER button for Sony DVD Handycam] on your computer. The thumbnails of the scenes recorded on the disc appear. Viewing/duplicating discs/editing the recordings on your computer Viewing scenes recorded on your computer You must install the USB driver and the ImageMixer software to view scenes recorded on a disc with your camcorder. 8 Click on the...

Operating Instructions
Page 100
... album 1 Click . 2 Double-click the scene to the thumbnails list, click below right of the window. To return to view from your camcorder during displaying the thumbnails on the recording mode (page 32) and the length of the scene to your computer display. •When anything goes ...wrong with the operation, close all the software and restart the computer. Install the USB driver again following the steps in the preview window. The selected scene is displayed in "If you have selected a movie, ...
... album 1 Click . 2 Double-click the scene to the thumbnails list, click below right of the window. To return to view from your camcorder during displaying the thumbnails on the recording mode (page 32) and the length of the scene to your computer display. •When anything goes ...wrong with the operation, close all the software and restart the computer. Install the USB driver again following the steps in the preview window. The selected scene is displayed in "If you have selected a movie, ...


