Operating Guide
Page 6
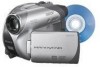
...the dealer or an experienced radio/ TV technician for details. For customers in your camcorder with marks listed below. "Operating Guide" (This manual) - Use the discs with the computer connected (stored on the supplied CD-ROM)* * The DCR-DVD105/DVD205/DVD605/ DVD705 do not include "First Step Guide" because they do not ... Part 15 of memory card except "Memory Stick Duo." • "Memory Stick PRO" and "Memory Stick PRO Duo" can use 8cm DVD-Rs, 8cm DVD-RWs and 8cm DVD+RWs only. See page 16 for help. You can be used only with or (p.135). On the discs you can use "Memory Stick...
...the dealer or an experienced radio/ TV technician for details. For customers in your camcorder with marks listed below. "Operating Guide" (This manual) - Use the discs with the computer connected (stored on the supplied CD-ROM)* * The DCR-DVD105/DVD205/DVD605/ DVD705 do not include "First Step Guide" because they do not ... Part 15 of memory card except "Memory Stick Duo." • "Memory Stick PRO" and "Memory Stick PRO Duo" can use 8cm DVD-Rs, 8cm DVD-RWs and 8cm DVD+RWs only. See page 16 for help. You can be used only with or (p.135). On the discs you can use "Memory Stick...
Operating Guide
Page 8
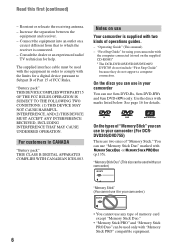
...this manual are captured using your camcorder if necessary (p.84). 8 About the Carl Zeiss lens Your camcorder is not possible due to a malfunction of recording media and accessories are based on the model DCR-DVD305. • Disc in Germany, and Sony Corporation, and produces superior images..., and other materials may appear different from a subject coming into the lens. The following marks are used for the different DVD formats. DVD +RW • The on-screen displays in each local language are used for illustrating the operating procedures. Read this Operating Guide...
...this manual are captured using your camcorder if necessary (p.84). 8 About the Carl Zeiss lens Your camcorder is not possible due to a malfunction of recording media and accessories are based on the model DCR-DVD305. • Disc in Germany, and Sony Corporation, and produces superior images..., and other materials may appear different from a subject coming into the lens. The following marks are used for the different DVD formats. DVD +RW • The on-screen displays in each local language are used for illustrating the operating procedures. Read this Operating Guide...
Operating Guide
Page 10
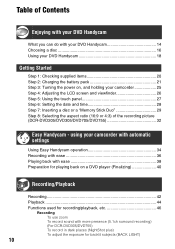
... (DCR-DVD205/DVD305/DVD705/DVD755 32 Easy Handycam - using your camcorder 25 Step 4: Adjusting the LCD screen and viewfinder 26 Step 5: Using the touch panel 27 Step 6: Setting the date and time 28 Step 7: Inserting a disc or a "Memory Stick Duo 29 Step 8: Selecting the aspect ratio (16:9 or 4:3) of Contents Enjoying with your DVD Handycam...
... (DCR-DVD205/DVD305/DVD705/DVD755 32 Easy Handycam - using your camcorder 25 Step 4: Adjusting the LCD screen and viewfinder 26 Step 5: Using the touch panel 27 Step 6: Setting the date and time 28 Step 7: Inserting a disc or a "Memory Stick Duo 29 Step 8: Selecting the aspect ratio (16:9 or 4:3) of Contents Enjoying with your DVD Handycam...
Operating Guide
Page 11
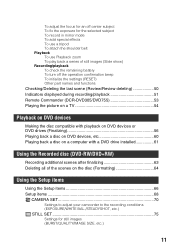
... 50 Indicators displayed during recording/playback 51 Remote Commander (DCR-DVD305/DVD755 53 Playing the picture on a TV 54 Playback on DVD devices Making the disc compatible with playback on DVD devices or DVD drives (Finalizing 56 Playing back a disc on DVD devices, etc 60 Playing back a disc on a computer...Using the Recorded disc (DVD-RW/DVD+RW) Recording additional scenes after finalizing 63 Deleting all of the scenes on the disc (Formatting 64 Using the Setup items Using the Setup items 66 Setup items 68 CAMERA SET 70 Settings to adjust your camcorder to the recording conditions ...
... 50 Indicators displayed during recording/playback 51 Remote Commander (DCR-DVD305/DVD755 53 Playing the picture on a TV 54 Playback on DVD devices Making the disc compatible with playback on DVD devices or DVD drives (Finalizing 56 Playing back a disc on DVD devices, etc 60 Playing back a disc on a computer...Using the Recorded disc (DVD-RW/DVD+RW) Recording additional scenes after finalizing 63 Deleting all of the scenes on the disc (Formatting 64 Using the Setup items Using the Setup items 66 Setup items 68 CAMERA SET 70 Settings to adjust your camcorder to the recording conditions ...
Operating Guide
Page 16
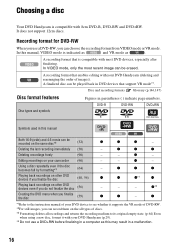
... instruction manual of your DVD device to see whether it with your camcorder (90) - A recording format that is compatible with 8cm DVD-R, DVD-RW and DVD+RW. A recording format that support VR mode*1. z z z Deleting recordings freely (90) - z - - Choosing a disc Your DVD Handycam is compatible with most... Glossary (p.146,147) Disc format features Disc types and symbols Figures in this may result in DVD devices that enables editing with your DVD Handycam (p.29). *4 Do not use a DVD-RW, you finalize the disc (59) z z - In this manual, VIDEO mode is indicated...
... instruction manual of your DVD device to see whether it with your camcorder (90) - A recording format that is compatible with 8cm DVD-R, DVD-RW and DVD+RW. A recording format that support VR mode*1. z z z Deleting recordings freely (90) - z - - Choosing a disc Your DVD Handycam is compatible with most... Glossary (p.146,147) Disc format features Disc types and symbols Figures in this may result in DVD devices that enables editing with your DVD Handycam (p.29). *4 Do not use a DVD-RW, you finalize the disc (59) z z - In this manual, VIDEO mode is indicated...
Operating Guide
Page 20
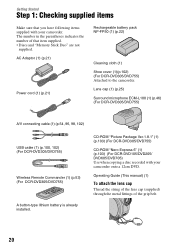
... NP-FP50 (1) (p.22) Cleaning cloth (1) Shoe cover (1)(p.102) (For DCR-DVD305/DVD755) Attached to the camcorder. CD-ROM "Picture Package Ver.1.8.1" (1) (p.103) (For DCR-DVD305/DVD755) CD-ROM "Nero Express 6" (1) (p.103) (For DCR-DVD105/DVD205/ DVD605/DVD705) Use when copying a disc recorded with your camcorder onto a 12cm DVD. Lens cap (1) (p.25) Surround microphone ECM-L100 (1) (p.46) (For...
... NP-FP50 (1) (p.22) Cleaning cloth (1) Shoe cover (1)(p.102) (For DCR-DVD305/DVD755) Attached to the camcorder. CD-ROM "Picture Package Ver.1.8.1" (1) (p.103) (For DCR-DVD305/DVD755) CD-ROM "Nero Express 6" (1) (p.103) (For DCR-DVD105/DVD205/ DVD605/DVD705) Use when copying a disc recorded with your camcorder onto a 12cm DVD. Lens cap (1) (p.25) Surround microphone ECM-L100 (1) (p.46) (For...
Operating Guide
Page 29
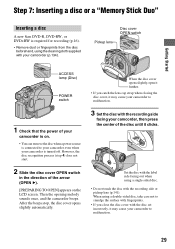
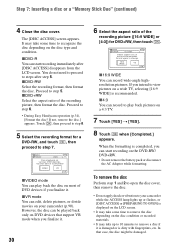
...OPEN] appears on . • You can remove the disc when a power source is connected to malfunction. 3 Set the disc with your camcorder is turned off. After the beeps stop, the disc cover opens slightly automatically. When the disc cover opens slightly, open it further. •...disc set incorrectly, it may cause your camcorder to your camcorder even when your camcorder (p.134). Then the opening melody sounds once, and the camcorder beeps. Getting Started Step 7: Inserting a disc or a "Memory Stick Duo" Inserting a disc A new 8cm DVD-R, DVD-RW, or DVD+RW is required for recording (p.16)....
...OPEN] appears on . • You can remove the disc when a power source is connected to malfunction. 3 Set the disc with your camcorder is turned off. After the beeps stop, the disc cover opens slightly automatically. When the disc cover opens slightly, open it further. •...disc set incorrectly, it may cause your camcorder to your camcorder even when your camcorder (p.134). Then the opening melody sounds once, and the camcorder beeps. Getting Started Step 7: Inserting a disc or a "Memory Stick Duo" Inserting a disc A new 8cm DVD-R, DVD-RW, or DVD+RW is required for recording (p.16)....
Operating Guide
Page 30
... on a 4:3 TV. 7 Touch [YES] t [YES]. 8 Touch when [Completed.] appears. You do not need to proceed to step 6. • During Easy Handycam operation (p.34), [Format the disc? If not, remove the disc.] appears. However, the disc can play back pictures on the disc condition or recorded materials...DISC ACCESS] or [PREPARING TO OPEN] is displayed on the disc type and condition. Cannot edit in Camcorder VIDEO VR OK xVIDEO mode You can be played back only on the DVD-RW/ DVD+RW. • Do not remove the battery pack or disconnect the AC Adaptor while formatting. FORMAT : ...
... on a 4:3 TV. 7 Touch [YES] t [YES]. 8 Touch when [Completed.] appears. You do not need to proceed to step 6. • During Easy Handycam operation (p.34), [Format the disc? If not, remove the disc.] appears. However, the disc can play back pictures on the disc condition or recorded materials...DISC ACCESS] or [PREPARING TO OPEN] is displayed on the disc type and condition. Cannot edit in Camcorder VIDEO VR OK xVIDEO mode You can be played back only on the DVD-RW/ DVD+RW. • Do not remove the battery pack or disconnect the AC Adaptor while formatting. FORMAT : ...
Operating Guide
Page 31
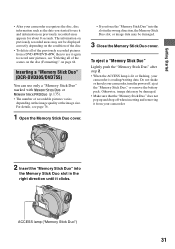
... or the image size. Do not shake or knock your camcorder is lit or flashing, your camcorder, turn the power off when inserting and removing it from a DVD-RW/DVD+RW, then to use it again to use it clicks. Inserting a "Memory Stick Duo" (DCR-DVD305/DVD755) You can use only a "Memory Stick Duo" marked...
... or the image size. Do not shake or knock your camcorder is lit or flashing, your camcorder, turn the power off when inserting and removing it from a DVD-RW/DVD+RW, then to use it again to use it clicks. Inserting a "Memory Stick Duo" (DCR-DVD305/DVD755) You can use only a "Memory Stick Duo" marked...

Operating Guide
Page 32
It may be shorter in the following cases: - when using a DVD+RW - when you change the aspect ratio in the following situations. - To play back pictures after connecting your camcorder to a TV Set [TV TYPE] to [16:9] or [4:3] according to your device. while recording movies - when you toggle ...desired screen aspect ratio. 16:9 (wide)* 4:3* POWER switch WIDE SELECT Movies 1 Slide the POWER switch in the direction of the recording picture (DCR-DVD205/DVD305/ DVD705/DVD755) By recording in the 16:9 (wide) mode, you can enjoy wide-angle, high-resolution pictures. • If ...
It may be shorter in the following cases: - when using a DVD+RW - when you change the aspect ratio in the following situations. - To play back pictures after connecting your camcorder to a TV Set [TV TYPE] to [16:9] or [4:3] according to your device. while recording movies - when you toggle ...desired screen aspect ratio. 16:9 (wide)* 4:3* POWER switch WIDE SELECT Movies 1 Slide the POWER switch in the direction of the recording picture (DCR-DVD205/DVD305/ DVD705/DVD755) By recording in the 16:9 (wide) mode, you can enjoy wide-angle, high-resolution pictures. • If ...
Operating Guide
Page 34
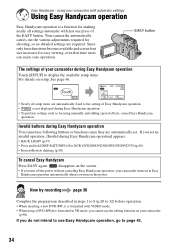
...EASY button. Easy Handycam - using a DVD-RW disc formatted in VR mode, you cannot use the editing function on your camcorder turns on the power. If you turn off the power without canceling Easy Handycam operation, your camcorder (p.90). Your camcorder automatically carries out ...• When inserting a new DVD-RW, it is formatted with automatic settings Using Easy Handycam operation Easy Handycam operation is not displayed during Easy Handycam operation] appears. • BACK LIGHT (p.47) • Press and hold DISP BATT/INFO (For DCR-DVD205/DVD305/DVD705/DVD755)(p.49) ...
...EASY button. Easy Handycam - using a DVD-RW disc formatted in VR mode, you cannot use the editing function on your camcorder turns on the power. If you turn off the power without canceling Easy Handycam operation, your camcorder (p.90). Your camcorder automatically carries out ...• When inserting a new DVD-RW, it is formatted with automatic settings Using Easy Handycam operation Easy Handycam operation is not displayed during Easy Handycam operation] appears. • BACK LIGHT (p.47) • Press and hold DISP BATT/INFO (For DCR-DVD205/DVD305/DVD705/DVD755)(p.49) ...
Operating Guide
Page 40
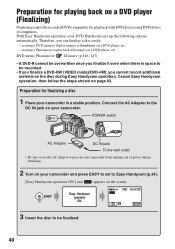
... it even when there is space to display images as thumbnails on a DVD player (Finalizing) Finalizing makes the recorded DVD compatible for playback with DVD devices and DVD drives of power during Easy Handycam operation. With Easy Handycam operation, your camcorder in a stable position. Cancel Easy Handycam operation, then follow the steps shown on page 63. Therefore, you...
... it even when there is space to display images as thumbnails on a DVD player (Finalizing) Finalizing makes the recorded DVD compatible for playback with DVD devices and DVD drives of power during Easy Handycam operation. With Easy Handycam operation, your camcorder in a stable position. Cancel Easy Handycam operation, then follow the steps shown on page 63. Therefore, you...
Operating Guide
Page 41
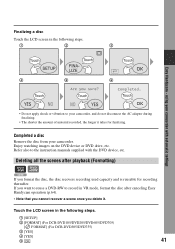
... Handycam operation (p.64). • Note that you cannot recover a scene once you format the disc, the disc recovers recording used capacity and is reusable for finalizing. Finalizing a disc Touch the LCD screen in the following steps. 1 [SETUP] 2 [FORMAT] (For DCR-DVD105/DVD205/DVD605/DVD705) [ FORMAT] (For DCR-...DVD305/DVD755) 3 [YES] 4 [YES] 5 41 If you want to reuse a DVD-RW to your camcorder.
... Handycam operation (p.64). • Note that you cannot recover a scene once you format the disc, the disc recovers recording used capacity and is reusable for finalizing. Finalizing a disc Touch the LCD screen in the following steps. 1 [SETUP] 2 [FORMAT] (For DCR-DVD105/DVD205/DVD605/DVD705) [ FORMAT] (For DCR-...DVD305/DVD755) 3 [YES] 4 [YES] 5 41 If you want to reuse a DVD-RW to your camcorder.
Operating Guide
Page 44
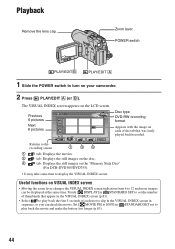
... [ DISPLAY] in STANDARD SET to set the number of thumbnails that was lastly played back/recorded. Previous 6 pictures Next 6 pictures Disc type DVD-RW recording format Appears with the image on VISUAL INDEX screen • Moving the zoom lever changes the VISUAL INDEX screen indication from 6 to ... the lens cap. The VISUAL INDEX screen appears on the "Memory Stick Duo" (For DCR-DVD305/DVD755). • It may take some time to 12 and more images can check the movie. Returns to turn on your camcorder. 2 Press PLAY/EDIT A (or B). Zoom lever POWER switch PLAY/EDITB PLAY/EDIT ...
... [ DISPLAY] in STANDARD SET to set the number of thumbnails that was lastly played back/recorded. Previous 6 pictures Next 6 pictures Disc type DVD-RW recording format Appears with the image on VISUAL INDEX screen • Moving the zoom lever changes the VISUAL INDEX screen indication from 6 to ... the lens cap. The VISUAL INDEX screen appears on the "Memory Stick Duo" (For DCR-DVD305/DVD755). • It may take some time to 12 and more images can check the movie. Returns to turn on your camcorder. 2 Press PLAY/EDIT A (or B). Zoom lever POWER switch PLAY/EDITB PLAY/EDIT ...
Operating Guide
Page 58
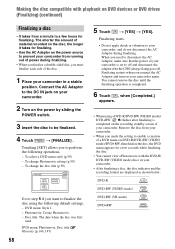
... AC Adaptor during finalizing. • When you finalize a double-sided disc, you must finalize each side of the disc. 1 Place your camcorder in your camcorder again. DVD menu: Style 1 - To change the disc title (p.59) Go to step 5 if you need to off and disconnect the adaptor after...the power of your camcorder from a minute to enable a creation of a DVD menu on DVD-R/DVD-RW (VIDEO mode)/DVD+RW, then finalize the disc, the DVD menu appears for a few hours for finalizing. • Use the AC Adaptor as shown below: DVD-R DVD-RW (VIDEO mode) DVD-RW (VR mode) DVD+RW The shorter ...
... AC Adaptor during finalizing. • When you finalize a double-sided disc, you must finalize each side of the disc. 1 Place your camcorder in your camcorder again. DVD menu: Style 1 - To change the disc title (p.59) Go to step 5 if you need to off and disconnect the adaptor after...the power of your camcorder from a minute to enable a creation of a DVD menu on DVD-R/DVD-RW (VIDEO mode)/DVD+RW, then finalize the disc, the DVD menu appears for a few hours for finalizing. • Use the AC Adaptor as shown below: DVD-R DVD-RW (VIDEO mode) DVD-RW (VR mode) DVD+RW The shorter ...
Operating Guide
Page 60
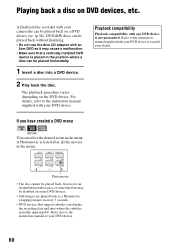
... subtitles normally appear(p.84). Playing back a disc on the DVD device. The playback procedure varies depending on DVD devices, etc. Refer to the instruction manual supplied with your DVD device. 60 Refer also to the instruction manual of your camcorder can be played back on some DVD devices. • Still images are played back as...
... subtitles normally appear(p.84). Playing back a disc on the DVD device. The playback procedure varies depending on DVD devices, etc. Refer to the instruction manual supplied with your DVD device. 60 Refer also to the instruction manual of your camcorder can be played back on some DVD devices. • Still images are played back as...
Operating Guide
Page 63
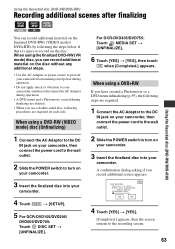
... disc into your camcorder. 4 Touch t [SETUP]. 5 For DCR-DVD105/DVD205/ DVD605/DVD705: Touch DISC SET t [UNFINALIZE]. For DCR-DVD305/DVD755: Touch MEDIA SET t [UNFINALIZE]. 6 Touch [YES] t [YES], then touch when [Completed.] appears. When using the finalized DVD-RW (VR mode) disc, you can record additional material on the finalized DVD-RWs (VIDEO mode)/ DVD+RWs by following...
... disc into your camcorder. 4 Touch t [SETUP]. 5 For DCR-DVD105/DVD205/ DVD605/DVD705: Touch DISC SET t [UNFINALIZE]. For DCR-DVD305/DVD755: Touch MEDIA SET t [UNFINALIZE]. 6 Touch [YES] t [YES], then touch when [Completed.] appears. When using the finalized DVD-RW (VR mode) disc, you can record additional material on the finalized DVD-RWs (VIDEO mode)/ DVD+RWs by following...
Operating Guide
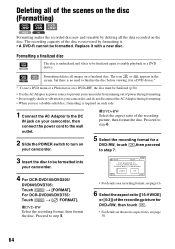
Page 64
... on the movie aspect ratio, see page 30. 64 FORMAT : VIDEO Can playback on your camcorder. 4 For DCR-DVD105/DVD205/ DVD605/DVD705: Touch t [FORMAT]. Cannot edit in a DVD device. Replace it in a DVD device.* * To use a DVD menu or a Photomovie on your camcorder, then connect the power cord to the wall outlet. 2 Slide the POWER switch to...
... on the movie aspect ratio, see page 30. 64 FORMAT : VIDEO Can playback on your camcorder. 4 For DCR-DVD105/DVD205/ DVD605/DVD705: Touch t [FORMAT]. Cannot edit in a DVD device. Replace it in a DVD device.* * To use a DVD menu or a Photomovie on your camcorder, then connect the power cord to the wall outlet. 2 Slide the POWER switch to...
Operating Guide
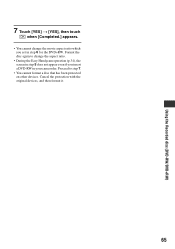
Page 65
Cancel the protection with the original devices, and then format it. 65 Format the disc again to step 7. • You cannot format a disc that has been protected on other devices. Proceed to change the movie aspect ratio which you insert a DVD-RW in step 6 for the DVD+RW. Using the Recorded disc (DVD-RW/DVD+RW) 7 Touch [YES] t [YES], then touch when [Completed.] appears. • You cannot change the aspect ratio. • During the Easy Handycam operation (p.34), the screen in step 5 does not appear even if you set in your camcorder.
Cancel the protection with the original devices, and then format it. 65 Format the disc again to step 7. • You cannot format a disc that has been protected on other devices. Proceed to change the movie aspect ratio which you insert a DVD-RW in step 6 for the DVD+RW. Using the Recorded disc (DVD-RW/DVD+RW) 7 Touch [YES] t [YES], then touch when [Completed.] appears. • You cannot change the aspect ratio. • During the Easy Handycam operation (p.34), the screen in step 5 does not appear even if you set in your camcorder.
Operating Guide
Page 75
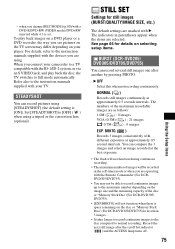
... next still image after another by pressing PHOTO. For details, refer to a TV compatible with a DVD-R/DVD-RW (VIDEO mode)/DVD+RW inserted while 4:3 is set. when you connect your camcorder to the instruction manuals supplied with B. The indicators in the self-timer mode or when you see ...pictures on the image size and the remaining capacity of the disc or "Memory Stick Duo"(For DCR-DVD305/ DVD755...
... next still image after another by pressing PHOTO. For details, refer to a TV compatible with a DVD-R/DVD-RW (VIDEO mode)/DVD+RW inserted while 4:3 is set. when you connect your camcorder to the instruction manuals supplied with B. The indicators in the self-timer mode or when you see ...pictures on the image size and the remaining capacity of the disc or "Memory Stick Duo"(For DCR-DVD305/ DVD755...


