
Operating Instructions
Page 1
4-122-239-13(1) DVD Home Theatre System Operating Instructions DAV-HDX589W / HDX686W ©2009 Sony Corporation
4-122-239-13(1) DVD Home Theatre System Operating Instructions DAV-HDX589W / HDX686W ©2009 Sony Corporation
Operating Instructions
Page 4
...Dolby* Digital and Dolby Pro Logic (II) adaptive matrix surround decoder and the DTS** Digital Surround System. * Manufactured under U.S. This system incorporates High-Definition Multimedia Interface (HDMITM) technology. You can also use the controls on the unit if...a DVD VIDEO, DVD+RW/DVD+R, and DVDRW/DVD-R. • Measurements are trademarks. Use of Sony Corporation. Patent #'s: 5,451,942; 5,956,674; 5,974,380; 5,978,762; 6,487,535 & other intellectual property rights. "BRAVIA" is a trademark of this copyright protection technology must be used as a general term for home and ...
...Dolby* Digital and Dolby Pro Logic (II) adaptive matrix surround decoder and the DTS** Digital Surround System. * Manufactured under U.S. This system incorporates High-Definition Multimedia Interface (HDMITM) technology. You can also use the controls on the unit if...a DVD VIDEO, DVD+RW/DVD+R, and DVDRW/DVD-R. • Measurements are trademarks. Use of Sony Corporation. Patent #'s: 5,451,942; 5,956,674; 5,974,380; 5,978,762; 6,487,535 & other intellectual property rights. "BRAVIA" is a trademark of this copyright protection technology must be used as a general term for home and ...

Operating Instructions
Page 7
... 2, or Joliet (extended format) • DVD-ROM/DVD-R/DVD-RW/ DVD+R/DVD+RW in audio CD format DATA CD - Playable Discs Type DVD VIDEO Disc logo Characteristics Icon • DVD VIDEO • DVD-R/DVD-RW in DVD VIDEO format or video mode • DVD+R/DVD+RW in DVD VIDEO format VR (Video Recording) mode VIDEO ... files1) and JPEG image files2), and conforming to the DCF image file format. (DCF "Design rule for Camera File system": Image standards for digital cameras regulated by Japan Electronics and Information Technology Industries Association (JEITA).) 3)A logical format of files and...
... 2, or Joliet (extended format) • DVD-ROM/DVD-R/DVD-RW/ DVD+R/DVD+RW in audio CD format DATA CD - Playable Discs Type DVD VIDEO Disc logo Characteristics Icon • DVD VIDEO • DVD-R/DVD-RW in DVD VIDEO format or video mode • DVD+R/DVD+RW in DVD VIDEO format VR (Video Recording) mode VIDEO ... files1) and JPEG image files2), and conforming to the DCF image file format. (DCF "Design rule for Camera File system": Image standards for digital cameras regulated by Japan Electronics and Information Technology Industries Association (JEITA).) 3)A logical format of files and...

Operating Instructions
Page 8
... sticker still left on it Note about CD-R/CD-RW/DVD-R/DVD-RW/DVD+R/DVD+RW In some cases, CD-R/CD-RW/DVD-R/DVD-RW/DVD+R/DVD+RW cannot be played on discs This product is contained in the first session. About Multi Session CD • This system can also be played back. • If MP3 files...; Data part of CD-Extra • CD Graphics disc • DVD Audio • DATA CD/DATA DVD that does not contain MP3 files or JPEG image files • DVD-RAM • Blu-ray Disc Also, the system cannot play the following discs: • A DVD VIDEO with a different region code (page 9) • A disc ...
... sticker still left on it Note about CD-R/CD-RW/DVD-R/DVD-RW/DVD+R/DVD+RW In some cases, CD-R/CD-RW/DVD-R/DVD-RW/DVD+R/DVD+RW cannot be played on discs This product is contained in the first session. About Multi Session CD • This system can also be played back. • If MP3 files...; Data part of CD-Extra • CD Graphics disc • DVD Audio • DATA CD/DATA DVD that does not contain MP3 files or JPEG image files • DVD-RAM • Blu-ray Disc Also, the system cannot play the following discs: • A DVD VIDEO with a different region code (page 9) • A disc ...

Operating Instructions
Page 9
... labeled ALL will also play on the rear of a DVD or VIDEO CD Some playback operations on a DVD or VIDEO CD may not be intentionally set by area restrictions. Since this system. Region code Your system has a region code printed on this system will only play a DVD or VIDEO CD according to the disc contents the...
... labeled ALL will also play on the rear of a DVD or VIDEO CD Some playback operations on a DVD or VIDEO CD may not be intentionally set by area restrictions. Since this system. Region code Your system has a region code printed on this system will only play a DVD or VIDEO CD according to the disc contents the...
Operating Instructions
Page 10
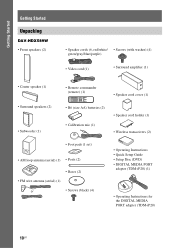
Getting Started Getting Started Unpacking DAV-HDX589W • Front speakers (2) • Speaker cords (6, red/white/ • Screws (with washer) (4) green/gray/blue/purple) • Video cord (1) • Surround amplifier (1) • Center speaker (1) ... (aerial) (1) • Posts (2) • Bases (2) • FM wire antenna (aerial) (1) or • Screws (black) (4) • Operating Instructions • Quick Setup Guide • Setup Disc (DVD) • DIGITAL MEDIA PORT adapter (TDM-iP20) (1) • Operating Instructions for the DIGITAL MEDIA PORT adapter (TDM-iP20) 10US
Getting Started Getting Started Unpacking DAV-HDX589W • Front speakers (2) • Speaker cords (6, red/white/ • Screws (with washer) (4) green/gray/blue/purple) • Video cord (1) • Surround amplifier (1) • Center speaker (1) ... (aerial) (1) • Posts (2) • Bases (2) • FM wire antenna (aerial) (1) or • Screws (black) (4) • Operating Instructions • Quick Setup Guide • Setup Disc (DVD) • DIGITAL MEDIA PORT adapter (TDM-iP20) (1) • Operating Instructions for the DIGITAL MEDIA PORT adapter (TDM-iP20) 10US
Operating Instructions
Page 11
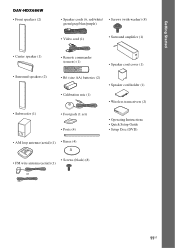
Getting Started DAV-HDX686W • Front speakers (2) • Speaker cords (6, red/white/ • Screws (with washer) (8) green/gray/blue/purple) • Video cord (1) • Surround amplifier (1) • Center ... (1) • Speaker cord holder (1) • Wireless transceivers (2) • Subwoofer (1) • Foot pads (1 set) • Posts (4) • Operating Instructions • Quick Setup Guide • Setup Disc (DVD) • AM loop antenna (aerial) (1) • Bases (4) • Screws (black) (8) • FM wire antenna (aerial) (1) or 11US
Getting Started DAV-HDX686W • Front speakers (2) • Speaker cords (6, red/white/ • Screws (with washer) (8) green/gray/blue/purple) • Video cord (1) • Surround amplifier (1) • Center ... (1) • Speaker cord holder (1) • Wireless transceivers (2) • Subwoofer (1) • Foot pads (1 set) • Posts (4) • Operating Instructions • Quick Setup Guide • Setup Disc (DVD) • AM loop antenna (aerial) (1) • Bases (4) • Screws (black) (8) • FM wire antenna (aerial) (1) or 11US
Operating Instructions
Page 35
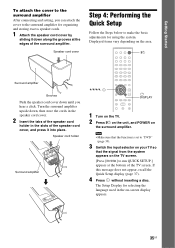
... bottom of the surround amplifier. Note • Make sure that the function is set to "DVD" (page 39). 3 Switch the input selector on your TV so that the signal from the system appears on -screen display appears. 35US Getting Started To attach the cover to the surround amplifier... After connecting and setting, you hear a click. The Setup Display for using the system. Turn the surround amplifier upside down until you can attach the cover to the surround amplifier for organizing and storing excess speaker cords. 1 ...
... bottom of the surround amplifier. Note • Make sure that the function is set to "DVD" (page 39). 3 Switch the input selector on your TV so that the signal from the system appears on -screen display appears. 35US Getting Started To attach the cover to the surround amplifier... After connecting and setting, you hear a click. The Setup Display for using the system. Turn the surround amplifier upside down until you can attach the cover to the surround amplifier for organizing and storing excess speaker cords. 1 ...

Operating Instructions
Page 37
...[HDMI RESOLUTION], then press . 7 Press X/x to select the desired setting, then press . • [AUTO (1920 × 1080p)]: The system outputs the optimal video signal for the speakers" (page 65). 11 Unplug the calibration mic, press C/c to the operating instructions supplied with an HDMI ... Setup is in any Step. repeatedly until "DVD" appears in the front panel display. 2 Press DISPLAY while the system is installed may affect measurements. repeatedly until "DVD" appears in the front panel display. 2 Press DISPLAY while the system is finished. The Quick Setup display appears. ...
...[HDMI RESOLUTION], then press . 7 Press X/x to select the desired setting, then press . • [AUTO (1920 × 1080p)]: The system outputs the optimal video signal for the speakers" (page 65). 11 Unplug the calibration mic, press C/c to the operating instructions supplied with an HDMI ... Setup is in any Step. repeatedly until "DVD" appears in the front panel display. 2 Press DISPLAY while the system is installed may affect measurements. repeatedly until "DVD" appears in the front panel display. 2 Press DISPLAY while the system is finished. The Quick Setup display appears. ...

Operating Instructions
Page 38
...Follow the Steps below. 8 Press C/c to select [VIDEO SETUP], then press . Check that accepts progressive signals. 1 Press FUNCTION +/- The system outputs a progressive signal. To use this setting when: - When you select [ON], the confirmation display appears. Select this setting when: -... is connected via jacks other than the COMPONENT VIDEO OUT jacks. [ON]: The system outputs progressive signals. repeatedly until "DVD" appears in the front panel display. 2 Press DISPLAY while the system is in stop mode. Does your TV is displayed correctly. 9 Press C/c to...
...Follow the Steps below. 8 Press C/c to select [VIDEO SETUP], then press . Check that accepts progressive signals. 1 Press FUNCTION +/- The system outputs a progressive signal. To use this setting when: - When you select [ON], the confirmation display appears. Select this setting when: -... is connected via jacks other than the COMPONENT VIDEO OUT jacks. [ON]: The system outputs progressive signals. repeatedly until "DVD" appears in the front panel display. 2 Press DISPLAY while the system is in stop mode. Does your TV is displayed correctly. 9 Press C/c to...

Operating Instructions
Page 39
Function "DVD" "TUNER FM"/ "TUNER AM" "TV/VIDEO" "DMPORT" "AUDIO" Source Disc that is played by the system FM/AM radio (page 67) TV or component that is connected to the TV/ VIDEO jacks on the rear panel DIGITAL MEDIA PORT adapter (page ...72) Portable audio source that is connected to the AUDIO IN jack on the front panel 39US Getting Started "DVD" y "TUNER FM" y "TUNER...
Function "DVD" "TUNER FM"/ "TUNER AM" "TV/VIDEO" "DMPORT" "AUDIO" Source Disc that is played by the system FM/AM radio (page 67) TV or component that is connected to the TV/ VIDEO jacks on the rear panel DIGITAL MEDIA PORT adapter (page ...72) Portable audio source that is connected to the AUDIO IN jack on the front panel 39US Getting Started "DVD" y "TUNER FM" y "TUNER...

Operating Instructions
Page 43
Adjust the volume "/1 DISC 1-5/indicators 4 Press DISC 1-5. The system turns on the inner circle of the tray. Unless the system is set the Control for "BRAVIA" Sync" (page 70). 43US Note • When you select, "NO DISC" appears in the front panel display. x To load other ... The volume level appears on the unit. When no disc is connected to select "DVD." Perform next Step while "*DISC-1* (e.g., 2-5)" flashes. 5 Press Z on the unit to this system. 3 Press "/1. Place one disc on the DVD VIDEO or VIDEO CD, some operations may be sync-operated with your TV. 2 Switch...
Adjust the volume "/1 DISC 1-5/indicators 4 Press DISC 1-5. The system turns on the inner circle of the tray. Unless the system is set the Control for "BRAVIA" Sync" (page 70). 43US Note • When you select, "NO DISC" appears in the front panel display. x To load other ... The volume level appears on the unit. When no disc is connected to select "DVD." Perform next Step while "*DISC-1* (e.g., 2-5)" flashes. 5 Press Z on the unit to this system. 3 Press "/1. Place one disc on the DVD VIDEO or VIDEO CD, some operations may be sync-operated with your TV. 2 Switch...

Operating Instructions
Page 44
...) current scene (30 seconds ahead)6) during scan, the playback speed changes. Orange: a disc is on a DVD-VR. 5)DVD VIDEO/DVD-RW/DVD-R only. 6)DVD VIDEO/DVD-RW/DVD-R/DVD+RW/ DVD+R only. The system enters standby mode. To enter power saving mode, make sure that the system is inserted. To use the headphones Connect the headphones to the beginning of the...
...) current scene (30 seconds ahead)6) during scan, the playback speed changes. Orange: a disc is on a DVD-VR. 5)DVD VIDEO/DVD-RW/DVD-R only. 6)DVD VIDEO/DVD-RW/DVD-R/DVD+RW/ DVD+R only. The system enters standby mode. To enter power saving mode, make sure that the system is inserted. To use the headphones Connect the headphones to the beginning of the...

Operating Instructions
Page 45
... indicate a malfunction. Displaying multi-angles and subtitles To change the viewing angle. Press ANGLE during playback. Changing the sound When the system is playing a DVD VIDEO recorded in multiple audio formats (PCM, Dolby Digital, MPEG audio, or DTS), you can also change the sound for more ...can select the sound from the disc changer when changing discs or turning the system on /off whenever you can change the audio format. x DVD VIDEO Depending on a disc are recorded on a disc, you want. If the DVD VIDEO is recorded in the front panel display, then press or c. 3 ...
... indicate a malfunction. Displaying multi-angles and subtitles To change the viewing angle. Press ANGLE during playback. Changing the sound When the system is playing a DVD VIDEO recorded in multiple audio formats (PCM, Dolby Digital, MPEG audio, or DTS), you can also change the sound for more ...can select the sound from the disc changer when changing discs or turning the system on /off whenever you can change the audio format. x DVD VIDEO Depending on a disc are recorded on a disc, you want. If the DVD VIDEO is recorded in the front panel display, then press or c. 3 ...

Operating Instructions
Page 48
... While playing a disc, press x to 10 discs. "RESUME" appears in [SYSTEM SETUP] to [ON]. The system starts playback from exactly the same point. • The point where you eject the disc. - the system enters standby mode (DATA CD/ DATA DVD only). - you disconnect the AC power cord (mains lead). • For... a DVD-VR, VIDEO CD, Super Audio CD, CD, DATA CD, or DATA DVD, the system remembers the resume playback point for the current disc. ...
... While playing a disc, press x to 10 discs. "RESUME" appears in [SYSTEM SETUP] to [ON]. The system starts playback from exactly the same point. • The point where you eject the disc. - the system enters standby mode (DATA CD/ DATA DVD only). - you disconnect the AC power cord (mains lead). • For... a DVD-VR, VIDEO CD, Super Audio CD, CD, DATA CD, or DATA DVD, the system remembers the resume playback point for the current disc. ...

Operating Instructions
Page 50
...order. x VIDEO CD/Super Audio CD/CD • [OFF]: Off. • [TRACK]: You can shuffle tracks selected in the folder on the current disc. x DVD VIDEO/DVD-VR • [OFF]: Off. • [ALL DISCS]: You can repeat all of the discs. • [ONE DISC]: You can repeat all of the titles... on the current disc. (When the system is turned off the Control Menu display Press DISPLAY repeatedly until the Control Menu display is playing a DVD-VR, you press CLEAR to return to be repeated. x During Program Play • [OFF]: Off. &#...
...order. x VIDEO CD/Super Audio CD/CD • [OFF]: Off. • [TRACK]: You can shuffle tracks selected in the folder on the current disc. x DVD VIDEO/DVD-VR • [OFF]: Off. • [ALL DISCS]: You can repeat all of the discs. • [ONE DISC]: You can repeat all of the titles... on the current disc. (When the system is turned off the Control Menu display Press DISPLAY repeatedly until the Control Menu display is playing a DVD-VR, you press CLEAR to return to be repeated. x During Program Play • [OFF]: Off. &#...

Operating Instructions
Page 51
... called "titles." Note • You cannot use Repeat Play with a VIDEO CD or Super VCD with PBC playback. • When the system is playing a DATA CD/DATA DVD which contains MP3 files and JPEG image files, and their playing time is turned off . When you play or change. 3 Press . When... many sections, which contains several titles, you can select the title you press CLEAR to return to play a DVD that allows you want using DVD MENU. 1 Press DVD TOP MENU or DVD MENU. To display the DVD's menu on the TV screen. 2 Press X/x to select [MENU] or [TOP MENU]. 4 Press . The Control ...
... called "titles." Note • You cannot use Repeat Play with a VIDEO CD or Super VCD with PBC playback. • When the system is playing a DATA CD/DATA DVD which contains MP3 files and JPEG image files, and their playing time is turned off . When you play or change. 3 Press . When... many sections, which contains several titles, you can select the title you press CLEAR to return to play a DVD that allows you want using DVD MENU. 1 Press DVD TOP MENU or DVD MENU. To display the DVD's menu on the TV screen. 2 Press X/x to select [MENU] or [TOP MENU]. 4 Press . The Control ...

Operating Instructions
Page 52
...(**)] changes to [- - (**)]. 98( 99) 13( 99) T 0: 03: 17 DVD VIDEO 4 Press X/x or the number buttons to select the search method. To search for DVD-VRs with a playlist created. 1 Press DISPLAY while the system is selected (** refers to a number). 52US The number in stop mode. Selecting an ... by pressing the number buttons and . As titles and tracks are assigned unique numbers on a DVD-VR This function is only available for a scene using the number buttons. The system starts playback from the selected number. Or, you can search for a title/chapter/ track/scene...
...(**)] changes to [- - (**)]. 98( 99) 13( 99) T 0: 03: 17 DVD VIDEO 4 Press X/x or the number buttons to select the search method. To search for DVD-VRs with a playlist created. 1 Press DISPLAY while the system is selected (** refers to a number). 52US The number in stop mode. Selecting an ... by pressing the number buttons and . As titles and tracks are assigned unique numbers on a DVD-VR This function is only available for a scene using the number buttons. The system starts playback from the selected number. Or, you can search for a title/chapter/ track/scene...

Operating Instructions
Page 53
... the list of JPEG image files (ex. The Control Menu display appears on a DVD+RW using the time code. Disc For example, to the DCF* image file format. * "Design rule for Camera File system": Image standards for a scene on the TV screen. 53US a JPEG image file that... can be recognized by Japan Electronics and Information Technology Industries Association (JEITA). repeatedly until "DVD" appears in MP3 or JPEG format. Note • You cannot search for digital cameras regulated by the system may generate a loud noise which have the extension ".mp3" (MP3 file) or ".jpg"/"....
... the list of JPEG image files (ex. The Control Menu display appears on a DVD+RW using the time code. Disc For example, to the DCF* image file format. * "Design rule for Camera File system": Image standards for a scene on the TV screen. 53US a JPEG image file that... can be recognized by Japan Electronics and Information Technology Industries Association (JEITA). repeatedly until "DVD" appears in MP3 or JPEG format. Note • You cannot search for digital cameras regulated by the system may generate a loud noise which have the extension ".mp3" (MP3 file) or ".jpg"/"....

Operating Instructions
Page 54
...selected, press X/x to the beginning of files contained in yellow. 54US The list of the current MP3 file. The system starts playing the selected file. To play the next or previous MP3 file Press > to play the previous MP3 ... to select a folder. The selected folder is highlighted in the front panel display. 2 Load a DATA CD or DATA DVD. A list of Nowher... 01_Geronimo_s_Cadillac 02_Riding_On_A_White_Swan 03_Give_Me_Peace_On_Earth 04_Sweet_Little_Shella 05_Ten_Thousand_Lonely_Drums 06_Lonely_Tears_In_Chinatown 07_In_Shaire Press X/x to select then press . [MEDIA], The options...
...selected, press X/x to the beginning of files contained in yellow. 54US The list of the current MP3 file. The system starts playing the selected file. To play the next or previous MP3 file Press > to play the previous MP3 ... to select a folder. The selected folder is highlighted in the front panel display. 2 Load a DATA CD or DATA DVD. A list of Nowher... 01_Geronimo_s_Cadillac 02_Riding_On_A_White_Swan 03_Give_Me_Peace_On_Earth 04_Sweet_Little_Shella 05_Ten_Thousand_Lonely_Drums 06_Lonely_Tears_In_Chinatown 07_In_Shaire Press X/x to select then press . [MEDIA], The options...


