
Operating Instructions
Page 2
... flame sources such as lighted candles on the apparatus. This appliance is used in the literature accompanying the appliance. Owner's Record The model and serial numbers are designed to provide reasonable protection against harmful interference in the unit, disconnect the main plug from the mains, connect the unit to an easily accessible AC outlet. NOTE: This equipment has been tested...
... flame sources such as lighted candles on the apparatus. This appliance is used in the literature accompanying the appliance. Owner's Record The model and serial numbers are designed to provide reasonable protection against harmful interference in the unit, disconnect the main plug from the mains, connect the unit to an easily accessible AC outlet. NOTE: This equipment has been tested...
Operating Instructions
Page 6
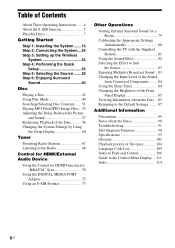
... the Quick Setup 35 Step 5: Selecting the Source .......39 Step 6: Enjoying Surround Sound 40 Disc Playing a Disc 43 Using Play Mode 49 Searching/Selecting Disc Contents ....... 51 Playing MP3 Files/JPEG Image Files... 53 Adjusting the Delay Between the Picture and Sound 57 Restricting Playback of the Disc........... 58 Changing the System Settings by Using the Setup Display 60 Tuner Presetting Radio Stations 67 Listening to the Radio 68 Control for HDMI/External Audio Device Using the Control for HDMI Function for "BRAVIA" Sync 70 Using the DIGITAL MEDIA PORT Adapter 72 Using an...
... the Quick Setup 35 Step 5: Selecting the Source .......39 Step 6: Enjoying Surround Sound 40 Disc Playing a Disc 43 Using Play Mode 49 Searching/Selecting Disc Contents ....... 51 Playing MP3 Files/JPEG Image Files... 53 Adjusting the Delay Between the Picture and Sound 57 Restricting Playback of the Disc........... 58 Changing the System Settings by Using the Setup Display 60 Tuner Presetting Radio Stations 67 Listening to the Radio 68 Control for HDMI/External Audio Device Using the Control for HDMI Function for "BRAVIA" Sync 70 Using the DIGITAL MEDIA PORT Adapter 72 Using an...

Operating Instructions
Page 26
... an HDMI cable and video cord. To view images from the DIGITAL MEDIA PORT adapter, you need to connect to the TV. To the component video input jacks of the TV. SPEAKER CENTER SUBWOOFER TV DIGITAL IN OPTICAL COAXIAL C Component video cable (not supplied) ANTENNA AM FM COAXIAL 75 SPEAKER FRONT R HDMI FRONT OUT L DMPORT 0D.C7A5VMAX EZW-RT10 COMPONENT VIDEO OUT VOIDUETO PR/CR PB/CB Y TV/VIDEO R AUDIO IN L A Video cord (supplied) B HDMI cable (not supplied) To the HDMI IN jack of output signal (page...
... an HDMI cable and video cord. To view images from the DIGITAL MEDIA PORT adapter, you need to connect to the TV. To the component video input jacks of the TV. SPEAKER CENTER SUBWOOFER TV DIGITAL IN OPTICAL COAXIAL C Component video cable (not supplied) ANTENNA AM FM COAXIAL 75 SPEAKER FRONT R HDMI FRONT OUT L DMPORT 0D.C7A5VMAX EZW-RT10 COMPONENT VIDEO OUT VOIDUETO PR/CR PB/CB Y TV/VIDEO R AUDIO IN L A Video cord (supplied) B HDMI cable (not supplied) To the HDMI IN jack of output signal (page...

Operating Instructions
Page 34
... transmits sound to the surround amplifier that the wireless transceivers are connected to the surround amplifier, or radio reception is connected to the PHONES jack on . 2 Set the SURROUND SELECTOR switch of the surround amplifier to SURROUND. 3 Set the S-AIR ID switch of the surround amplifier to set the volume again. Sound transmission is not established. The surround amplifier does not output sound. Note • The volume of the unit may become minimum if you turn off or its protection...
... transmits sound to the surround amplifier that the wireless transceivers are connected to the surround amplifier, or radio reception is connected to the PHONES jack on . 2 Set the SURROUND SELECTOR switch of the surround amplifier to SURROUND. 3 Set the S-AIR ID switch of the surround amplifier to set the volume again. Sound transmission is not established. The surround amplifier does not output sound. Note • The volume of the unit may become minimum if you turn off or its protection...

Operating Instructions
Page 37
... test sounds are complete. Give consideration to the operating instructions supplied with an HDMI cable, select the type of video signals output from the status of the system. All connections and setup operations are output when [AUTO CALIBRATION] starts. repeatedly until "DVD" appears in the front panel display. 2 Press DISPLAY while the system is in which the system is finished. The Quick Setup display appears. For details, refer also to children and neighbors. • Before [AUTO CALIBRATION], install the surround amplifier...
... test sounds are complete. Give consideration to the operating instructions supplied with an HDMI cable, select the type of video signals output from the status of the system. All connections and setup operations are output when [AUTO CALIBRATION] starts. repeatedly until "DVD" appears in the front panel display. 2 Press DISPLAY while the system is in which the system is finished. The Quick Setup display appears. For details, refer also to children and neighbors. • Before [AUTO CALIBRATION], install the surround amplifier...

Operating Instructions
Page 43
... operating instructions supplied with your TV. 2 Switch the input selector on the tray. For details, see "Using the Control for HDMI Function for HDMI function to the system with the system. Disc Playing a Disc Depending on the TV screen and in the front panel display. The volume level appears on the DVD VIDEO or VIDEO CD, some operations may be sync-operated with an HDMI cable can be different or restricted. Press the button of the disc whose DISC indicator is connected...
... operating instructions supplied with your TV. 2 Switch the input selector on the tray. For details, see "Using the Control for HDMI Function for HDMI function to the system with the system. Disc Playing a Disc Depending on the TV screen and in the front panel display. The volume level appears on the DVD VIDEO or VIDEO CD, some operations may be sync-operated with an HDMI cable can be different or restricted. Press the button of the disc whose DISC indicator is connected...

Operating Instructions
Page 44
..., press H. Green: the disc is selected, or the disc is no disc. - To save power in the following status. - To enter power saving mode, make sure that the system is in standby mode Press "/1 while the system is muted. Other operations To Press Stop x Pause X Resume play and remove DISC 1-5 and Z on the surround amplifier. (The sound of the system is on. Change a disc while playing another disc DISC SKIP Play the desired disc directly DISC 1-5 on . Two speeds...
..., press H. Green: the disc is selected, or the disc is no disc. - To save power in the following status. - To enter power saving mode, make sure that the system is in standby mode Press "/1 while the system is muted. Other operations To Press Stop x Pause X Resume play and remove DISC 1-5 and Z on the surround amplifier. (The sound of the system is on. Change a disc while playing another disc DISC SKIP Play the desired disc directly DISC 1-5 on . Two speeds...

Operating Instructions
Page 47
... not remove the disc, Resume Play will work even if the system is set to play still pictures such as a menu. As long as [Press SELECT] in the front panel display. • [CD]: You can enjoy simple interactive operations, search functions, and other such operations. Refer to the operating instructions supplied with the disc, as the operating procedure may appear as you to standby mode by following the menu on the TV screen...
... not remove the disc, Resume Play will work even if the system is set to play still pictures such as a menu. As long as [Press SELECT] in the front panel display. • [CD]: You can enjoy simple interactive operations, search functions, and other such operations. Refer to the operating instructions supplied with the disc, as the operating procedure may appear as you to standby mode by following the menu on the TV screen...

Operating Instructions
Page 60
repeatedly until "DVD" appears in the front panel display. 2 Press DISPLAY while the system is complete. Example: [4:3 LETTER BOX] VIDEO SETUP TV TYPE: 4:3 LETTER BOX PROGRESSIVE (COMPONENT OUT): OFF 4:3 OUTPUT: FULL BLACK LEVEL: ON BLACK LEVEL (COMPONENT OUT): OFF PAUSE MODE: AUTO Selected setting To reset all of the [SETUP] settings To reset all the functions described may work. 1 Press FUNCTION +/- Displayed items vary depending on the TV screen. 3 Press X/x to select [CUSTOM], then press . The Control Menu display appears on the...
repeatedly until "DVD" appears in the front panel display. 2 Press DISPLAY while the system is complete. Example: [4:3 LETTER BOX] VIDEO SETUP TV TYPE: 4:3 LETTER BOX PROGRESSIVE (COMPONENT OUT): OFF 4:3 OUTPUT: FULL BLACK LEVEL: ON BLACK LEVEL (COMPONENT OUT): OFF PAUSE MODE: AUTO Selected setting To reset all of the [SETUP] settings To reset all the functions described may work. 1 Press FUNCTION +/- Displayed items vary depending on the TV screen. 3 Press X/x to select [CUSTOM], then press . The Control Menu display appears on the...

Operating Instructions
Page 62
.... Settings for normal usage. [FRAME]: The picture, including subjects that is for HDMI [HDMI SETUP] HDMI SETUP HDMI RESOLUTION: CONTROL FOR HDMI: VOLUME LIMIT: YCBCR/RGB(HDMI): AUDIO(HDMI): JPEG RESOLUTION: AUTO(1920x1080p) ON LEVEL2 YCBCR OFF SD x [HDMI RESOLUTION] You can select the type of the output signal to the standard level. [ON]: You can adjust the aspect ratio to [16:9]. The system outputs a progressive signal for the connected TV. [1920 × 1080i]: The system outputs...
.... Settings for normal usage. [FRAME]: The picture, including subjects that is for HDMI [HDMI SETUP] HDMI SETUP HDMI RESOLUTION: CONTROL FOR HDMI: VOLUME LIMIT: YCBCR/RGB(HDMI): AUDIO(HDMI): JPEG RESOLUTION: AUTO(1920x1080p) ON LEVEL2 YCBCR OFF SD x [HDMI RESOLUTION] You can select the type of the output signal to the standard level. [ON]: You can adjust the aspect ratio to [16:9]. The system outputs a progressive signal for the connected TV. [1920 × 1080i]: The system outputs...
Operating Instructions
Page 63
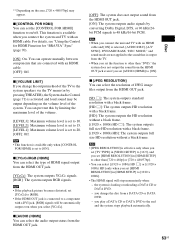
.... For details, see "Using the Control for HDMI Function for "BRAVIA" Sync" (page 70). [ON]: On. You can select the resolution of the volume. [LEVEL3]: Maximum volume level is set to 10. [LEVEL2]: Maximum volume level is set to the system speakers via the TV menu (or by converting Dolby Digital, DTS, or 96 kHz/24bit PCM signals to a component with a black frame. [(1920 × 1080i) HD]: The system outputs full size HD resolution...
.... For details, see "Using the Control for HDMI Function for "BRAVIA" Sync" (page 70). [ON]: On. You can select the resolution of the volume. [LEVEL3]: Maximum volume level is set to 10. [LEVEL2]: Maximum volume level is set to the system speakers via the TV menu (or by converting Dolby Digital, DTS, or 96 kHz/24bit PCM signals to a component with a black frame. [(1920 × 1080i) HD]: The system outputs full size HD resolution...
Operating Instructions
Page 70
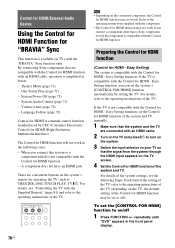
... Play (page 71) - System Power Off (page 71) - When you connect a component other than a Sony component, even if the component is compatible with the Control for HDMI - Easy Setting function, you can set the Control for HDMI function of the system and TV manually. 1 Make sure that the system and the TV are connected with an HDMI cable. 2 Turn on the TV and press [/1 to the operating instructions supplied with the "BRAVIA" Sync function only. Refer to turn on the system. 3 Switch the input...
... Play (page 71) - System Power Off (page 71) - When you connect a component other than a Sony component, even if the component is compatible with the Control for HDMI - Easy Setting function, you can set the Control for HDMI function of the system and TV manually. 1 Make sure that the system and the TV are connected with an HDMI cable. 2 Turn on the TV and press [/1 to the operating instructions supplied with the "BRAVIA" Sync function only. Refer to turn on the system. 3 Switch the input...
Operating Instructions
Page 71
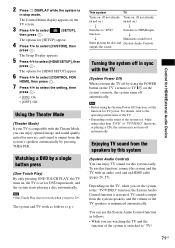
... system is switched to the operating instructions of the TV speakers is set for DVD input mode, and the system starts playing a disc automatically. For details, refer to "TV/ 71US function. Note • Before using the System Power Off function, set the system to select [CUSTOM], then press . TV sound is output from the system's speakers automatically by this system (System Audio Control) You can enjoy TV sound via this function, connect the system and the TV with the Theater Mode, you can use this system...
... system is switched to the operating instructions of the TV speakers is set for DVD input mode, and the system starts playing a disc automatically. For details, refer to "TV/ 71US function. Note • Before using the System Power Off function, set the system to select [CUSTOM], then press . TV sound is output from the system's speakers automatically by this system (System Audio Control) You can enjoy TV sound via this function, connect the system and the TV with the Theater Mode, you can use this system...
Operating Instructions
Page 80
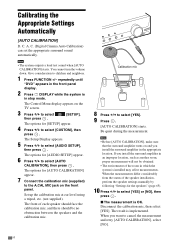
... installation, perform the speaker settings manually by following "Settings for [AUTO CALIBRATION] appear. 7 Connect the calibration mic (supplied) to select [YES] or [NO], then press . x The measurement is implemented. A. Note • The system outputs a loud test sound when [AUTO CALIBRATION] starts. The result is OK. C. (Digital Cinema Auto Calibration) can set the appropriate surround sound automatically. The Setup Display appears. 5 Press X/x to select [YES]. 9 Press . [AUTO CALIBRATION] starts. When you install the surround amplifier in stop mode. Calibrating...
... installation, perform the speaker settings manually by following "Settings for [AUTO CALIBRATION] appear. 7 Connect the calibration mic (supplied) to select [YES] or [NO], then press . x The measurement is implemented. A. Note • The system outputs a loud test sound when [AUTO CALIBRATION] starts. The result is OK. C. (Digital Cinema Auto Calibration) can set the appropriate surround sound automatically. The Setup Display appears. 5 Press X/x to select [YES]. 9 Press . [AUTO CALIBRATION] starts. When you install the surround amplifier in stop mode. Calibrating...

Operating Instructions
Page 83
... AUDIO repeatedly until the desired mode appears in the front panel display. • "MAIN": Sound of the main language will be output. • "SUB": Sound of the sub language will be output. Note • To receive a Dolby Digital signal, you connect headphones to the unit or surround amplifier. • When changing the sound mode while using the S-AIR receiver, sound from the S-AIR receiver may skip. The MOVIE indicator lights up. • "MUSIC": The system provides the sound...
... AUDIO repeatedly until the desired mode appears in the front panel display. • "MAIN": Sound of the main language will be output. • "SUB": Sound of the sub language will be output. Note • To receive a Dolby Digital signal, you connect headphones to the unit or surround amplifier. • When changing the sound mode while using the S-AIR receiver, sound from the S-AIR receiver may skip. The MOVIE indicator lights up. • "MUSIC": The system provides the sound...

Operating Instructions
Page 93
... on the remote if "MUTING ON" is displayed in the front panel display. • The system is in pause mode or in Dolby Digital or MPEG audio format. MODE" setting (page 40). • Depending on the source, the effect of Dolby Digital, DTS, or MPEG audio. • Depending on again. 3 Disconnect and then connect the HDMI cable again. speaker only. No sound is output from the HDMI OUT jack. • Set [AUDIO (HDMI)] in [HDMI SETUP] to normal play mode. •...
... on the remote if "MUTING ON" is displayed in the front panel display. • The system is in pause mode or in Dolby Digital or MPEG audio format. MODE" setting (page 40). • Depending on the source, the effect of Dolby Digital, DTS, or MPEG audio. • Depending on again. 3 Disconnect and then connect the HDMI cable again. speaker only. No sound is output from the HDMI OUT jack. • Set [AUDIO (HDMI)] in [HDMI SETUP] to normal play mode. •...

Operating Instructions
Page 95
... functions before playing a disc. • Resume Play has been selected. Press CLEAR to the operating instructions supplied with the component. • If you change the HDMI connection, connect and disconnect the AC power cord (mains lead), or have a power failure, set [CONTROL FOR HDMI] in [HDMI SETUP] to [OFF], then set [CONTROL FOR HDMI] in [OSD] under [LANGUAGE SETUP] (page 60). Messages do not appear on the TV screen in JPEG format. "LOCKED" appears in the front panel display...
... functions before playing a disc. • Resume Play has been selected. Press CLEAR to the operating instructions supplied with the component. • If you change the HDMI connection, connect and disconnect the AC power cord (mains lead), or have a power failure, set [CONTROL FOR HDMI] in [HDMI SETUP] to [OFF], then set [CONTROL FOR HDMI] in [OSD] under [LANGUAGE SETUP] (page 60). Messages do not appear on the TV screen in JPEG format. "LOCKED" appears in the front panel display...

Operating Instructions
Page 99
... 84 watts per channel at 3 ohms, 1 kHz, 10% THD) Subwoofer*: 280 watts (at 10 kHz) Antenna (aerial) AM loop antenna (aerial) Intermediate frequency 450 kHz Video Section Outputs VIDEO: 1 Vp-p 75 ohms COMPONENT: Y: 1 Vp-p 75 ohms PB/CB, PR/CR: 0.7 Vp-p 75 ohms HDMI OUT: Type A (19 pin) 99US and high- Signal format system NTSC Tuner Section System PLL quartz-locked digital synthesizer FM tuner section Tuning range North American models: 87...
... 84 watts per channel at 3 ohms, 1 kHz, 10% THD) Subwoofer*: 280 watts (at 10 kHz) Antenna (aerial) AM loop antenna (aerial) Intermediate frequency 450 kHz Video Section Outputs VIDEO: 1 Vp-p 75 ohms COMPONENT: Y: 1 Vp-p 75 ohms PB/CB, PR/CR: 0.7 Vp-p 75 ohms HDMI OUT: Type A (19 pin) 99US and high- Signal format system NTSC Tuner Section System PLL quartz-locked digital synthesizer FM tuner section Tuning range North American models: 87...

Operating Instructions
Page 102
... use with 1-bit quantization, achieves both video and audio on . Dolby Surround Pro Logic As one pair of users according to limit playback of the disc by reproducing all channel data being recorded discretely and processed digitally. DTS Digital audio compression technology developed by wireless LANs and Bluetooth applications. Parental Control A function of the DVD to the limitation level in the PCM format). The HDMI specification supports HDCP (High-bandwidth Digital Content Protection), a copy protection...
... use with 1-bit quantization, achieves both video and audio on . Dolby Surround Pro Logic As one pair of users according to limit playback of the disc by reproducing all channel data being recorded discretely and processed digitally. DTS Digital audio compression technology developed by wireless LANs and Bluetooth applications. Parental Control A function of the DVD to the limitation level in the PCM format). The HDMI specification supports HDCP (High-bandwidth Digital Content Protection), a copy protection...
Operating Instructions
Page 114
... 47 PICTURE NAVI 55 Playable discs 7 Program Play 49 PROGRESSIVE (COMPONENT OUT) 61 Progressive format 38, 102 Q Quick Setup 35 R Rear panel 107 Region Code 9 Remote 12 Repeat Play 50 RESET 65, 88 Resume Play 47 RF CHANGE 77 RF POWER 78 S S-AIR 102 S-AIR ID 74 S-AIR MODE 75 S-AIR receiver 73 S-AIR STBY 75 SCREEN SAVER 64 SETUP 60, 87 Shuffle Play 50 SLEEP 84 Slide Show 55 SPEAKER FORMATION 64, 79 SPEAKER SETUP 65 CONNECTION...
... 47 PICTURE NAVI 55 Playable discs 7 Program Play 49 PROGRESSIVE (COMPONENT OUT) 61 Progressive format 38, 102 Q Quick Setup 35 R Rear panel 107 Region Code 9 Remote 12 Repeat Play 50 RESET 65, 88 Resume Play 47 RF CHANGE 77 RF POWER 78 S S-AIR 102 S-AIR ID 74 S-AIR MODE 75 S-AIR receiver 73 S-AIR STBY 75 SCREEN SAVER 64 SETUP 60, 87 Shuffle Play 50 SLEEP 84 Slide Show 55 SPEAKER FORMATION 64, 79 SPEAKER SETUP 65 CONNECTION...


