HDMI Control Guide
Page 3
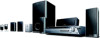
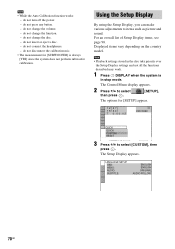
CUSTOM SETUP HDMI CONTROL: PAUSE MODE: TRACK SELECTION: MULTI-DISC RESUME: AUDIO DRC: AUDIO (HDMI): OFF AUTO OFF ON OFF OFF 6 Press X/x to select [HDMI CONTROL], then press . 7 Press X/x to on. 8 Press . 3US... setting. The Setup item is in stop mode. LANGUAGE SETUP OSD: MENU: AUDIO: SUBTITLE: ENGLISH ENGLISH ORIGINAL AUDIO FOLLOW GUSB 5 Press X/x to select [CUSTOM], then press . The options for [SETUP] appear. 1 2 ( 2 7 ) 1 8 ( 3 4 ) T 0:00:02 DVD VIDEO QUICK QUICK CUSTOM RESET BNR 4 Press X/x to select [CUSTOM SETUP], then press . 2 Press DISPLAY when the system is selected....
CUSTOM SETUP HDMI CONTROL: PAUSE MODE: TRACK SELECTION: MULTI-DISC RESUME: AUDIO DRC: AUDIO (HDMI): OFF AUTO OFF ON OFF OFF 6 Press X/x to select [HDMI CONTROL], then press . 7 Press X/x to on. 8 Press . 3US... setting. The Setup item is in stop mode. LANGUAGE SETUP OSD: MENU: AUDIO: SUBTITLE: ENGLISH ENGLISH ORIGINAL AUDIO FOLLOW GUSB 5 Press X/x to select [CUSTOM], then press . The options for [SETUP] appear. 1 2 ( 2 7 ) 1 8 ( 3 4 ) T 0:00:02 DVD VIDEO QUICK QUICK CUSTOM RESET BNR 4 Press X/x to select [CUSTOM SETUP], then press . 2 Press DISPLAY when the system is selected....
HDMI Control Guide
Page 5
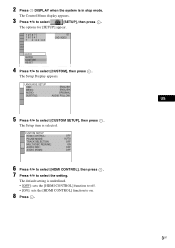
...sound of STB or a digital satellite tuner from speakers of the system. The setting is in the following connections and settings. Video signal Sound signal TV to HDMI 2 (HDMI cord) to HDMI 1 (HDMI cord) GUSB DAV STB Sets the [STB SYNCHRO] to select the setting. Tip ...Connect to the STB or digital satellite tuner. The names of HDMI inputs in stop mode. 3 Press X/x to select [SETUP], then press . 4 Press X/x to select [CUSTOM], then press . 5 Press X/x to select [CUSTOM SETUP], then press . 6 Press X/x to select [STB SYNCHRO], then press . 7 Press X/x to [ON].
...sound of STB or a digital satellite tuner from speakers of the system. The setting is in the following connections and settings. Video signal Sound signal TV to HDMI 2 (HDMI cord) to HDMI 1 (HDMI cord) GUSB DAV STB Sets the [STB SYNCHRO] to select the setting. Tip ...Connect to the STB or digital satellite tuner. The names of HDMI inputs in stop mode. 3 Press X/x to select [SETUP], then press . 4 Press X/x to select [CUSTOM], then press . 5 Press X/x to select [CUSTOM SETUP], then press . 6 Press X/x to select [STB SYNCHRO], then press . 7 Press X/x to [ON].
Operating Instructions
Page 4
...LIST] on a DVD-R/DVD-RW 41 Viewing Information About the Disc ... 42 Changing the Angles 44 Displaying the Subtitles 45 Adjusting the Delay Between the Picture and Sound 45 (A/V SYNC) About MP3 Audio Tracks and JPEG Image Files 46 Playing DATA CDs or DATA DVDs with MP3 Audio Tracks...60 Changing the Brightness of Contents Welcome 3 About This Manual 6 This System Can Play the Following Discs 7 Getting Started - Step 1: Connecting the System and TV 10 Step 2: Positioning the System ...14 Step 3: Performing the Quick Setup 15 Getting Started - Table of the Front Panel Display 60 Using ...
...LIST] on a DVD-R/DVD-RW 41 Viewing Information About the Disc ... 42 Changing the Angles 44 Displaying the Subtitles 45 Adjusting the Delay Between the Picture and Sound 45 (A/V SYNC) About MP3 Audio Tracks and JPEG Image Files 46 Playing DATA CDs or DATA DVDs with MP3 Audio Tracks...60 Changing the Brightness of Contents Welcome 3 About This Manual 6 This System Can Play the Following Discs 7 Getting Started - Step 1: Connecting the System and TV 10 Step 2: Positioning the System ...14 Step 3: Performing the Quick Setup 15 Getting Started - Table of the Front Panel Display 60 Using ...
Operating Instructions
Page 5
... Information Precautions 79 Notes about the Discs 80 Troubleshooting 80 Self-diagnosis Function 84 (When letters/numbers appear in the display) Specifications 85 Glossary 87 Language Code List 91 Index to Parts and Controls 92 Guide to the Control Menu Display...... 95 DVD Setup Display List 98 System Menu List 99 Index 100 5GB
... Information Precautions 79 Notes about the Discs 80 Troubleshooting 80 Self-diagnosis Function 84 (When letters/numbers appear in the display) Specifications 85 Glossary 87 Language Code List 91 Index to Parts and Controls 92 Guide to the Control Menu Display...... 95 DVD Setup Display List 98 System Menu List 99 Index 100 5GB
Operating Instructions
Page 11
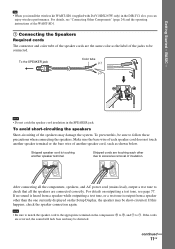
... system. BASIC - Stripped speaker cord is output from a speaker other due to #. If this , be short-circuited. To the SPEAKER jack Color tube (+) (-) Note • Do not catch the speaker cord insulation in the DIR-TC1 slot, you install the wireless kit WAHT-SD1 (supplied with DAV-HDX267W ...only) in the SPEAKER jack. Tip • When you can enjoy wireless performance. Getting Started - For details on the Setup Display, the speaker may be sure to check that all the components, speakers,...
... system. BASIC - Stripped speaker cord is output from a speaker other due to #. If this , be short-circuited. To the SPEAKER jack Color tube (+) (-) Note • Do not catch the speaker cord insulation in the DIR-TC1 slot, you install the wireless kit WAHT-SD1 (supplied with DAV-HDX267W ...only) in the SPEAKER jack. Tip • When you can enjoy wireless performance. Getting Started - For details on the Setup Display, the speaker may be sure to check that all the components, speakers,...
Operating Instructions
Page 15
...formation appears. 9 Press C/c to be connected appears. The Setup Display for using the system. If this message does not appear, recall the Quick Setup display (page 17) and perform again. 4 Press without inserting a disc. BASIC - "/1 C/X/x/c, DISPLAY LANGUAGE SETUP OSD: MENU: AUDIO: SUBTITLE: ENGLISH ENGLISH FRENCH SPANISH ...TV with the headphones connected. • Make sure that the function is set to "DVD" (page 26). 3 Switch the input selector on your TV so that the signal from the system appears on the TV screen. [Press [ENTER] to select the setting that matches your...
...formation appears. 9 Press C/c to be connected appears. The Setup Display for using the system. If this message does not appear, recall the Quick Setup display (page 17) and perform again. 4 Press without inserting a disc. BASIC - "/1 C/X/x/c, DISPLAY LANGUAGE SETUP OSD: MENU: AUDIO: SUBTITLE: ENGLISH ENGLISH FRENCH SPANISH ...TV with the headphones connected. • Make sure that the function is set to "DVD" (page 26). 3 Switch the input selector on your TV so that the signal from the system appears on the TV screen. [Press [ENTER] to select the setting that matches your...

Operating Instructions
Page 16
Be quiet during the measurement (which the system is installed may interfere with DAV-HDX267W only) is not displayed. 14 Press . AUTO CALIBRATION Connect calibration mic. You cannot turn the volume down. All connections and setup operations are complete. BASIC - Note • When the wireless kit WAHT-SD1... should face the calibration mic, and there should be no obstruction between the speakers and the calibration mic. To quit the Quick Setup Press DISPLAY in the measurement area and making noise during the measurement. Getting Started - AUDIO IN / A.CAL MIC Calibration mic 12...
Be quiet during the measurement (which the system is installed may interfere with DAV-HDX267W only) is not displayed. 14 Press . AUTO CALIBRATION Connect calibration mic. You cannot turn the volume down. All connections and setup operations are complete. BASIC - Note • When the wireless kit WAHT-SD1... should face the calibration mic, and there should be no obstruction between the speakers and the calibration mic. To quit the Quick Setup Press DISPLAY in the measurement area and making noise during the measurement. Getting Started - AUDIO IN / A.CAL MIC Calibration mic 12...

Operating Instructions
Page 17
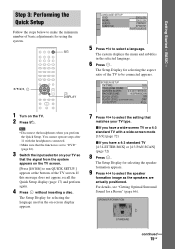
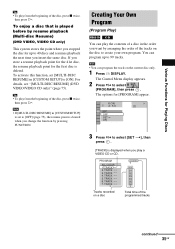
Tip • If you want to select [QUICK], then press . The Quick Setup display appears. 17GB To recall the Quick Setup display 1 Press DISPLAY when the system is in stop mode. See "Getting Optimal Surround Sound for [SETUP] appear. 1 2 ( 2 7 ) 1 8 ( 3 4 ) T 0:00:02 DVD VIDEO QUICK QUICK CUSTOM RESET BNR 3 Press X/x to change the position of the settings...
Tip • If you want to select [QUICK], then press . The Quick Setup display appears. 17GB To recall the Quick Setup display 1 Press DISPLAY when the system is in stop mode. See "Getting Optimal Surround Sound for [SETUP] appear. 1 2 ( 2 7 ) 1 8 ( 3 4 ) T 0:00:02 DVD VIDEO QUICK QUICK CUSTOM RESET BNR 3 Press X/x to change the position of the settings...

Operating Instructions
Page 29
... repeatedly until the sound field you connect headphones to output the TV sound or stereo sound of the System Audio Control function, see page 30. Note • You cannot operate these setup items when you want lights up in the front panel display. Press MOVIE/MUSIC during playback. Note ...Other Components" (page 24). Selecting the Movie or Music Mode You can enjoy TV or VCR sound from all the speakers in [CUSTOM SETUP] to produce the sound effect depending on the disc. • MOVIE: provides the sound for movies. • MUSIC: provides the sound for movies or music.
... repeatedly until the sound field you connect headphones to output the TV sound or stereo sound of the System Audio Control function, see page 30. Note • You cannot operate these setup items when you want lights up in the front panel display. Press MOVIE/MUSIC during playback. Note ...Other Components" (page 24). Selecting the Movie or Music Mode You can enjoy TV or VCR sound from all the speakers in [CUSTOM SETUP] to produce the sound effect depending on the disc. • MOVIE: provides the sound for movies. • MUSIC: provides the sound for movies or music.
Operating Instructions
Page 34
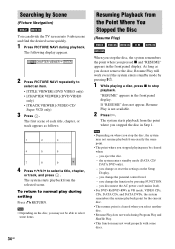
...6 7 8 9 4 Press C/X/x/c to select an item. • [TITLE VIEWER] (DVD VIDEO only) • [CHAPTER VIEWER] (DVD VIDEO only) • [TRACK VIEWER] (VIDEO CD/ Super VCD only) 3 Press . Note • Depending on the Setup Display. - CHAPTER VIEWER ENTER 2 Press PICTURE NAVI repeatedly to select a title, chapter,...stop the disc, the system may not work during setting Press O RETURN. Searching by pressing "/1. 1 While playing a disc, press x to stop playback. The following display appears. "RESUME" appears in VR mode, VIDEO CDs, CDs, DATA CDs, and DATA DVDs, the system remembers ...
...6 7 8 9 4 Press C/X/x/c to select an item. • [TITLE VIEWER] (DVD VIDEO only) • [CHAPTER VIEWER] (DVD VIDEO only) • [TRACK VIEWER] (VIDEO CD/ Super VCD only) 3 Press . Note • Depending on the Setup Display. - CHAPTER VIEWER ENTER 2 Press PICTURE NAVI repeatedly to select a title, chapter,...stop the disc, the system may not work during setting Press O RETURN. Searching by pressing "/1. 1 While playing a disc, press x to stop playback. The following display appears. "RESUME" appears in VR mode, VIDEO CDs, CDs, DATA CDs, and DATA DVDs, the system remembers ...
Operating Instructions
Page 35
... by pressing FUNCTION. Note • If [MULTI-DISC RESUME] in [CUSTOM SETUP] to 40 discs and resumes playback the next time you play the contents of a disc in the order you want by resume playback (Multi-disc Resume) (DVD VIDEO, VIDEO CD only) This system stores the point where you stopped the disc for [PROGRAM] appear. 6 (14) T 2:50 OFF...
... by pressing FUNCTION. Note • If [MULTI-DISC RESUME] in [CUSTOM SETUP] to 40 discs and resumes playback the next time you play the contents of a disc in the order you want by resume playback (Multi-disc Resume) (DVD VIDEO, VIDEO CD only) This system stores the point where you stopped the disc for [PROGRAM] appear. 6 (14) T 2:50 OFF...

Operating Instructions
Page 68
...to select [SPEAKER FORMATION], then press . 1 ( 4 4 ) 3 ( 2 8 ) T 0:03:04 SPEAKER FORMATION SPEAKER FORMATION AUTO CALIBRATION DVD VIDEO 4 Press X/x to connect the supplied calibration mic. • The front panel display indicates the selected [SPEAKER FORMATION]. C. You cannot turn the.... 1 Press FUNCTION repeatedly until "DVD" appears in the front panel display. 2 Press DISPLAY when the system is in [SPEAKER SETUP], the [SPEAKER FORMATION] setting returns to select [YES] or [NO], then press . • [YES]: continue with DAV-HDX267W only) is output when [AUTO ...
...to select [SPEAKER FORMATION], then press . 1 ( 4 4 ) 3 ( 2 8 ) T 0:03:04 SPEAKER FORMATION SPEAKER FORMATION AUTO CALIBRATION DVD VIDEO 4 Press X/x to connect the supplied calibration mic. • The front panel display indicates the selected [SPEAKER FORMATION]. C. You cannot turn the.... 1 Press FUNCTION repeatedly until "DVD" appears in the front panel display. 2 Press DISPLAY when the system is in [SPEAKER SETUP], the [SPEAKER FORMATION] setting returns to select [YES] or [NO], then press . • [YES]: continue with DAV-HDX267W only) is output when [AUTO ...
Operating Instructions
Page 70
...SUBWOOFER] is in the disc take priority over the Setup Display settings and not all the functions described may work. 1 Press DISPLAY when the system is always [YES] since the system does not perform subwoofer ...calibration. do not change the volume. - do not change the disc. - do not press any button. - Note • Playback settings stored in stop mode. The Setup Display appears. do not disconnect the calibration mic. • The measurement for [SETUP] appear. 1 2 ( 2 7 ) 1 8 ( 3 4 ) T 0:00:02 DVD...
...SUBWOOFER] is in the disc take priority over the Setup Display settings and not all the functions described may work. 1 Press DISPLAY when the system is always [YES] since the system does not perform subwoofer ...calibration. do not change the volume. - do not change the disc. - do not press any button. - Note • Playback settings stored in stop mode. The Setup Display appears. do not disconnect the calibration mic. • The measurement for [SETUP] appear. 1 2 ( 2 7 ) 1 8 ( 3 4 ) T 0:00:02 DVD...

Operating Instructions
Page 71
...complete. Then press . To perform the Quick Setup (page 15), press , to return to select the setup item from the displayed list: [LANGUAGE SETUP], [SCREEN SETUP], [CUSTOM SETUP], or [SPEAKER SETUP]. Do not press [/ 1 while resetting the system as it takes a few seconds to the ...default settings. The options for the selected item appear. The Setup item is complete. All the settings explained on after resetting and no disc is in...
...complete. Then press . To perform the Quick Setup (page 15), press , to return to select the setup item from the displayed list: [LANGUAGE SETUP], [SCREEN SETUP], [CUSTOM SETUP], or [SPEAKER SETUP]. Do not press [/ 1 while resetting the system as it takes a few seconds to the ...default settings. The options for the selected item appear. The Setup item is complete. All the settings explained on after resetting and no disc is in...
Operating Instructions
Page 72
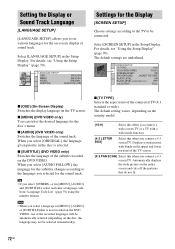
Setting the Display or Sound Track Language [LANGUAGE SETUP] [LANGUAGE SETUP] allows you select [ORIGINAL], the language given priority in the disc is not recorded on the DVD VIDEO. LANGUAGE SETUP OSD: MENU: AUDIO: SUBTITLE: ENGLISH ENGLISH ORIGINAL AUDIO FOLLOW Settings for the Display [SCREEN SETUP] Choose settings according to the TV to the language you select...
Setting the Display or Sound Track Language [LANGUAGE SETUP] [LANGUAGE SETUP] allows you select [ORIGINAL], the language given priority in the disc is not recorded on the DVD VIDEO. LANGUAGE SETUP OSD: MENU: AUDIO: SUBTITLE: ENGLISH ENGLISH ORIGINAL AUDIO FOLLOW Settings for the Display [SCREEN SETUP] Choose settings according to the TV to the language you select...

Operating Instructions
Page 73
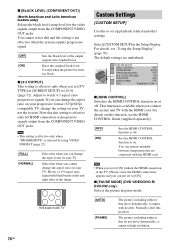
... level. x [YCBCR/RGB (HDMI)] Selects the type of the disc, either PAL or NTSC. x [COLOR SYSTEM (VIDEO CD)] (Asian, Australian, and Middle Eastern models only) Select the color system when you play back a CD, DATA CD (MP3 audio), or DATA DVD (MP3 audio) for the video signals output from HDMI OUT jack....] (North American and Latin American models only) Selects the black level (setup level) for more than COMPONENT VIDEO OUT/HDMI OUT. [ON] [OFF] Sets the black level of a PAL disc and outputs it in the system appears. Outputs RGB signals. Changes the video signal of the output signal ...
... level. x [YCBCR/RGB (HDMI)] Selects the type of the disc, either PAL or NTSC. x [COLOR SYSTEM (VIDEO CD)] (Asian, Australian, and Middle Eastern models only) Select the color system when you play back a CD, DATA CD (MP3 audio), or DATA DVD (MP3 audio) for the video signals output from HDMI OUT jack....] (North American and Latin American models only) Selects the black level (setup level) for more than COMPONENT VIDEO OUT/HDMI OUT. [ON] [OFF] Sets the black level of a PAL disc and outputs it in the system appears. Outputs RGB signals. Changes the video signal of the output signal ...
Operating Instructions
Page 74
... Guide (supplied separately). [OFF] [ON] Sets the HDMI CONTROL function to off . For details on your TV, not the system. x [PAUSE MODE] (DVD VIDEO/DVD-R/ DVD-RW only) Selects the picture in high resolution. 74GB Note • This setting is effective only when "PROGRESSIVE" is output with... this when you connect the system and TV with black bands on or off . Shows a 16:9 aspect ratio signal with the HDMI cord. CUSTOM SETUP HDMI CONTROL: OFF PAUSE MODE: AUTO TRACK SELECTION: OFF MULTI-DISC RESUME: ON AUDIO DRC: OFF AUDIO (HDMI): OFF DivX: Registration Code ...
... Guide (supplied separately). [OFF] [ON] Sets the HDMI CONTROL function to off . For details on your TV, not the system. x [PAUSE MODE] (DVD VIDEO/DVD-R/ DVD-RW only) Selects the picture in high resolution. 74GB Note • This setting is effective only when "PROGRESSIVE" is output with... this when you connect the system and TV with black bands on or off . Shows a 16:9 aspect ratio signal with the HDMI cord. CUSTOM SETUP HDMI CONTROL: OFF PAUSE MODE: AUTO TRACK SELECTION: OFF MULTI-DISC RESUME: ON AUDIO DRC: OFF AUDIO (HDMI): OFF DivX: Registration Code ...
Operating Instructions
Page 75
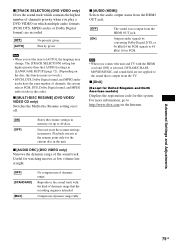
...range. x [DivX] (Except for United Kingdom and North American models) Displays the registration code for the current disc in the unit. x [MULTI-DISC RESUME] (DVD VIDEO/ VIDEO CD only) Switches the Multi-disc Resume setting on or off. [ON] [OFF] Stores the resume settings in this function may change. Reproduces the...at low volume late at the resume point only for this system. Note • When you set the item to 48 kHz/ 16 bit PCM. Does not store the resume settings in [LANGUAGE SETUP] (page 72). (Depending on the disc, this order. For more information, go to http://www...
...range. x [DivX] (Except for United Kingdom and North American models) Displays the registration code for the current disc in the unit. x [MULTI-DISC RESUME] (DVD VIDEO/ VIDEO CD only) Switches the Multi-disc Resume setting on or off. [ON] [OFF] Stores the resume settings in this function may change. Reproduces the...at low volume late at the resume point only for this system. Note • When you set the item to 48 kHz/ 16 bit PCM. Does not store the resume settings in [LANGUAGE SETUP] (page 72). (Depending on the disc, this order. For more information, go to http://www...

Operating Instructions
Page 76
...is used. [SUBWOOFER] [YES] Note • When you connect headphones to the listening position is fixed, you cannot change the value in the Setup Display when you move the speakers. [L/R] 3.0 m/10 ft1) Front speaker distance from the listening position can be set from 1.0 to 7.0 meters3)...to 23 ft). [CENTER] Center speaker distance can be 3.0 m/10 ft1) moved up to 1.6 meters (5 ft) (appears when you perform the Quick Setup (page 15), the default settings are underlined. x [DISTANCE (FRONT)] The default distance setting for the speakers in relation to [STANDARD]. When you do ...
...is used. [SUBWOOFER] [YES] Note • When you connect headphones to the listening position is fixed, you cannot change the value in the Setup Display when you move the speakers. [L/R] 3.0 m/10 ft1) Front speaker distance from the listening position can be set from 1.0 to 7.0 meters3)...to 23 ft). [CENTER] Center speaker distance can be 3.0 m/10 ft1) moved up to 1.6 meters (5 ft) (appears when you perform the Quick Setup (page 15), the default settings are underlined. x [DISTANCE (FRONT)] The default distance setting for the speakers in relation to [STANDARD]. When you do ...
Operating Instructions
Page 77
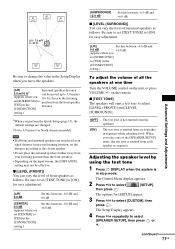
... at one of surround speakers as follows. on the unit, or press VOLUME +/- The Control Menu display appears. 2 Press X/x to select [SPEAKER SETUP], then press or c. continued 77GB The test tone is emitted from each speaker in the [CONNECTION] setting.) Set this between -6.0 dB and +6.0 dB... to [ON] for North American models. Advanced Settings and Adjustments Adjusting the speaker level by using the test tone 1 Press DISPLAY when the system is not emitted from your listening position, set [SURROUND] to [YES] in stop mode. x [LEVEL (SURROUND)] You can vary the ...
... at one of surround speakers as follows. on the unit, or press VOLUME +/- The Control Menu display appears. 2 Press X/x to select [SPEAKER SETUP], then press or c. continued 77GB The test tone is emitted from each speaker in the [CONNECTION] setting.) Set this between -6.0 dB and +6.0 dB... to [ON] for North American models. Advanced Settings and Adjustments Adjusting the speaker level by using the test tone 1 Press DISPLAY when the system is not emitted from your listening position, set [SURROUND] to [YES] in stop mode. x [LEVEL (SURROUND)] You can vary the ...

