

Limited Warranty (US Only)
Page 1
... degree of purchase in material or workmanship as fuses or batteries). Proof of protection, to any Sony authorized service facility. 4-557-172-02 General Stereo/Hifi Components/Tape Decks ® CD Players/Mini Disc Players/Audio Systems Hifi Audio LIMITED WARRANTY Sony Electronics Inc. ("Sony") warrants this Product is invalid if the factory applied serial number has been altered or removed from state to state. This warranty gives...
... degree of purchase in material or workmanship as fuses or batteries). Proof of protection, to any Sony authorized service facility. 4-557-172-02 General Stereo/Hifi Components/Tape Decks ® CD Players/Mini Disc Players/Audio Systems Hifi Audio LIMITED WARRANTY Sony Electronics Inc. ("Sony") warrants this Product is invalid if the factory applied serial number has been altered or removed from state to state. This warranty gives...
HDMI Control Guide
Page 2
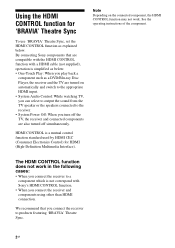
... connected by the HDMI cord (not supplied), you can not switch to the TV input mode even if connected by HDMI CEC (Consumer Electronics Control) for the HDMI CONTROL function To use the HDMI CONTROL function, make sure that you connect this case, turn the TV off automatically. A component does not have a HDMI terminal. Note • Do not use the THEATRE SYNC button on . 2US Note • Displayed items vary depending on TV setting, refer to the operating instructions...
... connected by the HDMI cord (not supplied), you can not switch to the TV input mode even if connected by HDMI CEC (Consumer Electronics Control) for the HDMI CONTROL function To use the HDMI CONTROL function, make sure that you connect this case, turn the TV off automatically. A component does not have a HDMI terminal. Note • Do not use the THEATRE SYNC button on . 2US Note • Displayed items vary depending on TV setting, refer to the operating instructions...
HDMI Control Guide
Page 3
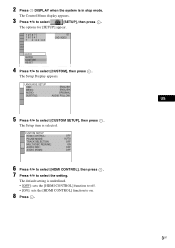
...HDMI CONTROL] function to off. • [ON]: sets the [HDMI CONTROL] function to select [CUSTOM SETUP], then press . 2 Press DISPLAY when the system is selected. CUSTOM SETUP HDMI CONTROL: PAUSE MODE: TRACK SELECTION: MULTI-DISC RESUME: AUDIO DRC: AUDIO (HDMI): OFF AUTO OFF ON OFF OFF 6 Press X/x to select [HDMI CONTROL], then press . 7 Press X/x to select [CUSTOM], then press . The options for [SETUP] appear. 1 2 ( 2 7 ) 1 8 ( 3 4 ) T 0:00:02 DVD VIDEO QUICK QUICK CUSTOM RESET BNR 4 Press X/x to select the setting. The Control Menu display appears. 3 Press X/x to select [SETUP...
...HDMI CONTROL] function to off. • [ON]: sets the [HDMI CONTROL] function to select [CUSTOM SETUP], then press . 2 Press DISPLAY when the system is selected. CUSTOM SETUP HDMI CONTROL: PAUSE MODE: TRACK SELECTION: MULTI-DISC RESUME: AUDIO DRC: AUDIO (HDMI): OFF AUTO OFF ON OFF OFF 6 Press X/x to select [HDMI CONTROL], then press . 7 Press X/x to select [CUSTOM], then press . The options for [SETUP] appear. 1 2 ( 2 7 ) 1 8 ( 3 4 ) T 0:00:02 DVD VIDEO QUICK QUICK CUSTOM RESET BNR 4 Press X/x to select the setting. The Control Menu display appears. 3 Press X/x to select [SETUP...
HDMI Control Guide
Page 2
... appropriate HDMI input. • System Audio Control: While watching TV, you can select to output the sound from the TV speaker or the speakers connected to the receiver. • System Power Off: When you play back a component such as below . Using the HDMI CONTROL function for HDMI (High-Definition Multimedia Interface). HDMI CONTROL is not correspond with a HDMI cable (not supplied), operation is simplified as a DVD/Blu-ray Disc Player, the receiver and the TV are turned on the connected component, the HDMI CONTROL function may not work in...
... appropriate HDMI input. • System Audio Control: While watching TV, you can select to output the sound from the TV speaker or the speakers connected to the receiver. • System Power Off: When you play back a component such as below . Using the HDMI CONTROL function for HDMI (High-Definition Multimedia Interface). HDMI CONTROL is not correspond with a HDMI cable (not supplied), operation is simplified as a DVD/Blu-ray Disc Player, the receiver and the TV are turned on the connected component, the HDMI CONTROL function may not work in...
HDMI Control Guide
Page 3
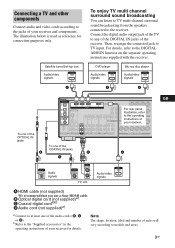
... multi channel surround sound broadcasting from the speakers connected to TV input. Audio/video signals A HDMI cable (not supplied) B We recommend that you use Optical digital cord (not asSuopnpyliHeDd)Ma)I cable. DVD player Blu-ray disc player Audio/video signals Audio/video signals A A To one of your receiver for connection purposes only. C Coaxial digital corda)b) D Audio cord (not supplied)a) a)Connect to at least one of the OPTICAL IN jacks B DIGITAL (ASSIGNABLE) SAT IN VIDEO 2/ BD IN VIDEO 1 IN OPTICAL SA-CD/ CD/CD-R IN DVD IN COAXIAL L L SAT IN ANTENNA AM L DVD...
... multi channel surround sound broadcasting from the speakers connected to TV input. Audio/video signals A HDMI cable (not supplied) B We recommend that you use Optical digital cord (not asSuopnpyliHeDd)Ma)I cable. DVD player Blu-ray disc player Audio/video signals Audio/video signals A A To one of your receiver for connection purposes only. C Coaxial digital corda)b) D Audio cord (not supplied)a) a)Connect to at least one of the OPTICAL IN jacks B DIGITAL (ASSIGNABLE) SAT IN VIDEO 2/ BD IN VIDEO 1 IN OPTICAL SA-CD/ CD/CD-R IN DVD IN COAXIAL L L SAT IN ANTENNA AM L DVD...
HDMI Control Guide
Page 4
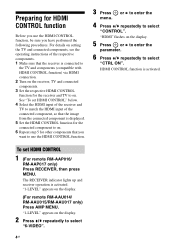
... and components (compatible with HDMI CONTROL function) via HDMI connection. 2 Turn on the receiver, TV and connected components. 3 Set the respective HDMI CONTROL function for the receiver and TV to select "6-VIDEO". 4GB "1-LEVEL" appears on the display. 2 Press V/v repeatedly to on. Preparing for HDMI CONTROL function Before you have performed the following procedures. The RECEIVER indicator lights up and receiver operation is activated. "1-LEVEL" appears on the display. (For remote RM-AAU014/ RM-AAU015/RM-AAU017 only) Press AMP MENU. For...
... and components (compatible with HDMI CONTROL function) via HDMI connection. 2 Turn on the receiver, TV and connected components. 3 Set the respective HDMI CONTROL function for the receiver and TV to select "6-VIDEO". 4GB "1-LEVEL" appears on the display. 2 Press V/v repeatedly to on. Preparing for HDMI CONTROL function Before you have performed the following procedures. The RECEIVER indicator lights up and receiver operation is activated. "1-LEVEL" appears on the display. (For remote RM-AAU014/ RM-AAU015/RM-AAU017 only) Press AMP MENU. For...
Operating Instructions
Page 4
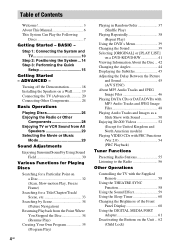
BASIC - Turning off the Demonstration 18 Installing the Speakers on a Wall.......... 19 Connecting the TV (Advanced 20 Connecting Other Components 24 Basic Operations Playing Discs 26 Enjoying the Radio or Other Components 28 Enjoying TV or VCR Sound from All Speakers 29 Selecting the Movie or Music Mode 29 Sound Adjustments Enjoying Surround Sound by Using Sound Field 30 Various Functions for Playing Discs Searching for a Particular Point on a Disc 32 (Scan, Slow-motion Play, Freeze Frame) Searching for...
BASIC - Turning off the Demonstration 18 Installing the Speakers on a Wall.......... 19 Connecting the TV (Advanced 20 Connecting Other Components 24 Basic Operations Playing Discs 26 Enjoying the Radio or Other Components 28 Enjoying TV or VCR Sound from All Speakers 29 Selecting the Movie or Music Mode 29 Sound Adjustments Enjoying Surround Sound by Using Sound Field 30 Various Functions for Playing Discs Searching for a Particular Point on a Disc 32 (Scan, Slow-motion Play, Freeze Frame) Searching for...
Operating Instructions
Page 11
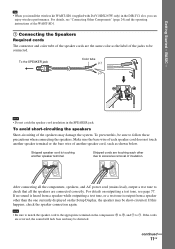
... DAV-HDX267W only) in the SPEAKER jack. For details on the components: 3 to 3, and # to the appropriate terminal on outputting a test tone, see "Connecting Other Components" (page 24) and the operating instructions of the WAHT-SD1. 1 Connecting the Speakers Required cords The connector and color tube of the speaker cords are touching each speaker cord does not touch another speaker terminal or the bare wire of insulation. If no sound is heard from a speaker...
... DAV-HDX267W only) in the SPEAKER jack. For details on the components: 3 to 3, and # to the appropriate terminal on outputting a test tone, see "Connecting Other Components" (page 24) and the operating instructions of the WAHT-SD1. 1 Connecting the Speakers Required cords The connector and color tube of the speaker cords are touching each speaker cord does not touch another speaker terminal or the bare wire of insulation. If no sound is heard from a speaker...

Operating Instructions
Page 16
... making noise during the measurement. Measurement complete. All connections and setup operations are complete. Set up the calibration mic at the ear level using a tripod, etc. (not supplied). FRONT L : YES FRONT R : YES CENTER : NONE SUBWOOFER : YES SURROUND L : NONE SURROUND R : NONE If OK, unplug calibration mic and select "YES". BASIC - Note • Loud test sound is installed may interfere with DAV-HDX267W only) is finished. AUDIO IN / A.CAL MIC Calibration mic 12 Press . You cannot turn the volume...
... making noise during the measurement. Measurement complete. All connections and setup operations are complete. Set up the calibration mic at the ear level using a tripod, etc. (not supplied). FRONT L : YES FRONT R : YES CENTER : NONE SUBWOOFER : YES SURROUND L : NONE SURROUND R : NONE If OK, unplug calibration mic and select "YES". BASIC - Note • Loud test sound is installed may interfere with DAV-HDX267W only) is finished. AUDIO IN / A.CAL MIC Calibration mic 12 Press . You cannot turn the volume...
Operating Instructions
Page 35
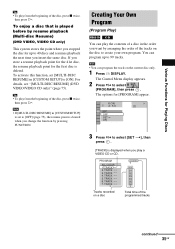
... play a VIDEO CD or CD. TRACK - - 7. TRACK - - 6. To activate this function, set to [OFF] (page 75), the resume point is played before by resume playback (Multi-disc Resume) (DVD VIDEO, VIDEO CD only) This system stores the point where you stopped the disc for up to 40 discs and resumes playback the next time you change the function by arranging the order of the tracks on the disc to select [PROGRAM...
... play a VIDEO CD or CD. TRACK - - 7. TRACK - - 6. To activate this function, set to [OFF] (page 75), the resume point is played before by resume playback (Multi-disc Resume) (DVD VIDEO, VIDEO CD only) This system stores the point where you stopped the disc for up to 40 discs and resumes playback the next time you change the function by arranging the order of the tracks on the disc to select [PROGRAM...
Operating Instructions
Page 43
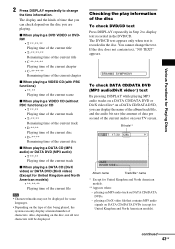
... audio signals on the type of disc being played, the system can only display a limited number of the disc To check DVD/CD text Press DISPLAY repeatedly in Step 2 to change the text. Also, depending on your TV screen. You cannot change the time information. BRAHMS SYMPHONY To check DATA CD/DATA DVD (MP3 audio/DivX video*) text By pressing DISPLAY while playing MP3 audio tracks on a DATA CD/DATA DVD or DivX video...
... audio signals on the type of disc being played, the system can only display a limited number of the disc To check DVD/CD text Press DISPLAY repeatedly in Step 2 to change the text. Also, depending on your TV screen. You cannot change the time information. BRAHMS SYMPHONY To check DATA CD/DATA DVD (MP3 audio/DivX video*) text By pressing DISPLAY while playing MP3 audio tracks on a DATA CD/DATA DVD or DivX video...
Operating Instructions
Page 67
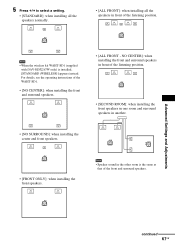
...]: when installing the front speakers. For details, see the operating instructions of the listening position. 5 Press C/c to select a setting. • [STANDARD]: when installing all the speakers normally. • [ALL FRONT]: when installing all the speakers in front of the WAHT-SD1. • [NO CENTER]: when installing the front and surround speakers. • [ALL FRONT - Note • When the wireless kit WAHT-SD1 (supplied with DAV-HDX267W only...
...]: when installing the front speakers. For details, see the operating instructions of the listening position. 5 Press C/c to select a setting. • [STANDARD]: when installing all the speakers normally. • [ALL FRONT]: when installing all the speakers in front of the WAHT-SD1. • [NO CENTER]: when installing the front and surround speakers. • [ALL FRONT - Note • When the wireless kit WAHT-SD1 (supplied with DAV-HDX267W only...

Operating Instructions
Page 68
.... 1 Press FUNCTION repeatedly until "DVD" appears in the front panel display. 2 Press DISPLAY when the system is output when [AUTO CALIBRATION] starts. SPEAKER FORMATION Continue with [AUTO CALIBRATION], see the operating instructions of the WAHTSD1. 6 Press . It does not indicate the speakers which output sound. • When you change the position of "Calibrating the Appropriate Settings Automatically" (page 68). • [NO]: exit [SPEAKER FORMATION]. AUTO CALIBRATION Connect calibration mic. The Control Menu display appears. 3 Press X/x to select [SPEAKER FORMATION], then...
.... 1 Press FUNCTION repeatedly until "DVD" appears in the front panel display. 2 Press DISPLAY when the system is output when [AUTO CALIBRATION] starts. SPEAKER FORMATION Continue with [AUTO CALIBRATION], see the operating instructions of the WAHTSD1. 6 Press . It does not indicate the speakers which output sound. • When you change the position of "Calibrating the Appropriate Settings Automatically" (page 68). • [NO]: exit [SPEAKER FORMATION]. AUTO CALIBRATION Connect calibration mic. The Control Menu display appears. 3 Press X/x to select [SPEAKER FORMATION], then...
Operating Instructions
Page 74
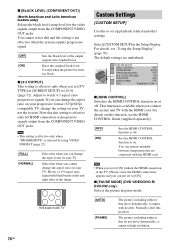
... HDMI cord. CUSTOM SETUP HDMI CONTROL: OFF PAUSE MODE: AUTO TRACK SELECTION: OFF MULTI-DISC RESUME: ON AUDIO DRC: OFF AUDIO (HDMI): OFF DivX: Registration Code x [HDMI CONTROL] Switches the HDMI CONTROL function on this function, see "Using the Setup Display" (page 70). Adjust to [ON]. This function is available when you set [TV TYPE] in high resolution. 74GB x [4:3 OUTPUT] This setting is output in [SCREEN SETUP] to off . Select this when you can change the aspect ratio on your progressive format (525p/625p) compatible TV, change...
... HDMI cord. CUSTOM SETUP HDMI CONTROL: OFF PAUSE MODE: AUTO TRACK SELECTION: OFF MULTI-DISC RESUME: ON AUDIO DRC: OFF AUDIO (HDMI): OFF DivX: Registration Code x [HDMI CONTROL] Switches the HDMI CONTROL function on this function, see "Using the Setup Display" (page 70). Adjust to [ON]. This function is available when you set [TV TYPE] in high resolution. 74GB x [4:3 OUTPUT] This setting is output in [SCREEN SETUP] to off . Select this when you can change the aspect ratio on your progressive format (525p/625p) compatible TV, change...

Operating Instructions
Page 76
... test tone to adjust the level and the balance of the speakers and their distance from the front speaker distance. [YES] in the [CONNECTION] setting.) 1)When you change them. [FRONT] [YES] [CENTER] [YES]: Normally select this. [NONE]: Select this if no center speaker is used . [SUBWOOFER] [YES] Note • When you perform the Quick Setup (page 15), the default settings are underlined. Settings for the Speakers [SPEAKER SETUP] To obtain the best possible surround sound, set connection of the speakers...
... test tone to adjust the level and the balance of the speakers and their distance from the front speaker distance. [YES] in the [CONNECTION] setting.) 1)When you change them. [FRONT] [YES] [CENTER] [YES]: Normally select this. [NONE]: Select this if no center speaker is used . [SUBWOOFER] [YES] Note • When you perform the Quick Setup (page 15), the default settings are underlined. Settings for the Speakers [SPEAKER SETUP] To obtain the best possible surround sound, set connection of the speakers...

Operating Instructions
Page 82
... the front panel display. Insert the disc with automatic tuning). No sound or only a very low-level sound is not recorded in a JPEG format that are indicated in the front panel display. • The front panel display indicates the selected [SPEAKER FORMATION]. Adjust the antenna (aerial) or connect an external antenna (aerial) if necessary. • The signal strength of the center speaker may cause damage to hear when you are weak. Preset the stations (page...
... the front panel display. Insert the disc with automatic tuning). No sound or only a very low-level sound is not recorded in a JPEG format that are indicated in the front panel display. • The front panel display indicates the selected [SPEAKER FORMATION]. Adjust the antenna (aerial) or connect an external antenna (aerial) if necessary. • The signal strength of the center speaker may cause damage to hear when you are weak. Preset the stations (page...
Operating Instructions
Page 85
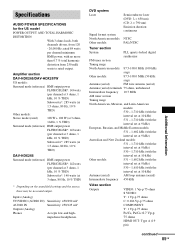
... ohms HDMI OUT: Type A (19 pin) continued 85GB Inputs (Analog) TV/VIDEO (AUDIO IN) AUDIO IN Outputs (Analog) Phones Sensitivity: 450/250 mV Sensitivity: 250/125 mV Accepts low-and highimpedance headphones. Amplifier section DAV-HDX265/DAV-HDX267W US models: Surround mode (reference) RMS output power FL/FR/C/SL/SR*: 143 watts (per channel at 3 ohms, 1 kHz, 10 % THD) Subwoofer*: 285 watts (at 1.5 ohms, 80 Hz, 10 % THD) Other models: Stereo mode (rated...
... ohms HDMI OUT: Type A (19 pin) continued 85GB Inputs (Analog) TV/VIDEO (AUDIO IN) AUDIO IN Outputs (Analog) Phones Sensitivity: 450/250 mV Sensitivity: 250/125 mV Accepts low-and highimpedance headphones. Amplifier section DAV-HDX265/DAV-HDX267W US models: Surround mode (reference) RMS output power FL/FR/C/SL/SR*: 143 watts (per channel at 3 ohms, 1 kHz, 10 % THD) Subwoofer*: 285 watts (at 1.5 ohms, 80 Hz, 10 % THD) Other models: Stereo mode (rated...
Operating Instructions
Page 100
... 16:9 72 4:3 LETTER BOX 72 4:3 OUTPUT 74 4:3 PAN SCAN 72 5.1 Channel Surround 40 A A/V SYNC 45 ALBUM 33 Album 87 ANGLE 44 ATTENUATE 28 AUDIO 72 AUDIO (HDMI) 75 AUDIO DRC 75 Auto Calibration 68, 87 B BACKGROUND 73 Batteries 9 BLACK LEVEL 73 BLACK LEVEL (COMPONENT OUT) 74 C CHAPTER 33 Chapter 87 Child Lock 62 COLD RESET 78 COLOR SYSTEM (VIDEO CD) 73 COMPONENT VIDEO OUT 22 Continuous play 26 Control Menu Display 95 Controlling the TV 58...
... 16:9 72 4:3 LETTER BOX 72 4:3 OUTPUT 74 4:3 PAN SCAN 72 5.1 Channel Surround 40 A A/V SYNC 45 ALBUM 33 Album 87 ANGLE 44 ATTENUATE 28 AUDIO 72 AUDIO (HDMI) 75 AUDIO DRC 75 Auto Calibration 68, 87 B BACKGROUND 73 Batteries 9 BLACK LEVEL 73 BLACK LEVEL (COMPONENT OUT) 74 C CHAPTER 33 Chapter 87 Child Lock 62 COLD RESET 78 COLOR SYSTEM (VIDEO CD) 73 COMPONENT VIDEO OUT 22 Continuous play 26 Control Menu Display 95 Controlling the TV 58...
Marketing Specifications
Page 1
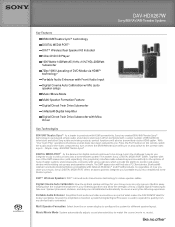
DAV-HDX267W Sony® BRAVIA® Theater System Key Features BRAVIA® Theatre Sync™ technology DIGITAL MEDIA PORT5 DIAT™ Wireless Rear Speaker Kit Included 5 Disc DVD/CD Player1 1000 Watts-143WattsX5 (1kHz,
DAV-HDX267W Sony® BRAVIA® Theater System Key Features BRAVIA® Theatre Sync™ technology DIGITAL MEDIA PORT5 DIAT™ Wireless Rear Speaker Kit Included 5 Disc DVD/CD Player1 1000 Watts-143WattsX5 (1kHz,
Marketing Specifications
Page 2
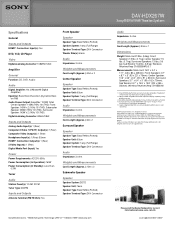
..., Theatre Sync, Network Walkman, S-master and Remote Commander are approximate. All weights and measures are trademarks of HDMI Licensing LLC. Surround Speakers: 3.7" x 6.4" x 3" (93 x 162 x 75mm); Requires Digital Media Port accessory compatible with the device (sold separately). ©2007 Sony Electronics Inc. Specifications General Inputs and Outputs HDMI™ Connection Input(s): Yes DVD, VCD, CD Player Video Digital-to-Analog Converter: 108MHz/12bit Amplifier General Function: CD, DVD, Audio Audio Digital Amplifier: Yes (S-Master® Digital Amplifier) Equalizer: Bass...
..., Theatre Sync, Network Walkman, S-master and Remote Commander are approximate. All weights and measures are trademarks of HDMI Licensing LLC. Surround Speakers: 3.7" x 6.4" x 3" (93 x 162 x 75mm); Requires Digital Media Port accessory compatible with the device (sold separately). ©2007 Sony Electronics Inc. Specifications General Inputs and Outputs HDMI™ Connection Input(s): Yes DVD, VCD, CD Player Video Digital-to-Analog Converter: 108MHz/12bit Amplifier General Function: CD, DVD, Audio Audio Digital Amplifier: Yes (S-Master® Digital Amplifier) Equalizer: Bass...


