HDMI Control Guide
Page 2
..., make sure that are compatible with the HDMI CONTROL function with Sony's HDMI CONTROL function. - The system turns on the country model. 1 Press "/1. By connecting Sony components that this system to come out of the system. • Depending on TV setting, refer to the operating instructions...component. • When [HDMI CONTROL] is for this system to the operating instructions supplied with the TV. Note • Displayed items vary depending on . 2US A component does not have a HDMI terminal. Then set for DVD input mode automatically. - One-Touch Play: By pressing ...
..., make sure that are compatible with the HDMI CONTROL function with Sony's HDMI CONTROL function. - The system turns on the country model. 1 Press "/1. By connecting Sony components that this system to come out of the system. • Depending on TV setting, refer to the operating instructions...component. • When [HDMI CONTROL] is for this system to the operating instructions supplied with the TV. Note • Displayed items vary depending on . 2US A component does not have a HDMI terminal. Then set for DVD input mode automatically. - One-Touch Play: By pressing ...
HDMI Control Guide
Page 3
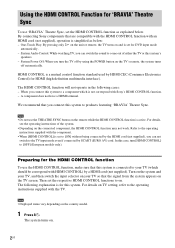
The options for [SETUP] appear. 1 2 ( 2 7 ) 1 8 ( 3 4 ) T 0:00:02 DVD VIDEO QUICK QUICK CUSTOM RESET BNR 4 Press X/x to select [CUSTOM SETUP], then press . 2 Press DISPLAY when the system is underlined. • [OFF]: sets the [HDMI CONTROL] function to off. • [ON]: sets the [HDMI CONTROL] function ...item is selected. The Control Menu display appears. 3 Press X/x to select the setting. CUSTOM SETUP HDMI CONTROL: PAUSE MODE: TRACK SELECTION: MULTI-DISC RESUME: AUDIO DRC: AUDIO (HDMI): OFF AUTO OFF ON OFF OFF 6 Press X/x to select [HDMI CONTROL], then press . 7 Press X/x ...
The options for [SETUP] appear. 1 2 ( 2 7 ) 1 8 ( 3 4 ) T 0:00:02 DVD VIDEO QUICK QUICK CUSTOM RESET BNR 4 Press X/x to select [CUSTOM SETUP], then press . 2 Press DISPLAY when the system is underlined. • [OFF]: sets the [HDMI CONTROL] function to off. • [ON]: sets the [HDMI CONTROL] function ...item is selected. The Control Menu display appears. 3 Press X/x to select the setting. CUSTOM SETUP HDMI CONTROL: PAUSE MODE: TRACK SELECTION: MULTI-DISC RESUME: AUDIO DRC: AUDIO (HDMI): OFF AUTO OFF ON OFF OFF 6 Press X/x to select [HDMI CONTROL], then press . 7 Press X/x ...
HDMI Control Guide
Page 4
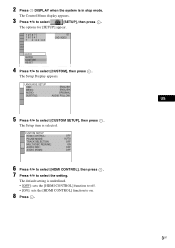
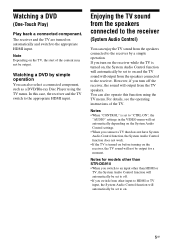
... see the operating instructions of the content may not be output. Watching DVD by a single button press (One-Touch Play) Press H on the system, One-Touch Play is activated. Note • When a CD/DATA-CD is operated with System Audio Control at the same time. Tip • One-Touch Play ...the active picture is output from the TV, set the function to "TV" (depending on the TV, the start of the system. 4US For details, see the operating instructions of disc. • When the "DMPORT" function (depending on the model, "DMPORT1" or "DMPORT2" appears) is active, OneTouch Play ...
... see the operating instructions of the content may not be output. Watching DVD by a single button press (One-Touch Play) Press H on the system, One-Touch Play is activated. Note • When a CD/DATA-CD is operated with System Audio Control at the same time. Tip • One-Touch Play ...the active picture is output from the TV, set the function to "TV" (depending on the TV, the start of the system. 4US For details, see the operating instructions of disc. • When the "DMPORT" function (depending on the model, "DMPORT1" or "DMPORT2" appears) is active, OneTouch Play ...
HDMI Control Guide
Page 2
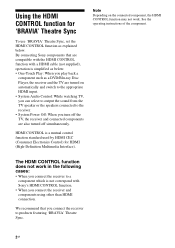
...HDMI CONTROL function for HDMI (High-Definition Multimedia Interface). Note Depending on automatically and switch to the appropriate HDMI input. • System Audio Control: While watching TV, you can select to output the sound from the TV speaker or the speakers connected to the receiver. ...) for 'BRAVIA' Theatre Sync To use 'BRAVIA' Theatre Sync, set the HDMI CONTROL function as a DVD/Blu-ray Disc Player, the receiver and the TV are compatible with the HDMI CONTROL function with Sony's HDMI CONTROL function. • When you play back a component such as explained below : • ...
...HDMI CONTROL function for HDMI (High-Definition Multimedia Interface). Note Depending on automatically and switch to the appropriate HDMI input. • System Audio Control: While watching TV, you can select to output the sound from the TV speaker or the speakers connected to the receiver. ...) for 'BRAVIA' Theatre Sync To use 'BRAVIA' Theatre Sync, set the HDMI CONTROL function as a DVD/Blu-ray Disc Player, the receiver and the TV are compatible with the HDMI CONTROL function with Sony's HDMI CONTROL function. • When you play back a component such as explained below : • ...
HDMI Control Guide
Page 3
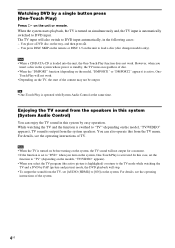
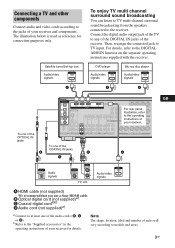
... enjoy TV multi channel surround sound broadcasting You can listen to TV multi channel surround sound broadcasting from the speakers connected to TV input. DVD player Blu-ray disc player Audio/video signals Audio/video signals A A To one of the COAXIAL IN jacks D A C GB Audio signals DIGITAL COAXIAL TV, etc. b)... To one of the OPTICAL IN jacks B DIGITAL (ASSIGNABLE) SAT IN VIDEO 2/ BD IN VIDEO 1 IN OPTICAL SA-CD/ CD/CD-R IN DVD IN COAXIAL L L SAT IN ANTENNA AM L DVD IN VIDEO 2/BD IN OUT HDMI FoYr rear panel VIDEO IN VIDEO IN VIDEO OUT VIDEO IN VIDEO OUT VIDEO IN VIDEO...
... enjoy TV multi channel surround sound broadcasting You can listen to TV multi channel surround sound broadcasting from the speakers connected to TV input. DVD player Blu-ray disc player Audio/video signals Audio/video signals A A To one of the COAXIAL IN jacks D A C GB Audio signals DIGITAL COAXIAL TV, etc. b)... To one of the OPTICAL IN jacks B DIGITAL (ASSIGNABLE) SAT IN VIDEO 2/ BD IN VIDEO 1 IN OPTICAL SA-CD/ CD/CD-R IN DVD IN COAXIAL L L SAT IN ANTENNA AM L DVD IN VIDEO 2/BD IN OUT HDMI FoYr rear panel VIDEO IN VIDEO IN VIDEO OUT VIDEO IN VIDEO OUT VIDEO IN VIDEO...
HDMI Control Guide
Page 5
...sound from the speakers connected to the receiver (System Audio Control) You can also operate this case, the receiver and the TV switch to the receiver by simple operation You can also select a connected component, such as a DVD/Blu-ray Disc Player using the TV menu. For details, see ...the operating instructions of the content may not be set automatically depending on the System Audio Control settings. • When you turn on the receiver while the...
...sound from the speakers connected to the receiver (System Audio Control) You can also operate this case, the receiver and the TV switch to the receiver by simple operation You can also select a connected component, such as a DVD/Blu-ray Disc Player using the TV menu. For details, see ...the operating instructions of the content may not be set automatically depending on the System Audio Control settings. • When you turn on the receiver while the...
Operating Instructions
Page 1
2-895-959-11(1) DVD Home Theatre System Operating Instructions * *DAV-HDX265/HDX267W only DAV-HDX265/HDX266/HDX267W ©2007 Sony Corporation
2-895-959-11(1) DVD Home Theatre System Operating Instructions * *DAV-HDX265/HDX267W only DAV-HDX265/HDX266/HDX267W ©2007 Sony Corporation
Operating Instructions
Page 3
... personnel. Servicing is required when the apparatus has been damaged in particular, specifies that the cable ground shall be connected to the grounding system of the building, as close to the wall outlet (mains), even if the unit itself has been turned off. • Install ...this apparatus during lightning storms or when unused for future reference. 13) Unplug this system so that provides guidelines for purchasing Sony DVD Home Theatre System. This marking is connected to the point of it is located on the rear exterior. Don't throw away the ...
... personnel. Servicing is required when the apparatus has been damaged in particular, specifies that the cable ground shall be connected to the grounding system of the building, as close to the wall outlet (mains), even if the unit itself has been turned off. • Install ...this apparatus during lightning storms or when unused for future reference. 13) Unplug this system so that provides guidelines for purchasing Sony DVD Home Theatre System. This marking is connected to the point of it is located on the rear exterior. Don't throw away the ...
Operating Instructions
Page 4
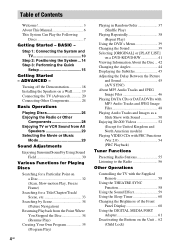
... 1: Connecting the System and TV 10 Step 2: Positioning the System ...14 Step 3: Performing the Quick Setup 15 Getting Started - Turning off the Demonstration 18 Installing the Speakers on a Wall.......... 19 Connecting the TV (Advanced 20 Connecting Other Components 24 Basic Operations Playing Discs 26 Enjoying the Radio... 41 Viewing Information About the Disc ... 42 Changing the Angles 44 Displaying the Subtitles 45 Adjusting the Delay Between the Picture and Sound 45 (A/V SYNC) About MP3 Audio Tracks and JPEG Image Files 46 Playing DATA CDs or DATA DVDs with MP3 Audio Tracks and...
... 1: Connecting the System and TV 10 Step 2: Positioning the System ...14 Step 3: Performing the Quick Setup 15 Getting Started - Turning off the Demonstration 18 Installing the Speakers on a Wall.......... 19 Connecting the TV (Advanced 20 Connecting Other Components 24 Basic Operations Playing Discs 26 Enjoying the Radio... 41 Viewing Information About the Disc ... 42 Changing the Angles 44 Displaying the Subtitles 45 Adjusting the Delay Between the Picture and Sound 45 (A/V SYNC) About MP3 Audio Tracks and JPEG Image Files 46 Playing DATA CDs or DATA DVDs with MP3 Audio Tracks and...
Operating Instructions
Page 5
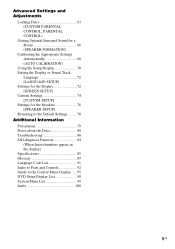
Advanced Settings and Adjustments Locking Discs 63 (CUSTOM PARENTAL CONTROL, PARENTAL CONTROL) Getting Optimal Surround Sound for a Room 66 (SPEAKER FORMATION) Calibrating the Appropriate Settings Automatically 68 (AUTO CALIBRATION) Using ... Custom Settings 74 [CUSTOM SETUP] Settings for the Speakers 76 [SPEAKER SETUP] Returning to the Default Settings.......... 78 Additional Information Precautions 79 Notes about the Discs 80 Troubleshooting 80 Self-diagnosis Function 84 (When letters/numbers appear in the display) Specifications 85 Glossary 87 Language Code List 91 Index to Parts...
Advanced Settings and Adjustments Locking Discs 63 (CUSTOM PARENTAL CONTROL, PARENTAL CONTROL) Getting Optimal Surround Sound for a Room 66 (SPEAKER FORMATION) Calibrating the Appropriate Settings Automatically 68 (AUTO CALIBRATION) Using ... Custom Settings 74 [CUSTOM SETUP] Settings for the Speakers 76 [SPEAKER SETUP] Returning to the Default Settings.......... 78 Additional Information Precautions 79 Notes about the Discs 80 Troubleshooting 80 Self-diagnosis Function 84 (When letters/numbers appear in the display) Specifications 85 Glossary 87 Language Code List 91 Index to Parts...
Operating Instructions
Page 6
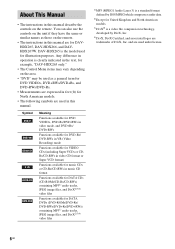
...VCD format) Functions available for music CDs or CD-Rs/CD-RWs in music CD format Functions available for DATA CDs (CD-ROMs/CD-Rs/CD-RWs) containing MP31) audio tracks, JPEG image files, and DivX2)3)4) video files Functions available for DATA DVDs (DVD-ROMs/DVD-Rs/ DVD-RWs/DVD+Rs/DVD+RWs) containing MP31) audio tracks... models. 3) DivX® is clearly indicated in the text, for example, "DAV-HDX265 only." • The Control Menu items may be used as a general term for DVD VIDEOs, DVD+RWs/DVD+Rs, and DVD-RWs/DVD-Rs. • Measurements are expressed in feet (ft) for North American models....
...VCD format) Functions available for music CDs or CD-Rs/CD-RWs in music CD format Functions available for DATA CDs (CD-ROMs/CD-Rs/CD-RWs) containing MP31) audio tracks, JPEG image files, and DivX2)3)4) video files Functions available for DATA DVDs (DVD-ROMs/DVD-Rs/ DVD-RWs/DVD+Rs/DVD+RWs) containing MP31) audio tracks... models. 3) DivX® is clearly indicated in the text, for example, "DAV-HDX265 only." • The Control Menu items may be used as a general term for DVD VIDEOs, DVD+RWs/DVD+Rs, and DVD-RWs/DVD-Rs. • Measurements are expressed in feet (ft) for North American models....
Operating Instructions
Page 7
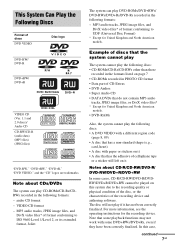
... format, Joliet The system can play DVD-ROMs/DVD+RWs/ DVD-RWs/DVD+Rs/DVD-Rs recorded in the following discs: • A DVD VIDEO with a different region code (page 8, 89) • A disc that has the adhesive of discs DVD VIDEO Disc logo DVD-RW/ DVD-R DVD+RW/ DVD+R VIDEO CD (Ver. 1.1 and 2.0 discs)/ Audio CD CD-RW/CD-R (audio data) (MP3 files) (JPEG files) "DVD-RW," "DVD+RW," "DVD+R," "DVD VIDEO," and the "CD" logos are...
... format, Joliet The system can play DVD-ROMs/DVD+RWs/ DVD-RWs/DVD+Rs/DVD-Rs recorded in the following discs: • A DVD VIDEO with a different region code (page 8, 89) • A disc that has the adhesive of discs DVD VIDEO Disc logo DVD-RW/ DVD-R DVD+RW/ DVD+R VIDEO CD (Ver. 1.1 and 2.0 discs)/ Audio CD CD-RW/CD-R (audio data) (MP3 files) (JPEG files) "DVD-RW," "DVD+RW," "DVD+R," "DVD VIDEO," and the "CD" logos are...
Operating Instructions
Page 8
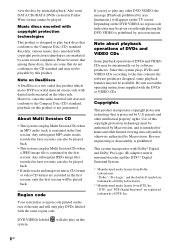
...intentionally set by area limitations.] will appear on this system plays DVDs and VIDEO CDs according to the Compact Disc (CD) standard. Note about playback operations of DVDs and VIDEO CDs Some playback operations of DVDs and VIDEO CDs may not be played. Be sure to play any... other intellectual property rights. Reverse engineering or disassembly is intended for home ...
...intentionally set by area limitations.] will appear on this system plays DVDs and VIDEO CDs according to the Compact Disc (CD) standard. Note about playback operations of DVDs and VIDEO CDs Some playback operations of DVDs and VIDEO CDs may not be played. Be sure to play any... other intellectual property rights. Reverse engineering or disassembly is intended for home ...
Operating Instructions
Page 10
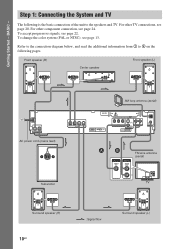
...) Y PB/CB PR/CR R AUDIO IN L (DVD ONLY) COMPONENT VIDEO OUT S VIDEO (DVD ONLY) VIDEO MONITOR OUT DMPORT TV/VIDEO AM FM 75 COAXIAL ANTENNA A B FM wire antenna (aerial) VIDEO IN AUDIO OUT L R TV Surround speaker (R) 10GB :Signal flow Surround speaker (L) Step 1: Connecting the System and TV The following pages. Getting Started - To...
...) Y PB/CB PR/CR R AUDIO IN L (DVD ONLY) COMPONENT VIDEO OUT S VIDEO (DVD ONLY) VIDEO MONITOR OUT DMPORT TV/VIDEO AM FM 75 COAXIAL ANTENNA A B FM wire antenna (aerial) VIDEO IN AUDIO OUT L R TV Surround speaker (R) 10GB :Signal flow Surround speaker (L) Step 1: Connecting the System and TV The following pages. Getting Started - To...
Operating Instructions
Page 15
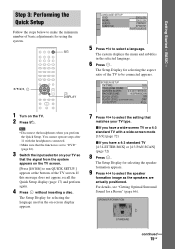
... 9 Press C/c to be connected appears. The system displays the menu and subtitles in the on your TV type. The Setup Display for using the system. "/1 C/X/x/c, DISPLAY LANGUAGE SETUP OSD: MENU: AUDIO... appear, recall the Quick Setup display (page 17) and perform again. 4 Press without inserting a disc. SPEAKER FORMATION STANDARD continued 15GB The Setup Display for a Room" (page 66). Note • ... 4:3 standard TV with the headphones connected. • Make sure that the signal from the system appears on the TV. 2 Press [/1. Step 3: Performing the Quick Setup Follow the steps ...
... 9 Press C/c to be connected appears. The system displays the menu and subtitles in the on your TV type. The Setup Display for using the system. "/1 C/X/x/c, DISPLAY LANGUAGE SETUP OSD: MENU: AUDIO... appear, recall the Quick Setup display (page 17) and perform again. 4 Press without inserting a disc. SPEAKER FORMATION STANDARD continued 15GB The Setup Display for a Room" (page 66). Note • ... 4:3 standard TV with the headphones connected. • Make sure that the signal from the system appears on the TV. 2 Press [/1. Step 3: Performing the Quick Setup Follow the steps ...

Operating Instructions
Page 17
... select [QUICK], then press . To recall the Quick Setup display 1 Press DISPLAY when the system is in stop mode. The Quick Setup display appears. 17GB BASIC - See "Getting Optimal Surround Sound for [SETUP] appear. 1 2 ( 2 7 ) 1 8 ( 3 4 ) T 0:00:02 DVD VIDEO QUICK QUICK CUSTOM RESET BNR 3 Press X/x to change the position of the settings, see...
... select [QUICK], then press . To recall the Quick Setup display 1 Press DISPLAY when the system is in stop mode. The Quick Setup display appears. 17GB BASIC - See "Getting Optimal Surround Sound for [SETUP] appear. 1 2 ( 2 7 ) 1 8 ( 3 4 ) T 0:00:02 DVD VIDEO QUICK QUICK CUSTOM RESET BNR 3 Press X/x to change the position of the settings, see...

Operating Instructions
Page 20
... CENTER WOOFER SPEAKER To HDMI* OUT To S VIDEO FRONT R FRONT L SUR R SPEAKER SUR L DIR-TC1 OUT (DVD ONLY) Y PB/CB PR/CR R AUDIO IN L (DVD ONLY) COMPONENT VIDEO OUT S VIDEO (DVD ONLY) VIDEO MONITOR OUT DMPORT TV/VIDEO AM FM 75 COAXIAL ANTENNA To COMPONENT VIDEO OUT To VIDEO C Y PB.../CB PR/CR A VIDEO IN B S VIDEO IN TV with COMPONENT VIDEO IN jacks TV with VIDEO IN jack :Signal flow TV with S VIDEO IN jack * HDMI (high-definition multimedia interface) The system...
... CENTER WOOFER SPEAKER To HDMI* OUT To S VIDEO FRONT R FRONT L SUR R SPEAKER SUR L DIR-TC1 OUT (DVD ONLY) Y PB/CB PR/CR R AUDIO IN L (DVD ONLY) COMPONENT VIDEO OUT S VIDEO (DVD ONLY) VIDEO MONITOR OUT DMPORT TV/VIDEO AM FM 75 COAXIAL ANTENNA To COMPONENT VIDEO OUT To VIDEO C Y PB.../CB PR/CR A VIDEO IN B S VIDEO IN TV with COMPONENT VIDEO IN jacks TV with VIDEO IN jack :Signal flow TV with S VIDEO IN jack * HDMI (high-definition multimedia interface) The system...
Operating Instructions
Page 21
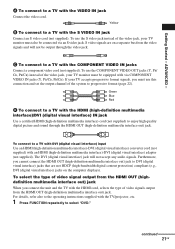
...the S video jack instead of the video jack, your TV monitor must be equipped with the HDMI cord, selects the type of the system to a TV with an HDMI (high-definition multimedia interface)-DVI (digital visual interface) adaptor (not supplied). To use this connection and set...(high-definition multimedia interface)/DVI (digital visual interface) IN jack Use a certified HDMI (high-definition multimedia interface) cord (not supplied) to select "DVD." The DVI (digital visual interface) jack will not be connected via COMPONENT VIDEO IN jacks (Y, PB/CB, PR/CR). ADVANCED - Green Blue ...
...the S video jack instead of the video jack, your TV monitor must be equipped with the HDMI cord, selects the type of the system to a TV with an HDMI (high-definition multimedia interface)-DVI (digital visual interface) adaptor (not supplied). To use this connection and set...(high-definition multimedia interface)/DVI (digital visual interface) IN jack Use a certified HDMI (high-definition multimedia interface) cord (not supplied) to select "DVD." The DVI (digital visual interface) jack will not be connected via COMPONENT VIDEO IN jacks (Y, PB/CB, PR/CR). ADVANCED - Green Blue ...

Operating Instructions
Page 22
...may not fit your TV accept progressive signals? To change the aspect ratio, see page 72. When connecting to a standard 4:3 screen TV Depending on the disc, the image may appear. To display using this method, you press VIDEO FORMAT, the display changes as follows: t 720 × 480p* r 1280 &#... the method for displaying TV images which reduces flickering, and sharpens the image. 2 Press VIDEO FORMAT. Each time you need to connect to select "DVD." 22GB FUNCTION VIDEO FORMAT "PROGRE" lights up , images other than [720 × 480p] or [720 × 576p] are stretched vertically....
...may not fit your TV accept progressive signals? To change the aspect ratio, see page 72. When connecting to a standard 4:3 screen TV Depending on the disc, the image may appear. To display using this method, you press VIDEO FORMAT, the display changes as follows: t 720 × 480p* r 1280 &#... the method for displaying TV images which reduces flickering, and sharpens the image. 2 Press VIDEO FORMAT. Each time you need to connect to select "DVD." 22GB FUNCTION VIDEO FORMAT "PROGRE" lights up , images other than [720 × 480p] or [720 × 576p] are stretched vertically....

Operating Instructions
Page 23
x PROGRESSIVE Select this setting when: - Tip • When you connect the unit and the TV with the HDMI cord during the system is set to "NORMAL (INTERLACE)," the system is derived from TV, such as dramas and sit-coms, and displays images at 24 frames per second. Film-based software is used ... in the interlace format. 23GB Even though you select these images to appear natural on your TV is connected to match the type of DVD software that the picture will not be clear or no picture will appear if you set to the conversion process when output through the COMPONENT...
x PROGRESSIVE Select this setting when: - Tip • When you connect the unit and the TV with the HDMI cord during the system is set to "NORMAL (INTERLACE)," the system is derived from TV, such as dramas and sit-coms, and displays images at 24 frames per second. Film-based software is used ... in the interlace format. 23GB Even though you select these images to appear natural on your TV is connected to match the type of DVD software that the picture will not be clear or no picture will appear if you set to the conversion process when output through the COMPONENT...


