
Limited Warranty (US Only)
Page 1
..., Sony will supply, at no charge, new or rebuilt replacements in exchange for defective parts for all parts costs. 3. This warranty does not cover customer instruction, installation, set up adjustments or signal reception problems. This warranty does not cover cosmetic damage or damage due to acts of God, accident, misuse, abuse, negligence, commercial use, or modification of, or to obtain warranty service...
..., Sony will supply, at no charge, new or rebuilt replacements in exchange for defective parts for all parts costs. 3. This warranty does not cover customer instruction, installation, set up adjustments or signal reception problems. This warranty does not cover cosmetic damage or damage due to acts of God, accident, misuse, abuse, negligence, commercial use, or modification of, or to obtain warranty service...
HDMI Control Guide
Page 2
... turns on the remote while the HDMI CONTROL function is set to [ON] without being connected by the HDMI cord (not supplied), you can not switch to the TV input mode even if connected by HDMI CEC (Consumer Electronics Control) for DVD input mode automatically. - System Power Off: When you connect this case, turn the TV off automatically. Note • Do not use the HDMI CONTROL function, make sure that are compatible with the HDMI CONTROL function with Sony's HDMI CONTROL function. - The following cases: - A component...
... turns on the remote while the HDMI CONTROL function is set to [ON] without being connected by the HDMI cord (not supplied), you can not switch to the TV input mode even if connected by HDMI CEC (Consumer Electronics Control) for DVD input mode automatically. - System Power Off: When you connect this case, turn the TV off automatically. Note • Do not use the HDMI CONTROL function, make sure that are compatible with the HDMI CONTROL function with Sony's HDMI CONTROL function. - The following cases: - A component...
HDMI Control Guide
Page 3
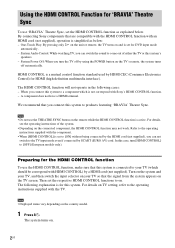
... SETUP OSD: MENU: AUDIO: SUBTITLE: ENGLISH ENGLISH ORIGINAL AUDIO FOLLOW GUSB 5 Press X/x to select the setting. The Setup item is in stop mode. The default setting is underlined. • [OFF]: sets the [HDMI CONTROL] function to off. • [ON]: sets the [HDMI CONTROL] function to select [CUSTOM], then press . The options for [SETUP] appear. 1 2 ( 2 7 ) 1 8 ( 3 4 ) T 0:00:02 DVD VIDEO QUICK QUICK CUSTOM RESET BNR 4 Press X/x to on. 8 Press . 3US The Control Menu display appears. 3 Press X/x to select [SETUP], then press . The Setup Display...
... SETUP OSD: MENU: AUDIO: SUBTITLE: ENGLISH ENGLISH ORIGINAL AUDIO FOLLOW GUSB 5 Press X/x to select the setting. The Setup item is in stop mode. The default setting is underlined. • [OFF]: sets the [HDMI CONTROL] function to off. • [ON]: sets the [HDMI CONTROL] function to select [CUSTOM], then press . The options for [SETUP] appear. 1 2 ( 2 7 ) 1 8 ( 3 4 ) T 0:00:02 DVD VIDEO QUICK QUICK CUSTOM RESET BNR 4 Press X/x to on. 8 Press . 3US The Control Menu display appears. 3 Press X/x to select [SETUP], then press . The Setup Display...
Operating Instructions
Page 2
... polarized or grounding-type plug. Owner's Record The model and serial numbers are cautioned that produce heat. 9) Do not defeat the safety purpose of the apparatus with the manufacturer's instructions. 8) Do not install near water. 6) Clean only with one or more of important operating and maintenance (servicing) instructions in the literature accompanying the appliance. DAV-HDX265/DAV-HDX266/DAVHDX267W Serial No 2GB...
... polarized or grounding-type plug. Owner's Record The model and serial numbers are cautioned that produce heat. 9) Do not defeat the safety purpose of the apparatus with the manufacturer's instructions. 8) Do not install near water. 6) Clean only with one or more of important operating and maintenance (servicing) instructions in the literature accompanying the appliance. DAV-HDX265/DAV-HDX266/DAVHDX267W Serial No 2GB...
Operating Instructions
Page 4
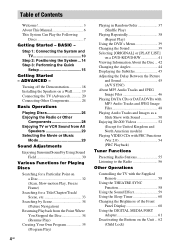
... the System ...14 Step 3: Performing the Quick Setup 15 Getting Started - BASIC - Table of the Front Panel Display 60 Using the DIGITAL MEDIA PORT Adapter 61 Deactivating the Buttons on a DVD-R/DVD-RW 41 Viewing Information About the Disc ... 42 Changing the Angles 44 Displaying the Subtitles 45 Adjusting the Delay Between the Picture and Sound 45 (A/V SYNC) About MP3 Audio Tracks and JPEG Image Files 46 Playing DATA CDs or DATA DVDs with MP3 Audio...
... the System ...14 Step 3: Performing the Quick Setup 15 Getting Started - BASIC - Table of the Front Panel Display 60 Using the DIGITAL MEDIA PORT Adapter 61 Deactivating the Buttons on a DVD-R/DVD-RW 41 Viewing Information About the Disc ... 42 Changing the Angles 44 Displaying the Subtitles 45 Adjusting the Delay Between the Picture and Sound 45 (A/V SYNC) About MP3 Audio Tracks and JPEG Image Files 46 Playing DATA CDs or DATA DVDs with MP3 Audio...
Operating Instructions
Page 5
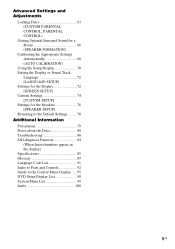
... (AUTO CALIBRATION) Using the Setup Display 70 Setting the Display or Sound Track Language 72 [LANGUAGE SETUP] Settings for the Display 72 [SCREEN SETUP] Custom Settings 74 [CUSTOM SETUP] Settings for the Speakers 76 [SPEAKER SETUP] Returning to the Default Settings.......... 78 Additional Information Precautions 79 Notes about the Discs 80 Troubleshooting 80 Self-diagnosis Function 84 (When letters/numbers appear in the display) Specifications 85 Glossary 87 Language Code List 91 Index to Parts and Controls 92 Guide to the Control Menu Display...
... (AUTO CALIBRATION) Using the Setup Display 70 Setting the Display or Sound Track Language 72 [LANGUAGE SETUP] Settings for the Display 72 [SCREEN SETUP] Custom Settings 74 [CUSTOM SETUP] Settings for the Speakers 76 [SPEAKER SETUP] Returning to the Default Settings.......... 78 Additional Information Precautions 79 Notes about the Discs 80 Troubleshooting 80 Self-diagnosis Function 84 (When letters/numbers appear in the display) Specifications 85 Glossary 87 Language Code List 91 Index to Parts and Controls 92 Guide to the Control Menu Display...

Operating Instructions
Page 16
... [SURROUND L] and [SURROUND R] is installed, [STANDARD (WIRELESS)] appears instead. 10 Press . 11 Connect the calibration mic to the A.CAL MIC jack on the front panel and press X/x to select [YES]. Getting Started - Set up the calibration mic at the ear level using a tripod, etc. (not supplied). Be quiet during the measurement (which the system is installed may interfere with DAV-HDX267W only) is not displayed. 14 Press . AUTO CALIBRATION Connect calibration mic. Note • Loud test sound...
... [SURROUND L] and [SURROUND R] is installed, [STANDARD (WIRELESS)] appears instead. 10 Press . 11 Connect the calibration mic to the A.CAL MIC jack on the front panel and press X/x to select [YES]. Getting Started - Set up the calibration mic at the ear level using a tripod, etc. (not supplied). Be quiet during the measurement (which the system is installed may interfere with DAV-HDX267W only) is not displayed. 14 Press . AUTO CALIBRATION Connect calibration mic. Note • Loud test sound...

Operating Instructions
Page 24
... R AUDIO IN L (DVD ONLY) COMPONENT VIDEO OUT S VIDEO (DVD ONLY) VIDEO MONITOR OUT DMPORT TV/VIDEO AM FM 75 COAXIAL ANTENNA To DMPORT jack To TV/VIDEO (AUDIO IN) DIGITAL MEDIA PORT adapter AUDIO OUT L R VCR, digital satellite receiver or PlayStation 2, etc. :Signal flow * CAUTION Please do not remove the screws before installing the WAHT-SD1. For video connection of the DIGITAL MEDIA PORT adapter, see "Using the DIGITAL MEDIA PORT Adapter" (page 61). 24GB White (L/audio) Red (R/audio) To connect the DIGITAL MEDIA PORT adapter Connect a DIGITAL MEDIA PORT adapter...
... R AUDIO IN L (DVD ONLY) COMPONENT VIDEO OUT S VIDEO (DVD ONLY) VIDEO MONITOR OUT DMPORT TV/VIDEO AM FM 75 COAXIAL ANTENNA To DMPORT jack To TV/VIDEO (AUDIO IN) DIGITAL MEDIA PORT adapter AUDIO OUT L R VCR, digital satellite receiver or PlayStation 2, etc. :Signal flow * CAUTION Please do not remove the screws before installing the WAHT-SD1. For video connection of the DIGITAL MEDIA PORT adapter, see "Using the DIGITAL MEDIA PORT Adapter" (page 61). 24GB White (L/audio) Red (R/audio) To connect the DIGITAL MEDIA PORT adapter Connect a DIGITAL MEDIA PORT adapter...
Operating Instructions
Page 30
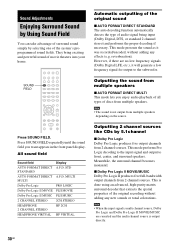
...movie theaters into your home. This mode presents the sound as it will generate a low frequency signal for output to front, center, and surround speakers. They bring exciting and powerful sound of audio signal being input (Dolby Digital, DTS, or standard 2 channel stereo) and performs the proper decoding if necessary. All sound field Sound field AUTO FORMAT DIRECT STANDARD AUTO FORMAT DIRECT MULTI Dolby Pro Logic Dolby Pro Logic II MOVIE Dolby Pro Logic II MUSIC 2 CHANNEL STEREO HEADPHONE 2 CHANNEL STEREO HEADPHONE VIRTUAL Display A.F.D. Note • When the input signal...
...movie theaters into your home. This mode presents the sound as it will generate a low frequency signal for output to front, center, and surround speakers. They bring exciting and powerful sound of audio signal being input (Dolby Digital, DTS, or standard 2 channel stereo) and performs the proper decoding if necessary. All sound field Sound field AUTO FORMAT DIRECT STANDARD AUTO FORMAT DIRECT MULTI Dolby Pro Logic Dolby Pro Logic II MOVIE Dolby Pro Logic II MUSIC 2 CHANNEL STEREO HEADPHONE 2 CHANNEL STEREO HEADPHONE VIRTUAL Display A.F.D. Note • When the input signal...
Operating Instructions
Page 35
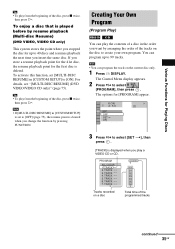
... options for [PROGRAM] appear. 6 (14) T 2:50 OFF OFF SET ON PLAY CD 3 Press X/x to select [SET t], then press . [TRACK] is displayed when you change the function by pressing FUNCTION. To enjoy a disc that is set [MULTI-DISC RESUME] in [CUSTOM SETUP] to select [PROGRAM], then press . Various Functions for Playing Discs Tip • To play from the beginning of the disc, press x twice, then press H. Creating Your Own Program (Program Play) You can program up to...
... options for [PROGRAM] appear. 6 (14) T 2:50 OFF OFF SET ON PLAY CD 3 Press X/x to select [SET t], then press . [TRACK] is displayed when you change the function by pressing FUNCTION. To enjoy a disc that is set [MULTI-DISC RESUME] in [CUSTOM SETUP] to select [PROGRAM], then press . Various Functions for Playing Discs Tip • To play from the beginning of the disc, press x twice, then press H. Creating Your Own Program (Program Play) You can program up to...
Operating Instructions
Page 43
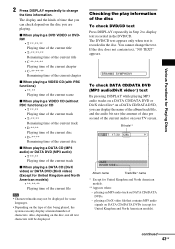
... and North American models). Bit rate** T 17:30 128k JAZZ RIVER SIDE Album name Track/file* name * Except for United Kingdom and North American models. ** Appears when: - Various Functions for Playing Discs 2 Press DISPLAY repeatedly to display text recorded in the DVD/CD. Checking the play information of time that contains MP3 audio signals on DATA CDs/DATA DVDs. - You cannot change the time information...
... and North American models). Bit rate** T 17:30 128k JAZZ RIVER SIDE Album name Track/file* name * Except for United Kingdom and North American models. ** Appears when: - Various Functions for Playing Discs 2 Press DISPLAY repeatedly to display text recorded in the DVD/CD. Checking the play information of time that contains MP3 audio signals on DATA CDs/DATA DVDs. - You cannot change the time information...
Operating Instructions
Page 45
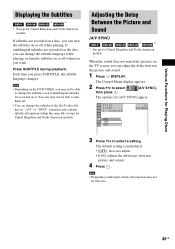
... can change the subtitle language while playing, or turn the subtitles on the DVD VIDEO, you can turn them off while playing. The options for United Kingdom and North American models. The default setting is underlined. • [OFF]: does not adjust. • [ON]: adjusts the difference between the picture and sound. 1 Press DISPLAY. If multilingual subtitles are recorded on a disc, you may not be able to select [A/V SYNC...
... can change the subtitle language while playing, or turn the subtitles on the DVD VIDEO, you can turn them off while playing. The options for United Kingdom and North American models. The default setting is underlined. • [OFF]: does not adjust. • [ON]: adjusts the difference between the picture and sound. 1 Press DISPLAY. If multilingual subtitles are recorded on a disc, you may not be able to select [A/V SYNC...
Operating Instructions
Page 64
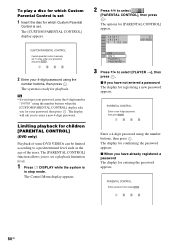
... 4-digit password using the number buttons when the [CUSTOM PARENTAL CONTROL] display asks you for your password, enter the 6-digit number "199703" using the number buttons, then press . The system is already set. The display will ask you to set a playback limitation level. 1 Press DISPLAY while the system is set 1 Insert the disc for which Custom Parental Control is in stop mode. To play a disc for which Custom Parental Control is set . The [PARENTAL CONTROL] function allows you to select [PARENTAL CONTROL...
... 4-digit password using the number buttons when the [CUSTOM PARENTAL CONTROL] display asks you for your password, enter the 6-digit number "199703" using the number buttons, then press . The system is already set. The display will ask you to set a playback limitation level. 1 Press DISPLAY while the system is set 1 Insert the disc for which Custom Parental Control is in stop mode. To play a disc for which Custom Parental Control is set . The [PARENTAL CONTROL] function allows you to select [PARENTAL CONTROL...

Operating Instructions
Page 68
... front panel display indicates the selected [SPEAKER FORMATION]. SPEAKER FORMATION Continue with [AUTO CALIBRATION], see the operating instructions of the WAHTSD1. 6 Press . A. Note • Loud test sound is installed, [STANDARD (WIRED)] appears. The Control Menu display appears. 3 Press X/x to select [SPEAKER FORMATION], then press . 1 ( 4 4 ) 3 ( 2 8 ) T 0:03:04 SPEAKER FORMATION SPEAKER FORMATION AUTO CALIBRATION DVD VIDEO 4 Press X/x to [STANDARD]. AUTO CALIBRATION Connect calibration mic. Tip • When the wireless kit WAHT-SD1 (supplied with DAV-HDX267W only) is output...
... front panel display indicates the selected [SPEAKER FORMATION]. SPEAKER FORMATION Continue with [AUTO CALIBRATION], see the operating instructions of the WAHTSD1. 6 Press . A. Note • Loud test sound is installed, [STANDARD (WIRED)] appears. The Control Menu display appears. 3 Press X/x to select [SPEAKER FORMATION], then press . 1 ( 4 4 ) 3 ( 2 8 ) T 0:03:04 SPEAKER FORMATION SPEAKER FORMATION AUTO CALIBRATION DVD VIDEO 4 Press X/x to [STANDARD]. AUTO CALIBRATION Connect calibration mic. Tip • When the wireless kit WAHT-SD1 (supplied with DAV-HDX267W only) is output...
Operating Instructions
Page 70
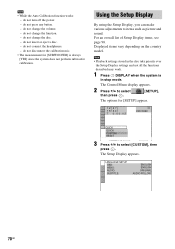
... perform subwoofer calibration. The Control Menu display appears. 2 Press X/x to items such as picture and sound. The Setup Display appears. do not disconnect the calibration mic. • The measurement for [SETUP] appear. 1 2 ( 2 7 ) 1 8 ( 3 4 ) T 0:00:02 DVD VIDEO QUICK QUICK CUSTOM RESET BNR 3 Press X/x to select [CUSTOM], then press . do not insert or eject a disc. - Displayed items vary depending on the country model. Note • Playback settings stored in stop mode. do not turn off the power...
... perform subwoofer calibration. The Control Menu display appears. 2 Press X/x to items such as picture and sound. The Setup Display appears. do not disconnect the calibration mic. • The measurement for [SETUP] appear. 1 2 ( 2 7 ) 1 8 ( 3 4 ) T 0:00:02 DVD VIDEO QUICK QUICK CUSTOM RESET BNR 3 Press X/x to select [CUSTOM], then press . do not insert or eject a disc. - Displayed items vary depending on the country model. Note • Playback settings stored in stop mode. do not turn off the power...
Operating Instructions
Page 74
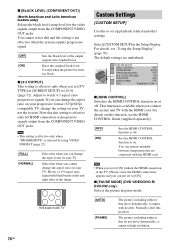
... level (setup level) for HDMI connection or progressive signals output from the COMPONENT VIDEO OUT jacks. You cannot select this when you can change the setting on or off . For details, see the HDMI CONTROL Guide (supplied separately). [OFF] [ON] Sets the HDMI CONTROL function to [16:9] (page 72). If you connect the system and TV with no jitter. CUSTOM SETUP HDMI CONTROL: OFF PAUSE MODE: AUTO TRACK SELECTION: OFF MULTI-DISC RESUME: ON AUDIO DRC: OFF AUDIO (HDMI): OFF DivX: Registration Code x [HDMI CONTROL] Switches the HDMI CONTROL function...
... level (setup level) for HDMI connection or progressive signals output from the COMPONENT VIDEO OUT jacks. You cannot select this when you can change the setting on or off . For details, see the HDMI CONTROL Guide (supplied separately). [OFF] [ON] Sets the HDMI CONTROL function to [16:9] (page 72). If you connect the system and TV with no jitter. CUSTOM SETUP HDMI CONTROL: OFF PAUSE MODE: AUTO TRACK SELECTION: OFF MULTI-DISC RESUME: ON AUDIO DRC: OFF AUDIO (HDMI): OFF DivX: Registration Code x [HDMI CONTROL] Switches the HDMI CONTROL function...

Operating Instructions
Page 76
...default setting when changing a setting Select the item, then press CLEAR. The default settings are changed. 2)0.0 to 6.9 meters for North American models. 3)0.9 to 6.9 meters for North American models. SPEAKER SETUP CONNECTION: DISTANCE(FRONT): DISTANCE(SURROUND): LEVEL(FRONT): LEVEL(SURROUND): TEST TONE: OFF FRONT: YES CENTER: YES SURROUND: YES SUBWOOFER: YES To return to the default setting. x [DISTANCE (FRONT)] The default distance setting for the speakers in the Setup Display. Settings for the Speakers [SPEAKER SETUP] To obtain the best possible surround sound...
...default setting when changing a setting Select the item, then press CLEAR. The default settings are changed. 2)0.0 to 6.9 meters for North American models. 3)0.9 to 6.9 meters for North American models. SPEAKER SETUP CONNECTION: DISTANCE(FRONT): DISTANCE(SURROUND): LEVEL(FRONT): LEVEL(SURROUND): TEST TONE: OFF FRONT: YES CENTER: YES SURROUND: YES SUBWOOFER: YES To return to the default setting. x [DISTANCE (FRONT)] The default distance setting for the speakers in the Setup Display. Settings for the Speakers [SPEAKER SETUP] To obtain the best possible surround sound...

Operating Instructions
Page 82
...; A 2 channel source is connected properly. Operation Radio stations cannot be played. • The DATA CD is not recorded in a JPEG format that conforms to ISO 9660 Level 1/Level 2, or Joliet. • The DATA DVD is not recorded in a JPEG format that the frequency appears in the front panel display. Insert the disc with automatic tuning). Adjust the antenna (aerial) or connect an external antenna (aerial) if necessary. • The signal strength of the center speaker...
...; A 2 channel source is connected properly. Operation Radio stations cannot be played. • The DATA CD is not recorded in a JPEG format that conforms to ISO 9660 Level 1/Level 2, or Joliet. • The DATA DVD is not recorded in a JPEG format that the frequency appears in the front panel display. Insert the disc with automatic tuning). Adjust the antenna (aerial) or connect an external antenna (aerial) if necessary. • The signal strength of the center speaker...
Operating Instructions
Page 85
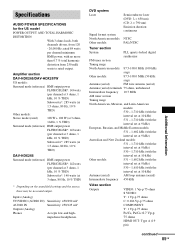
Inputs (Analog) TV/VIDEO (AUDIO IN) AUDIO IN Outputs (Analog) Phones Sensitivity: 450/250 mV Sensitivity: 250/125 mV Accepts low-and highimpedance headphones. Additional Information DVD system Laser Signal format system North American models: Other models: Semiconductor laser (DVD: λ = 650 nm) (CD: λ = 790 nm) Emission duration: continuous NTSC PAL/NTSC Tuner section System PLL quartz-locked digital synthesizer FM tuner section Tuning range North American models: 87.5-108.0 MHz (100...
Inputs (Analog) TV/VIDEO (AUDIO IN) AUDIO IN Outputs (Analog) Phones Sensitivity: 450/250 mV Sensitivity: 250/125 mV Accepts low-and highimpedance headphones. Additional Information DVD system Laser Signal format system North American models: Other models: Semiconductor laser (DVD: λ = 650 nm) (CD: λ = 790 nm) Emission duration: continuous NTSC PAL/NTSC Tuner section System PLL quartz-locked digital synthesizer FM tuner section Tuning range North American models: 87.5-108.0 MHz (100...
Operating Instructions
Page 100
... LEVEL (COMPONENT OUT) 74 C CHAPTER 33 Chapter 87 Child Lock 62 COLD RESET 78 COLOR SYSTEM (VIDEO CD) 73 COMPONENT VIDEO OUT 22 Continuous play 26 Control Menu Display 95 Controlling the TV 58 CUSTOM 70 CUSTOM PARENTAL CONTROL 63 CUSTOM SETUP 74 D D. C. 68, 87 DATA CD 48, 52 DATA DVD 48, 52 DEMO 18 Demonstration 18 Digital Cinema Auto Calibration 68, 87 Digital Direct Twin Drive Subwoofer 87 DIGITAL MEDIA PORT 61 DIMMER 60 DISC SKIP 27 DISPLAY...
... LEVEL (COMPONENT OUT) 74 C CHAPTER 33 Chapter 87 Child Lock 62 COLD RESET 78 COLOR SYSTEM (VIDEO CD) 73 COMPONENT VIDEO OUT 22 Continuous play 26 Control Menu Display 95 Controlling the TV 58 CUSTOM 70 CUSTOM PARENTAL CONTROL 63 CUSTOM SETUP 74 D D. C. 68, 87 DATA CD 48, 52 DATA DVD 48, 52 DEMO 18 Demonstration 18 Digital Cinema Auto Calibration 68, 87 Digital Direct Twin Drive Subwoofer 87 DIGITAL MEDIA PORT 61 DIMMER 60 DISC SKIP 27 DISPLAY...


