
Operating Instructions
Page 2
... can radiate radio frequency energy and, if not installed and used in a residential installation. Owner's Record The model and serial numbers are designed to Article 820-40 of the FCC Rules. Refer to them whenever you call the CATV system installer's attention to provide reasonable protection against harmful interference in accordance with the limits for a Class B digital device, pursuant to radio communications. DAV-FR1/FR8...
... can radiate radio frequency energy and, if not installed and used in a residential installation. Owner's Record The model and serial numbers are designed to Article 820-40 of the FCC Rules. Refer to them whenever you call the CATV system installer's attention to provide reasonable protection against harmful interference in accordance with the limits for a Class B digital device, pursuant to radio communications. DAV-FR1/FR8...
Operating Instructions
Page 5
... 10 Guide to the Control Menu Display...... 11 Getting Started Unpacking 13 Inserting Batteries into the Remote....... 13 Step 1: Speaker System Hookup........... 14 Step 2: Antenna (aerial) Hookups......... 21 Step 3: TV and Video Component Hookups 23 Step 4: Connecting the AC Power Cord (Mains Lead 27 Step 5: Performing the Quick Setup ..... 27 Speaker Setup 29 Playing Discs Playing Discs 30 Resuming Playback from the Point Where You Stopped the Disc 32 (Resume Play) Using the DVD's Menu 33 Playing VIDEO CDs with PBC Functions...
... 10 Guide to the Control Menu Display...... 11 Getting Started Unpacking 13 Inserting Batteries into the Remote....... 13 Step 1: Speaker System Hookup........... 14 Step 2: Antenna (aerial) Hookups......... 21 Step 3: TV and Video Component Hookups 23 Step 4: Connecting the AC Power Cord (Mains Lead 27 Step 5: Performing the Quick Setup ..... 27 Speaker Setup 29 Playing Discs Playing Discs 30 Resuming Playback from the Point Where You Stopped the Disc 32 (Resume Play) Using the DVD's Menu 33 Playing VIDEO CDs with PBC Functions...
Operating Instructions
Page 6
Settings and Adjustments Using the Setup Display 77 Setting the Display or Sound Track Language 78 (LANGUAGE SETUP) Settings for the Display 78 (SCREEN SETUP) Custom Settings 80 (CUSTOM SETUP) Settings for the Speakers 81 (SPEAKER SETUP) Quick Setup and Resetting the System 87 (SETUP) Additional Information Troubleshooting 88 Specifications 91 Glossary 93 Index to Parts and Controls 97 Language Code List 102 DVD Setup Menu List 103 AMP Menu List 105 Index 106 Quick Reference for Remote Commander Back cover 6US
Settings and Adjustments Using the Setup Display 77 Setting the Display or Sound Track Language 78 (LANGUAGE SETUP) Settings for the Display 78 (SCREEN SETUP) Custom Settings 80 (CUSTOM SETUP) Settings for the Speakers 81 (SPEAKER SETUP) Quick Setup and Resetting the System 87 (SETUP) Additional Information Troubleshooting 88 Specifications 91 Glossary 93 Index to Parts and Controls 97 Language Code List 102 DVD Setup Menu List 103 AMP Menu List 105 Index 106 Quick Reference for Remote Commander Back cover 6US

Operating Instructions
Page 11
... Currently playing chapter name or disc type (NPlayback, XPause, xStop, etc.) number (VIDEO CD/Super Audio CD/CD: index number) 1:DVD 1 2 ( 2 7 ) TITLE 12 1 8 ( 3 4 ) DVD Type of disc being played back Playing time T 1:32:55 Icon of selected Control Menu item Control Menu items 1: ENGLISH 2: FRENCH 3: SPANISH Current setting Options Function name of selected Control Menu item Operation message SUBTITLE Select: ENTER List of Control Menu Items DISC Displays the disc name or the disc type inserted into the system. TIME...
... Currently playing chapter name or disc type (NPlayback, XPause, xStop, etc.) number (VIDEO CD/Super Audio CD/CD: index number) 1:DVD 1 2 ( 2 7 ) TITLE 12 1 8 ( 3 4 ) DVD Type of disc being played back Playing time T 1:32:55 Icon of selected Control Menu item Control Menu items 1: ENGLISH 2: FRENCH 3: SPANISH Current setting Options Function name of selected Control Menu item Operation message SUBTITLE Select: ENTER List of Control Menu Items DISC Displays the disc name or the disc type inserted into the system. TIME...
Operating Instructions
Page 19
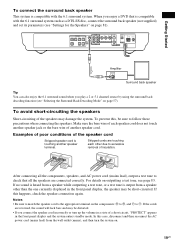
... the wall outlet (mains), and then turn up the volume in the front panel display and the system enters standby mode. When you play a 2 or 5.1 channel source by using the surround back decoding function (see page 83. Stripped cords are reversed, the sound will lack bass and may damage the system. Getting Started To connect the surround back speaker This system is compatible with the 6.1 surround system. SPEAKER FRONT R CENTER FRONT L WOOFER R VIDEO AUDIO IN Y L PB/CB PR/CR S VIDEO (DVD ONLY) OPTICAL DIGITAL...
... the wall outlet (mains), and then turn up the volume in the front panel display and the system enters standby mode. When you play a 2 or 5.1 channel source by using the surround back decoding function (see page 83. Stripped cords are reversed, the sound will lack bass and may damage the system. Getting Started To connect the surround back speaker This system is compatible with the 6.1 surround system. SPEAKER FRONT R CENTER FRONT L WOOFER R VIDEO AUDIO IN Y L PB/CB PR/CR S VIDEO (DVD ONLY) OPTICAL DIGITAL...

Operating Instructions
Page 24
... SPEAKER FRONT R CENTER FRONT L WOOFER R VIDEO AUDIO IN Y L PB/CB PR/CR S VIDEO (DVD ONLY) OPTICAL DIGITAL IN SURR R SURROUND BACK R AUDIO IN COMPOMEMT VIDEO OUT L S AT S AT VIDEO MONITOR OUT SURR L WOOFER AM FM 75 COAXIAL OUT OUT AUDIO OUT L R OPTICAL DIGITAL OUT IN VIDEO IN IN S VIDEO IN Digital satellite receiver or TV PlayStation 2 etc. Digital signals have priority over analogue signals. To listen to the game machine (e.g., PlayStation 2) sound by using the system Connect the audio output jacks...
... SPEAKER FRONT R CENTER FRONT L WOOFER R VIDEO AUDIO IN Y L PB/CB PR/CR S VIDEO (DVD ONLY) OPTICAL DIGITAL IN SURR R SURROUND BACK R AUDIO IN COMPOMEMT VIDEO OUT L S AT S AT VIDEO MONITOR OUT SURR L WOOFER AM FM 75 COAXIAL OUT OUT AUDIO OUT L R OPTICAL DIGITAL OUT IN VIDEO IN IN S VIDEO IN Digital satellite receiver or TV PlayStation 2 etc. Digital signals have priority over analogue signals. To listen to the game machine (e.g., PlayStation 2) sound by using the system Connect the audio output jacks...

Operating Instructions
Page 26
... using the VIDEO jack distorts the sound, reconnect the TV or VCR to output the TV sound or stereo sound of a 2 channel source from the 6 speakers, select any sound field other than "AUTO FORMAT DIRECT AUTO" or "2 CHANNEL STEREO" (page 53). 26US TV or VCR * AUDIO OUT L R SPEAKER FRONT R CENTER FRONT L WOOFER R VIDEO AUDIO IN Y L PB/CB PR/CR S VIDEO (DVD ONLY) OPTICAL DIGITAL IN SURR R SURROUND COMPOMEMT VIDEO OUT S AT BACK R AUDIO IN L S AT VIDEO MONITOR OUT SURR L WOOFER AM FM 75 COAXIAL * AUDIO...
... using the VIDEO jack distorts the sound, reconnect the TV or VCR to output the TV sound or stereo sound of a 2 channel source from the 6 speakers, select any sound field other than "AUTO FORMAT DIRECT AUTO" or "2 CHANNEL STEREO" (page 53). 26US TV or VCR * AUDIO OUT L R SPEAKER FRONT R CENTER FRONT L WOOFER R VIDEO AUDIO IN Y L PB/CB PR/CR S VIDEO (DVD ONLY) OPTICAL DIGITAL IN SURR R SURROUND COMPOMEMT VIDEO OUT S AT BACK R AUDIO IN L S AT VIDEO MONITOR OUT SURR L WOOFER AM FM 75 COAXIAL * AUDIO...

Operating Instructions
Page 29
... near the subwoofer. About magnetically shielded speakers (to prevent color irregularity occurring on a TV stand, etc., healthcare devices, toys, etc. Use the test tone to adjust the speaker level and balance to 23 ft)c) (A) from the listening position. Getting Started Speaker Setup Positioning the speakers For the best possible surround sound, all the speakers other than the front speakers. • When you to place the center speaker up...
... near the subwoofer. About magnetically shielded speakers (to prevent color irregularity occurring on a TV stand, etc., healthcare devices, toys, etc. Use the test tone to adjust the speaker level and balance to 23 ft)c) (A) from the listening position. Getting Started Speaker Setup Positioning the speakers For the best possible surround sound, all the speakers other than the front speakers. • When you to place the center speaker up...

Operating Instructions
Page 31
... titles, you want to go back to adjust the sound volume. To cancel muting, press it is ejected from the control menu. 31US Remove the disc after it again or VOL + to the preceding title by following Step 6 Depending on the disc, a menu may cancel the menu settings. Playing Discs After following the instructions on the menu. (DVD: page 33), (VIDEO CD: page 33). To save the...
... titles, you want to go back to adjust the sound volume. To cancel muting, press it is ejected from the control menu. 31US Remove the disc after it again or VOL + to the preceding title by following Step 6 Depending on the disc, a menu may cancel the menu settings. Playing Discs After following the instructions on the menu. (DVD: page 33), (VIDEO CD: page 33). To save the...

Operating Instructions
Page 53
...generate a low frequency signal for output to output the TV sound or stereo sound of a 2 channel source from the 6 speakers of system's preprogrammed sound fields. AUTO FORMAT DIRECT With cover opened. However, if there are no low frequency signals (Dolby Digital LFE, etc.), it was recorded/encoded, without adding any effects (e.g. AUTO 53US Automatic decoding of the audio input signal (AUTO FORMAT DIRECT AUTO) The auto decoding function automatically detects the type of movie theaters into your home. reverberation). Sound field AUTO FORMAT DIRECT AUTO Display A.F.D. They...
...generate a low frequency signal for output to output the TV sound or stereo sound of a 2 channel source from the 6 speakers of system's preprogrammed sound fields. AUTO FORMAT DIRECT With cover opened. However, if there are no low frequency signals (Dolby Digital LFE, etc.), it was recorded/encoded, without adding any effects (e.g. AUTO 53US Automatic decoding of the audio input signal (AUTO FORMAT DIRECT AUTO) The auto decoding function automatically detects the type of movie theaters into your home. reverberation). Sound field AUTO FORMAT DIRECT AUTO Display A.F.D. They...

Operating Instructions
Page 54
...center, and surround speakers. This allows you want appears in the front panel display. Press AUTO FORMAT DIRECT repeatedly until "2CH STEREO" appears in the front panel display. This mode performs Pro Logic decoding to the input signal and output to two channels. Selecting a sound field (AUTO FORMAT DIRECT button) AUTO FORMAT DIRECT MODE With cover opened . Sound field AUTO FORMAT DIRECT PRO LOGIC AUTO FORMAT DIRECT PRO LOGIC II MOVIE AUTO FORMAT DIRECT PRO LOGIC II MUSIC Neo:6 CINEMA Neo:6 MUSIC Display DOLBY PL PLII MOVIE PLII MUSIC NEO:6 CIN NEO:6 MUS x AUTO FORMAT DIRECT...
...center, and surround speakers. This allows you want appears in the front panel display. Press AUTO FORMAT DIRECT repeatedly until "2CH STEREO" appears in the front panel display. This mode performs Pro Logic decoding to the input signal and output to two channels. Selecting a sound field (AUTO FORMAT DIRECT button) AUTO FORMAT DIRECT MODE With cover opened . Sound field AUTO FORMAT DIRECT PRO LOGIC AUTO FORMAT DIRECT PRO LOGIC II MOVIE AUTO FORMAT DIRECT PRO LOGIC II MUSIC Neo:6 CINEMA Neo:6 MUSIC Display DOLBY PL PLII MOVIE PLII MUSIC NEO:6 CIN NEO:6 MUS x AUTO FORMAT DIRECT...

Operating Instructions
Page 57
... "AUTO FORMAT DIRECT AUTO" or "2CH STEREO." • The system memorizes the last sound field selected for the film (page 93, 94). Dolby Digital discs are labeled with the logo. - Dolby Surround encoded programs are memorized separately for all preset stations. • You can enjoy the kind of the multi channel input stream. continued 57US With the tuner, sound fields are labeled with the logo. - By decoding the surround back signal of DVD software, etc...
... "AUTO FORMAT DIRECT AUTO" or "2CH STEREO." • The system memorizes the last sound field selected for the film (page 93, 94). Dolby Digital discs are labeled with the logo. - Dolby Surround encoded programs are memorized separately for all preset stations. • You can enjoy the kind of the multi channel input stream. continued 57US With the tuner, sound fields are labeled with the logo. - By decoding the surround back signal of DVD software, etc...

Operating Instructions
Page 63
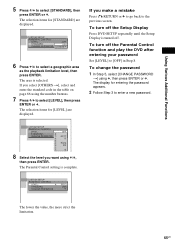
... Control function 1 In Step 4, select [OFF t], then press ENTER. 2 Enter your password Press C before you make a mistake Press O RETURN, then start from Step 3 again. CUSTOM PARENTAL CONTROL Custom parental control is set. If you set .] appears and the screen returns to the Control Menu display. The display for the current layer. Tip If you forget your password, enter the 6-digit number "199703" using the number buttons when the [CUSTOM PARENTAL CONTROL] display...
... Control function 1 In Step 4, select [OFF t], then press ENTER. 2 Enter your password Press C before you make a mistake Press O RETURN, then start from Step 3 again. CUSTOM PARENTAL CONTROL Custom parental control is set. If you set .] appears and the screen returns to the Control Menu display. The display for the current layer. Tip If you forget your password, enter the 6-digit number "199703" using the number buttons when the [CUSTOM PARENTAL CONTROL] display...
Operating Instructions
Page 65
... 8. To turn off the Setup Display Press DVD SETUP repeatedly until the Setup Display is turned off the Parental Control function and play the DVD after entering your password Set [LEVEL] to [OFF] in the table on page 66 using the number buttons. 7 Press X/x to the previous screen. The display for [STANDARD] are displayed. Using Various Additional Functions 5 Press X/x to select a geographic area as the playback limitation level, then press ENTER. CUSTOM SETUP PARENTAL CONTROL LEVEL: 4: STANDARD: CHANGE PASSWORD PG13...
... 8. To turn off the Setup Display Press DVD SETUP repeatedly until the Setup Display is turned off the Parental Control function and play the DVD after entering your password Set [LEVEL] to [OFF] in the table on page 66 using the number buttons. 7 Press X/x to the previous screen. The display for [STANDARD] are displayed. Using Various Additional Functions 5 Press X/x to select a geographic area as the playback limitation level, then press ENTER. CUSTOM SETUP PARENTAL CONTROL LEVEL: 4: STANDARD: CHANGE PASSWORD PG13...
Operating Instructions
Page 88
... case, return the setting to "AUTO FORMAT DIRECT AUTO" (page 53). Picture noise appears. • The disc is compatible with alcohol. • Clean the disc. Sound There is no sound. • The speaker cord is not connected securely. • Press MUTING on the remote if "MUTING ON" is displayed in the front panel display. • The system is in pause mode or in [TV TYPE] of [SCREEN SETUP], the picture does not fill...
... case, return the setting to "AUTO FORMAT DIRECT AUTO" (page 53). Picture noise appears. • The disc is compatible with alcohol. • Clean the disc. Sound There is no sound. • The speaker cord is not connected securely. • Press MUTING on the remote if "MUTING ON" is displayed in the front panel display. • The system is in pause mode or in [TV TYPE] of [SCREEN SETUP], the picture does not fill...
Operating Instructions
Page 89
... output signal may be less noticeable. Use direct tuning. • No stations have been preset or the preset stations have the extension ".MP3." • The data is not formatted in MP3 even though it has the extension ".MP3." • The system can only play MP3 (MPEG1 Audio Layer3) audio. • Set [DATA CD PRIORITY] to [STEREO] in the Control Menu display (page 51). • Make sure the system is recorded in Dolby Digital...
... output signal may be less noticeable. Use direct tuning. • No stations have been preset or the preset stations have the extension ".MP3." • The data is not formatted in MP3 even though it has the extension ".MP3." • The system can only play MP3 (MPEG1 Audio Layer3) audio. • Set [DATA CD PRIORITY] to [STEREO] in the Control Menu display (page 51). • Make sure the system is recorded in Dolby Digital...
Operating Instructions
Page 91
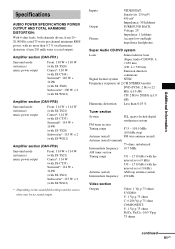
... settings and the source, there may be no sound output. Inputs Output Phones VIDEO/SAT: Sensitivity: 250 mV/ 450 mV Impedance: 50 kilohms SURROUND BACK Voltage: 2V Impedance: 1 kilohms Accepts low-and highimpedance headphones. rated 75 watts per channel minimum RMS power, with no more than 0.03 % Tuner section System PLL quartz-locked digital synthesizer system FM tuner section Tuning range 87.5 - 108.0 MHz (100 kHz step) Antenna (aerial) FM wire antenna...
... settings and the source, there may be no sound output. Inputs Output Phones VIDEO/SAT: Sensitivity: 250 mV/ 450 mV Impedance: 50 kilohms SURROUND BACK Voltage: 2V Impedance: 1 kilohms Accepts low-and highimpedance headphones. rated 75 watts per channel minimum RMS power, with no more than 0.03 % Tuner section System PLL quartz-locked digital synthesizer system FM tuner section Tuning range 87.5 - 108.0 MHz (100 kHz step) Antenna (aerial) FM wire antenna...
Operating Instructions
Page 101
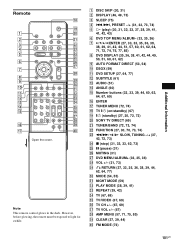
...) H DVD DISPLAY (35, 36, 38, 41, 42, 44, 49, 50, 51, 60, 61, 62) I AUTO FORMAT DIRECT (53, 54) J DSGX (59) K DVD SETUP (27, 64, 77) L SUBTITLE (61) M AUDIO (51) N ANGLE (60) O Number buttons (33, 33, 39, 44, 60, 62, 64, 67, 69) P ENTER Q TUNER MENU (72, 74) R TV [/1 (on/standby) (67) S "/1 (standby) (27, 30, 72, 73) T SONY TV DIRECT (69) U TUNER/BAND (72, 73, 74) V FUNCTION (27...
...) H DVD DISPLAY (35, 36, 38, 41, 42, 44, 49, 50, 51, 60, 61, 62) I AUTO FORMAT DIRECT (53, 54) J DSGX (59) K DVD SETUP (27, 64, 77) L SUBTITLE (61) M AUDIO (51) N ANGLE (60) O Number buttons (33, 33, 39, 44, 60, 62, 64, 67, 69) P ENTER Q TUNER MENU (72, 74) R TV [/1 (on/standby) (67) S "/1 (standby) (27, 30, 72, 73) T SONY TV DIRECT (69) U TUNER/BAND (72, 73, 74) V FUNCTION (27...

Operating Instructions
Page 106
... Program Play 39 PROGRESSIVE 95 R Radio 73 Rear Panel 100 Region Code 8, 95 Remote 67, 101 REPEAT 42 Resume Play 32 S S VIDEO 23 Scan 43 SCENE 11 Scene 7, 95 SCREEN SAVER 79 SCREEN SETUP 78 Setup Display 77 SHUFFLE 41 Shuffle Play 41 SIZE 81 SLEEP 75 Slide show 37 Slow-motion 43 Sound Field 53 SPEAKER SETUP 81 Speaker System Hookup 14 SUBTITLE 61, 78 Super Audio CD 95 Surround Back Decoding Mode 57 T TEST TONE...
... Program Play 39 PROGRESSIVE 95 R Radio 73 Rear Panel 100 Region Code 8, 95 Remote 67, 101 REPEAT 42 Resume Play 32 S S VIDEO 23 Scan 43 SCENE 11 Scene 7, 95 SCREEN SAVER 79 SCREEN SETUP 78 Setup Display 77 SHUFFLE 41 Shuffle Play 41 SIZE 81 SLEEP 75 Slide show 37 Slow-motion 43 Sound Field 53 SPEAKER SETUP 81 Speaker System Hookup 14 SUBTITLE 61, 78 Super Audio CD 95 Surround Back Decoding Mode 57 T TEST TONE...

Operating Instructions
Page 108
... works. TUNING -/+: Scan all preset stations. ek Sets the speaker parameter and changes the brightness of settings. Switches monaural or stereo of the TV. Q Press to turn off . Z Mutes the sound. TV mode: tuns in common with other Sony DVD products may respond. wj Displays the DVD menu on the TV screen to set or adjust the items. I Select the sound field. e; PRESET -/+: Scan all available radio stations. K Displays the setup display on the TV screen. eg Changes the input mode of FM stereo...
... works. TUNING -/+: Scan all preset stations. ek Sets the speaker parameter and changes the brightness of settings. Switches monaural or stereo of the TV. Q Press to turn off . Z Mutes the sound. TV mode: tuns in common with other Sony DVD products may respond. wj Displays the DVD menu on the TV screen to set or adjust the items. I Select the sound field. e; PRESET -/+: Scan all available radio stations. K Displays the setup display on the TV screen. eg Changes the input mode of FM stereo...


