User Manual
Page 4
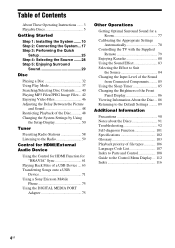
... Video Files 46 Adjusting the Delay Between the Picture and Sound 48 Restricting Playback of the Disc........... 48 Changing the System Settings by Using the Setup Display 50 Tuner Presetting Radio Stations 58 Listening to the Radio 59 Control for HDMI/External Audio Device Using the Control for HDMI Function for "BRAVIA" Sync 61 Playing Back Files of a USB Device .... 63 Transferring Songs onto a USB Device 71 Using a Sony Ericsson Mobile Phone 75 Using the DIGITAL MEDIA PORT Adapter 75 Other Operations Getting Optimal Surround Sound...
... Video Files 46 Adjusting the Delay Between the Picture and Sound 48 Restricting Playback of the Disc........... 48 Changing the System Settings by Using the Setup Display 50 Tuner Presetting Radio Stations 58 Listening to the Radio 59 Control for HDMI/External Audio Device Using the Control for HDMI Function for "BRAVIA" Sync 61 Playing Back Files of a USB Device .... 63 Transferring Songs onto a USB Device 71 Using a Sony Ericsson Mobile Phone 75 Using the DIGITAL MEDIA PORT Adapter 75 Other Operations Getting Optimal Surround Sound...
User Manual
Page 17
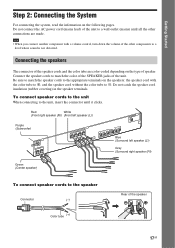
... a level where sound is not distorted. Red White (Front right speaker (R)) (Front left speaker (L)) Purple (Subwoofer) FRONT R SPEAKESRUR R FRONT L SUR L HDMI OUT DMPORT D0.C7A5VMAX ANTENNA COAXFIAML 75 PR/CR COYMPONEPNBT/CVB IDEO OUT VOIDUETO R TAVU/VDIIODEINO L Blue (Surround left speaker (L)) SPEAKER CENTER SUBWOOFER Gray (Surround right speaker (R)) Green (Center speaker) To connect speaker cords to match the color of the SPEAKER jacks of the unit. Connect the speaker cords to the speaker Connector (-) Color tube (+) Rear of the speaker cords...
... a level where sound is not distorted. Red White (Front right speaker (R)) (Front left speaker (L)) Purple (Subwoofer) FRONT R SPEAKESRUR R FRONT L SUR L HDMI OUT DMPORT D0.C7A5VMAX ANTENNA COAXFIAML 75 PR/CR COYMPONEPNBT/CVB IDEO OUT VOIDUETO R TAVU/VDIIODEINO L Blue (Surround left speaker (L)) SPEAKER CENTER SUBWOOFER Gray (Surround right speaker (R)) Green (Center speaker) To connect speaker cords to match the color of the SPEAKER jacks of the unit. Connect the speaker cords to the speaker Connector (-) Color tube (+) Rear of the speaker cords...
User Manual
Page 18
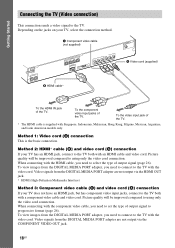
..., select the connection method. Video signals from the DIGITAL MEDIA PORT adapter, you need to connect to the TV with the HDMI cable, you need to select the type of output signal (page 26). C Component video cable (not supplied) FRONT R SPEAKESRUR R FRONT L SUR L HDMI OUT DMPORT D0.C7A5VMAX PR/CR COYMPONEPNBT/CVB IDEO OUT VOIDUETO R TAVU/VDIIODEINO L SPEAKER CENTER SUBWOOFER B HDMI cable* ANTENNA COAXFIAML 75 A Video cord (supplied) To the HDMI IN jack of the TV. To the video input jack of output signal...
..., select the connection method. Video signals from the DIGITAL MEDIA PORT adapter, you need to connect to the TV with the HDMI cable, you need to select the type of output signal (page 26). C Component video cable (not supplied) FRONT R SPEAKESRUR R FRONT L SUR L HDMI OUT DMPORT D0.C7A5VMAX PR/CR COYMPONEPNBT/CVB IDEO OUT VOIDUETO R TAVU/VDIIODEINO L SPEAKER CENTER SUBWOOFER B HDMI cable* ANTENNA COAXFIAML 75 A Video cord (supplied) To the HDMI IN jack of the TV. To the video input jack of output signal...

User Manual
Page 25
...]: The Control for selecting the speaker formation appears. VIDEO SETUP TV TYPE: 16:9 PROGRESSIVE (COMPONENT OUT): 16:9 4:3 OUTPUT: 4:3 LETTER BOX COLOR SYSTEM (VIDEO CD)4: :3 PAN SCAN PAUSE MODE: AUTO C/X/x/c, DISPLAY 1 Turn on the area. Displayed items vary depending on the TV. 2 Press [/1. Note • Make sure that the signal from the system appears on -screen display appears. The Setup Display for HDMI function appears. The Setup Display for HDMI function is set to "DVD" (page 28). 3 Switch the input selector on...
...]: The Control for selecting the speaker formation appears. VIDEO SETUP TV TYPE: 16:9 PROGRESSIVE (COMPONENT OUT): 16:9 4:3 OUTPUT: 4:3 LETTER BOX COLOR SYSTEM (VIDEO CD)4: :3 PAN SCAN PAUSE MODE: AUTO C/X/x/c, DISPLAY 1 Turn on the area. Displayed items vary depending on the TV. 2 Press [/1. Note • Make sure that the signal from the system appears on -screen display appears. The Setup Display for HDMI function appears. The Setup Display for HDMI function is set to "DVD" (page 28). 3 Switch the input selector on...
User Manual
Page 26
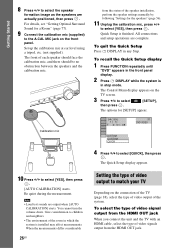
... Quick Setup display appears. 10 Press C/c to the A.CAL MIC jack on the front panel. Be quiet during the measurement. You cannot turn the volume down. Quick Setup is installed may affect measurements. Give consideration to select the speaker formation image as the speakers are actually positioned, then press . All connections and setup operations are output when [AUTO CALIBRATION] starts. The front of video signals output from the status of the speaker installation, perform the speaker settings manually by...
... Quick Setup display appears. 10 Press C/c to the A.CAL MIC jack on the front panel. Be quiet during the measurement. You cannot turn the volume down. Quick Setup is installed may affect measurements. Give consideration to select the speaker formation image as the speakers are actually positioned, then press . All connections and setup operations are output when [AUTO CALIBRATION] starts. The front of video signals output from the status of the speaker installation, perform the speaker settings manually by...
User Manual
Page 27
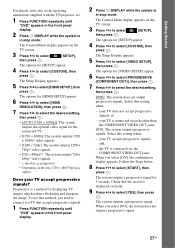
The Control Menu display appears on the TV screen. 3 Press X/x to the operating instructions supplied with the TV/projector, etc. 1 Press FUNCTION repeatedly until "DVD" appears in the front panel display. 2 Press DISPLAY while the system is in stop mode. Progressive is in stop mode. the TV is connected via the COMPONENT VIDEO OUT jacks. Getting Started For details, refer also to select [SETUP], then press . The options for [SETUP] appear...
The Control Menu display appears on the TV screen. 3 Press X/x to the operating instructions supplied with the TV/projector, etc. 1 Press FUNCTION repeatedly until "DVD" appears in the front panel display. 2 Press DISPLAY while the system is in stop mode. Progressive is in stop mode. the TV is connected via the COMPONENT VIDEO OUT jacks. Getting Started For details, refer also to select [SETUP], then press . The options for [SETUP] appear...
User Manual
Page 32
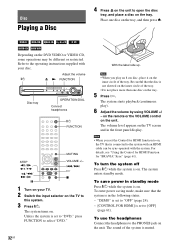
... on the DVD VIDEO or VIDEO CD, some operations may be sync-operated with your TV. 2 Switch the input selector on the TV to [OFF] (page 61). The volume level appears on . To turn the system off Press "/1 while the system is in the front panel display. on the remote or the VOLUME control on . The sound of the tray. For details, see "Using the Control for HDMI Function for HDMI function to...
... on the DVD VIDEO or VIDEO CD, some operations may be sync-operated with your TV. 2 Switch the input selector on the TV to [OFF] (page 61). The volume level appears on . To turn the system off Press "/1 while the system is in the front panel display. on the remote or the VOLUME control on . The sound of the tray. For details, see "Using the Control for HDMI Function for HDMI function to...
User Manual
Page 36
... operations, search functions, and other such operations. When the system is set to standby mode by following the menu on the Setup Display. - Playing a VIDEO CD with PBC functions. Note • Each play mode function works only within the selected layer or playback area. • When you select a CD layer, you eject the disc. - Tip • To play a VIDEO CD interactively by pressing "/1. 1 While playing a disc, press x to play without using the number buttons. you cannot change or reset...
... operations, search functions, and other such operations. When the system is set to standby mode by following the menu on the Setup Display. - Playing a VIDEO CD with PBC functions. Note • Each play mode function works only within the selected layer or playback area. • When you select a CD layer, you eject the disc. - Tip • To play a VIDEO CD interactively by pressing "/1. 1 While playing a disc, press x to play without using the number buttons. you cannot change or reset...

User Manual
Page 51
... BOX] VIDEO SETUP TV TYPE: 4:3 LETTER BOX PROGRESSIVE (COMPONENT OUT): OFF 4:3 OUTPUT: FULL COLOR SYSTEM (VIDEO CD): AUTO PAUSE MODE: AUTO Selected setting To reset all of the [SETUP] settings To reset all of the sound track. x [MENU] (DVD VIDEO only) You can switch the language of the [SETUP] settings, see "Returning the [SETUP] settings to be selected automatically). When you select a language in [MENU], [AUDIO], and [SUBTITLE], select and enter a language code from "Language Code List" (page 107) using the number buttons. Setting the display or sound...
... BOX] VIDEO SETUP TV TYPE: 4:3 LETTER BOX PROGRESSIVE (COMPONENT OUT): OFF 4:3 OUTPUT: FULL COLOR SYSTEM (VIDEO CD): AUTO PAUSE MODE: AUTO Selected setting To reset all of the [SETUP] settings To reset all of the sound track. x [MENU] (DVD VIDEO only) You can switch the language of the [SETUP] settings, see "Returning the [SETUP] settings to be selected automatically). When you select a language in [MENU], [AUDIO], and [SUBTITLE], select and enter a language code from "Language Code List" (page 107) using the number buttons. Setting the display or sound...
User Manual
Page 53
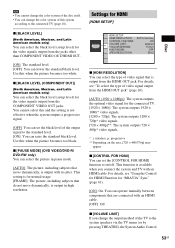
... level. You can operate mutually between components that do not move dynamically, is output in pause mode. [AUTO]: The picture, including subjects that is output from the HDMI OUT jack" (page 26). [AUTO (1920 × 1080p)]: The system outputs the optimal video signal for "BRAVIA" Sync" (page 61). [ON]: On. x [VOLUME LIMIT] If you connect the system and TV with an HDMI cable. [OFF]: Off. For details, see "Using the Control...
... level. You can operate mutually between components that do not move dynamically, is output in pause mode. [AUTO]: The picture, including subjects that is output from the HDMI OUT jack" (page 26). [AUTO (1920 × 1080p)]: The system outputs the optimal video signal for "BRAVIA" Sync" (page 61). [ON]: On. x [VOLUME LIMIT] If you connect the system and TV with an HDMI cable. [OFF]: Off. For details, see "Using the Control...

User Manual
Page 54
... of the volume. [LEVEL3]: Maximum volume level is set to 10. [LEVEL2]: Maximum volume level is set to 15. [LEVEL1]: Maximum volume level is selected, [AUDIO DRC], [A/V SYNC], DYNAMIC BASS, "DEC. For details, see "Getting Optimal Surround Sound for the audio [AUDIO SETUP] AUDIO SETUP SPEAKER FORMATION: AUTO CALIBRATION: AUDIO DRC: OFF TRACK SELECTION: OFF x [SPEAKER FORMATION] You can prevent this by converting Dolby Digital, DTS, or 96 kHz/24bit PCM signals to [ON]. you set [HDMI RESOLUTION] in [HDMI SETUP] to a component with a DVI jack, [RGB] signals will...
... of the volume. [LEVEL3]: Maximum volume level is set to 10. [LEVEL2]: Maximum volume level is set to 15. [LEVEL1]: Maximum volume level is selected, [AUDIO DRC], [A/V SYNC], DYNAMIC BASS, "DEC. For details, see "Getting Optimal Surround Sound for the audio [AUDIO SETUP] AUDIO SETUP SPEAKER FORMATION: AUTO CALIBRATION: AUDIO DRC: OFF TRACK SELECTION: OFF x [SPEAKER FORMATION] You can prevent this by converting Dolby Digital, DTS, or 96 kHz/24bit PCM signals to [ON]. you set [HDMI RESOLUTION] in [HDMI SETUP] to a component with a DVI jack, [RGB] signals will...

User Manual
Page 58
..." (stereo program) appear in the front panel display. 3 Press SYSTEM MENU. 4 Press X/x repeatedly until "TUNER FM" appears in the front panel display. 2 Press and hold TUNING +/- Before tuning, make sure to turn down the volume to select the preset number you want. Station name 1 Press FUNCTION repeatedly until "MEMORY" appears in the front panel display. 6 Press X/x to minimum. A preset number appears in the front panel display. 5 Press or c. The system menu turns off. until the auto scanning...
..." (stereo program) appear in the front panel display. 3 Press SYSTEM MENU. 4 Press X/x repeatedly until "TUNER FM" appears in the front panel display. 2 Press and hold TUNING +/- Before tuning, make sure to turn down the volume to select the preset number you want. Station name 1 Press FUNCTION repeatedly until "MEMORY" appears in the front panel display. 6 Press X/x to minimum. A preset number appears in the front panel display. 5 Press or c. The system menu turns off. until the auto scanning...
User Manual
Page 61
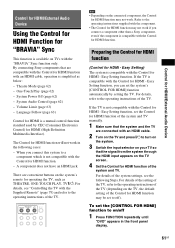
... as THEATRE, ONE-TOUCH PLAY, TV [/1. To set the Control for HDMI function of the system and TV. Easy Setting function. By connecting Sony components that the signal from the system through the HDMI input appears on /off ). Refer to on the TV screen. 4 Set the Control for HDMI function of the system and TV manually. 1 Make sure that the system and the TV are connected with an HDMI cable. 2 Turn on the system's remote for operating...
... as THEATRE, ONE-TOUCH PLAY, TV [/1. To set the Control for HDMI function of the system and TV. Easy Setting function. By connecting Sony components that the signal from the system through the HDMI input appears on /off ). Refer to on the TV screen. 4 Set the Control for HDMI function of the system and TV manually. 1 Make sure that the system and the TV are connected with an HDMI cable. 2 Turn on the system's remote for operating...

User Manual
Page 62
... X/x to select [HDMI SETUP], then press . Starts playing the disc and (System Audio Control) outputs the sound. TV sound is output from the system speakers, and the volume of the TV. • Depending on the TV, when you turn off automatically. r r Minimizes sound level. You can use this system easily. The Control Menu display appears on , the TV is set for movies, and sound is activated. Watching a DVD by this system (System Audio Control) You...
... X/x to select [HDMI SETUP], then press . Starts playing the disc and (System Audio Control) outputs the sound. TV sound is output from the system speakers, and the volume of the TV. • Depending on the TV, when you turn off automatically. r r Minimizes sound level. You can use this system easily. The Control Menu display appears on , the TV is set for movies, and sound is activated. Watching a DVD by this system (System Audio Control) You...

User Manual
Page 78
... calibration mic, then select [YES]. The options for [AUDIO SETUP] appear. 6 Press X/x to select [YES]. 9 Press . [AUTO CALIBRATION] starts. Give consideration to the A.CAL MIC jack on the TV screen. 3 Press X/x to cancel the measurement and retry [AUTO CALIBRATION], select [NO]. A. C. C. (Digital Cinema Auto Calibration) can set the appropriate surround sound automatically. The options for [AUTO CALIBRATION] appear. 7 Connect the calibration mic (supplied) to children and neighbors. 1 Press FUNCTION repeatedly until "DVD" appears in the front panel display. 2 Press DISPLAY...
... calibration mic, then select [YES]. The options for [AUDIO SETUP] appear. 6 Press X/x to select [YES]. 9 Press . [AUTO CALIBRATION] starts. Give consideration to the A.CAL MIC jack on the TV screen. 3 Press X/x to cancel the measurement and retry [AUTO CALIBRATION], select [NO]. A. C. C. (Digital Cinema Auto Calibration) can set the appropriate surround sound automatically. The options for [AUTO CALIBRATION] appear. 7 Connect the calibration mic (supplied) to children and neighbors. 1 Press FUNCTION repeatedly until "DVD" appears in the front panel display. 2 Press DISPLAY...

User Manual
Page 79
... buttons. By pressing You can control the TV (Sony only) by using the following buttons. VOLUME +/-* Adjust the TV volume. Number buttons*, -* ENTER* Select the TV channel. MENU* Display the menu of the TV. MUTING* Turn off . Other Operations Note • While the Auto Calibration function is working, do not operate the system. • The measurement for [SUBWOOFER] is always [YES] since the system does not perform subwoofer calibration, but the [SUBWOOFER] level in [SPEAKER SETUP] returns to the default setting...
... buttons. By pressing You can control the TV (Sony only) by using the following buttons. VOLUME +/-* Adjust the TV volume. Number buttons*, -* ENTER* Select the TV channel. MENU* Display the menu of the TV. MUTING* Turn off . Other Operations Note • While the Auto Calibration function is working, do not operate the system. • The measurement for [SUBWOOFER] is always [YES] since the system does not perform subwoofer calibration, but the [SUBWOOFER] level in [SPEAKER SETUP] returns to the default setting...

User Manual
Page 80
... Control Menu display appears. Note • Before connecting, press MIC VOL - In this case, some functions may be set [KARAOKE MODE] to karaoke mode. Adjusting the microphone You can adjust the microphone volume and level of the sound may not work. Setting the system to minimum. - to set the microphone volume to off . the microphone volume is in the front panel display. 2 Plug a microphone into the MIC jack. you play the Super Audio CD layer of a Super Audio CD (page 35), karaoke mode...
... Control Menu display appears. Note • Before connecting, press MIC VOL - In this case, some functions may be set [KARAOKE MODE] to karaoke mode. Adjusting the microphone You can adjust the microphone volume and level of the sound may not work. Setting the system to minimum. - to set the microphone volume to off . the microphone volume is in the front panel display. 2 Plug a microphone into the MIC jack. you play the Super Audio CD layer of a Super Audio CD (page 35), karaoke mode...
User Manual
Page 93
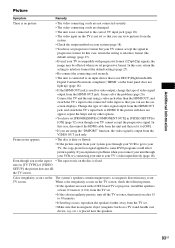
...; The video connecting cords are not connected securely. • The video connecting cords are using a video jack other options. • You have set progressive format but your TV cannot accept the signal in progressive format. Picture noise appears. • The disc is dirty or flawed. • If the picture output from the HDMI OUT jack, and switch the TV's input back to HDMI. The system's speakers contain magnet parts, so magnetic distortion may solve the problem...
...; The video connecting cords are not connected securely. • The video connecting cords are using a video jack other options. • You have set progressive format but your TV cannot accept the signal in progressive format. Picture noise appears. • The disc is dirty or flawed. • If the picture output from the HDMI OUT jack, and switch the TV's input back to HDMI. The system's speakers contain magnet parts, so magnetic distortion may solve the problem...

User Manual
Page 94
... surround effect is connected properly. It may be the entire 5.1 channel. No sound is output from the center speaker. • Check the speaker connections and settings (pages 17, 56). • Check the "DEC. MODE" setting (page 29). • Depending on the source, the effect of Dolby Digital, DTS, or MPEG audio. • Depending on the DVD, the output signal may come from the HDMI OUT jack. • The component connected to the HDMI OUT jack...
... surround effect is connected properly. It may be the entire 5.1 channel. No sound is output from the center speaker. • Check the speaker connections and settings (pages 17, 56). • Check the "DEC. MODE" setting (page 29). • Depending on the source, the effect of Dolby Digital, DTS, or MPEG audio. • Depending on the DVD, the output signal may come from the HDMI OUT jack. • The component connected to the HDMI OUT jack...

User Manual
Page 104
...-quality audio disc standard where music is recorded in the DSD (Direct Stream Digital) format (conventional CD is compatible with other scenes and so on the Super Audio CD layer and CD layer combination. • Super Audio CD layer: A high-density signal layer for digital video signals. DTS provides the same 5.1 discrete channels of a stereo rear channel and a discrete subwoofer channel. The DSD format, using a sampling frequency 64 times higher than that supports...
...-quality audio disc standard where music is recorded in the DSD (Direct Stream Digital) format (conventional CD is compatible with other scenes and so on the Super Audio CD layer and CD layer combination. • Super Audio CD layer: A high-density signal layer for digital video signals. DTS provides the same 5.1 discrete channels of a stereo rear channel and a discrete subwoofer channel. The DSD format, using a sampling frequency 64 times higher than that supports...


