User Manual
Page 3
... pending. "PLAYSTATION" is intended for home and other limited viewing uses only unless otherwise authorized by Macrovision, and is a trademark of Sony Corporation. and are expressed in these Operating Instructions describe the controls on the area. • "DVD" may vary depending on the... are used as those on the remote. • The Control Menu items may be authorized by Macrovision. HDMI, the HDMI logo and High-Definition Multimedia Interface are registered trademarks of this copyright protection technology must be used under license from Dolby Laboratories.
... pending. "PLAYSTATION" is intended for home and other limited viewing uses only unless otherwise authorized by Macrovision, and is a trademark of Sony Corporation. and are expressed in these Operating Instructions describe the controls on the area. • "DVD" may vary depending on the... are used as those on the remote. • The Control Menu items may be authorized by Macrovision. HDMI, the HDMI logo and High-Definition Multimedia Interface are registered trademarks of this copyright protection technology must be used under license from Dolby Laboratories.
User Manual
Page 4
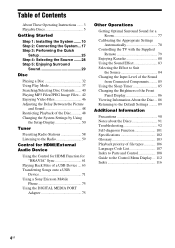
... the System Settings by Using the Setup Display 50 Tuner Presetting Radio Stations 58 Listening to the Radio 59 Control for HDMI/External Audio Device Using the Control for HDMI Function for "BRAVIA" Sync 61 Playing Back Files of a USB Device .... 63 Transferring Songs onto a USB Device 71... Using a Sony Ericsson Mobile Phone 75 Using the DIGITAL MEDIA PORT Adapter 75 Other Operations Getting Optimal Surround Sound for a Room 77 ...
... the System Settings by Using the Setup Display 50 Tuner Presetting Radio Stations 58 Listening to the Radio 59 Control for HDMI/External Audio Device Using the Control for HDMI Function for "BRAVIA" Sync 61 Playing Back Files of a USB Device .... 63 Transferring Songs onto a USB Device 71... Using a Sony Ericsson Mobile Phone 75 Using the DIGITAL MEDIA PORT Adapter 75 Other Operations Getting Optimal Surround Sound for a Room 77 ...
User Manual
Page 8
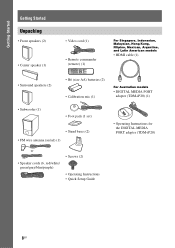
... speakers (2) • Center speaker (1) • Video cord (1) • Remote commander (remote) (1) For Singapore, Indonesian, Malaysian, Hong Kong, Filipino, Mexican, Argentine, and Latin American models • HDMI cable (1) • Surround speakers (2) • R6 (size AA) batteries (2) • Calibration mic (1) For Australian models • DIGITAL MEDIA PORT adapter (TDM-iP20) (1) • Subwoofer (1) •...
... speakers (2) • Center speaker (1) • Video cord (1) • Remote commander (remote) (1) For Singapore, Indonesian, Malaysian, Hong Kong, Filipino, Mexican, Argentine, and Latin American models • HDMI cable (1) • Surround speakers (2) • R6 (size AA) batteries (2) • Calibration mic (1) For Australian models • DIGITAL MEDIA PORT adapter (TDM-iP20) (1) • Subwoofer (1) •...
User Manual
Page 17
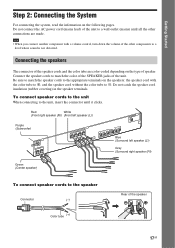
... volume of the unit to a level where sound is not distorted. Red White (Front right speaker (R)) (Front left speaker (L)) Purple (Subwoofer) FRONT R SPEAKESRUR R FRONT L SUR L HDMI OUT DMPORT D0.C7A5VMAX ANTENNA COAXFIAML 75 PR/CR COYMPONEPNBT/CVB IDEO OUT VOIDUETO R TAVU/VDIIODEINO L Blue (Surround left speaker (L)) SPEAKER CENTER SUBWOOFER Gray (Surround...
... volume of the unit to a level where sound is not distorted. Red White (Front right speaker (R)) (Front left speaker (L)) Purple (Subwoofer) FRONT R SPEAKESRUR R FRONT L SUR L HDMI OUT DMPORT D0.C7A5VMAX ANTENNA COAXFIAML 75 PR/CR COYMPONEPNBT/CVB IDEO OUT VOIDUETO R TAVU/VDIIODEINO L Blue (Surround left speaker (L)) SPEAKER CENTER SUBWOOFER Gray (Surround...
User Manual
Page 18
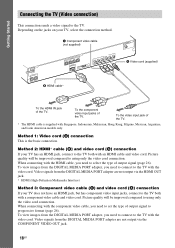
...video input jacks, connect to using only the video cord connection. To the video input jack of the TV. * The HDMI cable is the basic connection. Method 2: HDMI* cable (B) and video cord (A) connection If your TV, select the connection method. Picture quality will be improved compared to.... Getting Started Connecting the TV (Video connection) This connection sends a video signal to progressive format (page 26). When connecting with the HDMI cable, you need to connect to using only the video cord connection. Video signals from the DIGITAL MEDIA PORT adapter, you need to ...
...video input jacks, connect to using only the video cord connection. To the video input jack of the TV. * The HDMI cable is the basic connection. Method 2: HDMI* cable (B) and video cord (A) connection If your TV, select the connection method. Picture quality will be improved compared to.... Getting Started Connecting the TV (Video connection) This connection sends a video signal to progressive format (page 26). When connecting with the HDMI cable, you need to connect to using only the video cord connection. Video signals from the DIGITAL MEDIA PORT adapter, you need to ...
User Manual
Page 20
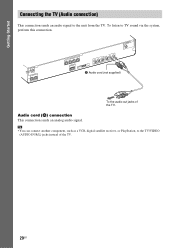
... satellite receiver, or PlayStation, to the TV/VIDEO (AUDIO IN R/L) jacks instead of the TV. SPEAKER CENTER SUBWOOFER ANTENNA COAXFIAML 75 FRONT R SPEAKESRUR R FRONT L SUR L HDMI OUT DMPORT D0.C7A5VMAX PR/CR COYMPONEPNBT/CVB IDEO OUT VOIDUETO R TAVU/VDIIODEINO L D Audio cord (not supplied) To the audio out jacks of the TV...
... satellite receiver, or PlayStation, to the TV/VIDEO (AUDIO IN R/L) jacks instead of the TV. SPEAKER CENTER SUBWOOFER ANTENNA COAXFIAML 75 FRONT R SPEAKESRUR R FRONT L SUR L HDMI OUT DMPORT D0.C7A5VMAX PR/CR COYMPONEPNBT/CVB IDEO OUT VOIDUETO R TAVU/VDIIODEINO L D Audio cord (not supplied) To the audio out jacks of the TV...
User Manual
Page 21
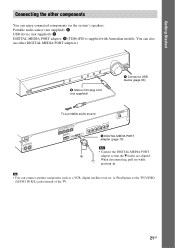
... the TV/VIDEO (AUDIO IN R/L) jacks instead of the TV. 21GB To a portable audio source ANTENNA COAXFIAML 75 SPEAKER CENTER SUBWOOFER FRONT R SPEAKESRUR R FRONT L SUR L HDMI OUT DMPORT D0.C7A5VMAX PR/CR COYMPONEPNBT/CVB IDEO OUT VOIDUETO R TAVU/VDIIODEINO L G DIGITAL MEDIA PORT adapter (page 75) Note • Connect the DIGITAL MEDIA...
... the TV/VIDEO (AUDIO IN R/L) jacks instead of the TV. 21GB To a portable audio source ANTENNA COAXFIAML 75 SPEAKER CENTER SUBWOOFER FRONT R SPEAKESRUR R FRONT L SUR L HDMI OUT DMPORT D0.C7A5VMAX PR/CR COYMPONEPNBT/CVB IDEO OUT VOIDUETO R TAVU/VDIIODEINO L G DIGITAL MEDIA PORT adapter (page 75) Note • Connect the DIGITAL MEDIA...

User Manual
Page 25
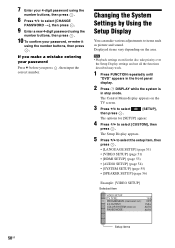
... OUTPUT: 4:3 LETTER BOX COLOR SYSTEM (VIDEO CD)4: :3 PAN SCAN PAUSE MODE: AUTO C/X/x/c, DISPLAY 1 Turn on the area. HDMI SETUP HDMI RESOLUTION: CONTROL FOR HDMI: VOLUME LIMIT: YCBCR/RGB(HDMI): AUDIO(HDMI): JPEG RESOLUTION: AUTO(1920x1080p) ON ON OFF OFF SD 7 Press X/x to select the setting, then press . • ... 52) • [4:3 LETTER BOX] or [4:3 PAN SCAN]: For a 4:3 standard TV (page 52) The Setup Display for the Control for HDMI function is set to select the setting that the signal from the system appears on -screen display appears. "/1 5 Press X/x to run QUICK SETUP...
... OUTPUT: 4:3 LETTER BOX COLOR SYSTEM (VIDEO CD)4: :3 PAN SCAN PAUSE MODE: AUTO C/X/x/c, DISPLAY 1 Turn on the area. HDMI SETUP HDMI RESOLUTION: CONTROL FOR HDMI: VOLUME LIMIT: YCBCR/RGB(HDMI): AUDIO(HDMI): JPEG RESOLUTION: AUTO(1920x1080p) ON ON OFF OFF SD 7 Press X/x to select the setting, then press . • ... 52) • [4:3 LETTER BOX] or [4:3 PAN SCAN]: For a 4:3 standard TV (page 52) The Setup Display for the Control for HDMI function is set to select the setting that the signal from the system appears on -screen display appears. "/1 5 Press X/x to run QUICK SETUP...
User Manual
Page 26
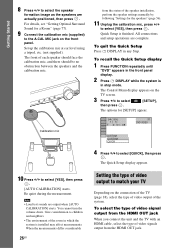
... to the A.CAL MIC jack on the front panel. To select the type of video signal output from the HDMI OUT jack When you connect the unit and the TV with an HDMI cable, select the type of video signals output from the status of the room in which the system is... The Quick Setup display appears. 10 Press C/c to select the speaker formation image as the speakers are actually positioned, then press . Calibration mic from the HDMI OUT jack. When the measurements differ considerably 26GB Setting the type of each speaker should face the calibration mic, and there should be no obstruction...
... to the A.CAL MIC jack on the front panel. To select the type of video signal output from the HDMI OUT jack When you connect the unit and the TV with an HDMI cable, select the type of video signals output from the status of the room in which the system is... The Quick Setup display appears. 10 Press C/c to select the speaker formation image as the speakers are actually positioned, then press . Calibration mic from the HDMI OUT jack. When the measurements differ considerably 26GB Setting the type of each speaker should face the calibration mic, and there should be no obstruction...
User Manual
Page 27
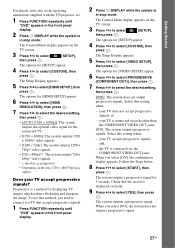
...options for [SETUP] appear. 4 Press X/x to select [CUSTOM], then press . your TV accept progressive signals? The options for [HDMI SETUP] appear. 6 Press X/x to select [HDMI RESOLUTION], then press . 7 Press X/x to select the desired setting, then press . • [AUTO (1920 × 1080p... the optimal video signal for [VIDEO SETUP] appear. 6 Press X/x to select [PROGRESSIVE (COMPONENT OUT)], then press . 7 Press X/x to select [HDMI SETUP], then press . Select this setting when: - The system outputs a progressive signal. The Setup Display appears. 5 Press X/x to select the desired...
...options for [SETUP] appear. 4 Press X/x to select [CUSTOM], then press . your TV accept progressive signals? The options for [HDMI SETUP] appear. 6 Press X/x to select [HDMI RESOLUTION], then press . 7 Press X/x to select the desired setting, then press . • [AUTO (1920 × 1080p... the optimal video signal for [VIDEO SETUP] appear. 6 Press X/x to select [PROGRESSIVE (COMPONENT OUT)], then press . 7 Press X/x to select [HDMI SETUP], then press . Select this setting when: - The system outputs a progressive signal. The Setup Display appears. 5 Press X/x to select the desired...
User Manual
Page 32
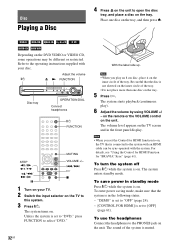
... on the inner circle of the system is set to on the DVD VIDEO or VIDEO CD, some operations may be sync-operated with an HDMI cable can be different or restricted. on the remote or the VOLUME control on . For details, see "Using the Control for... HDMI Function for HDMI function to "OFF" (page 24). - [CONTROL FOR HDMI] is muted. To use the headphones Connect the headphones to open the disc tray, and place a disc on the tray. 5 Press...
... on the inner circle of the system is set to on the DVD VIDEO or VIDEO CD, some operations may be sync-operated with an HDMI cable can be different or restricted. on the remote or the VOLUME control on . For details, see "Using the Control for... HDMI Function for HDMI function to "OFF" (page 24). - [CONTROL FOR HDMI] is muted. To use the headphones Connect the headphones to open the disc tray, and place a disc on the tray. 5 Press...
User Manual
Page 36
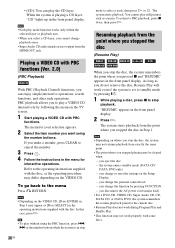
... appear as the operating procedure may be cleared when: - In this case, press H. You cannot play without using the number buttons. Resuming playback from the HDMI OUT jack. you to select a track, then press H or . the system enters standby mode (DATA CD/ DATA DVD only). - PBC playback allows you eject the...
... appear as the operating procedure may be cleared when: - In this case, press H. You cannot play without using the number buttons. Resuming playback from the HDMI OUT jack. you to select a track, then press H or . the system enters standby mode (DATA CD/ DATA DVD only). - PBC playback allows you eject the...

User Manual
Page 44
... When a JPEG image file is displayed on the TV screen, you can rotate the JPEG image file in [HDMI SETUP] to [(1920 × 1080i) HD ] or [(1920 × 1080i) HD] (page 54). Sony recommends that you set [JPEG RESOLUTION] in 90 degree increments. Selecting the slide show with sound by pressing DVD...
... When a JPEG image file is displayed on the TV screen, you can rotate the JPEG image file in [HDMI SETUP] to [(1920 × 1080i) HD ] or [(1920 × 1080i) HD] (page 54). Sony recommends that you set [JPEG RESOLUTION] in 90 degree increments. Selecting the slide show with sound by pressing DVD...

User Manual
Page 45
... [(1920 × 1080i) HD ] or [(1920 × 1080i) HD] (page 54). Note • The [EFFECT] setting is not effective when you set [JPEG RESOLUTION] in [HDMI SETUP] to select a setting. • [MUSIC/PHOTO]: You can play JPEG image files as a slide show . 6 Press .
... [(1920 × 1080i) HD ] or [(1920 × 1080i) HD] (page 54). Note • The [EFFECT] setting is not effective when you set [JPEG RESOLUTION] in [HDMI SETUP] to select a setting. • [MUSIC/PHOTO]: You can play JPEG image files as a slide show . 6 Press .
User Manual
Page 50
... press . The options for [SETUP] appear. 4 Press X/x to select the setup item, then press . • [LANGUAGE SETUP] (page 51) • [VIDEO SETUP] (page 51) • [HDMI SETUP] (page 53) • [AUDIO SETUP] (page 54) • [SYSTEM SETUP] (page 55) • [SPEAKER SETUP] (page 56) Example: [VIDEO SETUP] Selected item VIDEO SETUP...
... press . The options for [SETUP] appear. 4 Press X/x to select the setup item, then press . • [LANGUAGE SETUP] (page 51) • [VIDEO SETUP] (page 51) • [HDMI SETUP] (page 53) • [AUDIO SETUP] (page 54) • [SYSTEM SETUP] (page 55) • [SPEAKER SETUP] (page 56) Example: [VIDEO SETUP] Selected item VIDEO SETUP...
User Manual
Page 53
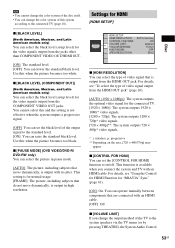
...(1920 × 1080p)]: The system outputs the optimal video signal for HDMI [HDMI SETUP] HDMI SETUP HDMI RESOLUTION: CONTROL FOR HDMI: VOLUME LIMIT: YCBCR/RGB(HDMI): AUDIO(HDMI): JPEG RESOLUTION: AUTO(1920x1080p) ON LEVEL2 YCBCR OFF SD x [HDMI RESOLUTION] You can select the type of video signal that do not ... × 480p]**: The system outputs 720 × 480p* video signals. * i: interlace, p: progressive ** Depending on /off. x [CONTROL FOR HDMI] You can set the black level of the output signal to the standard level. [ON]: You can raise the standard black level. Use this when...
...(1920 × 1080p)]: The system outputs the optimal video signal for HDMI [HDMI SETUP] HDMI SETUP HDMI RESOLUTION: CONTROL FOR HDMI: VOLUME LIMIT: YCBCR/RGB(HDMI): AUDIO(HDMI): JPEG RESOLUTION: AUTO(1920x1080p) ON LEVEL2 YCBCR OFF SD x [HDMI RESOLUTION] You can select the type of video signal that do not ... × 480p]**: The system outputs 720 × 480p* video signals. * i: interlace, p: progressive ** Depending on /off. x [CONTROL FOR HDMI] You can set the black level of the output signal to the standard level. [ON]: You can raise the standard black level. Use this when...

User Manual
Page 54
... HD]: The system outputs full size HD resolution without a black frame. [(1920 × 1080i) HD ]: The system outputs full size HD resolution with an HDMI cable and [ON] is selected, [AUDIO DRC], [A/V SYNC], DYNAMIC BASS, "DEC. Settings for the audio [AUDIO SETUP] AUDIO SETUP SPEAKER FORMATION: AUTO ... without a black frame. MODE," and sound mode are not applied to the sound that is output from the TV. • When you set [HDMI RESOLUTION] in [HDMI SETUP] to 20. [OFF]: Off. x [AUTO CALIBRATION] You can select the type of the volume. [LEVEL3]: Maximum volume level is set ...
... HD]: The system outputs full size HD resolution without a black frame. [(1920 × 1080i) HD ]: The system outputs full size HD resolution with an HDMI cable and [ON] is selected, [AUDIO DRC], [A/V SYNC], DYNAMIC BASS, "DEC. Settings for the audio [AUDIO SETUP] AUDIO SETUP SPEAKER FORMATION: AUTO ... without a black frame. MODE," and sound mode are not applied to the sound that is output from the TV. • When you set [HDMI RESOLUTION] in [HDMI SETUP] to 20. [OFF]: Off. x [AUTO CALIBRATION] You can select the type of the volume. [LEVEL3]: Maximum volume level is set ...
User Manual
Page 61
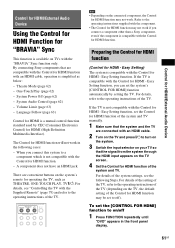
... may not work in the front panel display. 61GB By connecting Sony components that the signal from the system through the HDMI input appears on the TV screen. 4 Set the Control for HDMI function of the TV. The Control for HDMI function will not work . One-Touch Play (page 62) - Easy ...Setting function, you connect a component other than a Sony component, even if the component is compatible with the Control for HDMI - System Power Off (page 62) - To set to the operating instructions of the system and TV manually. 1 Make sure that ...
... may not work in the front panel display. 61GB By connecting Sony components that the signal from the system through the HDMI input appears on the TV screen. 4 Set the Control for HDMI function of the TV. The Control for HDMI function will not work . One-Touch Play (page 62) - Easy ...Setting function, you connect a component other than a Sony component, even if the component is compatible with the Control for HDMI - System Power Off (page 62) - To set to the operating instructions of the system and TV manually. 1 Make sure that ...

User Manual
Page 62
... function, set the function for TV power. TV sound is output from the system speakers, and the volume of the system is switched to select [HDMI SETUP], then press . The options for [SETUP] appear. 4 Press X/x to the operating instructions of the TV. • Depending on the TV, when you set... the system to HDMI input. For details, refer to select [CUSTOM], then press . Depending on the status of the system (ex. Note • One-Touch Play does not work...
... function, set the function for TV power. TV sound is output from the system speakers, and the volume of the system is switched to select [HDMI SETUP], then press . The options for [SETUP] appear. 4 Press X/x to the operating instructions of the TV. • Depending on the TV, when you set... the system to HDMI input. For details, refer to select [CUSTOM], then press . Depending on the status of the system (ex. Note • One-Touch Play does not work...
User Manual
Page 63
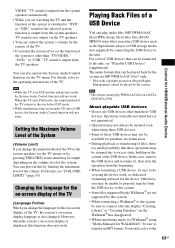
...; using "Media Manager for WALKMAN," be sure to do so using these USB devices. • Some of these USB devices may not be available for HDMI/External Audio Device The audio formats that these USB devices. When the TV exits PAP mode, the output method of the TV returns to the...
...; using "Media Manager for WALKMAN," be sure to do so using these USB devices. • Some of these USB devices may not be available for HDMI/External Audio Device The audio formats that these USB devices. When the TV exits PAP mode, the output method of the TV returns to the...


