Operating Instructions
Page 2
... a car parked in this equipment does cause harmful interference to radio or television reception, which the receiver is very easy to operate this Sony Handycam VisionTM camcorder. Never expose the battery pack to correct the interference by turning the equipment off and on, the user is intended to alert the user to rain or...
... a car parked in this equipment does cause harmful interference to radio or television reception, which the receiver is very easy to operate this Sony Handycam VisionTM camcorder. Never expose the battery pack to correct the interference by turning the equipment off and on, the user is intended to alert the user to rain or...
Operating Instructions
Page 3
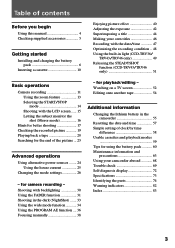
...end of clock by time difference 58 Usable cassettes and playback modes 59 Tips for using the battery pack 60 Maintenance information and precautions 63 Using your camcorder abroad 68 Trouble check 69 Self-diagnosis display 72 Specifications 73 Identifying the parts 74 Warning ...in light (CCD-TRV36/ TRV43/TRV46 only 49 Releasing the STEADYSHOT function (CCD-TRV43/TRV46 only 51 Basic operations Camera recording 11 Using the zoom feature 13 Selecting the START/STOP mode 14 Shooting with backlighting 30 Using the FADER function 31 Shooting in the camcorder 55 Resetting...
...end of clock by time difference 58 Usable cassettes and playback modes 59 Tips for using the battery pack 60 Maintenance information and precautions 63 Using your camcorder abroad 68 Trouble check 69 Self-diagnosis display 72 Specifications 73 Identifying the parts 74 Warning ...in light (CCD-TRV36/ TRV43/TRV46 only 49 Releasing the STEADYSHOT function (CCD-TRV43/TRV46 only 51 Basic operations Camera recording 11 Using the zoom feature 13 Selecting the START/STOP mode 14 Shooting with backlighting 30 Using the FADER function 31 Shooting in the camcorder 55 Resetting...
Operating Instructions
Page 5
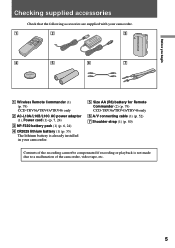
... only 2 AC-L10A/L10B/L10C AC power adaptor (1), Power cord (1) (p. 7, 24) 3 NP-F330 battery pack (1) (p. 6, 24) 4 CR2025 lithium battery (1) (p. 55) The lithium battery is already installed in your camcorder. 5 Size AA (R6) battery for Remote Commander (2) (p. 79) CCD-TRV36/TRV43/TRV46 only 6 A/V connecting cable (1) (p. 52) 7 Shoulder strap (1) (p. 80) Contents of the recording cannot be compensated if recording...
... only 2 AC-L10A/L10B/L10C AC power adaptor (1), Power cord (1) (p. 7, 24) 3 NP-F330 battery pack (1) (p. 6, 24) 4 CR2025 lithium battery (1) (p. 55) The lithium battery is already installed in your camcorder. 5 Size AA (R6) battery for Remote Commander (2) (p. 79) CCD-TRV36/TRV43/TRV46 only 6 A/V connecting cable (1) (p. 52) 7 Shoulder strap (1) (p. 80) Contents of the recording cannot be compensated if recording...
Operating Instructions
Page 6
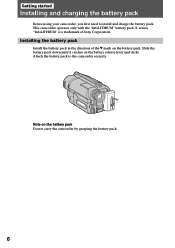
... of the $ mark on the battery pack. Installing the battery pack Install the battery pack in the direction of Sony Corporation. Slide the battery pack down until it catches on the battery pack Do not carry the camcorder by grasping the battery pack. 6 Note on the battery release lever and clicks. Attach the battery pack to install and charge the...
... of the $ mark on the battery pack. Installing the battery pack Install the battery pack in the direction of Sony Corporation. Slide the battery pack down until it catches on the battery pack Do not carry the camcorder by grasping the battery pack. 6 Note on the battery release lever and clicks. Attach the battery pack to install and charge the...

Operating Instructions
Page 7
... until FULL appears in the display window. It may differ from the DC IN jack of the camcorder. Getting started Installing and charging the battery pack Charging the battery pack Charge the battery pack on the display window. For full charge, which allows you to use the... recording time. 7 You can also use the battery longer than usual, leave the battery pack attached for about 1 hour after normal charge is completely charged. Use it is completed until the camcorder calculates remaining battery time. •Remaining battery time indication in the factory. (1) Open the ...
... until FULL appears in the display window. It may differ from the DC IN jack of the camcorder. Getting started Installing and charging the battery pack Charging the battery pack Charge the battery pack on the display window. For full charge, which allows you to use the... recording time. 7 You can also use the battery longer than usual, leave the battery pack attached for about 1 hour after normal charge is completely charged. Use it is completed until the camcorder calculates remaining battery time. •Remaining battery time indication in the factory. (1) Open the ...
Operating Instructions
Page 8
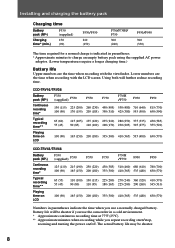
... 165 (150) 200 (180) 335 (300) 410 (365) 535 (480) F950 815 (730) 650 (590) 430 (385) 355 (320) 630 (570) CCD-TRV43/TRV46 Battery pack (NP-) Continuous recording time* F330 (supplied) F530 F550 F730 F730H /F750 F930 F950 125 (110) 215 (190) 250 (220) 430 (385) 510 (460...the viewfinder. Using both will be shorter. 8 Lower numbers are the time when recording with the LCD screen. The actual battery life may be shorter if you use the camcorder in a cold environment. * Approximate continuous recording time at 77°F (25°C). ** Approximate minutes when recording while you...
... 165 (150) 200 (180) 335 (300) 410 (365) 535 (480) F950 815 (730) 650 (590) 430 (385) 355 (320) 630 (570) CCD-TRV43/TRV46 Battery pack (NP-) Continuous recording time* F330 (supplied) F530 F550 F730 F730H /F750 F930 F950 125 (110) 215 (190) 250 (220) 430 (385) 510 (460...the viewfinder. Using both will be shorter. 8 Lower numbers are the time when recording with the LCD screen. The actual battery life may be shorter if you use the camcorder in a cold environment. * Approximate continuous recording time at 77°F (25°C). ** Approximate minutes when recording while you...
Operating Instructions
Page 9
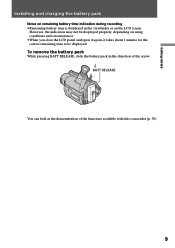
... for the correct remaining time to be displayed. Getting started Installing and charging the battery pack Notes on remaining battery time indication during recording •Remaining battery time is displayed in the direction of the functions available with this camcorder (p. 29). 9 BATT RELEASE You can look at the demonstration of the arrow. However, the...
... for the correct remaining time to be displayed. Getting started Installing and charging the battery pack Notes on remaining battery time indication during recording •Remaining battery time is displayed in the direction of the functions available with this camcorder (p. 29). 9 BATT RELEASE You can look at the demonstration of the arrow. However, the...
Operating Instructions
Page 11
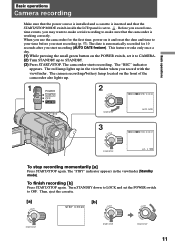
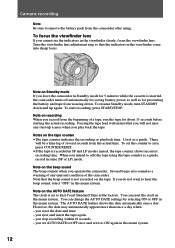
... AUTO DATE STA 3 LOCK NDBY START/STOP 40min SP REC 0:00:01 JUL 4 1999 To stop recording momentarily [a] Press START/STOP again. The camcorder starts recording. The "STBY" indicator appears in the viewfinder when you start recording (p. 57). Then, eject the cassette. This feature works only once ...STOP again. STA [a] LOCK NDBY START/STOP [b] STBY 0:35:20 LOCK STA NDBY START/STOP LOCK NDBY START/STOP 11 The camera recording/battery lamp located on it to CAMERA. (2) Turn STANDBY up in the viewfinder (Standby mode). The "REC" indicator appears. Basic operations STA ...
... AUTO DATE STA 3 LOCK NDBY START/STOP 40min SP REC 0:00:01 JUL 4 1999 To stop recording momentarily [a] Press START/STOP again. The camcorder starts recording. The "STBY" indicator appears in the viewfinder when you start recording (p. 57). Then, eject the cassette. This feature works only once ...STOP again. STA [a] LOCK NDBY START/STOP [b] STBY 0:35:20 LOCK STA NDBY START/STOP LOCK NDBY START/STOP 11 The camera recording/battery lamp located on it to CAMERA. (2) Turn STANDBY up in the viewfinder (Standby mode). The "REC" indicator appears. Basic operations STA ...
Operating Instructions
Page 12
...LP modes mixed, the tape counter shows incorrect recording time. Note that the beep sound is inserted, the camcorder turns off automatically for saving battery power as well as for preventing the battery and tape from wearing down and up scenes when you reset the date and time. - You can change...counter to zero, press COUNTER RESET. •If the tape is set it as a guide. Several beeps also sound as a warning of the camcorder. There will not miss any unusual condition of any start recording, press START/STOP. you play back the tape. If you cannot see the indicators...
...LP modes mixed, the tape counter shows incorrect recording time. Note that the beep sound is inserted, the camcorder turns off automatically for saving battery power as well as for preventing the battery and tape from wearing down and up scenes when you reset the date and time. - You can change...counter to zero, press COUNTER RESET. •If the tape is set it as a guide. Several beeps also sound as a warning of the camcorder. There will not miss any unusual condition of any start recording, press START/STOP. you play back the tape. If you cannot see the indicators...
Operating Instructions
Page 15
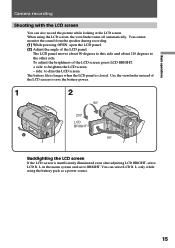
...LCD BRIGHT. + side: to BRIGHT. The LCD panel moves about 90 degrees to this side and about 210 degrees to dim the LCD screen The battery life is longer when the LCD panel is insufficiently illuminated even after adjusting LCD BRIGHT, select LCD B. L. only while using the LCD screen, the ... monitor the sound from the speaker during recording. (1) While pressing OPEN, open the LCD panel. (2) Adjust the angle of the LCD screen to save the battery power. 1 2 90° 210° LCD BRIGHT 90° Backlighting the LCD screen If the LCD screen is closed. side: to the other side. ...
...LCD BRIGHT. + side: to BRIGHT. The LCD panel moves about 90 degrees to this side and about 210 degrees to dim the LCD screen The battery life is longer when the LCD panel is insufficiently illuminated even after adjusting LCD BRIGHT, select LCD B. L. only while using the LCD screen, the ... monitor the sound from the speaker during recording. (1) While pressing OPEN, open the LCD panel. (2) Adjust the angle of the LCD screen to save the battery power. 1 2 90° 210° LCD BRIGHT 90° Backlighting the LCD screen If the LCD screen is closed. side: to the other side. ...
Operating Instructions
Page 21
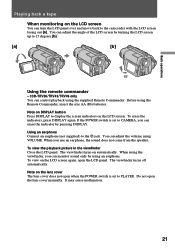
Before using the supplied Remote Commander. Using an earphone Connect an earphone (not supplied) to the camcorder with the LCD screen facing out [a]. CCD-TRV36/TRV43/TRV46 only You can erase the indicator by using an earphone. If the POWER switch is set to display the screen ... the LCD screen. Note on DISPLAY button Press DISPLAY to CAMERA, you can control playback using the Remote Commander, insert the size AA (R6) batteries. Do not open when the POWER switch is set to 15 degrees [b]. [a] [b] 15° Using the remote commander - To view the playback...
Before using the supplied Remote Commander. Using an earphone Connect an earphone (not supplied) to the camcorder with the LCD screen facing out [a]. CCD-TRV36/TRV43/TRV46 only You can erase the indicator by using an earphone. If the POWER switch is set to display the screen ... the LCD screen. Note on DISPLAY button Press DISPLAY to CAMERA, you can control playback using the Remote Commander, insert the size AA (R6) batteries. Do not open when the POWER switch is set to 15 degrees [b]. [a] [b] 15° Using the remote commander - To view the playback...
Operating Instructions
Page 24
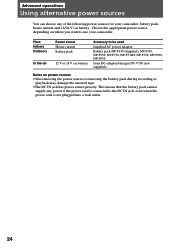
... following power sources for your camcorder. Place Indoors Outdoors In the car Power source House current Battery pack 12 V or 24 V car battery Accessory to be used Supplied AC power adaptor Battery pack NP-F330 (supplied), NP-F530, NP-F550, NP-F730, NP-F730H, NP-F750, NP-F930, NP-F950 Sony DC adaptor/charger DC...
... following power sources for your camcorder. Place Indoors Outdoors In the car Power source House current Battery pack 12 V or 24 V car battery Accessory to be used Supplied AC power adaptor Battery pack NP-F330 (supplied), NP-F530, NP-F550, NP-F730, NP-F730H, NP-F750, NP-F930, NP-F950 Sony DC adaptor/charger DC...
Operating Instructions
Page 27
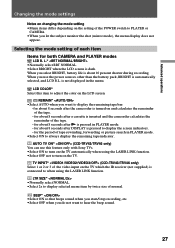
... the remainder of each item Items for about 8 seconds after the camcorder is turned on the TV which the IR receiver (not supplied) is automatically selected, and LCD B.L. LCD COLOR* Select this feature only with Sony TVs. •Select ON to PLAYER or CAMERA. •When you do not want to...size of tape rewinding, forwarding or picture search in the menu. for the period of normal. AUTO TV ON* (CCD-TRV43/TRV46 only) You can use the power sources other than the battery pack, BRIGHT is connected to when using the LASER LINK function. •Select OFF not to turn on the ...
... the remainder of each item Items for about 8 seconds after the camcorder is turned on the TV which the IR receiver (not supplied) is automatically selected, and LCD B.L. LCD COLOR* Select this feature only with Sony TVs. •Select ON to PLAYER or CAMERA. •When you do not want to...size of tape rewinding, forwarding or picture search in the menu. for the period of normal. AUTO TV ON* (CCD-TRV43/TRV46 only) You can use the power sources other than the battery pack, BRIGHT is connected to when using the LASER LINK function. •Select OFF not to turn on the ...
Operating Instructions
Page 29
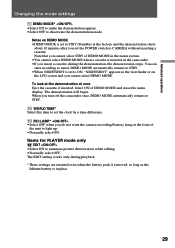
...set the clock by a time difference. The demonstration will begin. DEMO MODE automatically returns to STBY. •When NIGHTSHOT is inserted in the camcorder. •If you cannot select DEMO MODE. The EDIT setting works only during the demonstration, the demonstration stops. Items for PLAYER mode only... appears in place. 29 Notes on the LCD screen and you insert a cassette during playback * These settings are retained even when the battery pack is set the POWER switch to STBY. Select ON of the unit to deactivate the demonstration mode. When you set to STBY (...
...set the clock by a time difference. The demonstration will begin. DEMO MODE automatically returns to STBY. •When NIGHTSHOT is inserted in the camcorder. •If you cannot select DEMO MODE. The EDIT setting works only during the demonstration, the demonstration stops. Items for PLAYER mode only... appears in place. 29 Notes on the LCD screen and you insert a cassette during playback * These settings are retained even when the battery pack is set the POWER switch to STBY. Select ON of the unit to deactivate the demonstration mode. When you set to STBY (...
Operating Instructions
Page 49
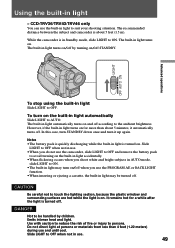
... OFF when not in light may be handled by turning on/off according to the ambient brightness. CCD-TRV36/TRV43/TRV46 only You can use the built-in light Slide LIGHT to OFF. Notes •The battery pack is in light - DANGER Not to be turned off by children. To stop using the... is about 5 minutes, it up again. Slide LIGHT to OFF when not in use. •When you do not use the camcorder, slide LIGHT to OFF and remove the battery pack to avoid turning on the built-in light accidentally. •When flickering occurs when you use the PROGRAM AE or BACK...
... OFF when not in light may be handled by turning on/off according to the ambient brightness. CCD-TRV36/TRV43/TRV46 only You can use the built-in light Slide LIGHT to OFF. Notes •The battery pack is in light - DANGER Not to be turned off by children. To stop using the... is about 5 minutes, it up again. Slide LIGHT to OFF when not in use. •When you do not use the camcorder, slide LIGHT to OFF and remove the battery pack to avoid turning on the built-in light accidentally. •When flickering occurs when you use the PROGRAM AE or BACK...
Operating Instructions
Page 55
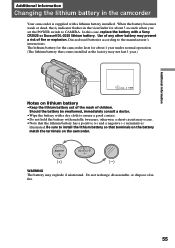
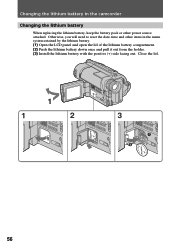
Additional information Additional information Changing the lithium battery in the camcorder Your camcorder is supplied with a Sony CR2025 or Duracell DL-2025 lithium battery. In this case, replace the battery with a lithium battery installed. Discard used batteries according to assure a good contact. •Do not hold the battery with a dry cloth to the manufacturer's instructions. Be sure to CAMERA. Do...
Additional information Additional information Changing the lithium battery in the camcorder Your camcorder is supplied with a Sony CR2025 or Duracell DL-2025 lithium battery. In this case, replace the battery with a lithium battery installed. Discard used batteries according to assure a good contact. •Do not hold the battery with a dry cloth to the manufacturer's instructions. Be sure to CAMERA. Do...
Operating Instructions
Page 56
Otherwise, you will need to reset the date, time and other power source attached. Close the lid. 1 1 2 5 3 5 CR 202 CR 202 56 Changing the lithium battery in the camcorder Changing the lithium battery When replacing the lithium battery, keep the battery pack or other items in the menu system retained by the lithium battery. (1) Open the LCD panel and open the lid of the lithium battery compartment. (2) Push the lithium battery down once and pull it out from the holder. (3) Install the lithium battery with the positive (+) side facing out.
Otherwise, you will need to reset the date, time and other power source attached. Close the lid. 1 1 2 5 3 5 CR 202 CR 202 56 Changing the lithium battery in the camcorder Changing the lithium battery When replacing the lithium battery, keep the battery pack or other items in the menu system retained by the lithium battery. (1) Open the LCD panel and open the lid of the lithium battery compartment. (2) Push the lithium battery down once and pull it out from the holder. (3) Install the lithium battery with the positive (+) side facing out.
Operating Instructions
Page 60
... and started again. While you have planned. A smooth transition between scenes after using the battery pack This section shows you how you are recording in the camcorder to save battery power Turn STANDBY down when not recording to obtain a smooth transition between scenes can get ... time in the viewfinder or on the camcorder and replace the battery pack. Leave the tape in a cold environment. Preparing the battery pack Always carry additional batteries Have sufficient battery pack power to do 2 to 3 times as much recording as battery power is used up . When to OFF...
... and started again. While you have planned. A smooth transition between scenes after using the battery pack This section shows you how you are recording in the camcorder to save battery power Turn STANDBY down when not recording to obtain a smooth transition between scenes can get ... time in the viewfinder or on the camcorder and replace the battery pack. Leave the tape in a cold environment. Preparing the battery pack Always carry additional batteries Have sufficient battery pack power to do 2 to 3 times as much recording as battery power is used up . When to OFF...
Operating Instructions
Page 61
... heats up During charging or recording, the battery pack heats up. This is not cause for using the battery pack Notes on the camcorder with a fully charged battery pack, the battery pack should charge batteries at temperatures from 50°F to 86°F (from fire. •Keep the battery pack dry. •Do not open nor try...
... heats up During charging or recording, the battery pack heats up. This is not cause for using the battery pack Notes on the camcorder with a fully charged battery pack, the battery pack should charge batteries at temperatures from 50°F to 86°F (from fire. •Keep the battery pack dry. •Do not open nor try...
Operating Instructions
Page 62
... cold environment for 30 seconds or more accurate remaining battery indication Set the camcorder to recording standby mode and point towards a stationary object. While checking the condition of using the battery pack Notes on its battery consumption. How the battery consumption is displayed The power consumption of Sony Corporation. * The indication may not be able to...
... cold environment for 30 seconds or more accurate remaining battery indication Set the camcorder to recording standby mode and point towards a stationary object. While checking the condition of using the battery pack Notes on its battery consumption. How the battery consumption is displayed The power consumption of Sony Corporation. * The indication may not be able to...


