Operating Instructions
Page 1
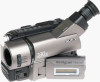
CCD-TRV46 CCD-TRV36/TRV43/TRV46 CCD-TRV16 ©1998 by Sony Corporation Model No. Serial No. Refer to these numbers whenever you call upon your Sony dealer regarding this manual thoroughly, and retain it for future reference. Owner's Record The model and serial numbers are located on the bottom. Record the serial number in the space provided below. 3-865-333-13 (1) Video Camera Recorder Operating Instructions Before operating the unit, please read this product. AC-L Serial No. CCD-TRV Model No.
CCD-TRV46 CCD-TRV36/TRV43/TRV46 CCD-TRV16 ©1998 by Sony Corporation Model No. Serial No. Refer to these numbers whenever you call upon your Sony dealer regarding this manual thoroughly, and retain it for future reference. Owner's Record The model and serial numbers are located on the bottom. Record the serial number in the space provided below. 3-865-333-13 (1) Video Camera Recorder Operating Instructions Before operating the unit, please read this product. AC-L Serial No. CCD-TRV Model No.
Operating Instructions
Page 3
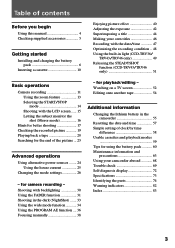
... 44 Making your camcorder abroad 68 Trouble check 69 Self-diagnosis display 72 Specifications 73 Identifying the parts 74 Warning indicators 82 Index 83 3 Shooting with backlighting 30 Using the FADER function 31 Shooting in light (CCD-TRV36/ TRV43/TRV46 only 49 Releasing the STEADYSHOT function (CCD-TRV43/TRV46 only 51 Basic operations Camera recording 11...
... 44 Making your camcorder abroad 68 Trouble check 69 Self-diagnosis display 72 Specifications 73 Identifying the parts 74 Warning indicators 82 Index 83 3 Shooting with backlighting 30 Using the FADER function 31 Shooting in light (CCD-TRV36/ TRV43/TRV46 only 49 Releasing the STEADYSHOT function (CCD-TRV43/TRV46 only 51 Basic operations Camera recording 11...
Operating Instructions
Page 4
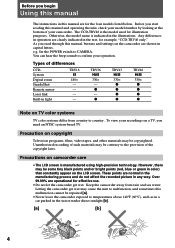
... [b]. [a] [b] 4 r - Over 99.99% are operational for illustration purposes. You can hear the beep sound to CAMERA. Keep the camcorder away from country to the provision of differences CCDSystem Digital zoom SteadyShot Remote sensor Laser link Built-in light TRV16 h 180×...The instructions in this manual are for example, "CCD-TRV46 only." Otherwise, the model name is manufactured using high-precision technology. e.g. r TRV43 H 330× r r r r TRV46 H 330× r r r r Note on the camcorder are shown in the illustrations. Precautions on copyright ...
... [b]. [a] [b] 4 r - Over 99.99% are operational for illustration purposes. You can hear the beep sound to CAMERA. Keep the camcorder away from country to the provision of differences CCDSystem Digital zoom SteadyShot Remote sensor Laser link Built-in light TRV16 h 180×...The instructions in this manual are for example, "CCD-TRV46 only." Otherwise, the model name is manufactured using high-precision technology. e.g. r TRV43 H 330× r r r r TRV46 H 330× r r r r Note on the camcorder are shown in the illustrations. Precautions on copyright ...

Operating Instructions
Page 7
... indicated by the minutes on a flat surface without vibration. When the remaining battery indicator becomes ı, normal charge is completely charged. POWER CAMERA OFF PPLLAYEERR Notes •"- - - min" appears in the display window until FULL appears in the display window. It may differ from ...battery pack Charging the battery pack Charge the battery pack on the display window. For full charge, which allows you to OFF. Before using the camcorder with the plug's 4 mark up. (2) Connect the power cord to the AC power adaptor. (3) Connect the power cord to a wall outlet...
... indicated by the minutes on a flat surface without vibration. When the remaining battery indicator becomes ı, normal charge is completely charged. POWER CAMERA OFF PPLLAYEERR Notes •"- - - min" appears in the display window until FULL appears in the display window. It may differ from ...battery pack Charging the battery pack Charge the battery pack on the display window. For full charge, which allows you to OFF. Before using the camcorder with the plug's 4 mark up. (2) Connect the power cord to the AC power adaptor. (3) Connect the power cord to a wall outlet...
Operating Instructions
Page 11
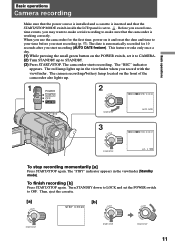
... time, power on the front of the camcorder also lights up in the viewfinder (Standby mode). The camera recording/battery lamp located on it to CAMERA. (2) Turn STANDBY up to OFF. The red lamp lights up . 1 POWER CAMERA OFF PLAYER STA 2 LOCK NDBY START/STOP... [a] Press START/STOP again. To finish recording [b] Press START/STOP again. Basic operations STA Basic operations Camera recording Make sure that the power source is installed and a cassette is inserted and that the camcorder is working correctly. The camcorder starts recording. Then, eject the cassette.
... time, power on the front of the camcorder also lights up in the viewfinder (Standby mode). The camera recording/battery lamp located on it to CAMERA. (2) Turn STANDBY up to OFF. The red lamp lights up . 1 POWER CAMERA OFF PLAYER STA 2 LOCK NDBY START/STOP... [a] Press START/STOP again. To finish recording [b] Press START/STOP again. Basic operations STA Basic operations Camera recording Make sure that the power source is installed and a cassette is inserted and that the camcorder is working correctly. The camcorder starts recording. Then, eject the cassette.
Operating Instructions
Page 12
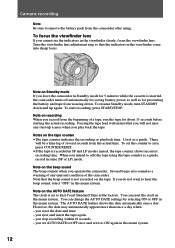
... beep sounds when you intend to edit the tape using . you do not want to hear the beep sound, select "OFF" in the menu system. Camera recording Note Be sure to remove the battery pack from the actual time. Note on the tape. Note that you cannot see the indicators in... several seconds from the comcorder after using the tape counter as a guide. To focus the viewfinder lens If you will be a time lag of the camcorder. The AUTO DATE feature shows the date automatically once a day. Notes on Standby mode If you stop recording within 10 seconds. - Several beeps also sound...
... beep sounds when you intend to edit the tape using . you do not want to hear the beep sound, select "OFF" in the menu system. Camera recording Note Be sure to remove the battery pack from the actual time. Note on the tape. Note that you cannot see the indicators in... several seconds from the comcorder after using the tape counter as a guide. To focus the viewfinder lens If you will be a time lag of the camcorder. The AUTO DATE feature shows the date automatically once a day. Notes on Standby mode If you stop recording within 10 seconds. - Several beeps also sound...
Operating Instructions
Page 13
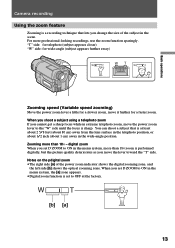
... zoom •The right side [a] of the subject in extreme telephoto zoom, move the power zoom lever to the "W" side until the focus is sharp. Camera recording Using the zoom feature Zooming is a recording technique that is at the factory. You can shoot a subject that lets you cannot get a sharp focus...
... zoom •The right side [a] of the subject in extreme telephoto zoom, move the power zoom lever to the "W" side until the focus is sharp. Camera recording Using the zoom feature Zooming is a recording technique that is at the factory. You can shoot a subject that lets you cannot get a sharp focus...
Operating Instructions
Page 14
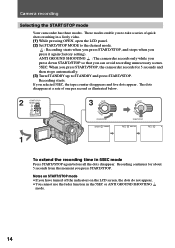
... only while you press down START/STOP so that you can avoid recording unnecessary scenes. 5SEC: When you press START/STOP, the camcorder records for about 5 seconds from the moment you press it again (factory setting). Notes on the LCD screen, the dots do not appear. •You ...; To extend the recording time in a lively video. (1) While pressing OPEN, open the LCD panel. (2) Set START/STOP MODE to STANDBY and press START/STOP. Camera recording Selecting the START/STOP mode Your camcorder has three modes.
... only while you press down START/STOP so that you can avoid recording unnecessary scenes. 5SEC: When you press START/STOP, the camcorder records for about 5 seconds from the moment you press it again (factory setting). Notes on the LCD screen, the dots do not appear. •You ...; To extend the recording time in a lively video. (1) While pressing OPEN, open the LCD panel. (2) Set START/STOP MODE to STANDBY and press START/STOP. Camera recording Selecting the START/STOP mode Your camcorder has three modes.
Operating Instructions
Page 15
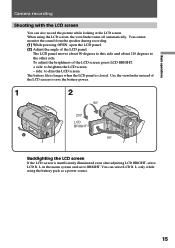
L. only while using the LCD screen, the viewfinder turns off automatically. Basic operations Camera recording Shooting with the LCD screen You can select LCD B. L. When using the battery pack as a power source. 15 side: to dim the LCD screen ...
L. only while using the LCD screen, the viewfinder turns off automatically. Basic operations Camera recording Shooting with the LCD screen You can select LCD B. L. When using the battery pack as a power source. 15 side: to dim the LCD screen ...
Operating Instructions
Page 16
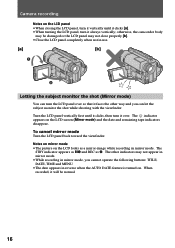
... the subject monitor the shot (Mirror mode) You can let the subject monitor the shot while shooting with the viewfinder. When recorded, it always vertically; Camera recording Notes on the LCD panel •When closing the LCD panel, turn it vertically until it clicks, then turn the LCD panel over so..., you can turn it faces the other indicators may not close properly [b]. •Close the LCD panel completely when not in mirror mode. otherwise, the camcorder body may be normal. 16
... the subject monitor the shot (Mirror mode) You can let the subject monitor the shot while shooting with the viewfinder. When recorded, it always vertically; Camera recording Notes on the LCD panel •When closing the LCD panel, turn it vertically until it clicks, then turn the LCD panel over so..., you can turn it faces the other indicators may not close properly [b]. •Close the LCD panel completely when not in mirror mode. otherwise, the camcorder body may be normal. 16
Operating Instructions
Page 18
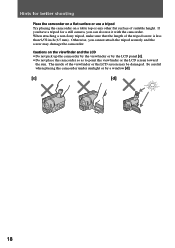
...other flat surface of the tripod screw is less than 9/32 inch (6.5 mm). Be careful when placing the camcorder under sunlight or by the LCD panel [c]. •Do not place the camcorder so as to point the viewfinder or the LCD screen toward the sun. The inside of the viewfinder or... the LCD screen may damage the camcorder. When attaching a non-Sony tripod, make sure that the length of suitable height. Hints for a still camera, you cannot attach the tripod securely and the screw may be damaged. Otherwise, you can also ...
...other flat surface of the tripod screw is less than 9/32 inch (6.5 mm). Be careful when placing the camcorder under sunlight or by the LCD panel [c]. •Do not place the camcorder so as to point the viewfinder or the LCD screen toward the sun. The inside of the viewfinder or... the LCD screen may damage the camcorder. When attaching a non-Sony tripod, make sure that the length of suitable height. Hints for a still camera, you cannot attach the tripod securely and the screw may be damaged. Otherwise, you can also ...
Operating Instructions
Page 19
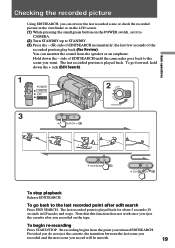
... picture Using EDITSEARCH, you can monitor the sound from the point you released EDITSEARCH. Hold down the + side (Edit Search). 1 POWER CAMERA OFF PLAYER 3 EDITSEARCH 2 LOCK NDBY START/STOP EDITSEARCH EDITSEARCH To stop playback Release EDITSEARCH. side of EDITSEARCH momentarily; To go back to ...that this function does not work once you recorded on the POWER switch, set it to CAMERA. (2) Turn STANDBY up to STANDBY. (3) Press the - (Œ) side of EDITSEARCH until the camcorder goes back to the last recorded point after you eject the cassette after edit search Press END...
... picture Using EDITSEARCH, you can monitor the sound from the point you released EDITSEARCH. Hold down the + side (Edit Search). 1 POWER CAMERA OFF PLAYER 3 EDITSEARCH 2 LOCK NDBY START/STOP EDITSEARCH EDITSEARCH To stop playback Release EDITSEARCH. side of EDITSEARCH momentarily; To go back to ...that this function does not work once you recorded on the POWER switch, set it to CAMERA. (2) Turn STANDBY up to STANDBY. (3) Press the - (Œ) side of EDITSEARCH until the camcorder goes back to the last recorded point after you eject the cassette after edit search Press END...
Operating Instructions
Page 20
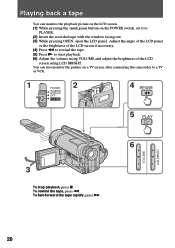
... rapidly, press ). 20 You can monitor the playback picture on the LCD screen. (1) While pressing the small green button on a TV screen, after connecting the camcorder to a TV or VCR. 1 2 POWER CAMERA OFF PLAYER 4 REW 5 PLAY VOLUME LCD BRIGHT 6 3 To stop playback, press p. To rewind the tape, press 0.
... rapidly, press ). 20 You can monitor the playback picture on the LCD screen. (1) While pressing the small green button on a TV screen, after connecting the camcorder to a TV or VCR. 1 2 POWER CAMERA OFF PLAYER 4 REW 5 PLAY VOLUME LCD BRIGHT 6 3 To stop playback, press p. To rewind the tape, press 0.
Operating Instructions
Page 21
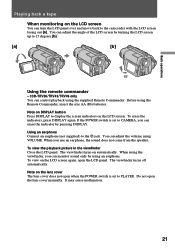
CCD-TRV36/TRV43/TRV46 only You can adjust the volume using VOLUME. To erase the indicators, press DISPLAY again. Do not open the LCD panel. Basic operations Playing ... screen You can monitor sound only by using the supplied Remote Commander. If the POWER switch is set to CAMERA, you can turn the LCD panel over and move back to the camcorder with the LCD screen facing out [a]. To view the playback picture in the viewfinder Close the LCD panel. When...
CCD-TRV36/TRV43/TRV46 only You can adjust the volume using VOLUME. To erase the indicators, press DISPLAY again. Do not open the LCD panel. Basic operations Playing ... screen You can monitor sound only by using the supplied Remote Commander. If the POWER switch is set to CAMERA, you can turn the LCD panel over and move back to the camcorder with the LCD screen facing out [a]. To view the playback picture in the viewfinder Close the LCD panel. When...
Operating Instructions
Page 23
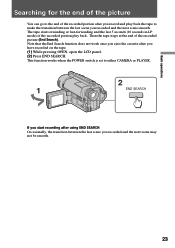
... Basic operations Searching for the end of the picture You can go to the end of the recorded portion play back the tape to either CAMERA or PLAYER. 2 1 END SEARCH If you start recording after you have recorded on the tape. (1) While pressing OPEN, open the LCD panel. (2) Press END SEARCH...
... Basic operations Searching for the end of the picture You can go to the end of the recorded portion play back the tape to either CAMERA or PLAYER. 2 1 END SEARCH If you start recording after you have recorded on the tape. (1) While pressing OPEN, open the LCD panel. (2) Press END SEARCH...
Operating Instructions
Page 26
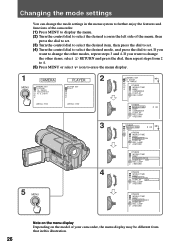
LIGHT PLAYER PLAYER SET EDIT 2 CAMERA SET D ZOOM 16 : 9WIDE OTHERS WORLD TIME BEEP COMMANDER DISPLAY REC LAMP [MENU] : END [MENU] : END...OTHERS WORLD TIME BEEP COMMANDER OFF DISPLAY REC LAMP RETURN Note on the menu display Depending on the model of your camcorder, the menu display may be different from 2 to 4. (5) Press MENU or select icon to change the mode ... the other items, select RETURN and press the dial, then repeat steps from that in the left side of the camcorder. (1) Press MENU to display the menu. (2) Turn the control dial to select the desired icon in this illustration....
LIGHT PLAYER PLAYER SET EDIT 2 CAMERA SET D ZOOM 16 : 9WIDE OTHERS WORLD TIME BEEP COMMANDER DISPLAY REC LAMP [MENU] : END [MENU] : END...OTHERS WORLD TIME BEEP COMMANDER OFF DISPLAY REC LAMP RETURN Note on the menu display Depending on the model of your camcorder, the menu display may be different from 2 to 4. (5) Press MENU or select icon to change the mode ... the other items, select RETURN and press the dial, then repeat steps from that in the left side of the camcorder. (1) Press MENU to display the menu. (2) Turn the control dial to select the desired icon in this illustration....
Operating Instructions
Page 27
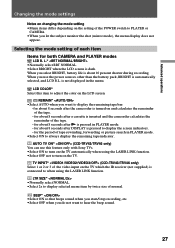
... when the LCD screen is not displayed in the menu. LCD COLOR* Select this feature only with Sony TVs. •Select ON to turn on the TV automatically when using the LASER LINK function. ...for the period of each item Items for both CAMERA and PLAYER modes LCD B. is dark. for about 8 seconds after a cassette is connected to PLAYER or CAMERA. •When you select BRIGHT, battery life ... for about 8 seconds after the camcorder is turned on and calculates the remainder of the POWER switch to when using the LASER LINK function. AUTO TV ON* (CCD-TRV43/TRV46 only) You can use the...
... when the LCD screen is not displayed in the menu. LCD COLOR* Select this feature only with Sony TVs. •Select ON to turn on the TV automatically when using the LASER LINK function. ...for the period of each item Items for both CAMERA and PLAYER modes LCD B. is dark. for about 8 seconds after a cassette is connected to PLAYER or CAMERA. •When you select BRIGHT, battery life ... for about 8 seconds after the camcorder is turned on and calculates the remainder of the POWER switch to when using the LASER LINK function. AUTO TV ON* (CCD-TRV43/TRV46 only) You can use the...
Operating Instructions
Page 28
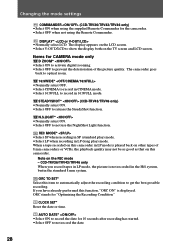
... condition to record in LP mode, the picture is displayed. STEADYSHOT* (CCD-TRV43/TRV46 only) •Normally select ON. •Select OFF to not record the date. 28 AUTO DATE* •Select ON to record the date for CAMERA mode only D ZOOM* •Select ON to activate digital zooming. ...this function, "ORC ON" is not recorded in the Hi8 system, but in LP (long play) mode. CCD-TRV36/TRV43/TRV46 only When you have already performed this camcorder. If you record tapes in 16:9FULL mode. ORC stands for the camcorder. •Select OFF when not using the supplied Remote ...
... condition to record in LP mode, the picture is displayed. STEADYSHOT* (CCD-TRV43/TRV46 only) •Normally select ON. •Select OFF to not record the date. 28 AUTO DATE* •Select ON to record the date for CAMERA mode only D ZOOM* •Select ON to activate digital zooming. ...this function, "ORC ON" is not recorded in the Hi8 system, but in LP (long play) mode. CCD-TRV36/TRV43/TRV46 only When you have already performed this camcorder. If you record tapes in 16:9FULL mode. ORC stands for the camcorder. •Select OFF when not using the supplied Remote ...
Operating Instructions
Page 29
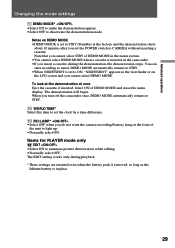
...•Select OFF when you set to STBY (Standby) at the factory and the demonstration starts about 10 minutes after you do not want the camera recording/battery lamp at once Eject the cassette, if inserted. To look at the demonstration at the front of DEMO MODE and erase the menu... Select this item to set to ON, "NIGHTSHOT" appears in the viewfinder or on DEMO MODE •DEMO MODE is in the camcorder. •If you turn off the camcorder once, DEMO MODE automatically returns to light up. •Normally select ON. Select ON of the unit to STBY. Advanced operations Changing...
...•Select OFF when you set to STBY (Standby) at the factory and the demonstration starts about 10 minutes after you do not want the camera recording/battery lamp at once Eject the cassette, if inserted. To look at the demonstration at the front of DEMO MODE and erase the menu... Select this item to set to ON, "NIGHTSHOT" appears in the viewfinder or on DEMO MODE •DEMO MODE is in the camcorder. •If you turn off the camcorder once, DEMO MODE automatically returns to light up. •Normally select ON. Select ON of the unit to STBY. Advanced operations Changing...

Operating Instructions
Page 51
... lights up when you set STEADYSHOT to ON in the menu system (p. 28). CCD-TRV43/TRV46 only When the SteadyShot function is working, the camcorder compensates for camerashake. Notes on the SteadyShot function •The SteadyShot function will not correct excessive camera-shake. •When you release the SteadyShot function. To activate the SteadyShot...
... lights up when you set STEADYSHOT to ON in the menu system (p. 28). CCD-TRV43/TRV46 only When the SteadyShot function is working, the camcorder compensates for camerashake. Notes on the SteadyShot function •The SteadyShot function will not correct excessive camera-shake. •When you release the SteadyShot function. To activate the SteadyShot...


