Operating Instructions
Page 2
... Service Center nearest you can be prohibited. With your nearest Sony Service Center or Factory Service Center. If this Sony Handycam VisionTM camcorder. For the Sony Service Center nearest you call 416-499-SONY (Canada only) Caution: Do not handle damaged or leaking lithium 2 ion battery. Congratulations on , the user is no guarantee that any changes or...
... Service Center nearest you can be prohibited. With your nearest Sony Service Center or Factory Service Center. If this Sony Handycam VisionTM camcorder. For the Sony Service Center nearest you call 416-499-SONY (Canada only) Caution: Do not handle damaged or leaking lithium 2 ion battery. Congratulations on , the user is no guarantee that any changes or...
Operating Instructions
Page 3
... for using the battery pack 60 Maintenance information and precautions 63 Using your own titles 46 Recording with the date/time 47 Optimizing the recording condition .. 48 Using the built-in light (CCD-TRV36/ TRV43/TRV46 only 49 Releasing the STEADYSHOT function (CCD-TRV43/TRV46 only 51 Basic... operations Camera recording 11 Using the zoom feature 13 Selecting the START/STOP mode 14 Shooting with backlighting 30 Using the FADER function 31 Shooting in the camcorder 55 ...
... for using the battery pack 60 Maintenance information and precautions 63 Using your own titles 46 Recording with the date/time 47 Optimizing the recording condition .. 48 Using the built-in light (CCD-TRV36/ TRV43/TRV46 only 49 Releasing the STEADYSHOT function (CCD-TRV43/TRV46 only 51 Basic... operations Camera recording 11 Using the zoom feature 13 Selecting the START/STOP mode 14 Shooting with backlighting 30 Using the FADER function 31 Shooting in the camcorder 55 ...
Operating Instructions
Page 5
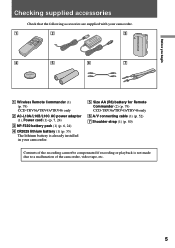
... only 2 AC-L10A/L10B/L10C AC power adaptor (1), Power cord (1) (p. 7, 24) 3 NP-F330 battery pack (1) (p. 6, 24) 4 CR2025 lithium battery (1) (p. 55) The lithium battery is already installed in your camcorder. 5 Size AA (R6) battery for Remote Commander (2) (p. 79) CCD-TRV36/TRV43/TRV46 only 6 A/V connecting cable (1) (p. 52) 7 Shoulder strap (1) (p. 80) Contents of the recording cannot be compensated if recording...
... only 2 AC-L10A/L10B/L10C AC power adaptor (1), Power cord (1) (p. 7, 24) 3 NP-F330 battery pack (1) (p. 6, 24) 4 CR2025 lithium battery (1) (p. 55) The lithium battery is already installed in your camcorder. 5 Size AA (R6) battery for Remote Commander (2) (p. 79) CCD-TRV36/TRV43/TRV46 only 6 A/V connecting cable (1) (p. 52) 7 Shoulder strap (1) (p. 80) Contents of the recording cannot be compensated if recording...
Operating Instructions
Page 6
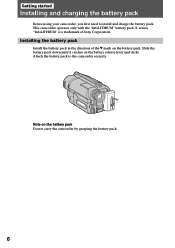
... catches on the battery pack Do not carry the camcorder by grasping the battery pack. 6 Getting started Installing and charging the battery pack Before using your camcorder, you first need to the camcorder securely. Attach the battery pack to install and charge the battery pack. Installing the battery pack Install the battery pack in the direction of Sony Corporation. "InfoLITHIUM" is...
... catches on the battery pack Do not carry the camcorder by grasping the battery pack. 6 Getting started Installing and charging the battery pack Before using your camcorder, you first need to the camcorder securely. Attach the battery pack to install and charge the battery pack. Installing the battery pack Install the battery pack in the direction of Sony Corporation. "InfoLITHIUM" is...

Operating Instructions
Page 7
...;, normal charge is completely charged. You can also use the battery longer than usual, leave the battery pack attached for about 1 hour after normal charge is completed until the camcorder calculates remaining battery time. •Remaining battery time indication in the factory. (1) Open the DC IN jack...flat surface without vibration. It may differ from the DC IN jack of the camcorder. Remaining battery time is charged a little in the display window roughly indicates the recording time with the battery pack, unplug the AC power adaptor from the actual recording time. 7 Before ...
...;, normal charge is completely charged. You can also use the battery longer than usual, leave the battery pack attached for about 1 hour after normal charge is completed until the camcorder calculates remaining battery time. •Remaining battery time indication in the factory. (1) Open the DC IN jack...flat surface without vibration. It may differ from the DC IN jack of the camcorder. Remaining battery time is charged a little in the display window roughly indicates the recording time with the battery pack, unplug the AC power adaptor from the actual recording time. 7 Before ...
Operating Instructions
Page 8
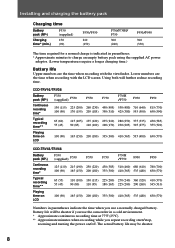
...time when you use the camcorder in parentheses. * Approximate minutes to charge an empty battery pack using the supplied AC power adaptor. (Lower temperatures require a longer charging time.) Battery life Upper numbers are the time when recording with the viewfinder. CCD-TRV16/TRV36 Battery pack (NP-) Continuous recording ...(150) 200 (180) 335 (300) 410 (365) 535 (480) F950 815 (730) 650 (590) 430 (385) 355 (320) 630 (570) CCD-TRV43/TRV46 Battery pack (NP-) Continuous recording time* F330 (supplied) F530 F550 F730 F730H /F750 F930 F950 125 (110) 215 (190) 250 (220) 430 (385) 510...
...time when you use the camcorder in parentheses. * Approximate minutes to charge an empty battery pack using the supplied AC power adaptor. (Lower temperatures require a longer charging time.) Battery life Upper numbers are the time when recording with the viewfinder. CCD-TRV16/TRV36 Battery pack (NP-) Continuous recording ...(150) 200 (180) 335 (300) 410 (365) 535 (480) F950 815 (730) 650 (590) 430 (385) 355 (320) 630 (570) CCD-TRV43/TRV46 Battery pack (NP-) Continuous recording time* F330 (supplied) F530 F550 F730 F730H /F750 F930 F950 125 (110) 215 (190) 250 (220) 430 (385) 510...
Operating Instructions
Page 9
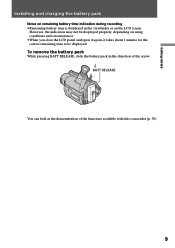
... in the viewfinder or on the LCD screen. Getting started Installing and charging the battery pack Notes on remaining battery time indication during recording •Remaining battery time is displayed in the direction of the functions available with this camcorder (p. 29). 9 However, the indication may not be displayed properly, depending on using conditions and...
... in the viewfinder or on the LCD screen. Getting started Installing and charging the battery pack Notes on remaining battery time indication during recording •Remaining battery time is displayed in the direction of the functions available with this camcorder (p. 29). 9 However, the indication may not be displayed properly, depending on using conditions and...
Operating Instructions
Page 11
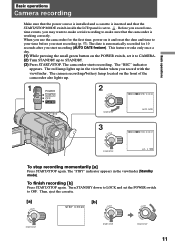
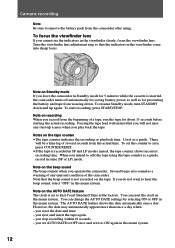
... CAMERA. (2) Turn STANDBY up in the viewfinder (Standby mode). The date is automatically recorded for the first time, power on it to . The camcorder starts recording. The "STBY" indicator appears in the viewfinder when you start recording (AUTO DATE feature). STA [a] LOCK NDBY START/STOP [b] STBY 0:...3 LOCK NDBY START/STOP 40min SP REC 0:00:01 JUL 4 1999 To stop recording momentarily [a] Press START/STOP again. The camera recording/battery lamp located on the POWER switch, set it and reset the date and time to OFF. To finish recording [b] Press START/STOP again. ...
... CAMERA. (2) Turn STANDBY up in the viewfinder (Standby mode). The date is automatically recorded for the first time, power on it to . The camcorder starts recording. The "STBY" indicator appears in the viewfinder when you start recording (AUTO DATE feature). STA [a] LOCK NDBY START/STOP [b] STBY 0:...3 LOCK NDBY START/STOP 40min SP REC 0:00:01 JUL 4 1999 To stop recording momentarily [a] Press START/STOP again. The camera recording/battery lamp located on the POWER switch, set it and reset the date and time to OFF. To finish recording [b] Press START/STOP again. ...
Operating Instructions
Page 12
...to hear the beep sound, select "OFF" in the menu system. Note on the AUTO DATE feature The clock is inserted, the camcorder turns off automatically for saving battery power as well as a guide. To resume Standby mode, turn STANDBY down . Notes on the beep sound The beep sounds when ... recording within 10 seconds. - To focus the viewfinder lens If you will be a time lag of several seconds from the beginning of the camcorder. Passing the tape lead will ensure that you cannot see the indicators in SP and LP modes mixed, the tape counter shows incorrect recording time...
...to hear the beep sound, select "OFF" in the menu system. Note on the AUTO DATE feature The clock is inserted, the camcorder turns off automatically for saving battery power as well as a guide. To resume Standby mode, turn STANDBY down . Notes on the beep sound The beep sounds when ... recording within 10 seconds. - To focus the viewfinder lens If you will be a time lag of several seconds from the beginning of the camcorder. Passing the tape lead will ensure that you cannot see the indicators in SP and LP modes mixed, the tape counter shows incorrect recording time...
Operating Instructions
Page 15
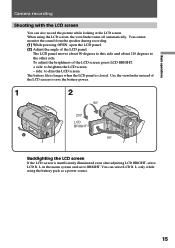
... adjust the brightness of the LCD screen to brighten the LCD screen - in the menu system and set to the other side. When using the battery pack as a power source. 15 The LCD panel moves about 90 degrees to this side and about 210 degrees to BRIGHT. L. Basic operations Camera ...recording Shooting with the LCD screen You can select LCD B. Use the viewfinder instead of the LCD screen, press LCD BRIGHT. + side: to save the battery power. 1 2 90° 210° LCD BRIGHT 90° Backlighting the LCD screen If the LCD screen is closed. You cannot monitor the sound from...
... adjust the brightness of the LCD screen to brighten the LCD screen - in the menu system and set to the other side. When using the battery pack as a power source. 15 The LCD panel moves about 90 degrees to this side and about 210 degrees to BRIGHT. L. Basic operations Camera ...recording Shooting with the LCD screen You can select LCD B. Use the viewfinder instead of the LCD screen, press LCD BRIGHT. + side: to save the battery power. 1 2 90° 210° LCD BRIGHT 90° Backlighting the LCD screen If the LCD screen is closed. You cannot monitor the sound from...
Operating Instructions
Page 21
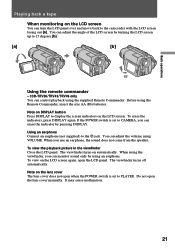
...open the lens cover manually. The viewfinder turns off automatically. Using an earphone Connect an earphone (not supplied) to the camcorder with the LCD screen facing out [a]. CCD-TRV36/TRV43/TRV46 only You can monitor sound only by using the viewfinder, you use an earphone, the sound does not come from... 15 degrees [b]. [a] [b] 15° Using the remote commander - When you can control playback using the Remote Commander, insert the size AA (R6) batteries. Before using the supplied Remote Commander. You can turn the LCD panel over and move back to the @ jack.
...open the lens cover manually. The viewfinder turns off automatically. Using an earphone Connect an earphone (not supplied) to the camcorder with the LCD screen facing out [a]. CCD-TRV36/TRV43/TRV46 only You can monitor sound only by using the viewfinder, you use an earphone, the sound does not come from... 15 degrees [b]. [a] [b] 15° Using the remote commander - When you can control playback using the Remote Commander, insert the size AA (R6) batteries. Before using the supplied Remote Commander. You can turn the LCD panel over and move back to the @ jack.
Operating Instructions
Page 24
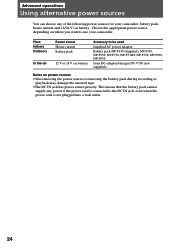
... cannot supply any of the following power sources for your camcorder. Choose the appropriate power source depending on power sources •Disconnecting the power source or removing the battery pack during recording or playback may damage the inserted tape. •The DC IN jack has power source priority. Place...connected to be used Supplied AC power adaptor Battery pack NP-F330 (supplied), NP-F530, NP-F550, NP-F730, NP-F730H, NP-F750, NP-F930, NP-F950 Sony DC adaptor/charger DC-V700 (not supplied) Notes on where you want to use your camcorder: battery pack, house current and 12/24 V car...
... cannot supply any of the following power sources for your camcorder. Choose the appropriate power source depending on power sources •Disconnecting the power source or removing the battery pack during recording or playback may damage the inserted tape. •The DC IN jack has power source priority. Place...connected to be used Supplied AC power adaptor Battery pack NP-F330 (supplied), NP-F530, NP-F550, NP-F730, NP-F730H, NP-F750, NP-F930, NP-F950 Sony DC adaptor/charger DC-V700 (not supplied) Notes on where you want to use your camcorder: battery pack, house current and 12/24 V car...
Operating Instructions
Page 27
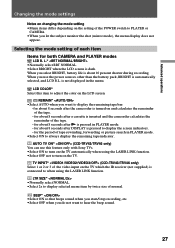
...items differ depending on the TV. AUTO TV ON* (CCD-TRV43/TRV46 only) You can use the power sources other than the battery pack, BRIGHT is about 10 percent shorter during recording. When...210; REMAIN* •Select AUTO when you select BRIGHT, battery life is automatically selected, and LCD B.L. LCD COLOR* Select this feature only with Sony TVs. •Select ON to PLAYER or CAMERA. •...menu. TV INPUT* (CCD-TRV43/TRV46 only) Select 1 or 2 or 3 of the video input on and calculates the remainder of each item Items for about 8 seconds after the camcorder is turned on the TV...
...items differ depending on the TV. AUTO TV ON* (CCD-TRV43/TRV46 only) You can use the power sources other than the battery pack, BRIGHT is about 10 percent shorter during recording. When...210; REMAIN* •Select AUTO when you select BRIGHT, battery life is automatically selected, and LCD B.L. LCD COLOR* Select this feature only with Sony TVs. •Select ON to PLAYER or CAMERA. •...menu. TV INPUT* (CCD-TRV43/TRV46 only) Select 1 or 2 or 3 of the video input on and calculates the remainder of each item Items for about 8 seconds after the camcorder is turned on the TV...
Operating Instructions
Page 29
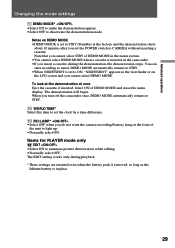
.... DEMO MODE automatically returns to STBY (Standby) at the factory and the demonstration starts about 10 minutes after you do not want the camera recording/battery lamp at once Eject the cassette, if inserted. REC LAMP* •Select OFF when you set to STBY. •When NIGHTSHOT is in place. 29... item to light up. •Normally select ON. The demonstration will begin. Select ON of the unit to set to ON, "NIGHTSHOT" appears in the camcorder. •If you turn off the camcorder once, DEMO MODE automatically returns to CAMERA without inserting a cassette.
.... DEMO MODE automatically returns to STBY (Standby) at the factory and the demonstration starts about 10 minutes after you do not want the camera recording/battery lamp at once Eject the cassette, if inserted. REC LAMP* •Select OFF when you set to STBY. •When NIGHTSHOT is in place. 29... item to light up. •Normally select ON. The demonstration will begin. Select ON of the unit to set to ON, "NIGHTSHOT" appears in the camcorder. •If you turn off the camcorder once, DEMO MODE automatically returns to CAMERA without inserting a cassette.
Operating Instructions
Page 49
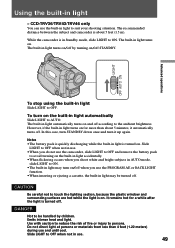
...when you do not use and until cool. It remains hot for more than 4 feet (1.22 meters) during use the camcorder, slide LIGHT to OFF and remove the battery pack to avoid turning on the built-in light accidentally. •When flickering occurs when you shoot white and bright subjects...Advanced operations Using the built-in light automatically Slide LIGHT to the ambient brightness. The built-in light may be handled by turning on . CCD-TRV36/TRV43/TRV46 only You can use the PROGRAM AE or BACK LIGHT function. •When inserting or ejecting a cassette, the built-in light ...
...when you do not use and until cool. It remains hot for more than 4 feet (1.22 meters) during use the camcorder, slide LIGHT to OFF and remove the battery pack to avoid turning on the built-in light accidentally. •When flickering occurs when you shoot white and bright subjects...Advanced operations Using the built-in light automatically Slide LIGHT to the ambient brightness. The built-in light may be handled by turning on . CCD-TRV36/TRV43/TRV46 only You can use the PROGRAM AE or BACK LIGHT function. •When inserting or ejecting a cassette, the built-in light ...
Operating Instructions
Page 55
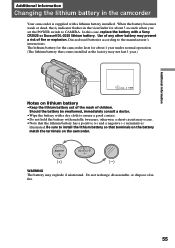
... 1 year.) JUL 4 1999 Notes on the camcorder. (+) (---) WARNING The battery may present a risk of children. Discard used batteries according to install the lithium battery so that the lithium battery has a positive (+) and a negative (-) terminals as illustrated. Additional information Additional information Changing the lithium battery in the camcorder Your camcorder is supplied with a Sony CR2025 or Duracell DL-2025 lithium...
... 1 year.) JUL 4 1999 Notes on the camcorder. (+) (---) WARNING The battery may present a risk of children. Discard used batteries according to install the lithium battery so that the lithium battery has a positive (+) and a negative (-) terminals as illustrated. Additional information Additional information Changing the lithium battery in the camcorder Your camcorder is supplied with a Sony CR2025 or Duracell DL-2025 lithium...
Operating Instructions
Page 56
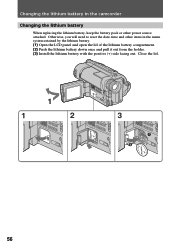
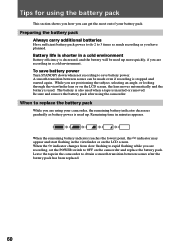
Otherwise, you will need to reset the date, time and other power source attached. Close the lid. 1 1 2 5 3 5 CR 202 CR 202 56 Changing the lithium battery in the camcorder Changing the lithium battery When replacing the lithium battery, keep the battery pack or other items in the menu system retained by the lithium battery. (1) Open the LCD panel and open the lid of the lithium battery compartment. (2) Push the lithium battery down once and pull it out from the holder. (3) Install the lithium battery with the positive (+) side facing out.
Otherwise, you will need to reset the date, time and other power source attached. Close the lid. 1 1 2 5 3 5 CR 202 CR 202 56 Changing the lithium battery in the camcorder Changing the lithium battery When replacing the lithium battery, keep the battery pack or other items in the menu system retained by the lithium battery. (1) Open the LCD panel and open the lid of the lithium battery compartment. (2) Push the lithium battery down once and pull it out from the holder. (3) Install the lithium battery with the positive (+) side facing out.
Operating Instructions
Page 60
.... A smooth transition between scenes after using the camcorder. When the remaining battery indicator reaches the lowest point, the i indicator may appear and start flashing in a cold environment Battery efficiency is decreased, and the battery will be made even if recording is used ....OFF on the camcorder and replace the battery pack. Remaining time in a cold environment. Leave the tape in the camcorder to replace the battery pack While you are recording in minutes appears. Preparing the battery pack Always carry additional batteries Have sufficient battery pack power to...
.... A smooth transition between scenes after using the camcorder. When the remaining battery indicator reaches the lowest point, the i indicator may appear and start flashing in a cold environment Battery efficiency is decreased, and the battery will be made even if recording is used ....OFF on the camcorder and replace the battery pack. Remaining time in a cold environment. Leave the tape in the camcorder to replace the battery pack While you are recording in minutes appears. Preparing the battery pack Always carry additional batteries Have sufficient battery pack power to...
Operating Instructions
Page 61
... generated and a chemical change that has occurred inside the battery pack. The battery pack heats up During charging or recording, the battery pack heats up. This is not cause for using the battery pack Notes on the camcorder with a fully charged battery pack, the battery pack should charge batteries at temperatures from 50°F to 86°F (from...
... generated and a chemical change that has occurred inside the battery pack. The battery pack heats up During charging or recording, the battery pack heats up. This is not cause for using the battery pack Notes on the camcorder with a fully charged battery pack, the battery pack should charge batteries at temperatures from 50°F to 86°F (from...
Operating Instructions
Page 62
... it with video equipment having this mark, the remaining battery capacity will indicate the remaining battery time in minutes*. While checking the condition of Sony Corporation. * The indication may not be accurate depending on its battery consumption. To obtain more accurate remaining battery indication Set the camcorder to 10 minutes is indicated as the continuous recording...
... it with video equipment having this mark, the remaining battery capacity will indicate the remaining battery time in minutes*. While checking the condition of Sony Corporation. * The indication may not be accurate depending on its battery consumption. To obtain more accurate remaining battery indication Set the camcorder to 10 minutes is indicated as the continuous recording...


