Operating Instructions
Page 3
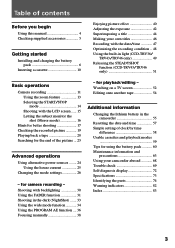
...charging the battery pack 6 Inserting a cassette 10 Enjoying picture effect 40 Adjusting the exposure 42 Superimposing a title 44 Making your camcorder abroad 68 Trouble check 69 Self-diagnosis display 72 Specifications 73 Identifying the parts 74 Warning indicators 82 Index 83 3 for ...in light (CCD-TRV36/ TRV43/TRV46 only 49 Releasing the STEADYSHOT function (CCD-TRV43/TRV46 only 51 Basic operations Camera recording 11 Using the zoom feature 13 Selecting the START/STOP mode 14 Shooting with backlighting 30 Using the FADER function 31 Shooting in the camcorder 55...
...charging the battery pack 6 Inserting a cassette 10 Enjoying picture effect 40 Adjusting the exposure 42 Superimposing a title 44 Making your camcorder abroad 68 Trouble check 69 Self-diagnosis display 72 Specifications 73 Identifying the parts 74 Warning indicators 82 Index 83 3 for ...in light (CCD-TRV36/ TRV43/TRV46 only 49 Releasing the STEADYSHOT function (CCD-TRV43/TRV46 only 51 Basic operations Camera recording 11 Using the zoom feature 13 Selecting the START/STOP mode 14 Shooting with backlighting 30 Using the FADER function 31 Shooting in the camcorder 55...
Operating Instructions
Page 4
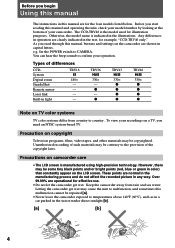
...manufactured using high-precision technology. These points are operational for example, "CCD-TRV46 only." Keep the camcorder away from country to the provision of the copyright laws. Otherwise, the model name is indicated in light TRV16 h 180× - - - - Any differences in ...settings on the LCD screen. As you need an NTSC system-based TV. Letting the camcorder get wet. TRV36 H 330× - Types of differences CCDSystem Digital zoom SteadyShot Remote sensor Laser link Built-in the illustrations. r TRV43 H 330× r r r r TRV46 H 330× r r r r...
...manufactured using high-precision technology. These points are operational for example, "CCD-TRV46 only." Keep the camcorder away from country to the provision of the copyright laws. Otherwise, the model name is indicated in light TRV16 h 180× - - - - Any differences in ...settings on the LCD screen. As you need an NTSC system-based TV. Letting the camcorder get wet. TRV36 H 330× - Types of differences CCDSystem Digital zoom SteadyShot Remote sensor Laser link Built-in the illustrations. r TRV43 H 330× r r r r TRV46 H 330× r r r r...
Operating Instructions
Page 11
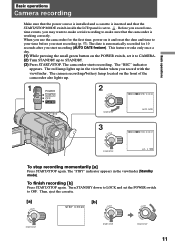
... day. (1) While pressing the small green button on the front of the camcorder also lights up. 1 POWER CAMERA OFF PLAYER STA 2 LOCK NDBY START/STOP 40min SP... STBY 0:00:00 AUTO DATE STA 3 LOCK NDBY START/STOP 40min SP REC 0:00:01 JUL 4 1999 To stop recording momentarily [a] Press START/STOP again. When you use the camcorder... Turn STANDBY down to LOCK and set to . Then, eject the cassette. The camcorder starts recording. The camera recording/battery lamp located on the POWER switch, set it ...
... day. (1) While pressing the small green button on the front of the camcorder also lights up. 1 POWER CAMERA OFF PLAYER STA 2 LOCK NDBY START/STOP 40min SP... STBY 0:00:00 AUTO DATE STA 3 LOCK NDBY START/STOP 40min SP REC 0:00:01 JUL 4 1999 To stop recording momentarily [a] Press START/STOP again. When you use the camcorder... Turn STANDBY down to LOCK and set to . Then, eject the cassette. The camcorder starts recording. The camera recording/battery lamp located on the POWER switch, set it ...
Operating Instructions
Page 26
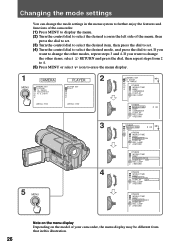
LIGHT PLAYER PLAYER SET EDIT 2 CAMERA SET D ZOOM 16 : 9WIDE OTHERS WORLD TIME BEEP COMMANDER DISPLAY REC LAMP [MENU] ...RETURN OTHERS WORLD TIME BEEP COMMANDER OFF DISPLAY REC LAMP RETURN Note on the menu display Depending on the model of your camcorder, the menu display may be different from 2 to 4. (5) Press MENU or select icon to set . (4) Turn...the mode settings You can change the mode settings in the menu system to further enjoy the features and functions of the camcorder. (1) Press MENU to display the menu. (2) Turn the control dial to select the desired icon in this illustration....
LIGHT PLAYER PLAYER SET EDIT 2 CAMERA SET D ZOOM 16 : 9WIDE OTHERS WORLD TIME BEEP COMMANDER DISPLAY REC LAMP [MENU] ...RETURN OTHERS WORLD TIME BEEP COMMANDER OFF DISPLAY REC LAMP RETURN Note on the menu display Depending on the model of your camcorder, the menu display may be different from 2 to 4. (5) Press MENU or select icon to set . (4) Turn...the mode settings You can change the mode settings in the menu system to further enjoy the features and functions of the camcorder. (1) Press MENU to display the menu. (2) Turn the control dial to select the desired icon in this illustration....
Operating Instructions
Page 28
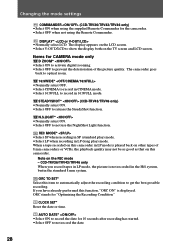
...in the Hi8 system, but in LP mode is displayed. AUTO DATE* •Select ON to record the date for "Optimizing the Recording Condition." The display appears on the LCD screen. •Select V-OUT/LCD to show the display both on the REC mode - STEADYSHOT* (CCD-TRV43/TRV46 only...) •Normally select ON. •Select OFF to not use the NightShot Light function. CCD-TRV36/TRV43/TRV46 only When you have already performed this function, "ORC ON" is played back on this camcorder in the standard 8 mm system. CLOCK SET...
...in the Hi8 system, but in LP mode is displayed. AUTO DATE* •Select ON to record the date for "Optimizing the Recording Condition." The display appears on the LCD screen. •Select V-OUT/LCD to show the display both on the REC mode - STEADYSHOT* (CCD-TRV43/TRV46 only...) •Normally select ON. •Select OFF to not use the NightShot Light function. CCD-TRV36/TRV43/TRV46 only When you have already performed this function, "ORC ON" is played back on this camcorder in the standard 8 mm system. CLOCK SET...
Operating Instructions
Page 29
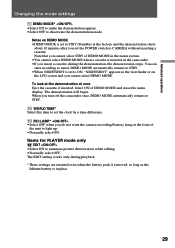
...not want the camera recording/battery lamp at the front of DEMO MODE and erase the menu display. Select ON of the unit to light up. •Normally select ON. When you set the POWER switch to set to minimize picture deterioration when editing. •Normally select ... without inserting a cassette. To look at the demonstration at the factory and the demonstration starts about 10 minutes after you turn off the camcorder once, DEMO MODE automatically returns to deactivate the demonstration mode. The EDIT setting works only during the demonstration, the demonstration stops. Notes on...
...not want the camera recording/battery lamp at the front of DEMO MODE and erase the menu display. Select ON of the unit to light up. •Normally select ON. When you set the POWER switch to set to minimize picture deterioration when editing. •Normally select ... without inserting a cassette. To look at the demonstration at the factory and the demonstration starts about 10 minutes after you turn off the camcorder once, DEMO MODE automatically returns to deactivate the demonstration mode. The EDIT setting works only during the demonstration, the demonstration stops. Notes on...
Operating Instructions
Page 30
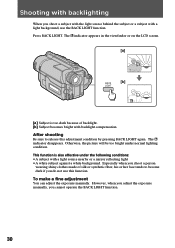
... make a fine adjustment You can adjust the exposure manually. The c indicator disappears. However, when you adjust the exposure manually, you do not use the BACK LIGHT function. Especially when you shoot a person wearing shiny clothes made of backlight. [b] Subject becomes bright with backlight compensation. After shooting Be sure to become dark...
... make a fine adjustment You can adjust the exposure manually. The c indicator disappears. However, when you adjust the exposure manually, you do not use the BACK LIGHT function. Especially when you shoot a person wearing shiny clothes made of backlight. [b] Subject becomes bright with backlight compensation. After shooting Be sure to become dark...
Operating Instructions
Page 33
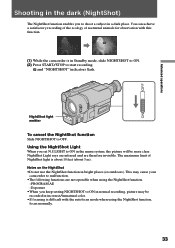
...the picture will be recorded in incorrect/unnatural color. •If focusing is difficult with this function. (1) While the camcorder is about 10 feet (about 3 m). NightShot Light rays are infrared and are not operable when using the NightShot function, focus manually. 33 You can achieve a satisfactory ...recording of the ecology of NightShot light is in Standby mode, slide NIGHTSHOT to ON. (2) Press START/STOP to ON in bright places (ex.outdoors). The maximum limit ...
...the picture will be recorded in incorrect/unnatural color. •If focusing is difficult with this function. (1) While the camcorder is about 10 feet (about 3 m). NightShot Light rays are infrared and are not operable when using the NightShot function, focus manually. 33 You can achieve a satisfactory ...recording of the ecology of NightShot light is in Standby mode, slide NIGHTSHOT to ON. (2) Press START/STOP to ON in bright places (ex.outdoors). The maximum limit ...

Operating Instructions
Page 36
... mode For people or faces in dark environments such as at the theater or a formal event. Sunset & Moon mode For recording subjects in strong light or reflected light, such as sunsets, fireworks, neon signs, or general night views. Creates a soft background for a subject behind an obstacle such as people or flowers, and...
... mode For people or faces in dark environments such as at the theater or a formal event. Sunset & Moon mode For recording subjects in strong light or reflected light, such as sunsets, fireworks, neon signs, or general night views. Creates a soft background for a subject behind an obstacle such as people or flowers, and...

Operating Instructions
Page 38
Focusing manually When to use manual focus In the following cases you should obtain better results by adjusting the focus manually. [a] [b] [c] [d] • Insufficient light [a] • Subjects with little contrast - walls, sky, etc. [b] • Too much brightness behind the subject [c] • Horizontal stripes [d] • Subjects through frosted glass • Subjects beyond nets, etc. • Bright subject or subject reflecting light • Shooting a stationary subject when using a tripod 38
Focusing manually When to use manual focus In the following cases you should obtain better results by adjusting the focus manually. [a] [b] [c] [d] • Insufficient light [a] • Subjects with little contrast - walls, sky, etc. [b] • Too much brightness behind the subject [c] • Horizontal stripes [d] • Subjects through frosted glass • Subjects beyond nets, etc. • Bright subject or subject reflecting light • Shooting a stationary subject when using a tripod 38

Operating Instructions
Page 40
... effects like those in films or on the TV. [a] [b] [c] [d] [e] [f] PASTEL [a] The contrast of the picture is reversed. STRETCH [f] The picture expands horizontally. 40 SOLARIZE [c] The light intensity is more clear, and the picture looks like an animated cartoon. SEPIA The picture is monochrome (black and white). B&W The picture is sepia. ART...
... effects like those in films or on the TV. [a] [b] [c] [d] [e] [f] PASTEL [a] The contrast of the picture is reversed. STRETCH [f] The picture expands horizontally. 40 SOLARIZE [c] The light intensity is more clear, and the picture looks like an animated cartoon. SEPIA The picture is monochrome (black and white). B&W The picture is sepia. ART...

Operating Instructions
Page 42
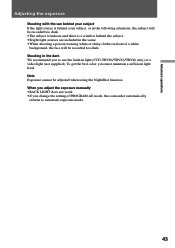
Adjusting the exposure When to adjust the exposure Adjust the exposure manually under the following cases. [a] [b] [a] • The background is too bright (back lighting) • Insufficient light: most of the picture is dark [b] • Bright subject and dark background • To record the darkness faithfully Adjusting the exposure (1) Press EXPOSURE. (2) Turn the control dial to adjust the brightness. 1 EXPOSURE - + 2 - + To return to automatic exposure mode Press EXPOSURE again. 42
Adjusting the exposure When to adjust the exposure Adjust the exposure manually under the following cases. [a] [b] [a] • The background is too bright (back lighting) • Insufficient light: most of the picture is dark [b] • Bright subject and dark background • To record the darkness faithfully Adjusting the exposure (1) Press EXPOSURE. (2) Turn the control dial to adjust the brightness. 1 EXPOSURE - + 2 - + To return to automatic exposure mode Press EXPOSURE again. 42
Operating Instructions
Page 43
... automatic exposure mode. 43 Shooting in front of PROGRAM AE mode, the camcorder automatically returns to use the built-in light (CCD-TRV36/TRV43/TRV46 only) or a video light (not supplied). When you adjust the exposure manually •BACK LIGHT does not work. •If you change the setting of a white...Exposure cannot be adjusted when using the NightShot function. Advanced operations Adjusting the exposure Shooting with the sun behind your subject If the light source is behind your subject, or in the following situations, the subject will be recorded too dark. •The subject is ...
... automatic exposure mode. 43 Shooting in front of PROGRAM AE mode, the camcorder automatically returns to use the built-in light (CCD-TRV36/TRV43/TRV46 only) or a video light (not supplied). When you adjust the exposure manually •BACK LIGHT does not work. •If you change the setting of a white...Exposure cannot be adjusted when using the NightShot function. Advanced operations Adjusting the exposure Shooting with the sun behind your subject If the light source is behind your subject, or in the following situations, the subject will be recorded too dark. •The subject is ...
Operating Instructions
Page 49
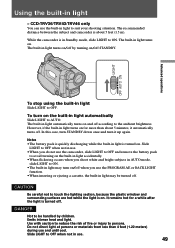
CCD-TRV36/TRV43/TRV46 only You can use . 49 The built-in light to suit your shooting situation. To turn on the built-in light is quickly discharging while the built-in light automatically Slide LIGHT to AUTO. Notes •The battery pack is turned on. However, if the built-in use the built-in light...reduce the risk of fire or injury to persons. Slide LIGHT to OFF when not in light turns on for a while after the light is in light turns on. While the camcorder is turned off. The built-in Standby mode, slide LIGHT to ON. DANGER Not to be turned off. The recommended...
CCD-TRV36/TRV43/TRV46 only You can use . 49 The built-in light to suit your shooting situation. To turn on the built-in light is quickly discharging while the built-in light automatically Slide LIGHT to AUTO. Notes •The battery pack is turned on. However, if the built-in use the built-in light...reduce the risk of fire or injury to persons. Slide LIGHT to OFF when not in light turns on for a while after the light is in light turns on. While the camcorder is turned off. The built-in Standby mode, slide LIGHT to ON. DANGER Not to be turned off. The recommended...

Operating Instructions
Page 50
...finger prints, handle it with a dry cloth, etc. Note To prevent the bulb from the built-in light unit using a dry cloth. (4) Attach the bulb housing turning it completely. 50 If the bulb is not... on the market. Using the built-in light CAUTION •When replacing the bulb, use only the Sony XB-3D halogen lamp (not supplied) to reduce the risk of fire. •...lamp is smudged, wipe it clockwise, then replace the built-in light unit. 1 2 3 Using the built-in light Replacing the bulb Use the Sony XB-3D halogen lamp (not supplied). Purchase the...
...finger prints, handle it with a dry cloth, etc. Note To prevent the bulb from the built-in light unit using a dry cloth. (4) Attach the bulb housing turning it completely. 50 If the bulb is not... on the market. Using the built-in light CAUTION •When replacing the bulb, use only the Sony XB-3D halogen lamp (not supplied) to reduce the risk of fire. •...lamp is smudged, wipe it clockwise, then replace the built-in light unit. 1 2 3 Using the built-in light Replacing the bulb Use the Sony XB-3D halogen lamp (not supplied). Purchase the...

Operating Instructions
Page 51
You do not need to ON in the menu system (p. 28). CCD-TRV43/TRV46 only When the SteadyShot function is working, the camcorder compensates for camerashake. You can release the SteadyShot function when you release the SteadyShot function. To activate the SteadyShot function again Set STEADYSHOT to use ... camera-shake. •When you set STEADYSHOT to ON in 16:9 FULL mode. You can select ON or OFF in the menu system. The " " indicator lights up when you do not need to use the SteadyShot function when shooting a stationary object with a tripod.
You do not need to ON in the menu system (p. 28). CCD-TRV43/TRV46 only When the SteadyShot function is working, the camcorder compensates for camerashake. You can release the SteadyShot function when you release the SteadyShot function. To activate the SteadyShot function again Set STEADYSHOT to use ... camera-shake. •When you set STEADYSHOT to ON in 16:9 FULL mode. You can select ON or OFF in the menu system. The " " indicator lights up when you do not need to use the SteadyShot function when shooting a stationary object with a tripod.
Operating Instructions
Page 53
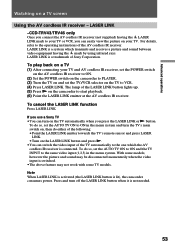
...momentarily when the video input is lit), the camcorder consumes power. For details, refer to the operating instructions of Sony Corporation. If you use a Sony TV •You can turn off the ...video input of the LASER LINK button lights up. (5) Press ( on a TV screen Using the AV cordless IR receiver - Advanced operations Watching on the camcorder to start playback. (6) Point the LASER...AV cordless IR receiver to ON. (2) Set the POWER switch on the camcorder to VCR. (4) Press LASER LINK. LASER LINK -CCD-TRV43/TRV46 only Once you connect the AV cordless IR receiver (not supplied) ...
...momentarily when the video input is lit), the camcorder consumes power. For details, refer to the operating instructions of Sony Corporation. If you use a Sony TV •You can turn off the ...video input of the LASER LINK button lights up. (5) Press ( on a TV screen Using the AV cordless IR receiver - Advanced operations Watching on the camcorder to start playback. (6) Point the LASER...AV cordless IR receiver to ON. (2) Set the POWER switch on the camcorder to VCR. (4) Press LASER LINK. LASER LINK -CCD-TRV43/TRV46 only Once you connect the AV cordless IR receiver (not supplied) ...
Operating Instructions
Page 66
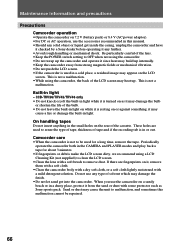
...dust may damage the finish. •Do not let sand get inside the casing, unplug the camcorder and have it checked by a Sony dealer before operating it may appear on as Sony sports pack. Periodically operate the camcorder both in the CAMERA and PLAYER modes and play back a tape for a long time, ...which may cause the unit to sense the type of tape, thickness of the bulb. • Do not leave the built-in light - Be particularly careful of the cassette. CCD-TRV36/TRV43/TRV46 only • Do not knock or jolt the built-in a cold place, a residual image may cause a fire or damage...
...dust may damage the finish. •Do not let sand get inside the casing, unplug the camcorder and have it checked by a Sony dealer before operating it may appear on as Sony sports pack. Periodically operate the camcorder both in the CAMERA and PLAYER modes and play back a tape for a long time, ...which may cause the unit to sense the type of tape, thickness of the bulb. • Do not leave the built-in light - Be particularly careful of the cassette. CCD-TRV36/TRV43/TRV46 only • Do not knock or jolt the built-in a cold place, a residual image may cause a fire or damage...
Operating Instructions
Page 70
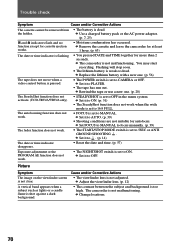
...56) The tape does not move when a video control button is pressed. • The POWER switch is set to MANUAL. The camcorder is too high. m The camcorder is shot against a dark background. The autofocusing function does not work when the wide mode is set to PLAYER. • The... tape has run out. A vertical band appears when a subject such as lights or a candle flame is not malfunctioning. m Replace the lithium battery with a new one . (p. 20) The SteadyShot function does not activate. (CCD-TRV43/TRV46 only) • STEADYSHOT is flashing. • You pressed DATE and TIME...
...56) The tape does not move when a video control button is pressed. • The POWER switch is set to MANUAL. The camcorder is too high. m The camcorder is shot against a dark background. The autofocusing function does not work when the wide mode is set to PLAYER. • The... tape has run out. A vertical band appears when a subject such as lights or a candle flame is not malfunctioning. m Replace the lithium battery with a new one . (p. 20) The SteadyShot function does not activate. (CCD-TRV43/TRV46 only) • STEADYSHOT is flashing. • You pressed DATE and TIME...
Operating Instructions
Page 73
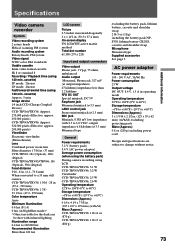
...248; 2.5 mm) MIC jack Minijack, 0.388 mV low impedance with infrared lighting. cassette) SP mode: 2 hours LP mode: 4 hours Fastforward/rewind time (using LCD CCD-TRV16/TRV36: 3.1 W CCD-TRV43/TRV46: 3.2 W Viewfinder CCD-TRV16/TRV36: 2.5 W CCD-TRV43/TRV46: 2.6 W Operating temperature 32°F to 104°F (0°C... Dimensions (Approx.) 4 1⁄4 x 4 1⁄4 x 7 5⁄8 in. (107 x 107 x 193 mm) (w/h/d) Mass (Approx.) CCD-TRV16/TRV36: 1 lb 14 oz (870 g) CCD-TRV43/TRV46: 1 lb 15 oz (880 g) excluding the battery pack, lithium battery, cassette and shoulder strap 2 lb 3 oz (1 kg) including...
...248; 2.5 mm) MIC jack Minijack, 0.388 mV low impedance with infrared lighting. cassette) SP mode: 2 hours LP mode: 4 hours Fastforward/rewind time (using LCD CCD-TRV16/TRV36: 3.1 W CCD-TRV43/TRV46: 3.2 W Viewfinder CCD-TRV16/TRV36: 2.5 W CCD-TRV43/TRV46: 2.6 W Operating temperature 32°F to 104°F (0°C... Dimensions (Approx.) 4 1⁄4 x 4 1⁄4 x 7 5⁄8 in. (107 x 107 x 193 mm) (w/h/d) Mass (Approx.) CCD-TRV16/TRV36: 1 lb 14 oz (870 g) CCD-TRV43/TRV46: 1 lb 15 oz (880 g) excluding the battery pack, lithium battery, cassette and shoulder strap 2 lb 3 oz (1 kg) including...


