
Operating Instructions
Page 1
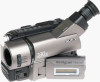
Model No. CCD-TRV Model No. Record the serial number in the space provided below. AC-L Serial No. CCD-TRV46 CCD-TRV36/TRV43/TRV46 CCD-TRV16 ©1998 by Sony Corporation Owner's Record The model and serial numbers are located on the bottom. 3-865-333-13 (1) Video Camera Recorder Operating Instructions Before operating the unit, please read this product. Refer to these numbers whenever you call upon your Sony dealer regarding this manual thoroughly, and retain it for future reference. Serial No.
Model No. CCD-TRV Model No. Record the serial number in the space provided below. AC-L Serial No. CCD-TRV46 CCD-TRV36/TRV43/TRV46 CCD-TRV16 ©1998 by Sony Corporation Owner's Record The model and serial numbers are located on the bottom. 3-865-333-13 (1) Video Camera Recorder Operating Instructions Before operating the unit, please read this product. Refer to these numbers whenever you call upon your Sony dealer regarding this manual thoroughly, and retain it for future reference. Serial No.
Operating Instructions
Page 2
... and used in household or business trash may cause harmful interference to operate this equipment. If this Sony Handycam VisionTM camcorder. For the Sony Service Center nearest you call 416-499-SONY (Canada only) Caution: Do not handle damaged or leaking lithium 2 ion battery. DISPOSAL OF LITHIUM...same time it is intended to alert the user to the presence of important operating and maintenance (servicing) instructions in this manual could void your purchase of this equipment does cause harmful interference to radio or television reception, which the receiver is intended...
... and used in household or business trash may cause harmful interference to operate this equipment. If this Sony Handycam VisionTM camcorder. For the Sony Service Center nearest you call 416-499-SONY (Canada only) Caution: Do not handle damaged or leaking lithium 2 ion battery. DISPOSAL OF LITHIUM...same time it is intended to alert the user to the presence of important operating and maintenance (servicing) instructions in this manual could void your purchase of this equipment does cause harmful interference to radio or television reception, which the receiver is intended...
Operating Instructions
Page 3
... Using the built-in light (CCD-TRV36/ TRV43/TRV46 only 49 Releasing the STEADYSHOT function (CCD-TRV43/TRV46 only 51 Basic operations Camera recording 11 Using the zoom feature 13 Selecting the START/STOP mode 14 Shooting with backlighting 30 Using the FADER function 31 Shooting in the camcorder 55 Resetting the date and time... 54 Additional information Changing the lithium battery in the dark (NightShot) ....... 33 Using the wide mode function 34 Using the PROGRAM AE function .... 36 Focusing manually 38 - for camera recording - for playback/editing -
... Using the built-in light (CCD-TRV36/ TRV43/TRV46 only 49 Releasing the STEADYSHOT function (CCD-TRV43/TRV46 only 51 Basic operations Camera recording 11 Using the zoom feature 13 Selecting the START/STOP mode 14 Shooting with backlighting 30 Using the FADER function 31 Shooting in the camcorder 55 Resetting the date and time... 54 Additional information Changing the lithium battery in the dark (NightShot) ....... 33 Using the wide mode function 34 Using the PROGRAM AE function .... 36 Focusing manually 38 - for camera recording - for playback/editing -
Operating Instructions
Page 4
.... •Do not let the camcorder get wet may be copyrighted. Letting the camcorder get wet. r TRV43 H 330× r r r r TRV46 H 330× r r r r Note on the LCD screen. Before you begin Using this manual The instructions in this manual are clearly indicated in the text, for example, "CCD-TRV46 only." Keep the camcorder away from country to temperatures...
.... •Do not let the camcorder get wet may be copyrighted. Letting the camcorder get wet. r TRV43 H 330× r r r r TRV46 H 330× r r r r Note on the LCD screen. Before you begin Using this manual The instructions in this manual are clearly indicated in the text, for example, "CCD-TRV46 only." Keep the camcorder away from country to temperatures...
Operating Instructions
Page 21
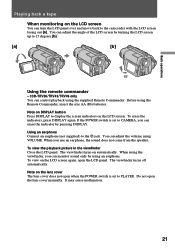
... can adjust the volume using VOLUME. Note on the lens cover The lens cover does not open when the POWER switch is set to the camcorder with the LCD screen facing out [a]. Basic operations Playing back a tape When monitoring on the LCD screen You can monitor sound only by using an... the viewfinder, you use an earphone, the sound does not come from the speaker. To view on the LCD screen again, open the lens cover manually. CCD-TRV36/TRV43/TRV46 only You can erase the indicator by pressing DISPLAY. The viewfinder turns off automatically.
... can adjust the volume using VOLUME. Note on the lens cover The lens cover does not open when the POWER switch is set to the camcorder with the LCD screen facing out [a]. Basic operations Playing back a tape When monitoring on the LCD screen You can monitor sound only by using an... the viewfinder, you use an earphone, the sound does not come from the speaker. To view on the LCD screen again, open the lens cover manually. CCD-TRV36/TRV43/TRV46 only You can erase the indicator by pressing DISPLAY. The viewfinder turns off automatically.
Operating Instructions
Page 30
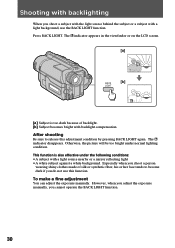
...subject with a light source nearby or a mirror reflecting light • A white subject against a white background. However, when you adjust the exposure manually, you shoot a person wearing shiny clothes made of backlight. [b] Subject becomes bright with a light background, use this adjustment condition by pressing BACK ... synthetic fiber, his or her face tends to release this function. To make a fine adjustment You can adjust the exposure manually. Press BACK LIGHT. Shooting with backlighting When you shoot a subject with the light source behind the subject or a subject with...
...subject with a light source nearby or a mirror reflecting light • A white subject against a white background. However, when you adjust the exposure manually, you shoot a person wearing shiny clothes made of backlight. [b] Subject becomes bright with a light background, use this adjustment condition by pressing BACK ... synthetic fiber, his or her face tends to release this function. To make a fine adjustment You can adjust the exposure manually. Press BACK LIGHT. Shooting with backlighting When you shoot a subject with the light source behind the subject or a subject with...
Operating Instructions
Page 33
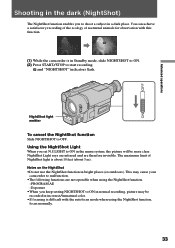
...•If focusing is difficult with this function. (1) While the camcorder is about 10 feet (about 3 m). NightShot Light rays are infrared and are not operable when using the NightShot function, focus manually. 33 Advanced operations OFF ON Shooting in the dark (NightShot)... The NightShot function enables you to shoot a subject in normal recording, picture may cause your camcorder to malfunction. •The following functions are therefore ...
...•If focusing is difficult with this function. (1) While the camcorder is about 10 feet (about 3 m). NightShot Light rays are infrared and are not operable when using the NightShot function, focus manually. 33 Advanced operations OFF ON Shooting in the dark (NightShot)... The NightShot function enables you to shoot a subject in normal recording, picture may cause your camcorder to malfunction. •The following functions are therefore ...

Operating Instructions
Page 38
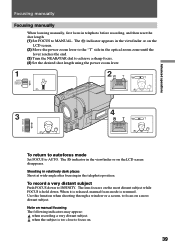
Focusing manually When to use manual focus In the following cases you should obtain better results by adjusting the focus manually. [a] [b] [c] [d] • Insufficient light [a] • Subjects with little contrast - walls, sky, etc. [b] • Too much brightness behind the subject [c] • Horizontal stripes [d] • Subjects through frosted glass • Subjects beyond nets, etc. • Bright subject or subject reflecting light • Shooting a stationary subject when using a tripod 38
Focusing manually When to use manual focus In the following cases you should obtain better results by adjusting the focus manually. [a] [b] [c] [d] • Insufficient light [a] • Subjects with little contrast - walls, sky, etc. [b] • Too much brightness behind the subject [c] • Horizontal stripes [d] • Subjects through frosted glass • Subjects beyond nets, etc. • Bright subject or subject reflecting light • Shooting a stationary subject when using a tripod 38
Operating Instructions
Page 39
..."T" side in the viewfinder or on a most distant subject while FOCUS is resumed. Note on the most distant subject. The lens focuses on manual focusing The following indicators may appear: when recording a very distant subject. Use this function when shooting through a window or a screen, to ... lever reaches the end. (3) Turn the NEAR/FAR dial to achieve a sharp focus. (4) Set the desired shot length using the power zoom lever. 1 AUTO MANUAL INFINITY 2W T W T 3 4 WT W T FAR NEAR To return to autofocus mode Set FOCUS to INFINITY. To record a very distant subject Push FOCUS ...
..."T" side in the viewfinder or on a most distant subject while FOCUS is resumed. Note on the most distant subject. The lens focuses on manual focusing The following indicators may appear: when recording a very distant subject. Use this function when shooting through a window or a screen, to ... lever reaches the end. (3) Turn the NEAR/FAR dial to achieve a sharp focus. (4) Set the desired shot length using the power zoom lever. 1 AUTO MANUAL INFINITY 2W T W T 3 4 WT W T FAR NEAR To return to autofocus mode Set FOCUS to INFINITY. To record a very distant subject Push FOCUS ...

Operating Instructions
Page 42
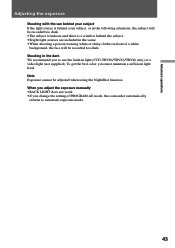
Adjusting the exposure When to adjust the exposure Adjust the exposure manually under the following cases. [a] [b] [a] • The background is too bright (back lighting) • Insufficient light: most of the picture is dark [b] • Bright subject and dark background • To record the darkness faithfully Adjusting the exposure (1) Press EXPOSURE. (2) Turn the control dial to adjust the brightness. 1 EXPOSURE - + 2 - + To return to automatic exposure mode Press EXPOSURE again. 42
Adjusting the exposure When to adjust the exposure Adjust the exposure manually under the following cases. [a] [b] [a] • The background is too bright (back lighting) • Insufficient light: most of the picture is dark [b] • Bright subject and dark background • To record the darkness faithfully Adjusting the exposure (1) Press EXPOSURE. (2) Turn the control dial to adjust the brightness. 1 EXPOSURE - + 2 - + To return to automatic exposure mode Press EXPOSURE again. 42
Operating Instructions
Page 43
... of PROGRAM AE mode, the camcorder automatically returns to use the built-in the dark We recommend you must maintain a sufficient light level. Note Exposure cannot be recorded too dark. Shooting in light (CCD-TRV36/TRV43/TRV46 only) or a video light (not supplied). When you adjust the exposure manually •BACK LIGHT does not...
... of PROGRAM AE mode, the camcorder automatically returns to use the built-in the dark We recommend you must maintain a sufficient light level. Note Exposure cannot be recorded too dark. Shooting in light (CCD-TRV36/TRV43/TRV46 only) or a video light (not supplied). When you adjust the exposure manually •BACK LIGHT does not...
Operating Instructions
Page 66
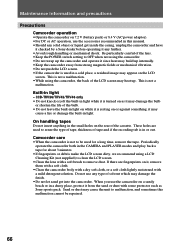
... moistened with a mild detergent solution. Do not use any further. •Avoid rough handling or mechanical shock. Camcorder care •When the camcorder is in or out. CCD-TRV36/TRV43/TRV46 only • Do not knock or jolt the built-in light while it is resting on or against something...the POWER switch setting to malfunction, and sometimes this manual. •Should any solid object or liquid get inside the casing, unplug the camcorder and have it checked by a Sony dealer before operating it since heat may build up the camcorder and operate it any type of the cassette. ...
... moistened with a mild detergent solution. Do not use any further. •Avoid rough handling or mechanical shock. Camcorder care •When the camcorder is in or out. CCD-TRV36/TRV43/TRV46 only • Do not knock or jolt the built-in light while it is resting on or against something...the POWER switch setting to malfunction, and sometimes this manual. •Should any solid object or liquid get inside the casing, unplug the camcorder and have it checked by a Sony dealer before operating it since heat may build up the camcorder and operate it any type of the cassette. ...
Operating Instructions
Page 70
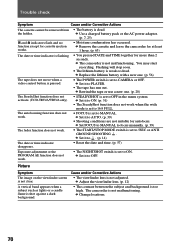
...camcorder for at least 1 hour. (p. 63) The date or time indicator is flashing. • You pressed DATE and TIME together for cassette ejection works. • Moisture condensation has occurred. You may start recording. m Replace the lithium battery with a new one . (p. 20) The SteadyShot function does not activate. (CCD-TRV43...• The POWER switch is set to AUTO. (p. 39) • Shooting conditions are not suitable for autofocus. m Set FOCUS to MANUAL to focus manually. (p. 39) The fader function does not work . • The NIGHTSHOT switch is set to 16:9 FULL. m Set it to ...
...camcorder for at least 1 hour. (p. 63) The date or time indicator is flashing. • You pressed DATE and TIME together for cassette ejection works. • Moisture condensation has occurred. You may start recording. m Replace the lithium battery with a new one . (p. 20) The SteadyShot function does not activate. (CCD-TRV43...• The POWER switch is set to AUTO. (p. 39) • Shooting conditions are not suitable for autofocus. m Set FOCUS to MANUAL to focus manually. (p. 39) The fader function does not work . • The NIGHTSHOT switch is set to 16:9 FULL. m Set it to ...
Operating Instructions
Page 81
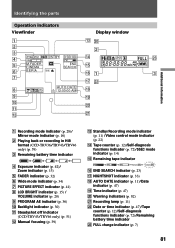
... in Hi8 format (CCD-TRV36/TRV43/TRV46 only) (p. 59) 3 Remaining battery time indicator 4 Exposure indicator (p. 42)/ Zoom indicator (p. 13) 5 FADER indicator (p. 32) 6 Wide mode indicator (p. 34) 7 PICTURE EFFECT indicator (p. 41) 8 LCD BRIGHT indicator (p. 15) / VOLUME indicator (p. 20) 9 PROGRAM AE indicator (p. 36) 0 Backlight indicator (p. 30) !¡ Steadyshot off indicator (CCD-TRV43/TRV46 only) (p. 51) !™ Manual focusing...
... in Hi8 format (CCD-TRV36/TRV43/TRV46 only) (p. 59) 3 Remaining battery time indicator 4 Exposure indicator (p. 42)/ Zoom indicator (p. 13) 5 FADER indicator (p. 32) 6 Wide mode indicator (p. 34) 7 PICTURE EFFECT indicator (p. 41) 8 LCD BRIGHT indicator (p. 15) / VOLUME indicator (p. 20) 9 PROGRAM AE indicator (p. 36) 0 Backlight indicator (p. 30) !¡ Steadyshot off indicator (CCD-TRV43/TRV46 only) (p. 51) !™ Manual focusing...
Operating Instructions
Page 83
..., 80 Digital zoom 13 DISPLAY 21 E EDIT 29 Editing 54 EDITSEARCH 19 END SEARCH 23 Exposure 42 L LANC 77 LASER LINK 53 Lithium battery 55 M, N Manual focus 38 Menu system 26 MIC (microphone) jack .......... 78 NIGHTSHOT 33 O, P, Q ORC 48 PICTURE EFFECT 40 Playback pause 22 Power sources 24 Power zoom 13...
..., 80 Digital zoom 13 DISPLAY 21 E EDIT 29 Editing 54 EDITSEARCH 19 END SEARCH 23 Exposure 42 L LANC 77 LASER LINK 53 Lithium battery 55 M, N Manual focus 38 Menu system 26 MIC (microphone) jack .......... 78 NIGHTSHOT 33 O, P, Q ORC 48 PICTURE EFFECT 40 Playback pause 22 Power sources 24 Power zoom 13...


