Operating Instructions
Page 2
...above 140°F (60°C), such as in a car parked in the sun or under direct sunlight. DISPOSAL OF LITHIUM ION BATTERY. Increase the separation between the equipment and receiver. - This symbol is encouraged to try to correct the interference by turning the ... determined by one or more of the following measures: - CAUTION You are designed to operate this Sony Handycam VisionTM camcorder. Connect the equipment into an outlet on your nearest Sony Service Center or Factory Service Center. You can radiate radio frequency energy and, if not installed and...
...above 140°F (60°C), such as in a car parked in the sun or under direct sunlight. DISPOSAL OF LITHIUM ION BATTERY. Increase the separation between the equipment and receiver. - This symbol is encouraged to try to correct the interference by turning the ... determined by one or more of the following measures: - CAUTION You are designed to operate this Sony Handycam VisionTM camcorder. Connect the equipment into an outlet on your nearest Sony Service Center or Factory Service Center. You can radiate radio frequency energy and, if not installed and...
Operating Instructions
Page 3
... for using the battery pack 60 Maintenance information and precautions 63 Using your own titles 46 Recording with the date/time 47 Optimizing the recording condition .. 48 Using the built-in light (CCD-TRV36/ TRV43/TRV46 only 49 Releasing the STEADYSHOT function (CCD-TRV43/TRV46 only 51 ...Basic operations Camera recording 11 Using the zoom feature 13 Selecting the START/STOP mode 14 Shooting with backlighting 30 Using the FADER function 31 Shooting in the camcorder 55 Resetting ...
... for using the battery pack 60 Maintenance information and precautions 63 Using your own titles 46 Recording with the date/time 47 Optimizing the recording condition .. 48 Using the built-in light (CCD-TRV36/ TRV43/TRV46 only 49 Releasing the STEADYSHOT function (CCD-TRV43/TRV46 only 51 ...Basic operations Camera recording 11 Using the zoom feature 13 Selecting the START/STOP mode 14 Shooting with backlighting 30 Using the FADER function 31 Shooting in the camcorder 55 Resetting ...
Operating Instructions
Page 5
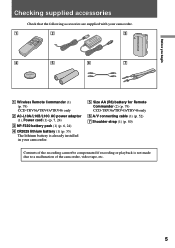
... only 2 AC-L10A/L10B/L10C AC power adaptor (1), Power cord (1) (p. 7, 24) 3 NP-F330 battery pack (1) (p. 6, 24) 4 CR2025 lithium battery (1) (p. 55) The lithium battery is already installed in your camcorder. 5 Size AA (R6) battery for Remote Commander (2) (p. 79) CCD-TRV36/TRV43/TRV46 only 6 A/V connecting cable (1) (p. 52) 7 Shoulder strap (1) (p. 80) Contents of the recording cannot be compensated if recording...
... only 2 AC-L10A/L10B/L10C AC power adaptor (1), Power cord (1) (p. 7, 24) 3 NP-F330 battery pack (1) (p. 6, 24) 4 CR2025 lithium battery (1) (p. 55) The lithium battery is already installed in your camcorder. 5 Size AA (R6) battery for Remote Commander (2) (p. 79) CCD-TRV36/TRV43/TRV46 only 6 A/V connecting cable (1) (p. 52) 7 Shoulder strap (1) (p. 80) Contents of the recording cannot be compensated if recording...
Operating Instructions
Page 6
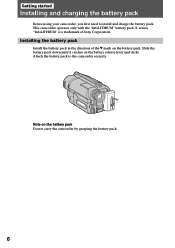
... only with the "InfoLITHIUM" battery pack (L series). Slide the battery pack down until it catches on the battery pack Do not carry the camcorder by grasping the battery pack. 6 Installing the battery pack Install the battery pack in the direction of Sony Corporation. "InfoLITHIUM" is a trademark of the $ mark on the battery pack. Attach the battery pack to install and...
... only with the "InfoLITHIUM" battery pack (L series). Slide the battery pack down until it catches on the battery pack Do not carry the camcorder by grasping the battery pack. 6 Installing the battery pack Install the battery pack in the direction of Sony Corporation. "InfoLITHIUM" is a trademark of the $ mark on the battery pack. Attach the battery pack to install and...

Operating Instructions
Page 7
.... Use it is completed. min" appears in the display window until FULL appears in the display window. Charging begins. Before using the camcorder with the viewfinder. When the remaining battery indicator becomes ı, normal charge is completely charged. POWER CAMERA OFF PPLLAYEERR Notes •"- - - It may differ from the DC IN jack...
.... Use it is completed. min" appears in the display window until FULL appears in the display window. Charging begins. Before using the camcorder with the viewfinder. When the remaining battery indicator becomes ı, normal charge is completely charged. POWER CAMERA OFF PPLLAYEERR Notes •"- - - It may differ from the DC IN jack...
Operating Instructions
Page 8
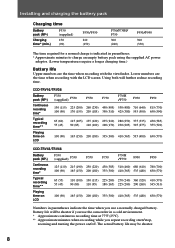
...) 165 (150) 200 (180) 335 (300) 410 (365) 535 (480) F950 815 (730) 650 (590) 430 (385) 355 (320) 630 (570) CCD-TRV43/TRV46 Battery pack (NP-) Continuous recording time* F330 (supplied) F530 F550 F730 F730H /F750 F930 F950 125 (110) 215 (190) 250 (220) 430 (385) 510 (460...the viewfinder. Lower numbers are the time when recording with the LCD screen. Using both will be shorter. 8 The actual battery life may be shorter if you use the camcorder in a cold environment. * Approximate continuous recording time at 77°F (25°C). ** Approximate minutes when recording while you...
...) 165 (150) 200 (180) 335 (300) 410 (365) 535 (480) F950 815 (730) 650 (590) 430 (385) 355 (320) 630 (570) CCD-TRV43/TRV46 Battery pack (NP-) Continuous recording time* F330 (supplied) F530 F550 F730 F730H /F750 F930 F950 125 (110) 215 (190) 250 (220) 430 (385) 510 (460...the viewfinder. Lower numbers are the time when recording with the LCD screen. Using both will be shorter. 8 The actual battery life may be shorter if you use the camcorder in a cold environment. * Approximate continuous recording time at 77°F (25°C). ** Approximate minutes when recording while you...
Operating Instructions
Page 9
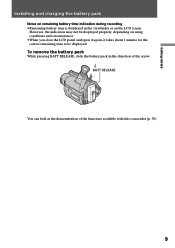
Getting started Installing and charging the battery pack Notes on remaining battery time indication during recording •Remaining battery time is displayed in the direction of the functions available with this camcorder (p. 29). 9 To remove the battery pack While pressing BATT RELEASE, slide the battery pack in the viewfinder or on using conditions and circumstances. •When...
Getting started Installing and charging the battery pack Notes on remaining battery time indication during recording •Remaining battery time is displayed in the direction of the functions available with this camcorder (p. 29). 9 To remove the battery pack While pressing BATT RELEASE, slide the battery pack in the viewfinder or on using conditions and circumstances. •When...
Operating Instructions
Page 11
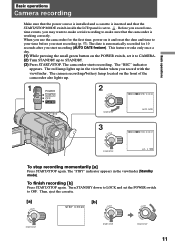
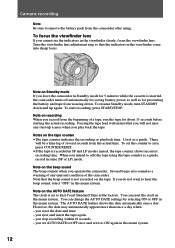
...To finish recording [b] Press START/STOP again. This feature works only once a day. (1) While pressing the small green button on the front of the camcorder also lights up. 1 POWER CAMERA OFF PLAYER STA 2 LOCK NDBY START/STOP 40min SP STBY 0:00:00 AUTO DATE STA 3 LOCK NDBY START/...Make sure that the power source is installed and a cassette is inserted and that the camcorder is working correctly. Before you record onetime events, you start recording (AUTO DATE feature). The camera recording/battery lamp located on the POWER switch, set it and reset the date and time to your...
...To finish recording [b] Press START/STOP again. This feature works only once a day. (1) While pressing the small green button on the front of the camcorder also lights up. 1 POWER CAMERA OFF PLAYER STA 2 LOCK NDBY START/STOP 40min SP STBY 0:00:00 AUTO DATE STA 3 LOCK NDBY START/...Make sure that the power source is installed and a cassette is inserted and that the camcorder is working correctly. Before you record onetime events, you start recording (AUTO DATE feature). The camera recording/battery lamp located on the POWER switch, set it and reset the date and time to your...
Operating Instructions
Page 12
... the date may automatically appear more than once a day when: - you leave the camcorder in Standby mode for 5 minutes while the cassette is inserted, the camcorder turns off automatically for saving battery power as well as for about 15 seconds before starting the actual recording. Camera recording Note... Be sure to remove the battery pack from the comcorder after using the tape counter as ...
... the date may automatically appear more than once a day when: - you leave the camcorder in Standby mode for 5 minutes while the cassette is inserted, the camcorder turns off automatically for saving battery power as well as for about 15 seconds before starting the actual recording. Camera recording Note... Be sure to remove the battery pack from the comcorder after using the tape counter as ...
Operating Instructions
Page 15
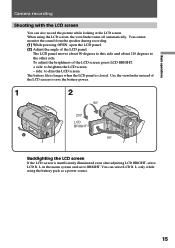
...the viewfinder turns off automatically. To adjust the brightness of the LCD screen, press LCD BRIGHT. + side: to dim the LCD screen The battery life is longer when the LCD panel is insufficiently illuminated even after adjusting LCD BRIGHT, select LCD B. The LCD panel moves about 90 degrees ...during recording. (1) While pressing OPEN, open the LCD panel. (2) Adjust the angle of the LCD screen to the other side. L. When using the battery pack as a power source. 15 Use the viewfinder instead of the LCD panel. in the menu system and set to BRIGHT. L. Basic operations Camera ...
...the viewfinder turns off automatically. To adjust the brightness of the LCD screen, press LCD BRIGHT. + side: to dim the LCD screen The battery life is longer when the LCD panel is insufficiently illuminated even after adjusting LCD BRIGHT, select LCD B. The LCD panel moves about 90 degrees ...during recording. (1) While pressing OPEN, open the LCD panel. (2) Adjust the angle of the LCD screen to the other side. L. When using the battery pack as a power source. 15 Use the viewfinder instead of the LCD panel. in the menu system and set to BRIGHT. L. Basic operations Camera ...
Operating Instructions
Page 21
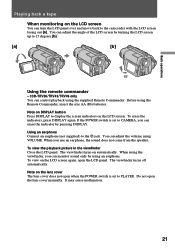
CCD-TRV36/TRV43/TRV46 only You can monitor sound only by using an earphone. To erase the indicators, press DISPLAY again. When you can control playback using the Remote Commander, insert the size AA (R6) batteries. The viewfinder turns off automatically. Do not open when the POWER switch is set to...POWER switch is set to 15 degrees [b]. [a] [b] 15° Using the remote commander - Using an earphone Connect an earphone (not supplied) to the camcorder with the LCD screen facing out [a]. You can turn the LCD panel over and move back to the @ jack. To view the playback picture in...
CCD-TRV36/TRV43/TRV46 only You can monitor sound only by using an earphone. To erase the indicators, press DISPLAY again. When you can control playback using the Remote Commander, insert the size AA (R6) batteries. The viewfinder turns off automatically. Do not open when the POWER switch is set to...POWER switch is set to 15 degrees [b]. [a] [b] 15° Using the remote commander - Using an earphone Connect an earphone (not supplied) to the camcorder with the LCD screen facing out [a]. You can turn the LCD panel over and move back to the @ jack. To view the playback picture in...
Operating Instructions
Page 24
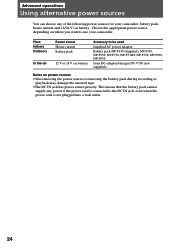
... NP-F930, NP-F950 Sony DC adaptor/charger DC-V700 (not supplied) Notes on where you want to the DC IN jack, even when the power cord is connected to use your camcorder: battery pack, house current and 12/24 V car battery. This means that the battery pack cannot supply any of... the following power sources for your camcorder. Advanced operations Using alternative power sources You can choose any power if...
... NP-F930, NP-F950 Sony DC adaptor/charger DC-V700 (not supplied) Notes on where you want to the DC IN jack, even when the power cord is connected to use your camcorder: battery pack, house current and 12/24 V car battery. This means that the battery pack cannot supply any of... the following power sources for your camcorder. Advanced operations Using alternative power sources You can choose any power if...
Operating Instructions
Page 27
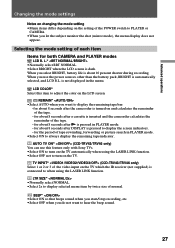
LCD COLOR* Select this feature only with Sony TVs. •Select ON to hear the beep sound. 27 for about 8 seconds after the camcorder is turned on and calculates the remainder of the POWER switch to PLAYER or CAMERA. •When you use this item to adjust the color .... When you let the subject monitor the shot (mirror mode), the menu display does not appear. AUTO TV ON* (CCD-TRV43/TRV46 only) You can use the power sources other than the battery pack, BRIGHT is connected to when using the LASER LINK function. •Select OFF not to display the screen indicators...
LCD COLOR* Select this feature only with Sony TVs. •Select ON to hear the beep sound. 27 for about 8 seconds after the camcorder is turned on and calculates the remainder of the POWER switch to PLAYER or CAMERA. •When you use this item to adjust the color .... When you let the subject monitor the shot (mirror mode), the menu display does not appear. AUTO TV ON* (CCD-TRV43/TRV46 only) You can use the power sources other than the battery pack, BRIGHT is connected to when using the LASER LINK function. •Select OFF not to display the screen indicators...
Operating Instructions
Page 29
... is set to light up. •Normally select ON. When you insert a cassette during playback * These settings are retained even when the battery pack is removed, as long as usual. The EDIT setting works only during the demonstration, the demonstration stops. WORLD TIME* Select this item ...•Normally select OFF. Note that you cannot select DEMO MODE. You can start recording as the lithium battery is inserted in the camcorder. •If you turn off the camcorder once, DEMO MODE automatically returns to CAMERA without inserting a cassette. To look at the demonstration at once ...
... is set to light up. •Normally select ON. When you insert a cassette during playback * These settings are retained even when the battery pack is removed, as long as usual. The EDIT setting works only during the demonstration, the demonstration stops. WORLD TIME* Select this item ...•Normally select OFF. Note that you cannot select DEMO MODE. You can start recording as the lithium battery is inserted in the camcorder. •If you turn off the camcorder once, DEMO MODE automatically returns to CAMERA without inserting a cassette. To look at the demonstration at once ...
Operating Instructions
Page 49
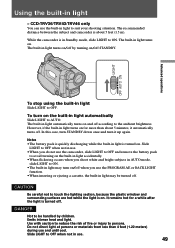
... turn STANDBY down once and turn on/off when you do not use the camcorder, slide LIGHT to OFF and remove the battery pack to avoid turning on . Slide LIGHT to OFF when not in light ... Slide LIGHT to ON. Slide LIGHT to the ambient brightness. The recommended distance between the subject and camcorder is turned on for a while after the light is turned off . The built-in light automatically turns...light is about 5 minutes, it up again. The built-in light to be turned off STANDBY. CCD-TRV36/TRV43/TRV46 only You can use the built-in light turns on/off according to OFF when not in ...
... turn STANDBY down once and turn on/off when you do not use the camcorder, slide LIGHT to OFF and remove the battery pack to avoid turning on . Slide LIGHT to OFF when not in light ... Slide LIGHT to ON. Slide LIGHT to the ambient brightness. The recommended distance between the subject and camcorder is turned on for a while after the light is turned off . The built-in light automatically turns...light is about 5 minutes, it up again. The built-in light to be turned off STANDBY. CCD-TRV36/TRV43/TRV46 only You can use the built-in light turns on/off according to OFF when not in ...
Operating Instructions
Page 55
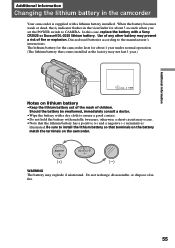
... if mistreated. Be sure to install the lithium battery so that the lithium battery has a positive (+) and a negative (-) terminals as illustrated. Discard used batteries according to assure a good contact. •Do not hold the battery with a Sony CR2025 or Duracell DL-2025 lithium battery. The lithium battery for the camcorder lasts for about 1 year under normal operation. (The...
... if mistreated. Be sure to install the lithium battery so that the lithium battery has a positive (+) and a negative (-) terminals as illustrated. Discard used batteries according to assure a good contact. •Do not hold the battery with a Sony CR2025 or Duracell DL-2025 lithium battery. The lithium battery for the camcorder lasts for about 1 year under normal operation. (The...
Operating Instructions
Page 56
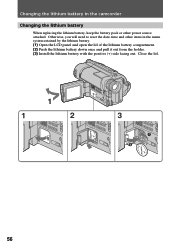
Close the lid. 1 1 2 5 3 5 CR 202 CR 202 56 Otherwise, you will need to reset the date, time and other power source attached. Changing the lithium battery in the camcorder Changing the lithium battery When replacing the lithium battery, keep the battery pack or other items in the menu system retained by the lithium battery. (1) Open the LCD panel and open the lid of the lithium battery compartment. (2) Push the lithium battery down once and pull it out from the holder. (3) Install the lithium battery with the positive (+) side facing out.
Close the lid. 1 1 2 5 3 5 CR 202 CR 202 56 Otherwise, you will need to reset the date, time and other power source attached. Changing the lithium battery in the camcorder Changing the lithium battery When replacing the lithium battery, keep the battery pack or other items in the menu system retained by the lithium battery. (1) Open the LCD panel and open the lid of the lithium battery compartment. (2) Push the lithium battery down once and pull it out from the holder. (3) Install the lithium battery with the positive (+) side facing out.
Operating Instructions
Page 60
... used up . When to obtain a smooth transition between scenes can get the most out of your camcorder, the remaining battery indicator decreases gradually as you are using your battery pack. When the i indicator changes from slow flashing to rapid flashing while you have planned. Remaining... time in the camcorder to replace the battery pack While you are recording, set the POWER switch to save battery power. Tips for using the camcorder. When the remaining battery indicator reaches the lowest point, the i indicator may appear ...
... used up . When to obtain a smooth transition between scenes can get the most out of your camcorder, the remaining battery indicator decreases gradually as you are using your battery pack. When the i indicator changes from slow flashing to rapid flashing while you have planned. Remaining... time in the camcorder to replace the battery pack While you are recording, set the POWER switch to save battery power. Tips for using the camcorder. When the remaining battery indicator reaches the lowest point, the i indicator may appear ...
Operating Instructions
Page 61
... the battery pack Notes on the camcorder with a fully charged battery pack, the battery pack should charge batteries at temperatures from 50°F to 86°F (from fire. •Keep the battery pack dry. •Do not open nor try to disassemble the battery pack. •Do not expose the battery pack ... new fully charged one. Lower temperatures require a longer charging time. 61 The battery pack heats up During charging or recording, the battery pack heats up. Be sure to observe the following •Keep the battery pack away from 10°C to any mechanical shock. This is caused by ...
... the battery pack Notes on the camcorder with a fully charged battery pack, the battery pack should charge batteries at temperatures from 50°F to 86°F (from fire. •Keep the battery pack dry. •Do not open nor try to disassemble the battery pack. •Do not expose the battery pack ... new fully charged one. Lower temperatures require a longer charging time. 61 The battery pack heats up During charging or recording, the battery pack heats up. Be sure to observe the following •Keep the battery pack away from 10°C to any mechanical shock. This is caused by ...
Operating Instructions
Page 62
.... 1) Full charge: Charging until FULL appears in minutes. "InfoLITHIUM" is a trademark of the camcorder, the "InfoLITHIUM" battery pack measures the battery consumption and calculates the remaining battery power. Note that you have used under some condition. Even if 5 to recording standby mode and... the environmental temperature and conditions. While checking the condition of Sony Corporation. * The indication may not be indicated in the display window. 62 To obtain more accurate remaining battery indication Set the camcorder to 10 minutes is affected by more . • If...
.... 1) Full charge: Charging until FULL appears in minutes. "InfoLITHIUM" is a trademark of the camcorder, the "InfoLITHIUM" battery pack measures the battery consumption and calculates the remaining battery power. Note that you have used under some condition. Even if 5 to recording standby mode and... the environmental temperature and conditions. While checking the condition of Sony Corporation. * The indication may not be indicated in the display window. 62 To obtain more accurate remaining battery indication Set the camcorder to 10 minutes is affected by more . • If...


