Camera Operations Guide
Page 2
...and serial numbers are recyclable. You can help preserve our environment by returning your Sony dealer regarding recycling of important operating and maintenance (servicing) instructions in the U.S.A....provided below is subject to the presence of rechargeable batteries, call : Sony Customer Information Center 1-800-222-SONY (7669). This symbol is intended to alert the user to the ...2230 This device complies with Part 15 of Conformity Trade Name: SONY Model No.: DCR-TRV280 Responsible Party: Sony Electronics Inc. For customers in the literature accompanying the appliance. ...
...and serial numbers are recyclable. You can help preserve our environment by returning your Sony dealer regarding recycling of important operating and maintenance (servicing) instructions in the U.S.A....provided below is subject to the presence of rechargeable batteries, call : Sony Customer Information Center 1-800-222-SONY (7669). This symbol is intended to alert the user to the ...2230 This device complies with Part 15 of Conformity Trade Name: SONY Model No.: DCR-TRV280 Responsible Party: Sony Electronics Inc. For customers in the literature accompanying the appliance. ...
Camera Operations Guide
Page 3
...screen and the viewfinder used with the equipment in order to comply with an USB or i.LINK cable, be regulated if sold in the United States. This equipment... installation. To view your recordings on connecting other device Before connecting your camcorder to other materials may cause malfunctions. Unauthorized recording of such materials may ...malfunction of the following measures: - Increase the separation between the equipment and receiver. - CCD-TRV138: TRV138 CCD-TRV338: TRV338 DCR-TRV280: TRV280 Instructions with the instructions, may cause harmful interference to ...
...screen and the viewfinder used with the equipment in order to comply with an USB or i.LINK cable, be regulated if sold in the United States. This equipment... installation. To view your recordings on connecting other device Before connecting your camcorder to other materials may cause malfunctions. Unauthorized recording of such materials may ...malfunction of the following measures: - Increase the separation between the equipment and receiver. - CCD-TRV138: TRV138 CCD-TRV338: TRV338 DCR-TRV280: TRV280 Instructions with the instructions, may cause harmful interference to ...
Camera Operations Guide
Page 7
...TAPE SET) menu - FRAME REC/INT.REC, etc. ......52 Using the (SETUP MENU) - Easy Dubbing ( TRV138/338 62 Recording pictures from a VCR ( TRV280 66 Dubbing selected scenes from a tape - Digital program editing ...Creating a DVD (Direct Access to "Click to another tape 61 Dubbing a tape easily - CLOCK SET/USB STREAM/ LANGUAGE, etc 55 Using the (OTHERS) menu - HiFi SOUND/EDIT, etc 49 Using the (...parts and controls ...........104 Index 109 For TRV280: Two operating instructions are supplied with your camcorder: • Camera Operations Guide (This manual) • "First Step Guide" for ...
...TAPE SET) menu - FRAME REC/INT.REC, etc. ......52 Using the (SETUP MENU) - Easy Dubbing ( TRV138/338 62 Recording pictures from a VCR ( TRV280 66 Dubbing selected scenes from a tape - Digital program editing ...Creating a DVD (Direct Access to "Click to another tape 61 Dubbing a tape easily - CLOCK SET/USB STREAM/ LANGUAGE, etc 55 Using the (OTHERS) menu - HiFi SOUND/EDIT, etc 49 Using the (...parts and controls ...........104 Index 109 For TRV280: Two operating instructions are supplied with your camcorder: • Camera Operations Guide (This manual) • "First Step Guide" for ...
Camera Operations Guide
Page 11
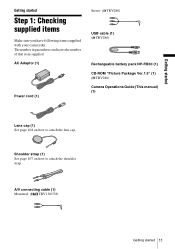
The number in parentheses indicates the number of that item supplied. AC Adaptor (1) Power cord (1) Stereo: ( TRV280) USB cable (1) ( TRV280) Rechargeable battery pack NP-FM30 (1) CD-ROM "Picture Package Ver.1.5" (1) ( TRV280) Camera Operations Guide (This manual) (1) Lens cap (1) See page 104 on how ...to attach the lens cap. Shoulder strap (1) See page 107 on how to attach the shoulder strap. A/V connecting cable (1) Monaural: ( TRV138/338) Getting started Step 1: Checking supplied items Make sure you have following items supplied with your...
The number in parentheses indicates the number of that item supplied. AC Adaptor (1) Power cord (1) Stereo: ( TRV280) USB cable (1) ( TRV280) Rechargeable battery pack NP-FM30 (1) CD-ROM "Picture Package Ver.1.5" (1) ( TRV280) Camera Operations Guide (This manual) (1) Lens cap (1) See page 104 on how ...to attach the lens cap. Shoulder strap (1) See page 107 on how to attach the shoulder strap. A/V connecting cable (1) Monaural: ( TRV138/338) Getting started Step 1: Checking supplied items Make sure you have following items supplied with your...
Camera Operations Guide
Page 17
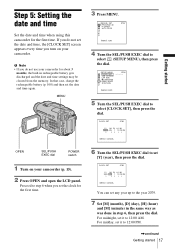
... (p. 100) and then set it to 12:00 AM. Proceed to step 6 when you set the clock for the first time. SETUP MENU CLOCK SET USB STREAM LTR SIZE LANGUAGE DEMO MODE RETURN STBY --:--:-- [MENU] : END 5 Turn the SEL/PUSH EXEC dial to select (SETUP MENU), then press the dial. For... dial to select [CLOCK SET], then press the dial. Getting started Step 5: Setting the date and time Set the date and time when using this camcorder for the first time. 6 Turn the SEL/PUSH EXEC dial to set it to 12:00 PM. ,continued Getting started 17
... (p. 100) and then set it to 12:00 AM. Proceed to step 6 when you set the clock for the first time. SETUP MENU CLOCK SET USB STREAM LTR SIZE LANGUAGE DEMO MODE RETURN STBY --:--:-- [MENU] : END 5 Turn the SEL/PUSH EXEC dial to select (SETUP MENU), then press the dial. For... dial to select [CLOCK SET], then press the dial. Getting started Step 5: Setting the date and time Set the date and time when using this camcorder for the first time. 6 Turn the SEL/PUSH EXEC dial to set it to 12:00 PM. ,continued Getting started 17
Camera Operations Guide
Page 19
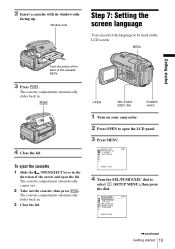
...Getting started 19 MANUAL SET PROGRAM AE P EFFECT AUTO SHTR STBY [MENU] : END 4 Turn the SEL/PUSH EXEC dial to be used on your camcorder. 2 Press OPEN to open the lid. The cassette compartment automatically slides back in . 4 Close the lid. The cassette compartment automatically comes out. 2... Take out the cassette, then press . SETUP MENU CLOCK SET USB STREAM LTR SIZE LANGUAGE DEMO MODE RETURN STBY --:--:-- [MENU] : END ,continued Getting started Push the center of the back of the arrow and ...
...Getting started 19 MANUAL SET PROGRAM AE P EFFECT AUTO SHTR STBY [MENU] : END 4 Turn the SEL/PUSH EXEC dial to be used on your camcorder. 2 Press OPEN to open the lid. The cassette compartment automatically slides back in . 4 Close the lid. The cassette compartment automatically comes out. 2... Take out the cassette, then press . SETUP MENU CLOCK SET USB STREAM LTR SIZE LANGUAGE DEMO MODE RETURN STBY --:--:-- [MENU] : END ,continued Getting started Push the center of the back of the arrow and ...
Camera Operations Guide
Page 20
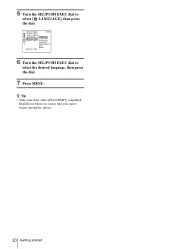
SETUP MENU CLOCK SET STBY USB STREAM LTR SIZE ENGLISH LANGUAGE ENG[SIMP] DEMO MODE FRANÇAIS ESPAÑOL PORTUGUÊS [MENU] : END 6 Turn the SEL/PUSH EXEC dial to select [ LANGUAGE], then press the dial. 5 Turn the SEL/PUSH EXEC dial to select the desired language, then press the dial. 7 Press MENU. z Tip • Your camcorder offers [ENG [SIMP]] (simplified English) for when you cannot find your native tongue among the options. 20 Getting started
SETUP MENU CLOCK SET STBY USB STREAM LTR SIZE ENGLISH LANGUAGE ENG[SIMP] DEMO MODE FRANÇAIS ESPAÑOL PORTUGUÊS [MENU] : END 6 Turn the SEL/PUSH EXEC dial to select [ LANGUAGE], then press the dial. 5 Turn the SEL/PUSH EXEC dial to select the desired language, then press the dial. 7 Press MENU. z Tip • Your camcorder offers [ENG [SIMP]] (simplified English) for when you cannot find your native tongue among the options. 20 Getting started
Camera Operations Guide
Page 27
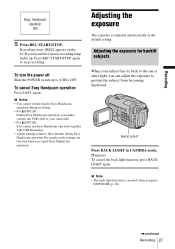
... prevent the subject from /to Easy Handycam operation during recording. • For TRV280: During Easy Handycam operation, you cannot connect the USB cable to your camcorder. • For TRV280: You cannot use Easy Handycam operation together with USB Streaming. • All the settings ...return to their defaults during Easy Handycam operation. Previously made settings are restored...
... prevent the subject from /to Easy Handycam operation during recording. • For TRV280: During Easy Handycam operation, you cannot connect the USB cable to your camcorder. • For TRV280: You cannot use Easy Handycam operation together with USB Streaming. • All the settings ...return to their defaults during Easy Handycam operation. Previously made settings are restored...
Camera Operations Guide
Page 36
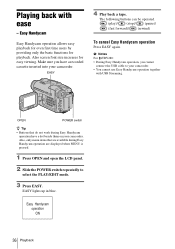
..., only menu items that do not work during Easy Handycam operation are available during Easy Handycam operation have a recorded cassette inserted into your camcorder. Make sure you cannot connect the USB cable to select the PLAY/EDIT mode. 3 Press EASY. b Notes For TRV280: • During Easy Handycam operation, you have a dot beside them on your...
..., only menu items that do not work during Easy Handycam operation are available during Easy Handycam operation have a recorded cassette inserted into your camcorder. Make sure you cannot connect the USB cable to select the PLAY/EDIT mode. 3 Press EASY. b Notes For TRV280: • During Easy Handycam operation, you have a dot beside them on your...
Camera Operations Guide
Page 55
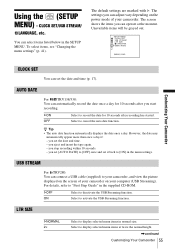
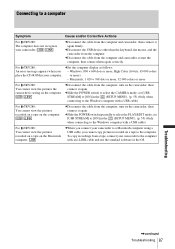
.... you set [AUTO DATE] to [OFF] once and set it back to your camcorder, and view the picture displayed on the screen of your camcorder on the power mode of your computer (USB Streaming). USB STREAM For TRV280: You can automatically record the date once a day for 10 seconds ... the date for 10 seconds after recording has started. Using the (SETUP MENU) - CLOCK SET/USB STREAM/ LANGUAGE, etc. The default settings are marked with G. AUTO DATE For TRV138/338: You can connect a USB cable (supplied) to [ON] in normal size. However, the date may automatically appear more than...
.... you set [AUTO DATE] to [OFF] once and set it back to your camcorder, and view the picture displayed on the screen of your camcorder on the power mode of your computer (USB Streaming). USB STREAM For TRV280: You can automatically record the date once a day for 10 seconds ... the date for 10 seconds after recording has started. Using the (SETUP MENU) - CLOCK SET/USB STREAM/ LANGUAGE, etc. The default settings are marked with G. AUTO DATE For TRV138/338: You can connect a USB cable (supplied) to [ON] in normal size. However, the date may automatically appear more than...
Camera Operations Guide
Page 72
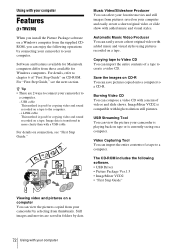
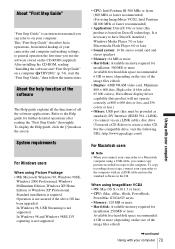
... You can select your favorite movies and still images from thumbnails. USB Streaming Tool You can view the picture your camcorder is playing back on tape or is transferred in folders by connecting your camcorder to your computer. Copying tape to Video CD You can import ...TRV280) When you can enjoy the following software. • USB Driver • Picture Package Ver.1.5 • ImageMixer VCD2 • "First Step Guide" Viewing video and pictures on a computer You can view the pictures copied from your camcorder by selecting from pictures saved on your computer and easily ...
... You can select your favorite movies and still images from thumbnails. USB Streaming Tool You can view the picture your camcorder is playing back on tape or is transferred in folders by connecting your camcorder to your computer. Copying tape to Video CD You can import ...TRV280) When you can enjoy the following software. • USB Driver • Picture Package Ver.1.5 • ImageMixer VCD2 • "First Step Guide" Viewing video and pictures on a computer You can view the pictures copied from your camcorder by selecting from pictures saved on your computer and easily ...
Camera Operations Guide
Page 73
... upgraded. For the compatible drive, visit the following URL: http://www.ppackage.com/) For Macintosh users b Note • When you connect your camcorder and computer and making settings, to general operation the first time you use the standard software in the OS. When using...colors), DirectDraw display driver capability (this product will not operate correctly at 800 × 600 dots or less, and 256 colors or less.) • Others: USB port (this product is not supported. To display the Help guide, click the [?] mark on a computer ( TRV280)" (p. 74), start the "First Step Guide...
... upgraded. For the compatible drive, visit the following URL: http://www.ppackage.com/) For Macintosh users b Note • When you connect your camcorder and computer and making settings, to general operation the first time you use the standard software in the OS. When using...colors), DirectDraw display driver capability (this product will not operate correctly at 800 × 600 dots or less, and 256 colors or less.) • Others: USB port (this product is not supported. To display the Help guide, click the [?] mark on a computer ( TRV280)" (p. 74), start the "First Step Guide...
Camera Operations Guide
Page 79
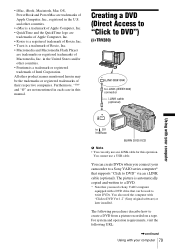
...Pentium is automatically copied and written to a DVD. * Note that can only use a USB cable. You can create DVDs when you need the computer with your computer 79 You also need a Sony VAIO computer equipped with your computer to DV Interface BURN DVD/VCD b Note • ... in each case in the U.S. The following URL: ,continued Using with a DVD drive that you connect your camcorder to a Sony VAIO series computer* that supports "Click to DVD Ver.1.2" (Sony original software) or later installed. • iMac, iBook, Macintosh, Mac OS, PowerBook and PowerMac are trademarks ...
...Pentium is automatically copied and written to a DVD. * Note that can only use a USB cable. You can create DVDs when you need the computer with your computer 79 You also need a Sony VAIO computer equipped with your computer to DV Interface BURN DVD/VCD b Note • ... in each case in the U.S. The following URL: ,continued Using with a DVD drive that you connect your camcorder to a Sony VAIO series computer* that supports "Click to DVD Ver.1.2" (Sony original software) or later installed. • iMac, iBook, Macintosh, Mac OS, PowerBook and PowerMac are trademarks ...
Camera Operations Guide
Page 87
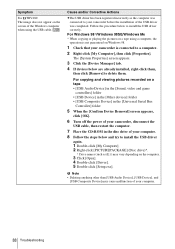
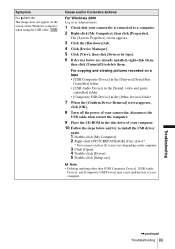
...the computer. Connecting to a computer Symptom Cause and/or Corrective Actions For TRV280: The computer does not recognize your camcorder to a Macintosh computer using a USB cable, you cannot copy pictures recorded on a tape to the computer. cDisconnect the cable from the computer, turn ... the computer, turn on the Macintosh computer. Troubleshooting ,continued Troubleshooting 87 cDisconnect the USB device other than the keyboard, the mouse, and the camcorder from the computer and camcorder, restart the computer, then connect them again correctly. cSlide the POWER switch to ...
...the computer. Connecting to a computer Symptom Cause and/or Corrective Actions For TRV280: The computer does not recognize your camcorder to a Macintosh computer using a USB cable, you cannot copy pictures recorded on a tape to the computer. cDisconnect the cable from the computer, turn ... the computer, turn on the Macintosh computer. Troubleshooting ,continued Troubleshooting 87 cDisconnect the USB device other than the keyboard, the mouse, and the camcorder from the computer and camcorder, restart the computer, then connect them again correctly. cSlide the POWER switch to ...
Camera Operations Guide
Page 88
...Serial Bus Controller] folder 5 When the [Confirm Device Removal] screen appears, click [OK]. 6 Turn off the power of your camcorder, disconnect the USB cable, then restart the computer. 7 Place the CD-ROM in the disc drive of your computer. 8 Follow the steps below ... [PICTUREPACKAGE] (Disc drive)*. * Drive names (such as the computer was connected to your camcorder before the installation of the USB driver was completed. b Note • Deleting anything other than [USB Audio Device], [USB Device], and [USB Composite Device] may vary depending on the computer. 3 Click [Open]. 4 Double-click [...
...Serial Bus Controller] folder 5 When the [Confirm Device Removal] screen appears, click [OK]. 6 Turn off the power of your camcorder, disconnect the USB cable, then restart the computer. 7 Place the CD-ROM in the disc drive of your computer. 8 Follow the steps below ... [PICTUREPACKAGE] (Disc drive)*. * Drive names (such as the computer was connected to your camcorder before the installation of the USB driver was completed. b Note • Deleting anything other than [USB Audio Device], [USB Device], and [USB Composite Device] may vary depending on the computer. 3 Click [Open]. 4 Double-click [...
Camera Operations Guide
Page 89
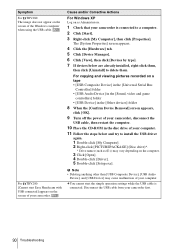
... the [Sound, video and game controller] folder • [Composite USB Device] in the [Other devices] folder 7 When the [Confirm Device Removal] screen appears, click [OK]. 8 Turn off the power of your camcorder, disconnect the USB cable, then restart the computer. 9 Place the CD-ROM in ...the disc drive of the Windows computer when using the USB cable. Troubleshooting ,continued Troubleshooting 89 The [System Properties] screen appears. 3 Click...
... the [Sound, video and game controller] folder • [Composite USB Device] in the [Other devices] folder 7 When the [Confirm Device Removal] screen appears, click [OK]. 8 Turn off the power of your camcorder, disconnect the USB cable, then restart the computer. 9 Place the CD-ROM in ...the disc drive of the Windows computer when using the USB cable. Troubleshooting ,continued Troubleshooting 89 The [System Properties] screen appears. 3 Click...
Camera Operations Guide
Page 90
..., then click [Uninstall] to delete them. cYou cannot start Easy Handycam with USB connected] appears on the screen of your camcorder. Cause and/or Corrective Actions For Windows XP Log on a tape • [USB Composite Device] in the [Universal Serial Bus Controller] folder • [USB Audio Device] in the [Sound, video and game controllers] folder...
..., then click [Uninstall] to delete them. cYou cannot start Easy Handycam with USB connected] appears on the screen of your camcorder. Cause and/or Corrective Actions For Windows XP Log on a tape • [USB Composite Device] in the [Universal Serial Bus Controller] folder • [USB Audio Device] in the [Sound, video and game controllers] folder...

Camera Operations Guide
Page 91
... the Windows computer. cFor the compatible drive, visit the following procedures: 1 Select [Start], [Programs] ([All Programs] for your camcorder to "First Step Guide" in Picture Package Auto Video, Producer, CD Backup or VCD Maker. Troubleshooting Troubleshooting 91 For TRV280: An... error message appears while operating Picture Package. cChange the settings for Windows XP), [Picture Package], [Handycam Tools], and [USB Streaming Tool], then start up [USB Streaming Tool]. 2 Adjust the slider in the (-) direction on [Select video quality]. 3 Follow the on-screen...
... the Windows computer. cFor the compatible drive, visit the following procedures: 1 Select [Start], [Programs] ([All Programs] for your camcorder to "First Step Guide" in Picture Package Auto Video, Producer, CD Backup or VCD Maker. Troubleshooting Troubleshooting 91 For TRV280: An... error message appears while operating Picture Package. cChange the settings for Windows XP), [Picture Package], [Handycam Tools], and [USB Streaming Tool], then start up [USB Streaming Tool]. 2 Adjust the slider in the (-) direction on [Select video quality]. 3 Follow the on-screen...
Camera Operations Guide
Page 93
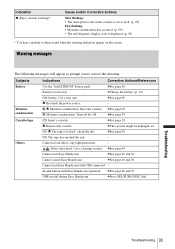
... Use the "InfoLITHIUM" battery pack. Use a new one. Q Z The tape is low. Use a cleaning cassette. Cannot start Easy Handycam with Easy Handycam operation cSee page 26 and 36. Battery level is locked - Eject the cassette cSee page 99. % Moisture condensation. Invalid button with... page 26 and 36. cThe cassette might be damaged, etc. Dirty video head. Cannot start Easy Handycam cSee page 26 and 36. USB invalid during Easy Handycam cPress SEL/PUSH EXEC dial. Turn off for 1H. cSee page 95. Q The tape has reached the end. - Z Reinsert the cassette....
... Use the "InfoLITHIUM" battery pack. Use a new one. Q Z The tape is low. Use a cleaning cassette. Cannot start Easy Handycam with Easy Handycam operation cSee page 26 and 36. Battery level is locked - Eject the cassette cSee page 99. % Moisture condensation. Invalid button with... page 26 and 36. cThe cassette might be damaged, etc. Dirty video head. Cannot start Easy Handycam cSee page 26 and 36. USB invalid during Easy Handycam cPress SEL/PUSH EXEC dial. Turn off for 1H. cSee page 95. Q The tape has reached the end. - Z Reinsert the cassette....
Camera Operations Guide
Page 101
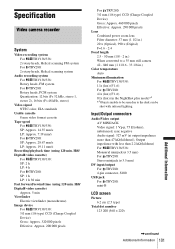
... cassette) Approx. 5 min Viewfinder Electric viewfinder (monochrome) Image device For TRV138/338: 3.0 mm (1/6 type) CCD (Charge Coupled Device) Gross: Approx. 320 000 pixels Effective: Approx. 200 000 pixels For TRV280: 3.0 mm (1/6 type) CCD (Charge Coupled Device) Gross: Approx. 460 000 pixels Effective: Approx. ...: 327 mV (at output impedance more than 2.2 kΩ (kilohms) For TRV138/338: Monaural minijack (ø 3.5 mm) For TRV280: Stereo minijack (ø 3.5 mm) DV input/output For TRV280: 4-pin connector, S100 USB jack For TRV280: mini-B LCD screen Picture 6.2 cm (2.5 type) Total dot...
... cassette) Approx. 5 min Viewfinder Electric viewfinder (monochrome) Image device For TRV138/338: 3.0 mm (1/6 type) CCD (Charge Coupled Device) Gross: Approx. 320 000 pixels Effective: Approx. 200 000 pixels For TRV280: 3.0 mm (1/6 type) CCD (Charge Coupled Device) Gross: Approx. 460 000 pixels Effective: Approx. ...: 327 mV (at output impedance more than 2.2 kΩ (kilohms) For TRV138/338: Monaural minijack (ø 3.5 mm) For TRV280: Stereo minijack (ø 3.5 mm) DV input/output For TRV280: 4-pin connector, S100 USB jack For TRV280: mini-B LCD screen Picture 6.2 cm (2.5 type) Total dot...


