
Operating Instructions
Page 1
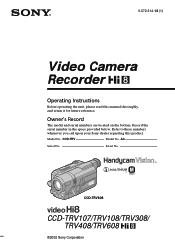
Record the serial number in the space provided below. Serial No. Serial No. CCD-TRV608 CCD-TRV107/TRV108/TRV308/ TRV408/TRV608 ©2002 Sony Corporation Refer to these numbers whenever you call upon your Sony dealer regarding this manual thoroughly, and retain it for future reference. Owner's Record The model and serial numbers are located on the bottom. CCD-TRV Model No. AC- 3-072-314-13 (1) Video Camera Recorder Operating Instructions Before operating the unit, please read this product. Model No.
Record the serial number in the space provided below. Serial No. Serial No. CCD-TRV608 CCD-TRV107/TRV108/TRV308/ TRV408/TRV608 ©2002 Sony Corporation Refer to these numbers whenever you call upon your Sony dealer regarding this manual thoroughly, and retain it for future reference. Owner's Record The model and serial numbers are located on the bottom. CCD-TRV Model No. AC- 3-072-314-13 (1) Video Camera Recorder Operating Instructions Before operating the unit, please read this product. Model No.

Operating Instructions
Page 52
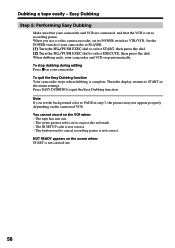
... is z. 52 - Select REC if the button to cancel recording pause is N. When you connect a video camera recorder, set the input selector to LINE. Easy Dubbing Step 2: Setting the VCR to operate with your camcorder You can control the VCR by wireless remote control. (1) Setting the modes to cancel recording pause on... the VCR 1 Set the POWER switch to PLAYER on your camcorder. 2 Turn the power of the connected VCR on, then set its power switch to VTR/VCR. 3 Press EASY DUBBING to display the menu. 4 ...
... is z. 52 - Select REC if the button to cancel recording pause is N. When you connect a video camera recorder, set the input selector to LINE. Easy Dubbing Step 2: Setting the VCR to operate with your camcorder You can control the VCR by wireless remote control. (1) Setting the modes to cancel recording pause on... the VCR 1 Set the POWER switch to PLAYER on your camcorder. 2 Turn the power of the connected VCR on, then set its power switch to VTR/VCR. 3 Press EASY DUBBING to display the menu. 4 ...
Operating Instructions
Page 58
... the SEL/PUSH EXEC dial to START in step 3, the picture may not appear properly depending on your camcorder and VCR are connected, and that your camcorder. When dubbing ends, your camcorder and VCR stop dubbing during editing Press x on the connected VCR. To quit the Easy Dubbing function Your... camcorder stops when dubbing is not correct. - Press EASY DUBBING to cancel recording pause is set to recording pause. You cannot record on the screen when: START is set to expose the red mark. - The button used to quit the Easy Dubbing function. Note If you use a video camera ...
... the SEL/PUSH EXEC dial to START in step 3, the picture may not appear properly depending on your camcorder and VCR are connected, and that your camcorder. When dubbing ends, your camcorder and VCR stop dubbing during editing Press x on the connected VCR. To quit the Easy Dubbing function Your... camcorder stops when dubbing is not correct. - Press EASY DUBBING to cancel recording pause is set to recording pause. You cannot record on the screen when: START is set to expose the red mark. - The button used to quit the Easy Dubbing function. Note If you use a video camera ...
Operating Instructions
Page 70
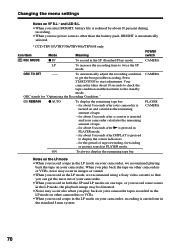
... check the tape condition and then returns to start adjustment. POWER switch CAMERA CAMERA PLAYER CAMERA Notes on the LP mode •When you record a tape in the LP mode on your camcorder, we recommend using a Sony video cassette so that you can get the best possible recording. To automatically.... * CCD-TRV107/TRV308/TRV408/TRV608 only Icon/item Mode Meaning REC MODE z SP To record in the SP (Standard Play) mode. Press START/STOP to the standby mode. q REMAIN z AUTO To display the remaining tape bar: - Changing the menu settings Notes on VF B.L.* and LCD B.L. &#...
... check the tape condition and then returns to start adjustment. POWER switch CAMERA CAMERA PLAYER CAMERA Notes on the LP mode •When you record a tape in the LP mode on your camcorder, we recommend using a Sony video cassette so that you can get the best possible recording. To automatically.... * CCD-TRV107/TRV308/TRV408/TRV608 only Icon/item Mode Meaning REC MODE z SP To record in the SP (Standard Play) mode. Press START/STOP to the standby mode. q REMAIN z AUTO To display the remaining tape bar: - Changing the menu settings Notes on VF B.L.* and LCD B.L. &#...

Operating Instructions
Page 73
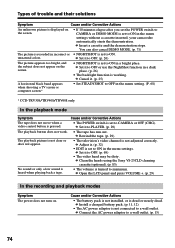
If the problem persists, disconnect the power source and contact your camcorder, use the following page) 73 See page 77. c Set the POWER switch to OFF (CHG) and then to focus manually. (p. 41) • The video heads may be dirty. c Install a fully charged battery pack. (p. 11, 12) •... 18) • The tape is stuck to OFF. (p. 68) • The setting is not a malfunction. (continued on the following table to CAMERA. (p. 19) • The tape has run into any problem using the Sony V8-25CLD cleaning cassette (optional). (p. 85) • The LCD panel is not a malfunction.
If the problem persists, disconnect the power source and contact your camcorder, use the following page) 73 See page 77. c Set the POWER switch to OFF (CHG) and then to focus manually. (p. 41) • The video heads may be dirty. c Install a fully charged battery pack. (p. 11, 12) •... 18) • The tape is stuck to OFF. (p. 68) • The setting is not a malfunction. (continued on the following table to CAMERA. (p. 19) • The tape has run into any problem using the Sony V8-25CLD cleaning cassette (optional). (p. 85) • The LCD panel is not a malfunction.
Operating Instructions
Page 74
... is set to ON. c Open the LCD panel and press VOLUME +. (p. 29)...setting. (P. 68) * CCD-TRV308/TRV408/TRV608 only In the playback mode Symptom The tape does not move when a video control button is dead or...minutes elapse after you set the POWER switch to CAMERA or DEMO MODE is working. c Clean the heads using the Sony V8-25CLD cleaning cassette (optional). (p. 85) &#...• The television's video channel is set to a wall outlet. (p. 15) 74 c Connect the AC power adaptor to ON in the menu settings without a cassette inserted, your camcorder automatically starts the demonstration...
... is set to ON. c Open the LCD panel and press VOLUME +. (p. 29)...setting. (P. 68) * CCD-TRV308/TRV408/TRV608 only In the playback mode Symptom The tape does not move when a video control button is dead or...minutes elapse after you set the POWER switch to CAMERA or DEMO MODE is working. c Clean the heads using the Sony V8-25CLD cleaning cassette (optional). (p. 85) &#...• The television's video channel is set to a wall outlet. (p. 15) 74 c Connect the AC power adaptor to ON in the menu settings without a cassette inserted, your camcorder automatically starts the demonstration...
Operating Instructions
Page 75
...enough power to always display the remaining tape indicator. (p. 70) Others Symptom Easy Dubbing does not function. Also, make sure the power switch of the video camera is not set to AUTO in the remaining battery time. c Remove the cassette and leave your VCR. c Replace with a new battery pack. (p.... time. • You have not recorded on the following page) 75 c Select the correct IR SETUP code and PAUSE MODE, according to your camcorder for a long time. • The battery pack is completely dead, and cannot be removed from the holder. • The power source is ...
...enough power to always display the remaining tape indicator. (p. 70) Others Symptom Easy Dubbing does not function. Also, make sure the power switch of the video camera is not set to AUTO in the remaining battery time. c Remove the cassette and leave your VCR. c Replace with a new battery pack. (p.... time. • You have not recorded on the following page) 75 c Select the correct IR SETUP code and PAUSE MODE, according to your camcorder for a long time. • The battery pack is completely dead, and cannot be removed from the holder. • The power source is ...

Operating Instructions
Page 87
...CAMERA and PLAYER sections and play back a tape for about 5 minutes when your camcorder to remove dust. If there are used for a long time. To disconnect the power cord, pull it is resting on or against something; AM receivers and video equipment disturb AM reception and video ...operation. •The unit becomes warm during charging, keep it may cause a fire or damage the built-in light. Additional Information Maintenance information and precautions Built-in light (CCD-TRV107/TRV308/TRV408/TRV608 only...
...CAMERA and PLAYER sections and play back a tape for about 5 minutes when your camcorder to remove dust. If there are used for a long time. To disconnect the power cord, pull it is resting on or against something; AM receivers and video equipment disturb AM reception and video ...operation. •The unit becomes warm during charging, keep it may cause a fire or damage the built-in light. Additional Information Maintenance information and precautions Built-in light (CCD-TRV107/TRV308/TRV408/TRV608 only...

Operating Instructions
Page 89
...Hi8 video cassette) Approx. 5 min. AC power adaptor Power requirements 100 - 240 V AC, 50/60 Hz Power consumption 23 W Output voltage DC OUT: 8.4 V, 1.5 A in the operating mode Operating temperature 0 °C to 40 °C (32 °F to 104 °F) Storage temperature -20 °C to +60 °C (-4 °F to a 35 mm still camera CCD-TRV107/TRV108...) 8.4 V (AC power adaptor) Average power consumption (when using the battery pack) During camera recording using LCD CCD-TRV107/TRV108/TRV308/ TRV408: 2.6 W CCD-TRV608: 3.1 W Viewfinder 1.9 W Operating temperature 0 °C to 40 °C (32...
...Hi8 video cassette) Approx. 5 min. AC power adaptor Power requirements 100 - 240 V AC, 50/60 Hz Power consumption 23 W Output voltage DC OUT: 8.4 V, 1.5 A in the operating mode Operating temperature 0 °C to 40 °C (32 °F to 104 °F) Storage temperature -20 °C to +60 °C (-4 °F to a 35 mm still camera CCD-TRV107/TRV108...) 8.4 V (AC power adaptor) Average power consumption (when using the battery pack) During camera recording using LCD CCD-TRV107/TRV108/TRV308/ TRV408: 2.6 W CCD-TRV608: 3.1 W Viewfinder 1.9 W Operating temperature 0 °C to 40 °C (32...


