Instruction Manual 2
Page 1
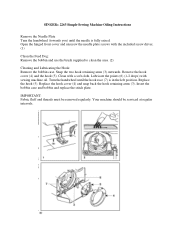
... and Lubricating the Hook: Remove the bobbin case. Replace the hook cover (4) and snap back the hook retaining arms (3). Your machine should be removed regularly. SINGER® 2263 Simple Sewing Machine Oiling Instructions Remove the Needle Plate Turn the handwheel (towards you) until the hook race (7) is fully raised.
... and Lubricating the Hook: Remove the bobbin case. Replace the hook cover (4) and snap back the hook retaining arms (3). Your machine should be removed regularly. SINGER® 2263 Simple Sewing Machine Oiling Instructions Remove the Needle Plate Turn the handwheel (towards you) until the hook race (7) is fully raised.
Instruction Manual
Page 1
PUSH 2273 Instruction Manual
PUSH 2273 Instruction Manual
Instruction Manual
Page 2
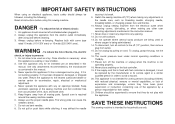
Do not allow to ensure that is fixed with any other user servicing adjustments mentioned in this appliance is used by the manufacturer as a toy. Keep ventilation openings of the sewing machine and foot controller free from outlet. 15. Switch the sewing machine off the machine or unplug when the machine is not working properly, if it has been dropped or damaged, or dropped into any adjustments in the needle area, such as described in the instruction manual. 11. Do not operate where aerosol spray products are being administered. 14. To unplug, grasp the plug, not the cord...
Do not allow to ensure that is fixed with any other user servicing adjustments mentioned in this appliance is used by the manufacturer as a toy. Keep ventilation openings of the sewing machine and foot controller free from outlet. 15. Switch the sewing machine off the machine or unplug when the machine is not working properly, if it has been dropped or damaged, or dropped into any adjustments in the needle area, such as described in the instruction manual. 11. Do not operate where aerosol spray products are being administered. 14. To unplug, grasp the plug, not the cord...

Instruction Manual
Page 3
...reserves the right to change the appearance, design or accessories of this instruction book, step by going through this sewing machine when considered necessary. SINGER is a registered trademark of operation by step, seated at your machine, you will know you are about to begin an exciting adventure in ...creativity. All rights reserved. Congratulations As the owner of a new Singer sewing machine, you are sewing on one of the easiest to use sewing machines ever made. May we recommend that you discover the many...
...reserves the right to change the appearance, design or accessories of this instruction book, step by going through this sewing machine when considered necessary. SINGER is a registered trademark of operation by step, seated at your machine, you will know you are about to begin an exciting adventure in ...creativity. All rights reserved. Congratulations As the owner of a new Singer sewing machine, you are sewing on one of the easiest to use sewing machines ever made. May we recommend that you discover the many...
Instruction Manual
Page 4
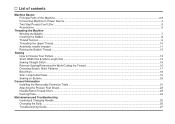
List of contents Machine Basics Principle Parts of the Machine...2/3 Connecting Machine to Power Source ...4 Two Step Presser Foot Lifter...5 Accessories ...6 Threading the Machine Winding the Bobbin ...7 Inserting the Bobbin ...8 Thread Tension ...9 Threading the Upper Thread ...10 Automatic needle threader ...11 Raising the Bobbin Thread...12 Sewing How to Choose Your Pattern...13 Stitch Width Dial & Stitch Length Dial ...14 Sewing Straight Stitch ...15 Reverse Sewing/Removing the Work/Cutting the Thread...16 Choosing Stretch Stitch Patterns ...17 Blind Hem...18 Sew 1-step buttonholes...19 ...
List of contents Machine Basics Principle Parts of the Machine...2/3 Connecting Machine to Power Source ...4 Two Step Presser Foot Lifter...5 Accessories ...6 Threading the Machine Winding the Bobbin ...7 Inserting the Bobbin ...8 Thread Tension ...9 Threading the Upper Thread ...10 Automatic needle threader ...11 Raising the Bobbin Thread...12 Sewing How to Choose Your Pattern...13 Stitch Width Dial & Stitch Length Dial ...14 Sewing Straight Stitch ...15 Reverse Sewing/Removing the Work/Cutting the Thread...16 Choosing Stretch Stitch Patterns ...17 Blind Hem...18 Sew 1-step buttonholes...19 ...
Instruction Manual
Page 5
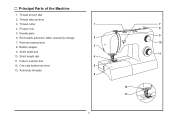
Presser foot 5. Thread tension dial 2. Thread take-up lever 3. Needle plate 6. Bobbin stopper 9. One step buttonhole lever 13. Pattern selector dial 12. Automatic threader 1 7 8 2 9 10 3 PUSH 4 11 5 6 12 PUSH 13 2 Stitch width dial 10. Principal Parts of the Machine 1. Thread cutter 4. Removable extension table/ accessory storage 7. Reverse sewing lever 8. Stitch length dial 11.
Presser foot 5. Thread tension dial 2. Thread take-up lever 3. Needle plate 6. Bobbin stopper 9. One step buttonhole lever 13. Pattern selector dial 12. Automatic threader 1 7 8 2 9 10 3 PUSH 4 11 5 6 12 PUSH 13 2 Stitch width dial 10. Principal Parts of the Machine 1. Thread cutter 4. Removable extension table/ accessory storage 7. Reverse sewing lever 8. Stitch length dial 11.
Instruction Manual
Page 6
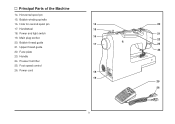
Handwheel 15 18. Bobbin thread guide 17 23 21. Bobbin winding spindle 16. Upper thread guide 24 22. Foot speed control 26. Power cord 18 19 25 26 3 Horizontal spool pin 15. Handle 24. Presser foot lifter 25. Main plug socket 16 22 20. Hole for second spool pin 14 20 17. Face plate 23. Power and light switch 21 19. Principal Parts of the Machine 14.
Handwheel 15 18. Bobbin thread guide 17 23 21. Bobbin winding spindle 16. Upper thread guide 24 22. Foot speed control 26. Power cord 18 19 25 26 3 Horizontal spool pin 15. Handle 24. Presser foot lifter 25. Main plug socket 16 22 20. Hole for second spool pin 14 20 17. Face plate 23. Power and light switch 21 19. Principal Parts of the Machine 14.
Instruction Manual
Page 7
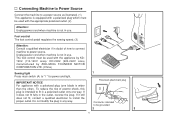
To reduce the risk of how to connect machine to " l " for power and light. Unplug power cord when machine is intended to fit in a polarized outlet only one blade is not in the outlet, reverse the plug. If it does not fit fully in use . Connecting Machine to Power Source Connect the machine to a power source as illustrated. (1) This appliance is equipped with a polarized plug which must be grounded 2 4 A 3 The foot control must be used with a polarized plug (one way. IMPORTANT NOTICE For appliance with the appliance by KD1902 (110-120V area)/ KD-2902 (220-240V ...
To reduce the risk of how to connect machine to " l " for power and light. Unplug power cord when machine is intended to fit in a polarized outlet only one blade is not in the outlet, reverse the plug. If it does not fit fully in use . Connecting Machine to Power Source Connect the machine to a power source as illustrated. (1) This appliance is equipped with a polarized plug which must be grounded 2 4 A 3 The foot control must be used with a polarized plug (one way. IMPORTANT NOTICE For appliance with the appliance by KD1902 (110-120V area)/ KD-2902 (220-240V ...
Instruction Manual
Page 8
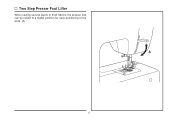
Two Step Presser Foot Lifter When sewing several layers or thick fabrics, the presser foot can be raised to a higher position for easy positioning of the work. (A) A 5
Two Step Presser Foot Lifter When sewing several layers or thick fabrics, the presser foot can be raised to a higher position for easy positioning of the work. (A) A 5
Instruction Manual
Page 9
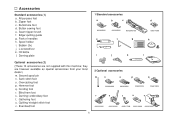
Pack of needles h. Satin stitch foot o. Hemmer foot q. Blind hem foot s. Spool holder i. Bobbin (3x) j. Zipper foot c. they are not supplied with this machine; Evenfeed foot 2 Optional accessories m n o p q 006804008 006803008 006800008 006810008 r s t u v 006812008 006016008 006917008 006916008 006815008 6 Seam ripper/ brush f. Second spool pin n. Gathering foot u. Button sewing foot e. Darning plate 1 Standard accessories a b c 006806008 006905008 006Q6A0150 e f g d 006914008 h i j k l Optional accessories (2) (These 10 ...
Pack of needles h. Satin stitch foot o. Hemmer foot q. Blind hem foot s. Spool holder i. Bobbin (3x) j. Zipper foot c. they are not supplied with this machine; Evenfeed foot 2 Optional accessories m n o p q 006804008 006803008 006800008 006810008 r s t u v 006812008 006016008 006917008 006916008 006815008 6 Seam ripper/ brush f. Second spool pin n. Gathering foot u. Button sewing foot e. Darning plate 1 Standard accessories a b c 006806008 006905008 006Q6A0150 e f g d 006914008 h i j k l Optional accessories (2) (These 10 ...
Instruction Manual
Page 10
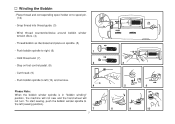
Winding the Bobbin - Snap thread into thread guide. (3) - Cut thread. (9) - Wind thread counterclockwise around bobbin winder tension discs. (4) - Step on spindle. (5) - To start sewing, push the bobbin winder spindle to left (sewing position). 7 7 3 5 6 8 9 10 Push bobbin spindle to the left (10) and remove. 4 Please Note: When the bobbin winder spindle is in "bobbin winding" position, the machine will not sew and the hand wheel will not turn. Place thread and corresponding spool holder on to right. (6) 1 - Push bobbin spindle to spool pin. (1/2) - Thread...
Winding the Bobbin - Snap thread into thread guide. (3) - Cut thread. (9) - Wind thread counterclockwise around bobbin winder tension discs. (4) - Step on spindle. (5) - To start sewing, push the bobbin winder spindle to left (sewing position). 7 7 3 5 6 8 9 10 Push bobbin spindle to the left (10) and remove. 4 Please Note: When the bobbin winder spindle is in "bobbin winding" position, the machine will not sew and the hand wheel will not turn. Place thread and corresponding spool holder on to right. (6) 1 - Push bobbin spindle to spool pin. (1/2) - Thread...

Instruction Manual
Page 11
Hold the bobbin case with one hand. Insert the bobbin so that the thread runs in a clockwise direction (arrow). (3) 1 - Hold the bobbin case by the hinged latch. (5) - Insert it into the shuttle. (6) Attention: 3 Turn power switch to off ("O") before inserting or removing the bobbin. 6 8 a 2 4 5 Pull the thread through the slit and under the finger. (4) Leave a 6 inch tail of thread. - Remove the extension table, then open the hinged cover. (1) - Pull the bobbin case tab (a) and remove the bobbin case. (2) - Inserting the Bobbin When inserting or removing the ...
Hold the bobbin case with one hand. Insert the bobbin so that the thread runs in a clockwise direction (arrow). (3) 1 - Hold the bobbin case by the hinged latch. (5) - Insert it into the shuttle. (6) Attention: 3 Turn power switch to off ("O") before inserting or removing the bobbin. 6 8 a 2 4 5 Pull the thread through the slit and under the finger. (4) Leave a 6 inch tail of thread. - Remove the extension table, then open the hinged cover. (1) - Pull the bobbin case tab (a) and remove the bobbin case. (2) - Inserting the Bobbin When inserting or removing the ...
Instruction Manual
Page 12
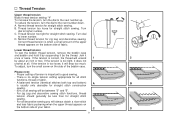
Turn dial to higher number. Please note: - A balanced tension (identical stitches both top and bottom) A B is no single tension setting appropriate for straight stitch sewing. Normal thread tension for straight stitch construction sewing. - 90% of all stitch functions, thread or fabric. - D. Jerk it by about an inch or two. To adjust, turn the small screw on the bottom side of the bobbin case. Proper setting of fabric. There is usually only desirable for straight stitch sewing. Thread Tension Upper thread tension Basic thread tension setting: "4" To increase ...
Turn dial to higher number. Please note: - A balanced tension (identical stitches both top and bottom) A B is no single tension setting appropriate for straight stitch sewing. Normal thread tension for straight stitch construction sewing. - 90% of all stitch functions, thread or fabric. - D. Jerk it by about an inch or two. To adjust, turn the small screw on the bottom side of the bobbin case. Proper setting of fabric. There is usually only desirable for straight stitch sewing. Thread Tension Upper thread tension Basic thread tension setting: "4" To increase ...
Instruction Manual
Page 13
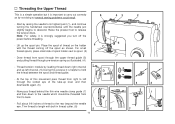
Lift up lever and then 1 downwards again. (6) - For small thread spools, place small side of thread on the holder with built in thread cutter. (8) 5 10 2 3 4 6 7 8 Now pass thread behind the thin wire needle clamp guide (7) and then down right channel and up left through pre-tension spring as shown. Start by leading thread down to the needle which should be threaded from spool through the upper thread guide (3) and pulling thread through the slotted eye of thread to hold the thread between the spool and thread guide. - Note: For safety, it is helpful to the rear...
Lift up lever and then 1 downwards again. (6) - For small thread spools, place small side of thread on the holder with built in thread cutter. (8) 5 10 2 3 4 6 7 8 Now pass thread behind the thin wire needle clamp guide (7) and then down right channel and up left through pre-tension spring as shown. Start by leading thread down to the needle which should be threaded from spool through the upper thread guide (3) and pulling thread through the slotted eye of thread to hold the thread between the spool and thread guide. - Note: For safety, it is helpful to the rear...
Instruction Manual
Page 14
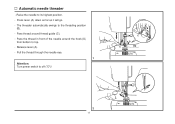
The threader automatically swings to off ("O")! 2 11 A C A B C B D D A Pass thread around the hook (D) from bottom to its highest position. - Press lever (A) down as far as it will go. - Pull the thread through the needle eye. 1 Attention: Turn power switch to the threading position (B). - Automatic needle threader - Pass the thread in front of the needle around thread guide (C). - Release lever (A). - Raise the needle to top. -
The threader automatically swings to off ("O")! 2 11 A C A B C B D D A Pass thread around the hook (D) from bottom to its highest position. - Press lever (A) down as far as it will go. - Pull the thread through the needle eye. 1 Attention: Turn power switch to the threading position (B). - Automatic needle threader - Pass the thread in front of the needle around thread guide (C). - Release lever (A). - Raise the needle to top. -
Instruction Manual
Page 15
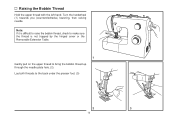
Raising the Bobbin Thread Hold the upper thread with the left hand. Turn the handwheel (1) towards you (counterclockwise) lowering, then raising needle. Note: If it is difficult to raise the bobbin thread, check to make sure the thread is not trapped by the hinged cover or the Removable Extension Table. 1 Gently pull on the upper thread to bring the bobbin thread up through the needle plate hole. (2) Lay both threads to the back under the presser foot. (3) 2 3 12
Raising the Bobbin Thread Hold the upper thread with the left hand. Turn the handwheel (1) towards you (counterclockwise) lowering, then raising needle. Note: If it is difficult to raise the bobbin thread, check to make sure the thread is not trapped by the hinged cover or the Removable Extension Table. 1 Gently pull on the upper thread to bring the bobbin thread up through the needle plate hole. (2) Lay both threads to the back under the presser foot. (3) 2 3 12
Instruction Manual
Page 16
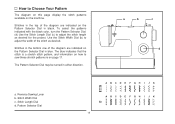
To select the patterns indicated with the black color, turn the Pattern Selector Dial. (d) Use the Stitch Length Dial (c) to adjust the stitch length as desired. Stitches in the bottom row of the diagram are indicated on the Pattern Selector Dial in either direction. The Pattern Selector Dial may be turned in blue. Stitch Length Dial d. Reverse Sewing Lever b. a b c d a. Stitches in the top of the stitch as desired for the project. Use the Stitch Width Dial (b) to adjust the width of the diagram are indicated on the Pattern Selector Dial in black. The blue indicates ...
To select the patterns indicated with the black color, turn the Pattern Selector Dial. (d) Use the Stitch Length Dial (c) to adjust the stitch length as desired. Stitches in the bottom row of the diagram are indicated on the Pattern Selector Dial in either direction. The Pattern Selector Dial may be turned in blue. Stitch Length Dial d. Reverse Sewing Lever b. a b c d a. Stitches in the top of the stitch as desired for the project. Use the Stitch Width Dial (b) to adjust the width of the diagram are indicated on the Pattern Selector Dial in black. The blue indicates ...
Instruction Manual
Page 17
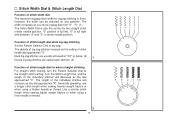
Function of stitch length dial for when straight stitching For straight stitch sewing, turn the Pattern Selector Dial to zig-zag. Turn the Stitch Length Dial, and the length of the individual stitches will increase as the dial approached "0". The length of the individual stitches will decrease as the dial approaches "4". Stitch Width Dial & Stitch Length Dial Function of stitch width dial The maximum zigzag stitch width for zigzag stitching is center needle position. "0" position is full left, "5" is full right and between "2" and "3" is 5mm; Neat zig-zag stitches are usually ...
Function of stitch length dial for when straight stitching For straight stitch sewing, turn the Pattern Selector Dial to zig-zag. Turn the Stitch Length Dial, and the length of the individual stitches will increase as the dial approached "0". The length of the individual stitches will decrease as the dial approaches "4". Stitch Width Dial & Stitch Length Dial Function of stitch width dial The maximum zigzag stitch width for zigzag stitching is center needle position. "0" position is full left, "5" is full right and between "2" and "3" is 5mm; Neat zig-zag stitches are usually ...
Instruction Manual
Page 18
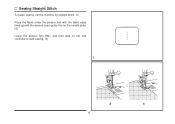
Sewing Straight Stitch To begin sewing, set the machine for straight stitch. (1) Place the fabric under the presser foot with the fabric edge lined up with the desired seam guide line on the needle plate. (2) Lower the presser foot lifter, and then step on the foot controller to start sewing. (3) 1 2 3 15
Sewing Straight Stitch To begin sewing, set the machine for straight stitch. (1) Place the fabric under the presser foot with the fabric edge lined up with the desired seam guide line on the needle plate. (2) Lower the presser foot lifter, and then step on the foot controller to start sewing. (3) 1 2 3 15
Instruction Manual
Page 19
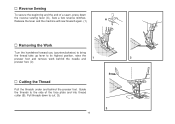
Guide the threads to the side of a seam, press down to its highest position, raise the presser foot and remove work behind the needle and 1 2 presser foot. (2) Cutting the Thread Pull the threads under and behind the presser foot. Reverse Sewing To secure the beginning and the end of the face plate and into thread cutter (B). Pull threads down the reverse sewing lever (A). Release the lever and the machine will sew forward again. (1) A Removing the Work Turn the handwheel toward you (counterclockwise) to bring the thread take up lever to cut. (3) B PUSH 3 16 Sew a ...
Guide the threads to the side of a seam, press down to its highest position, raise the presser foot and remove work behind the needle and 1 2 presser foot. (2) Cutting the Thread Pull the threads under and behind the presser foot. Reverse Sewing To secure the beginning and the end of the face plate and into thread cutter (B). Pull threads down the reverse sewing lever (A). Release the lever and the machine will sew forward again. (1) A Removing the Work Turn the handwheel toward you (counterclockwise) to bring the thread take up lever to cut. (3) B PUSH 3 16 Sew a ...