
Instruction Manual
Page 3
... ever made. To ensure that , before you start to change the appearance, design or accessories of The Singer Company Limited or its affiliates. © 2008 The Singer Company Limited or its affiliates. Congratulations As the owner of a new Singer sewing machine, you are sewing on one of the easiest to begin an exciting adventure...
... ever made. To ensure that , before you start to change the appearance, design or accessories of The Singer Company Limited or its affiliates. © 2008 The Singer Company Limited or its affiliates. Congratulations As the owner of a new Singer sewing machine, you are sewing on one of the easiest to begin an exciting adventure...
Instruction Manual
Page 4
List of contents Machine Basics Principle Parts of the Machine...2/3 Connecting Machine to Power Source ...4 Two Step Presser Foot Lifter...5 Accessories ...6 Threading the Machine Winding the Bobbin ...7 Inserting the Bobbin ...8 Thread Tension ...9 Threading the Upper Thread ...10 Automatic needle threader ...11 Raising the Bobbin Thread...12 ...
List of contents Machine Basics Principle Parts of the Machine...2/3 Connecting Machine to Power Source ...4 Two Step Presser Foot Lifter...5 Accessories ...6 Threading the Machine Winding the Bobbin ...7 Inserting the Bobbin ...8 Thread Tension ...9 Threading the Upper Thread ...10 Automatic needle threader ...11 Raising the Bobbin Thread...12 ...
Instruction Manual
Page 5
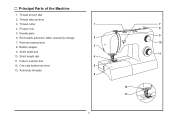
Thread cutter 4. Stitch length dial 11. Thread take-up lever 3. Reverse sewing lever 8. Thread tension dial 2. Pattern selector dial 12. Automatic threader 1 7 8 2 9 10 3 PUSH 4 11 5 6 12 PUSH 13 2 Needle plate 6. Presser foot 5. Bobbin stopper 9. One step buttonhole lever 13. Principal Parts of the Machine 1. Removable extension table/ accessory storage 7. Stitch width dial 10.
Thread cutter 4. Stitch length dial 11. Thread take-up lever 3. Reverse sewing lever 8. Thread tension dial 2. Pattern selector dial 12. Automatic threader 1 7 8 2 9 10 3 PUSH 4 11 5 6 12 PUSH 13 2 Needle plate 6. Presser foot 5. Bobbin stopper 9. One step buttonhole lever 13. Principal Parts of the Machine 1. Removable extension table/ accessory storage 7. Stitch width dial 10.
Instruction Manual
Page 9
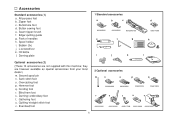
... spool pin n. Overcasting foot p. Evenfeed foot 2 Optional accessories m n o p q 006804008 006803008 006800008 006810008 r s t u v 006812008 006016008 006917008 006916008 006815008 6 Blind hem foot s. Oil bottle l. Darning plate 1 Standard accessories a b c 006806008 006905008 006Q6A0150 e f g d 006914008 h i j k l Optional accessories (2) (These 10 accessories are however available as special accessories from your local dealer.) m. Pack of needles h. Accessories Standard accessories (1) a. Buttonhole foot d. Seam ripper/ brush...
... spool pin n. Overcasting foot p. Evenfeed foot 2 Optional accessories m n o p q 006804008 006803008 006800008 006810008 r s t u v 006812008 006016008 006917008 006916008 006815008 6 Blind hem foot s. Oil bottle l. Darning plate 1 Standard accessories a b c 006806008 006905008 006Q6A0150 e f g d 006914008 h i j k l Optional accessories (2) (These 10 accessories are however available as special accessories from your local dealer.) m. Pack of needles h. Accessories Standard accessories (1) a. Buttonhole foot d. Seam ripper/ brush...
Instruction Manual
Page 24
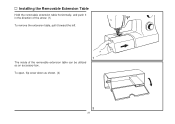
To open, flip cover down as an accessory box. PUSH 1 The inside of the arrow. (1) To remove the extension table, pull it toward the left. Installing the Removable Extension Table Hold the removable extension table horizontally, and push it in the direction of the removable extension table can be utilized as shown. (2) 2 21
To open, flip cover down as an accessory box. PUSH 1 The inside of the arrow. (1) To remove the extension table, pull it toward the left. Installing the Removable Extension Table Hold the removable extension table horizontally, and push it in the direction of the removable extension table can be utilized as shown. (2) 2 21
Instruction Manual
Page 27
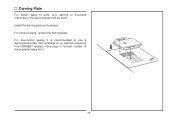
For free-motion sewing it is recommended to use a darning/embroidery foot, available as illustrated. Install the darning plate as an optional accessory from SINGER® retailers. (See page 6 for part number of work, (e.g. For normal sewing, remove the darning plate. Darning Plate For certain types of darning/embroidery foot ) 24 darning or free-hand embroidery), the darning plate must be used.
For free-motion sewing it is recommended to use a darning/embroidery foot, available as illustrated. Install the darning plate as an optional accessory from SINGER® retailers. (See page 6 for part number of work, (e.g. For normal sewing, remove the darning plate. Darning Plate For certain types of darning/embroidery foot ) 24 darning or free-hand embroidery), the darning plate must be used.

