Singer XL-580 FUTURA Support and Manuals
Get Help and Manuals for this Singer item
View All Support Options Below
Free Singer XL-580 FUTURA manuals!
Problems with Singer XL-580 FUTURA?
Ask a Question
Free Singer XL-580 FUTURA manuals!
Problems with Singer XL-580 FUTURA?
Ask a Question
Most Recent Singer XL-580 FUTURA Questions


Transmitting Design To Machine
I cannot transmit the design to the machine, Singer XL-580. Everything is connected as stated in the...
I cannot transmit the design to the machine, Singer XL-580. Everything is connected as stated in the...
(Posted by dcarlisle446 1 year ago)

What Does Code 10 Mean And How Can I Fix It?
(Posted by Kateesbowtique 9 years ago)

What Is Included With The Machine ?
what is included with the machine?
what is included with the machine?
(Posted by infomachinemal 9 years ago)
Singer XL-580 FUTURA Videos

Singer XL580 Futura Embroidery Sewing Machine
Duration: 22:40
Total Views: 279
Duration: 22:40
Total Views: 279
Singer XL-580 Futura Embroidery and Sewing Machine with 250 Embroidery Designs
Duration: 2:51
Total Views: 1,428
Duration: 2:51
Total Views: 1,428
Popular Singer XL-580 FUTURA Manual Pages
Instruction Manual - Page 2
³,03257$176$)(7
Instruction Manual - Page 5
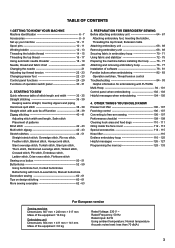
... and stabilizer 72 - 75 Preparing the machine before installing the hoop ------- 76 - 77 Attaching and removing embroidery hoop 76 - 77 Installation of software 78 - 81 Function buttons when embroidering 82 - 83 Operation switches, Thread tension control Troubleshooting 84 - 93 Helpful information for embroidering with hard-to free-arm sewing 106 - 107 Performance checklist 108 - 109...
Instruction Manual - Page 10
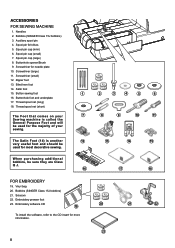
... foot
15.
Embroidery software CD
19
To install the software, refer to the CD insert for needle plate
10. Buttonhole opener/Brush
9. Zipper foot
13. Bobbins (SINGER Class 15J bobbins) 21. The Satin Foot (14) is called the
General Purpose Foot and will
be used for the majority of your
7
Sewing machine is another
12...
Instruction Manual - Page 12
... without the foot control (see page 30 - 31). Set power/light switch at "OFF"
Mettez l'interrupteur moteur/ lumière sur "OFF". NOTE: In sewing mode, the machine can be disconnected from the power supply. When servicing the machine, or when changing needles or lights, etc., the machine must be operated either
with a spool cap WR...
Instruction Manual - Page 32
...243;n de otras puntadas.
7. SPEED CONTROL LEVER
Sliding the lever sets desired sewing speed. When foot control is operating. ¿ Flashing red light indicates a problem or an error.
* Flashing for 2 - 3 seconds shows that an incorrect operation was made.
* Continuous flashing indicates that the machine malfunctions.
6
Reverse stitch function for straight and zigzag stitches Fonction...
Instruction Manual - Page 38
...: The Needle Plate has both threads under the presser foot and lower the
presser foot lifter.
5
4. Start/stop the sewing machine. The guide line on the needle plate. SETTINGS Presser foot - Needle up/down position selector button D. Turn the hand wheel counter clockwise (towards you )
until
the needle enters the fabric.
5. Let's begin by...
Instruction Manual - Page 66
...embroidery presser foot behind presser bar so that the drive lever is required for embroidering, so
be sure to turn off power to touch the needle when CAUTION replacing ... de aguja
Embroidery presser foot Pied presseur de broderie Prensatelas de bordado
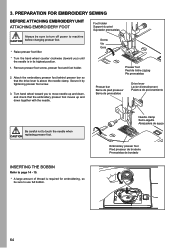
64 PREPARATION FOR EMBROIDERY SEWING
BEFORE ATTACHING EMBROIDERY UNIT ATTACHING EMBROIDERY FOOT
Foot holder Support du pied Sujetador...
Instruction Manual - Page 68
NOTE: It is recommended to thread the upper thread before
transmitting a design to machine. 2.
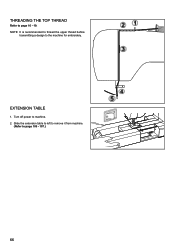
Turn off power to the machine for embroidery. Slide the extension table to left to remove it from machine.
(Refer to page 16 - 19. EXTENSION TABLE
1. THREADING THE TOP THREAD
Refer to page 106 - 107.)
66
Instruction Manual - Page 70

...
* Turn off the machine. * Remove embroidery hoop from machine.
(Refer to machine CAUTION before installing embroidery unit.
1. Note: Do not pull carriage when removing embroidery unit.
2. Turn off power to page 76 - 77.)
1. Note: If embroidery unit is pushed in as far as it will go until it clicks into place. Holding handle of the embroidery unit and pull...
Instruction Manual - Page 80
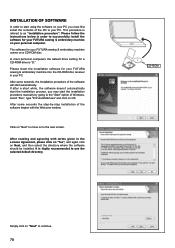
...This procedure is "D:"
Please insert the installation software for your FUTURA sewing & embroidery machine into the CD-ROM disc receiver in order to your PC.
In most personal computers the default drive setting for a CD-ROM drive is refered to as ³LQVWDOODWLRQ SURFHGXUH´ 3OHDVH IROORZ WKH instructions below in your FUTURA sewing & embroidery machine comes on a CD-ROM disc...
Instruction Manual - Page 82
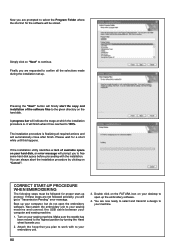
... FRQ¿UP DOO WKH VHOHFWLRQV PDGH during the installation set-up. Double click on the FUTURA icon on the hard disk. Next attach the embroidery unit to free some hard disk space before proceeding with to the highest position by clicking on your sewing machine. Boot up protocol. If these steps are not followed precisely...
Instruction Manual - Page 84
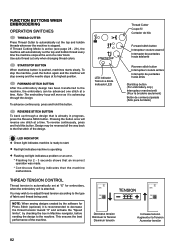
... up through the design. START/STOP BUTTON When start .
¿ Red light indicates machine is operating.
¿ Flashing red light indicates a problem or an error. * Flashing for embroidery, when the embroidery unit is active (see page 28 - 29), the machine will stop button (For embroidery only) Interrupteur marche/arrêt (Pour la broderie seulement) Botón de...
Instruction Manual - Page 112

... the essential parts clean at its highest position.
2
2. CLEANING HOOK AREA AND FEED DOGS
1
Always disconnect the machine from power
CAUTION supply by the arrows. (A, B)
NOTE: Singer Brand Sewing Machine Oil is suggested. '2 127 XVH ³DOO SXUSRVH´ RLO DV LW LV QRW VXLWHG IRU
sewing machine lubrication.
5. Remove the bobbin case (2).
3
4. Replace the bobbin case...
Instruction Manual - Page 114

... before it is used after a long interval : It should be oiled periodically. For best results always use SINGER Brand Sewing Machine Oil. Screw Vis Guia
2
Screw Vis Guia
112 Put one drop of oil other than Sewing Machine Oil will cause damage to the points indicated
by arrows.
1
Face cover Plaque frontale Cubierta frontal
Helpful...
Instruction Manual - Page 118
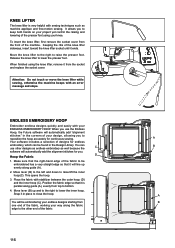
... the Endless
Hoop, the Futura software will automatically add the alignment stitches for you.
Position the fabric edge so that it in the corners of the fabric, working your design, allowing you to the other designs as endless embroidery as machine applique and free-motion sewing. Keeping the ribs of the machine. Attention: Do not...
Singer XL-580 FUTURA Reviews
We have not received any reviews for Singer yet.