Singer 9980 QUANTUM STYLIST Support and Manuals
Get Help and Manuals for this Singer item
View All Support Options Below
Free Singer 9980 QUANTUM STYLIST manuals!
Problems with Singer 9980 QUANTUM STYLIST?
Ask a Question
Free Singer 9980 QUANTUM STYLIST manuals!
Problems with Singer 9980 QUANTUM STYLIST?
Ask a Question
Most Recent Singer 9980 QUANTUM STYLIST Questions

Machine Start Up
my quantum will not run the start up when turned on. It beeps but the needle doesn't adjust. I am un...
my quantum will not run the start up when turned on. It beeps but the needle doesn't adjust. I am un...
(Posted by Dgmcmaster 1 year ago)

Why Does The Thread Break On My Quantum Stylist 9980 ?
My machine will sew for less than a minute and the thread breaks and the needle becomes unthreaded b...
My machine will sew for less than a minute and the thread breaks and the needle becomes unthreaded b...
(Posted by Duhholloway 4 years ago)
Popular Singer 9980 QUANTUM STYLIST Manual Pages
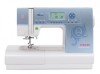
Instruction Manual - Page 2
Read all moving parts. WARNING - Use this manual. 3. Never drop or insert any object into water. To disconnect, turn the power switch to the nearest authorized dealer or service center for its intended use outdoors. 7. Do not unplug by the manufacturer as contained in the instruction manual. 16. Switch the sewing machine off position (symbol "O"), then remove plug...
Instruction Manual - Page 3
...36 38
EYELET
74
MODEL 9980 8 C. TURNING OFF AUDIBLE BEEP 26
BOBBIN SETTING 28
INSERTING ZIPPERS CENTERED INSERTION ........ TRIPLE CORDING 80
CONTINUOUS DECORATIVE PATTERN 82
CHANGING THE PRESSER FOOT 14
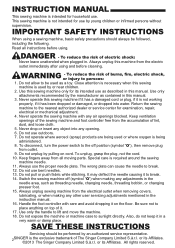
A. SETTING (Mirror/reverse, elongation) .. 44 C. CONTENTS
IMPORTANT SAFETY
STARTING TO SEW 36 BOUND BUTTONHOLE ......... 72
INSTRUCTIONS
2
A. CHANGING THE PRESSER...
Instruction Manual - Page 8
...correspond with the machine by following code. Cleaning and user...machine. MODEL 9980
PREFACE Thank you are colored in accordance with the following the instruction manual page by children without notification or obligation. Cet appareil ne doit pas entre utiliser comme un jouet par les enfants.
3. If a 13 Amp. (BS 1363) plug is used by children aged from light to this sewing machine...
Instruction Manual - Page 12
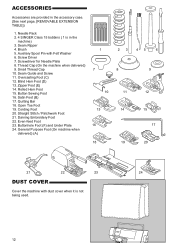
... Foot 19. Needle Pack 2. 4 SINGER Class 15 bobbins ( 1 is not being used.
12 Overcasting Foot (C) 12. General Purpose Foot (On machine when
delivered) (A)
1 7
10 13 16
18
23 8
11 14
19
45
6
9
12 15
17 20
21
22
23
24
DUST COVER
Cover the machine with Felt Washer 6. Button Sewing Foot 16. Satin Foot (B) 17...
Instruction Manual - Page 28

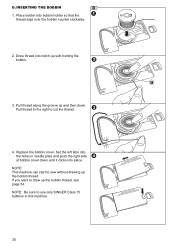
... direction. 4.Insert thread through the thread guide from left .
10.Remove the bobbin from the machine. REMOVING THE BOBBIN 1. Set the spool cap on bobbin winder spindle. Use the small spool cap when you use only SINGER Class 15 bobbins in bobbin and place the bobbin on spool pin as far as illustrated. SETTING SPOOL OF THREAD ON SPOOL PIN
1. b. Push...
Instruction Manual - Page 30
a
3.
Replace the bobbin cover. NOTE: This machine can start to cut the thread.
4. Pull thread to the right to sew without drawing up the bobbin thread. If you want to use only SINGER Class 15 bobbins in needle plate and push the right side of bobbin cover down . Place bobbin into notch (a) with holding the bobbin. Set the left tabs into place...
Instruction Manual - Page 42
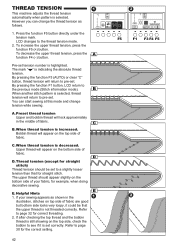
...set tension number is selected, thread tension will return to pre-set...set . If after checking the top thread and the bobbin thread is set...bobbin to pre-set correctly. A.
C. E. However you can start sewing...sewing. If your sewing appears as follows.
1. Refer to page 30 for correct threading. 2.
Preset thread tension Upper and bobbin...sewing. Bobbin...correct setting.
...
Instruction Manual - Page 44

... selected, LCD will flip from left and right) c. The icon on the machine, straight stitch will change settings by pressing
the utility button.)
3. Function of the top cover. Pressing the function ... the pattern chart located inside of function button
F2 Tack stitch (See page 38)
F3 Setting
F4 Stitch Width, Length
F5 Thread Tension (See previous page)
B-i
B. Diagram A1. ...
Instruction Manual - Page 46
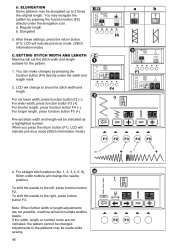
...width, length or number icons are not possible, machine will change to the patterns may be changed. a. For wider width, press function button F3 (+). Pre-set the stitch width and length
suitable for the ...: When further width or length adjustments are not indicated, the pattern cannot be made while sewing.
46 ii. To shift the needle to the right, press funtion button F3. To shift ...
Instruction Manual - Page 52
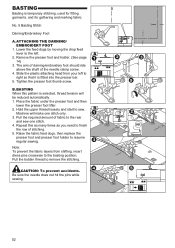
.... Pull the bobbin thread to sew. BASTING
Basting is fitted into the presser bar.
5. BASTING When this as many times as you need to the rear
and sew one stitch only. 3. Machine will be reduced...shaft of fabric to finish
the row of stitching. 5. Raise the fabric feed dogs, then replace the
presser foot and presser foot holder to right so that it is temporary stitching, used...
Instruction Manual - Page 54

... the fabric on top. The topper, batting, and backing fabric. Place thread that matches the fabric on the bobbin. The top layer is formed by shaped pieces of 1/4 inch (6.3 mm)
B. Set the upper tension to sew successive rows. Bag
b. Pocket
QUILTING
A quilt always consists of three layers of material (topper, batting, backing). Otherwise...
Instruction Manual - Page 56

... settings of the stitch width and stitch length. SATIN STITCHING To sew a satin stitch, shorten the stitch length and attach the Satin Foot. (B) Refer to next page for easy to ravel and knit fabrics. Overcast Stitching Used for using the zig-zag to next page for applique and decorative sewing.
ZIGZAG STITCH SEWING
Your machine...
Instruction Manual - Page 62

...
No. 23, 24
Open Toe Foot
CAUTION: To prevent accidents. Set the applique in place on both sides of the seam. Sew with the right side of the stitch following the right edge of fabrics...with a satin stitch using fusible web.
2. With the right side of fabric right sides together and sew a long straight stitch.
2.
Note: Applique can also be helpful to place a fabric stabilizer underneath your...
Instruction Manual - Page 86

... again or turn off the machine. Press the twin needle button (F2).
The needle threader cannot be produced by hand from front to back. 7. TWIN NEEDLE SEWING
Interesting effects can be used with felt washer into the needle bar thread guide. Try using a twin needle.
Contact your authorized SINGER retailer for even more variety...
Instruction Manual - Page 100

... machine. It does not require replacement.
Do not touch thread cutter unit (a). Edged knife is used to illuminate the stitching
area. In the unlikely event it . Remove the screws holding the needle plate. 2. Remove the needle plate by lifting up the bobbin holder and remove it does not light, call your authorized SINGER retailer for service...
Singer 9980 QUANTUM STYLIST Reviews
We have not received any reviews for Singer yet.