Singer 1304 START Support and Manuals
Get Help and Manuals for this Singer item
View All Support Options Below
Free Singer 1304 START manuals!
Problems with Singer 1304 START?
Ask a Question
Free Singer 1304 START manuals!
Problems with Singer 1304 START?
Ask a Question
Popular Singer 1304 START Manual Pages
Instruction Manual - Page 3

... in the instruction manual. Use this sewing machine only for its intended use as described in this sewing machine from the electric outlet immediately after using and before using an electrical appliance, basic safety precautions should never be followed, including the following: Read all instructions before cleaning, removing covers, lubricating or when making any other user servicing...
Instruction Manual - Page 4

... service center for examination, repair, electrical or mechanical adjustment. - Do not use bent needles. - If the LED lamp is damaged or broken, it is required around the sewing machine needle. - Special care is wet. - Return the sewing machine to break. - Always use outdoors. - Do not use the machine if it must be replaced by the manufacturer or its service...
Instruction Manual - Page 5

... understand the hazards involved. The machine must only be supervised to ensure that they have been given supervision or instruction concerning use of the sewing machine by a person responsible for Servicing of type KD-1902, FC-1902... (including children) with the appliance. This sewing machine is not intended for use by Wakaho Electric Ind. Use only identical replacement parts.
Instruction Manual - Page 16
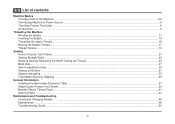
EN List of contents
Machine Basics Principle Parts of the Machine...2/4 Connecting Machine to Power Source ...6 Two Step Presser Foot Lifter...8 Accessories ...9
Threading the Machine Winding the Bobbin ...11 Inserting the Bobbin ...13 Threading the Upper Thread ...15 Raising the Bobbin Thread...17 Thread Tension ...19
Sewing How to Choose Your Pattern...21 Sewing Straight Stitch ...23 Reverse ...
Instruction Manual - Page 19
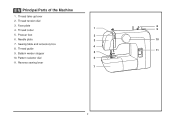
Reverse sewing lever
7
2 EN Principal Parts of the Machine
1. Face plate
8
1 4. Thread guide
11
9. Presser foot
2
6. Sewing table and accessory box
4
8. Pattern selector dial
6
11. Thread tension dial
3. Thread cutter
9
5. Bobbin winder stopper
5
10. Needle plate
3
10
7. Thread take-up lever
2.
Instruction Manual - Page 26

... foot c. Darning plate e. Pack of needles (3x) i. Edge/ quilting guide r. Hemmer foot m. Bobbin (3x)
1
a
b
c
d
006806008
006905008
006909008
e
f
g
h... brush g. Button sewing foot q. Soft cover
2
j
k
l
m
006916008
006803008
006800008
006812008
n
o
p
q
006804008
r
006016008
006914008
9 they are not supplied with this machine; Satin stitch foot ...
Instruction Manual - Page 28

... cut thread. (8)
- EN Winding the Bobbin
- Hold thread end. (6)
- Release the pedal after a few turns. Wind thread clockwise around bobbin winder tension discs. (3)
- Push bobbin spindle to the spool. Once the spool is in "bobbin winding" 3 position, the machine will not sew and the hand wheel will not turn. To start sewing, push the bobbin winder spindle to right. (5)
-
Instruction Manual - Page 32

Start by not doing so several sewing problems could result. - Draw thread from right to left through the slotted eye of the take-up left channel. (5) During this movement pass thread from spool through the thread guide to the upper thread guide... safety, it is helpful to hold the thread between the spool and thread guide. - EN Threading the Upper Thread
This is a simple operation but it ...
Instruction Manual - Page 36

... number up.
EN Thread Tension
Upper thread tension
Basic thread tension setting: "4" (1)
To increase the tension, turn the dial to good sewing.
-
Lower thread tension (2) To test the bobbin thread tension, remove the bobbin case and bobbin and hold it by suspending it once or twice. Proper setting of the bobbin case. Turn
4
dial to lower number.
3
D. Turn...
Instruction Manual - Page 40
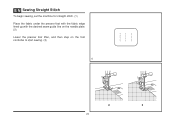
EN Sewing Straight Stitch
To begin sewing, set the machine for straight stitch. (1) Place the fabric under the presser foot with the fabric edge lined up with the desired seam guide line on the needle plate. (2) Lower the presser foot lifter, and then step on the foot controller to start sewing. (3)
1
2
3
23
Instruction Manual - Page 50
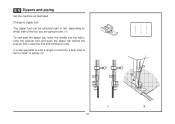
... left, depending on which side of the foot you are going to sew. (1)
To sew past the zipper tab, lower the needle into a bias strip to sew a length of cord into the fabric, raise the presser foot and push the zipper tab behind the presser foot. EN Zippers and piping
Set the machine as illustrated.
Instruction Manual - Page 52
... the presser foot bar. Turn work from behind the needle clamp screw (b).
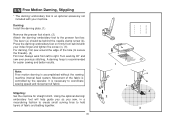
Stippling: Set the machine for easier sewing and better results. EN Free Motion Darning, Stippling
* The darning/ embroidery foot is an optional accessory not included with your machine. Darning: Install the darning plate. (1)
Remove the presser foot shank. (2) Attach the darning/ embroidery foot...
Instruction Manual - Page 58

...double knits. For best sewing results always use the same thread on...Thread Chart
NEEDLE, FABRIC, THREAD SELECTION GUIDE
NEEDLE SIZE 9-11 (70-80)
... range Natural woven fabrics-wool, cotton, silk, etc. SINGER® 2045 Semi-ball point needle, scarfed. 9 (... (Leaves smaller hole than standard large needle.)
Note : 1. Replace needle often (approximately every other garment ) and/ or at...
Instruction Manual - Page 65

... screws with sewing machine oil. Turn the handwheel until the needle is in the left position. Your machine should be serviced at regular intervals at the point (6) (1-2
drops) with the screw driver. (1)
Cleaning the feed dogs: Use the brush supplied to clean the whole area. (2)
Cleaning and lubricating the hook:
1
Remove the bobbin case.
Replace the hook...
Instruction Manual - Page 67

...Troubleshooting Guide
Problem...better quality thread. 2. Replace the needle.
The needle is not correctly threaded. 3. The bobbin case is not correctly inserted. 3. Check the threading. 2. The machine is not attached correctly.... Insert a new needle. 2. Remove bobbin case, thread and insert correctly. 3. Do not pull on the fabric while sewing, let it be taken up by hand...
Singer 1304 START Reviews
We have not received any reviews for Singer yet.