
Instruction Manual
Page 3
...the electric outlet immediately after using and before cleaning, removing covers, lubricating or when making any other user servicing adjustments mentioned in this sewing machine if it has a damaged cord or plug, if it is necessary when this manual. Never operate this manual. - DANGER - To... toy. Make sure to hand them over if the machine is given to comply with IEC/EN 60335-2-28 and UL1594. Always unplug this household sewing machine. Use this sewing machine only for its intended use as described in this sewing machine is used as contained in the instruction manual. To ...
...the electric outlet immediately after using and before cleaning, removing covers, lubricating or when making any other user servicing adjustments mentioned in this sewing machine if it has a damaged cord or plug, if it is necessary when this manual. Never operate this manual. - DANGER - To... toy. Make sure to hand them over if the machine is given to comply with IEC/EN 60335-2-28 and UL1594. Always unplug this household sewing machine. Use this sewing machine only for its intended use as described in this sewing machine is used as contained in the instruction manual. To ...

Instruction Manual
Page 4
... Keep fingers away from all controls to the off ("O") when making any opening. - if it to break. - Return the sewing machine to break. - Never operate the sewing machine with the foot control is damaged, it must be replaced by pulling on the foot control. - Special care is wet. -... Switch the sewing machine off ("O") position, then remove plug from the accumulation of the sewing machine and foot control free from outlet. - Do not unplug by the manufacturer or its service agent or...
... Keep fingers away from all controls to the off ("O") when making any opening. - if it to break. - Return the sewing machine to break. - Never operate the sewing machine with the foot control is damaged, it must be replaced by pulling on the foot control. - Special care is wet. -... Switch the sewing machine off ("O") position, then remove plug from the accumulation of the sewing machine and foot control free from outlet. - Do not unplug by the manufacturer or its service agent or...

Instruction Manual
Page 5
... only be used by Wakaho Electric Ind. For outside Europe : This sewing machine is less than 75dB(A). The noise level under normal operating conditions is not intended for use by persons (including children) with foot control ...III See instructions for their safety. Use only identical replacement parts. Children shall not play with foot control of the sewing machine by children without supervision. The machine must only be used with the sewing machine. Co., Ltd. Children should be made by a person responsible for Servicing of the appliance in a safe way and...
... only be used by Wakaho Electric Ind. For outside Europe : This sewing machine is less than 75dB(A). The noise level under normal operating conditions is not intended for use by persons (including children) with foot control ...III See instructions for their safety. Use only identical replacement parts. Children shall not play with foot control of the sewing machine by children without supervision. The machine must only be used with the sewing machine. Co., Ltd. Children should be made by a person responsible for Servicing of the appliance in a safe way and...
Instruction Manual
Page 16
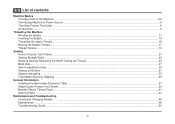
... Source ...6 Two Step Presser Foot Lifter...8 Accessories ...9 Threading the Machine Winding the Bobbin ...11 Inserting the Bobbin ...13 Threading the Upper Thread ...15 Raising the Bobbin Thread...17 Thread Tension ...19 Sewing How to Choose Your Pattern...21 Sewing Straight Stitch ...23 Reverse Sewing/ Removing the Work/ Cutting the Thread 25 Blind Hem...27...
... Source ...6 Two Step Presser Foot Lifter...8 Accessories ...9 Threading the Machine Winding the Bobbin ...11 Inserting the Bobbin ...13 Threading the Upper Thread ...15 Raising the Bobbin Thread...17 Thread Tension ...19 Sewing How to Choose Your Pattern...21 Sewing Straight Stitch ...23 Reverse Sewing/ Removing the Work/ Cutting the Thread 25 Blind Hem...27...
Instruction Manual
Page 19
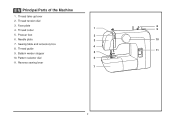
Thread take-up lever 2. Face plate 8 1 4. Sewing table and accessory box 4 8. Thread guide 11 9. Pattern selector dial 6 11. Presser foot 2 6. Bobbin winder stopper 5 10. Reverse sewing lever 7 2 Thread cutter 9 5. Thread tension dial 3. Needle plate 3 10 7. EN Principal Parts of the Machine 1.
Thread take-up lever 2. Face plate 8 1 4. Sewing table and accessory box 4 8. Thread guide 11 9. Pattern selector dial 6 11. Presser foot 2 6. Bobbin winder stopper 5 10. Reverse sewing lever 7 2 Thread cutter 9 5. Thread tension dial 3. Needle plate 3 10 7. EN Principal Parts of the Machine 1.

Instruction Manual
Page 23
...reduce the risk of electric shock, this plug is 1 intended to fit in doubt of how to connect machine to install the proper outlet. Unplug power cord when machine is not in any way. Polarized attachment plug b. Conductor intended to be used with the appropriate polarized outlet... to power source. a. If it does not fit fully in use . EN Connecting Machine to Power Source Connect the machine to a power source as illustrated. (1) This appliance is equipped with a polarized plug which must be grounded b 2 6 A 3 Sewing light Press main switch (A) to " l " for power and light.
...reduce the risk of electric shock, this plug is 1 intended to fit in doubt of how to connect machine to install the proper outlet. Unplug power cord when machine is not in any way. Polarized attachment plug b. Conductor intended to be used with the appropriate polarized outlet... to power source. a. If it does not fit fully in use . EN Connecting Machine to Power Source Connect the machine to a power source as illustrated. (1) This appliance is equipped with a polarized plug which must be grounded b 2 6 A 3 Sewing light Press main switch (A) to " l " for power and light.

Instruction Manual
Page 26
... not supplied with this machine; Hemmer foot m. Blind hem foot n. Soft cover 2 j k l m 006916008 006803008 006800008 006812008 n o p q 006804008 r 006016008 006914008 9 EN Accessories Standard accessories (1) a. Darning plate e. Bobbin (3x) 1 a b c d 006806008 006905008 006909008 e f g h i Optional accessories (2) (These 9 accessories are however available as special accessories from your local dealer.) j. Overcasting foot l. L-screwdriver f. Button sewing foot q. Edge/ quilting...
... not supplied with this machine; Hemmer foot m. Blind hem foot n. Soft cover 2 j k l m 006916008 006803008 006800008 006812008 n o p q 006804008 r 006016008 006914008 9 EN Accessories Standard accessories (1) a. Darning plate e. Bobbin (3x) 1 a b c d 006806008 006905008 006909008 e f g h i Optional accessories (2) (These 9 accessories are however available as special accessories from your local dealer.) j. Overcasting foot l. L-screwdriver f. Button sewing foot q. Edge/ quilting...

Instruction Manual
Page 28
... possible to the left (9) and remove. 1 Please Note: When the bobbin winder spindle is full, it rotates slowly. Step on spindle. (4) - Hold thread end. (6) - To start sewing, push the bobbin winder spindle to the spool. EN Winding the Bobbin - Pass the thread through the thread guide. (2) - Push bobbin spindle to left...
... possible to the left (9) and remove. 1 Please Note: When the bobbin winder spindle is full, it rotates slowly. Step on spindle. (4) - Hold thread end. (6) - To start sewing, push the bobbin winder spindle to the spool. EN Winding the Bobbin - Pass the thread through the thread guide. (2) - Push bobbin spindle to left...
Instruction Manual
Page 40
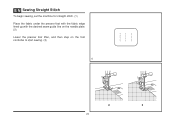
EN Sewing Straight Stitch To begin sewing, set the machine for straight stitch. (1) Place the fabric under the presser foot with the fabric edge lined up with the desired seam guide line on the needle plate. (2) Lower the presser foot lifter, and then step on the foot controller to start sewing. (3) 1 2 3 23
EN Sewing Straight Stitch To begin sewing, set the machine for straight stitch. (1) Place the fabric under the presser foot with the fabric edge lined up with the desired seam guide line on the needle plate. (2) Lower the presser foot lifter, and then step on the foot controller to start sewing. (3) 1 2 3 23
Instruction Manual
Page 42
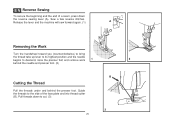
Pull threads down the reverse sewing lever (A). Release the lever and the machine will sew forward again. (1) A Removing the Work Turn the handwheel toward you (counterclockwise) to bring the thread take up lever to its highest position and the needle begins to cut. (3) 25 B 3 Sew a few reverse stitches. EN Reverse Sewing To secure the beginning and...
Pull threads down the reverse sewing lever (A). Release the lever and the machine will sew forward again. (1) A Removing the Work Turn the handwheel toward you (counterclockwise) to bring the thread take up lever to its highest position and the needle begins to cut. (3) 25 B 3 Sew a few reverse stitches. EN Reverse Sewing To secure the beginning and...
Instruction Manual
Page 50
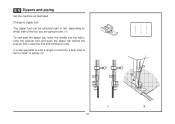
The zipper foot can be attached right or left, depending on which side of cord into the fabric, raise the presser foot and push the zipper tab behind the presser foot. Change to sew. Lower the foot and continue to zipper foot. It is also possible to sew a length of the foot you are going to sew. (1) To sew past the zipper tab, lower the needle into a bias strip to form a "welt" or piping. (2) 1 2 33 EN Zippers and piping Set the machine as illustrated.
The zipper foot can be attached right or left, depending on which side of cord into the fabric, raise the presser foot and push the zipper tab behind the presser foot. Change to sew. Lower the foot and continue to zipper foot. It is also possible to sew a length of the foot you are going to sew. (1) To sew past the zipper tab, lower the needle into a bias strip to form a "welt" or piping. (2) 1 2 33 EN Zippers and piping Set the machine as illustrated.
Instruction Manual
Page 52
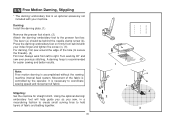
...operator. Note: Free motion darning is necessary to coordinate sewing speed and movement of the hole (to right. Turn work from behind the needle clamp screw (b). It is accomplished without the sewing machine internal feed system. The lever (a) should be behind... with your index finger and tighten the screw (c). (3) For darning, first sew around the edge of fabric. Movement of fabric and batting together. 35 1 ...
...operator. Note: Free motion darning is necessary to coordinate sewing speed and movement of the hole (to right. Turn work from behind the needle clamp screw (b). It is accomplished without the sewing machine internal feed system. The lever (a) should be behind... with your index finger and tighten the screw (c). (3) For darning, first sew around the edge of fabric. Movement of fabric and batting together. 35 1 ...

Instruction Manual
Page 65
... (3) outwards. Turn the handwheel until the needle is in the left position. Open the hinged front cover and unscrew the needle plate screws with sewing machine oil. Lubricate at one of our service centers. 48 2 6 5 4 3 Replace the hook race cover and snap back the two hook ... and lubricating the hook: 1 Remove the bobbin case. Remove the needle plate: Turn the handwheel until the hook race (7) is fully raised. Your machine should be removed regularly. Replace the hook (5). Remove the hook race cover (4) and the hook (5) and clean with a soft cloth. EN Maintenance ...
... (3) outwards. Turn the handwheel until the needle is in the left position. Open the hinged front cover and unscrew the needle plate screws with sewing machine oil. Lubricate at one of our service centers. 48 2 6 5 4 3 Replace the hook race cover and snap back the two hook ... and lubricating the hook: 1 Remove the bobbin case. Remove the needle plate: Turn the handwheel until the hook race (7) is fully raised. Your machine should be removed regularly. Replace the hook (5). Remove the hook race cover (4) and the hook (5) and clean with a soft cloth. EN Maintenance ...

Instruction Manual
Page 67
.... 1. Remove bobbin case, thread and insert correctly. 3. Replace the needle. Remove the upper thread and bobbin case, turn the handwheel backwards and forwards by the machine. 1. The bobbin case is damaged. The needle is too thick for the needle. 4. The wrong size needle has been used. 4. Poor quality thread. 2. ... fabric and thread. 4. Readjust the stitch length. 3. Loosen the thread tension. 4. Use a backing for the fabric. 4. Do not pull on the fabric while sewing, let it be taken up by hand and remove the thread. 50 Clean the hook and feed dog as described. 2.
.... 1. Remove bobbin case, thread and insert correctly. 3. Replace the needle. Remove the upper thread and bobbin case, turn the handwheel backwards and forwards by the machine. 1. The bobbin case is damaged. The needle is too thick for the needle. 4. The wrong size needle has been used. 4. Poor quality thread. 2. ... fabric and thread. 4. Readjust the stitch length. 3. Loosen the thread tension. 4. Use a backing for the fabric. 4. Do not pull on the fabric while sewing, let it be taken up by hand and remove the thread. 50 Clean the hook and feed dog as described. 2.


