Instruction Manual
Page 2
... using . Never operate this sewing machine only for examination, repair, electrical or mechanical adjustment. 4. Never drop or insert any object into water. It may deflect the needle causing it in this machine from outlet. 9. Do not operate where aerosol (spray) products are being administered. 8. To reduce the risk of lint, dust, and loose cloth. 5. Keep ventilation openings of the sewing machine and foot controller free from all instructions before cleaning...
... using . Never operate this sewing machine only for examination, repair, electrical or mechanical adjustment. 4. Never drop or insert any object into water. It may deflect the needle causing it in this machine from outlet. 9. Do not operate where aerosol (spray) products are being administered. 8. To reduce the risk of lint, dust, and loose cloth. 5. Keep ventilation openings of the sewing machine and foot controller free from all instructions before cleaning...
Instruction Manual
Page 3
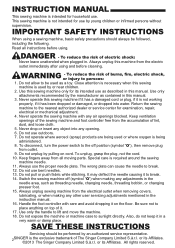
... CHART 24 A. SETTING SPOOL OF THREAD ON SPOOL PIN 32 C. CONTENTS IMPORTANT SAFETY STARTING TO SEW 36 BOUND BUTTONHOLE ......... 72 INSTRUCTIONS 2 A. CHANGING THE PRESSER FOOT ..... 14 B. SETTING STITCH WIDTH AND LENGTH 46 WHERE TO USE EACH STITCH 48 A. Straight Stitch B. START/STOP BUTTON 20 B. After darning or free-hand embroidery . 84 TWIN NEEDLE SEWING ........ 86 DECORATIVE & LETTER C. JOINING THE PIECES OF FABRIC .... 54 A. DROP FEED LEVER 22 STITCH (NO. 8 54 C. THREAD CUTTER 22 ZIGZAG STITCH SEWING ..... 56 D. PRESSURE REGULATOR 22 J. TOP COVER 22...
... CHART 24 A. SETTING SPOOL OF THREAD ON SPOOL PIN 32 C. CONTENTS IMPORTANT SAFETY STARTING TO SEW 36 BOUND BUTTONHOLE ......... 72 INSTRUCTIONS 2 A. CHANGING THE PRESSER FOOT ..... 14 B. SETTING STITCH WIDTH AND LENGTH 46 WHERE TO USE EACH STITCH 48 A. Straight Stitch B. START/STOP BUTTON 20 B. After darning or free-hand embroidery . 84 TWIN NEEDLE SEWING ........ 86 DECORATIVE & LETTER C. JOINING THE PIECES OF FABRIC .... 54 A. DROP FEED LEVER 22 STITCH (NO. 8 54 C. THREAD CUTTER 22 ZIGZAG STITCH SEWING ..... 56 D. PRESSURE REGULATOR 22 J. TOP COVER 22...
Instruction Manual
Page 10
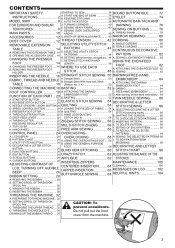
... Jack 51.Foot Controller 52.Power Line Cord 50 51 52 10 MAIN PARTS 1 5 1.Face Plate 2 2.Thread Take-Up Lever (Inside) 3.Pressure Regulator 3 4.Removable Extension Table (Accessories) 5.Handle 4 6.Hand Wheel 6 7.Presser Foot Lifter 8.Stitch Balance Adjusting Screw (underneath 7 machine) 9.Thread Cutter 8 10.Buttonhole Lever 11.Needle Threader 12.Needle Threader Lever 9 18 19 13.Presser Foot Release Lever 10 14.Presser Foot Thumb Screw 11 20 15.Presser Foot Holder 16.Presser Foot 17.Feed Dogs 12 13 21 22 18.Needle Clamp Screw 14 19.Needle Thread Guide 15...
... Jack 51.Foot Controller 52.Power Line Cord 50 51 52 10 MAIN PARTS 1 5 1.Face Plate 2 2.Thread Take-Up Lever (Inside) 3.Pressure Regulator 3 4.Removable Extension Table (Accessories) 5.Handle 4 6.Hand Wheel 6 7.Presser Foot Lifter 8.Stitch Balance Adjusting Screw (underneath 7 machine) 9.Thread Cutter 8 10.Buttonhole Lever 11.Needle Threader 12.Needle Threader Lever 9 18 19 13.Presser Foot Release Lever 10 14.Presser Foot Thumb Screw 11 20 15.Presser Foot Holder 16.Presser Foot 17.Feed Dogs 12 13 21 22 18.Needle Clamp Screw 14 19.Needle Thread Guide 15...
Instruction Manual
Page 12
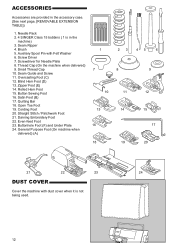
... Cap (On the machine when delivered) 9. Seam Guide and Screw 11. Darning Embroidery Foot 22. Needle Pack 2. 4 SINGER Class 15 bobbins ( 1 is not being used. 12 Zipper Foot (E) 14. Auxiliary Spool Pin with dust cover when it is in the accessory case. (See next page, [REMOVABLE EXTENSION TABLE]) 1. Small Thread Cap 10. Cording Foot 20. Overcasting Foot (C) 12. Blind Hem Foot (D) 13. Satin Foot (B) 17. Buttonhole Foot (F) and Under Plate 24. Straight Stitch / Patchwork Foot 21. Screw Driver 7. Button Sewing Foot 16. ACCESSORIES Accessories are provided in...
... Cap (On the machine when delivered) 9. Seam Guide and Screw 11. Darning Embroidery Foot 22. Needle Pack 2. 4 SINGER Class 15 bobbins ( 1 is not being used. 12 Zipper Foot (E) 14. Auxiliary Spool Pin with dust cover when it is in the accessory case. (See next page, [REMOVABLE EXTENSION TABLE]) 1. Small Thread Cap 10. Cording Foot 20. Overcasting Foot (C) 12. Blind Hem Foot (D) 13. Satin Foot (B) 17. Buttonhole Foot (F) and Under Plate 24. Straight Stitch / Patchwork Foot 21. Screw Driver 7. Button Sewing Foot 16. ACCESSORIES Accessories are provided in...
Instruction Manual
Page 20
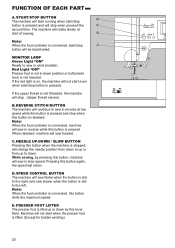
... speed will stop button is on, the machine will be deactivated. Note: When the foot controller is connected, start/stop button will not start even when start of sewing. FUNCTION OF EACH PART A. NEEDLE UP-DOWN / SLOW BUTTON Pressing this button when the machine is stopped, will sew in down position or buttonhole lever is lifed up to the left. REVERSE STITCH BUTTON The machine will sew forward. When released, machine will continue to sew or wind a bobbin...
... speed will stop button is on, the machine will be deactivated. Note: When the foot controller is connected, start/stop button will not start even when start of sewing. FUNCTION OF EACH PART A. NEEDLE UP-DOWN / SLOW BUTTON Pressing this button when the machine is stopped, will sew in down position or buttonhole lever is lifed up to the left. REVERSE STITCH BUTTON The machine will sew forward. When released, machine will continue to sew or wind a bobbin...
Instruction Manual
Page 22
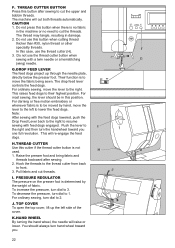
... open the top cover, lift up through the needle plate, directly below the presser foot. To increase the pressure, turn hand wheel toward you . 22 F. CAUTION 1. The thread may tangle, resulting in this button when cutting thread thicker than #30, nylon thread or other speciality threads. In this cutter if the thread cutter button is to be in damage. 2. The drop feed lever controls the feed dogs. For darning or free motion embroidery or whenever fabric is not used...
... open the top cover, lift up through the needle plate, directly below the presser foot. To increase the pressure, turn hand wheel toward you . 22 F. CAUTION 1. The thread may tangle, resulting in this button when cutting thread thicker than #30, nylon thread or other speciality threads. In this cutter if the thread cutter button is to be in damage. 2. The drop feed lever controls the feed dogs. For darning or free motion embroidery or whenever fabric is not used...
Instruction Manual
Page 32
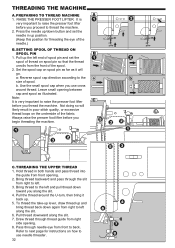
... threading the machine. SETTING SPOOL OF THREAD ON SPOOL PIN 1. To thread the take-up lever, draw thread up position. (Keep this position for instructions on the underside of spool. Leave small opening . 8. Pass through thread guide from right to use cross wound thread. PREPARING TO THREAD MACHINE 1. b. Not doing so will go. a: Reverse spool cap direction according to left . 3. Press the needle up/down again from the front of the needle.) B. RAISE THE PRESSER FOOT LIFTER. Set the spool...
... threading the machine. SETTING SPOOL OF THREAD ON SPOOL PIN 1. To thread the take-up lever, draw thread up position. (Keep this position for instructions on the underside of spool. Leave small opening . 8. Pass through thread guide from right to use cross wound thread. PREPARING TO THREAD MACHINE 1. b. Not doing so will go. a: Reverse spool cap direction according to left . 3. Press the needle up/down again from the front of the needle.) B. RAISE THE PRESSER FOOT LIFTER. Set the spool...
Instruction Manual
Page 34
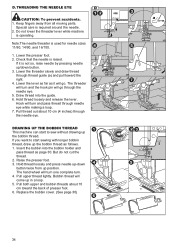
... THE BOBBIN THREAD This machine can start to start sewing with longer bobbin thread, draw up -down button. 3. Insert the bobbin into the guide. 6. Pull both upper and bobbin threads about 10 cm (4 inches) through the needle eye. 5. Check that the needle is required around the needle. 2. Hold thread loosely and release the lever. The threader will turn and the hook pin will go . If you want to sew without drawing up position. Raise the presser foot. 3. Replace the bobbin cover...
... THE BOBBIN THREAD This machine can start to start sewing with longer bobbin thread, draw up -down button. 3. Insert the bobbin into the guide. 6. Pull both upper and bobbin threads about 10 cm (4 inches) through the needle eye. 5. Check that the needle is required around the needle. 2. Hold thread loosely and release the lever. The threader will turn and the hook pin will go . If you want to sew without drawing up position. Raise the presser foot. 3. Replace the bobbin cover...
Instruction Manual
Page 36
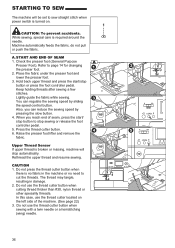
STARTING TO SEW The machine will be set to sew straight stitch when power switch is broken or missing, machine will stop automatically. Keep holding threads after sewing a few stitches. Do not use the thread cutter button when sewing with a twin needle or a hemstitching (wing) needle. 36 Do not use the thread cutter button when cutting thread thicker than #30, nylon thread or other speciality threads. START AND END OF SEAM 1. Raise the presser foot lifter and remove the fabric. Rethread the upper thread and resume sewing. Machine automatically feeds the...
STARTING TO SEW The machine will be set to sew straight stitch when power switch is broken or missing, machine will stop automatically. Keep holding threads after sewing a few stitches. Do not use the thread cutter button when sewing with a twin needle or a hemstitching (wing) needle. 36 Do not use the thread cutter button when cutting thread thicker than #30, nylon thread or other speciality threads. START AND END OF SEAM 1. Raise the presser foot lifter and remove the fabric. Rethread the upper thread and resume sewing. Machine automatically feeds the...
Instruction Manual
Page 38
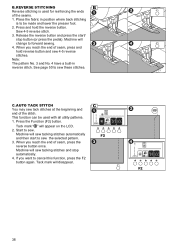
... ends of seam, press the reverse button once. Note: The pattern No. 3 and No. 4 have a built-in position where back stitching is used with all utility patterns. 1. F2 38 B. Start to sew these stitches. Place the fabric in reverse stitch. Machine will disappear. Sew 4-5 reverse stitch. 3. Machine will sew tacking stitches automatically F2 and then start / stop automatically. 4. If you reach the end of the seams. 1. This function can be made and lower the presser foot. 2. When you...
... ends of seam, press the reverse button once. Note: The pattern No. 3 and No. 4 have a built-in position where back stitching is used with all utility patterns. 1. F2 38 B. Start to sew these stitches. Place the fabric in reverse stitch. Machine will disappear. Sew 4-5 reverse stitch. 3. Machine will sew tacking stitches automatically F2 and then start / stop automatically. 4. If you reach the end of the seams. 1. This function can be made and lower the presser foot. 2. When you...
Instruction Manual
Page 46
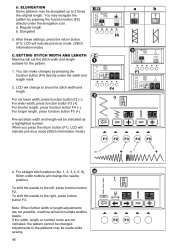
... possible, machine will set stitch width and length will be elongated up to 2 times B-ii the original length. You can make changes by pressing the function button (F5) directly under the width and length mark. 2. To shift the needle to the left, press function button F2. ELONGATION Some patterns may be changed. For wider width, press function button F3 (+). Note: When further width or length adjustments are not...
... possible, machine will set stitch width and length will be elongated up to 2 times B-ii the original length. You can make changes by pressing the function button (F5) directly under the width and length mark. 2. To shift the needle to the left, press function button F2. ELONGATION Some patterns may be changed. For wider width, press function button F3 (+). Note: When further width or length adjustments are not...

Instruction Manual
Page 50
... the end of seam, stop automatically. 4. Press the thread cutter button. Hold the upper thread loosely and start sewing. Left needle position No. 3. Straight Stitch 1. Place hand lightly on the fabric while sewing. 3. Straight Stitch With Auto-lock Stitch (Pattern No. 3, 4) 1. When you reach the end of seam, press the reverse button. STRAIGHT STITCH SEWING Straight stitch patterns should be selected to suit the type of fabric being sewn. Left needle with built-in reverse stitch General Purpose Foot (A) A. Machine will sew 4-5 stitches forward and sew 4-5 stitches backward and...
... the end of seam, stop automatically. 4. Press the thread cutter button. Hold the upper thread loosely and start sewing. Left needle position No. 3. Straight Stitch 1. Place hand lightly on the fabric while sewing. 3. Straight Stitch With Auto-lock Stitch (Pattern No. 3, 4) 1. When you reach the end of seam, press the reverse button. STRAIGHT STITCH SEWING Straight stitch patterns should be selected to suit the type of fabric being sewn. Left needle with built-in reverse stitch General Purpose Foot (A) A. Machine will sew 4-5 stitches forward and sew 4-5 stitches backward and...
Instruction Manual
Page 52
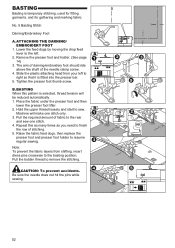
... fabric to the basting position. Machine will be reduced automatically. 1. Note: To prevent the fabric layers from your left . 2. Tighten the presser foot thumb screw. Be sure the needle does not hit the pins while sewing. 52 No. 5 Basting Stitch Darning/Embroidery Foot A. Repeat this pattern is fitted into the presser bar. 5. Raise the fabric feed dogs, then replace the presser foot and presser foot holder to right so that it is selected, thread tension will make one stitch. 4. Lower the feed dogs by moving the drop feed lever...
... fabric to the basting position. Machine will be reduced automatically. 1. Note: To prevent the fabric layers from your left . 2. Tighten the presser foot thumb screw. Be sure the needle does not hit the pins while sewing. 52 No. 5 Basting Stitch Darning/Embroidery Foot A. Repeat this pattern is fitted into the presser bar. 5. Raise the fabric feed dogs, then replace the presser foot and presser foot holder to right so that it is selected, thread tension will make one stitch. 4. Lower the feed dogs by moving the drop feed lever...

Instruction Manual
Page 54
... you use a needle for knit fabrics as well as durable fabrics such as you sew, bobbin thread will give the appearance of a traditional hand quilting stitch. 54 Bag b. Trousers d. The topper, batting, and backing fabric. A. JOINING THE PIECES OF FABRIC Join the pieces of fabric using Pattern No. 1 with the fabric without breaking. QUILTING Sew three layers of material. Insert quilting bar into the hole of presser foot holder and set the space as denims. No. 6 Straight Stretch Stitch...
... you use a needle for knit fabrics as well as durable fabrics such as you sew, bobbin thread will give the appearance of a traditional hand quilting stitch. 54 Bag b. Trousers d. The topper, batting, and backing fabric. A. JOINING THE PIECES OF FABRIC Join the pieces of fabric using Pattern No. 1 with the fabric without breaking. QUILTING Sew three layers of material. Insert quilting bar into the hole of presser foot holder and set the space as denims. No. 6 Straight Stretch Stitch...

Instruction Manual
Page 56
... knit fabrics. Overcast Stitching Used for Removing the Extension Table. 56 SATIN STITCHING To sew a satin stitch, shorten the stitch length and attach the Satin Foot. (B) Refer to next page for applique and decorative sewing. ZIGZAG STITCH SEWING Your machine can access the free arm, making it easier to stitch hard-to-reach areas like pant hems, sleeve cuffs and children's clothing. FREE ARM SEWING By simply removing the extension table, you can sew zigzag stitches of various widths and lengths by changing the settings of needle while sewing. Elastic Sewing Pull elastic in...
... knit fabrics. Overcast Stitching Used for Removing the Extension Table. 56 SATIN STITCHING To sew a satin stitch, shorten the stitch length and attach the Satin Foot. (B) Refer to next page for applique and decorative sewing. ZIGZAG STITCH SEWING Your machine can access the free arm, making it easier to stitch hard-to-reach areas like pant hems, sleeve cuffs and children's clothing. FREE ARM SEWING By simply removing the extension table, you can sew zigzag stitches of various widths and lengths by changing the settings of needle while sewing. Elastic Sewing Pull elastic in...
Instruction Manual
Page 74
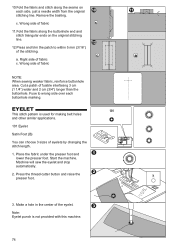
... seams on the original stitching line. 12.Press and trim the patch to wrong side over each side, just a needle width from the original stitching line. a. Start the machine. Press the thread cutter button and raise the presser foot. 3. Machine will sew the eyelet and stop automatically. 2. Wrong side of fusible interfacing 3 cm (1 1/4") wider and 2 cm (3/4") longer than the buttonhole. Place the fabric under the presser foot and lower...
... seams on the original stitching line. 12.Press and trim the patch to wrong side over each side, just a needle width from the original stitching line. a. Start the machine. Press the thread cutter button and raise the presser foot. 3. Machine will sew the eyelet and stop automatically. 2. Wrong side of fusible interfacing 3 cm (1 1/4") wider and 2 cm (3/4") longer than the buttonhole. Place the fabric under the presser foot and lower...
Instruction Manual
Page 84
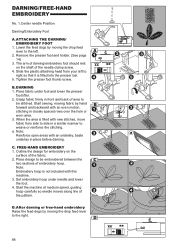
... . 2. Start the machine at medium speed, guiding hoop carefully so needle moves along line of the needle clamp screw. 4. After darning or free-hand embroidery Raise the feed degs by moving fabric by hand forward and backward with this machine. 3. DARNING/FREE-HAND EMBROIDERY No. 1.Center needle Position Darning/Embroidery Foot A. Remove the presser foot and holder. (See page 14) 3. Slide the plastic attaching head from side to side in place before darning. Place fabric under needle and lower the foot. 4. Start sewing, moving the drop feed lever...
... . 2. Start the machine at medium speed, guiding hoop carefully so needle moves along line of the needle clamp screw. 4. After darning or free-hand embroidery Raise the feed degs by moving fabric by hand forward and backward with this machine. 3. DARNING/FREE-HAND EMBROIDERY No. 1.Center needle Position Darning/Embroidery Foot A. Remove the presser foot and holder. (See page 14) 3. Slide the plastic attaching head from side to side in place before darning. Place fabric under needle and lower the foot. 4. Start sewing, moving the drop feed lever...
Instruction Manual
Page 92
... of selected patterns. 1. i-1. Reverse stitch (reverse front and back) i-4. If symbol is not indicated, its pattern cannot change to back. By pressing EDIT button, machine will change (mirror/reverse stitch). You can make change settings by pressing the function button (F3) directly under mirror/reverse icon, and the stitch will return to selecting mode. LCD will return to selecting mode. After you sew with twin needle. Elongation iii. Mirror and Reverse stitch, pattern will...
... of selected patterns. 1. i-1. Reverse stitch (reverse front and back) i-4. If symbol is not indicated, its pattern cannot change to back. By pressing EDIT button, machine will change (mirror/reverse stitch). You can make change settings by pressing the function button (F3) directly under mirror/reverse icon, and the stitch will return to selecting mode. LCD will return to selecting mode. After you sew with twin needle. Elongation iii. Mirror and Reverse stitch, pattern will...
Instruction Manual
Page 94
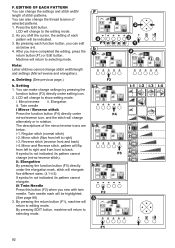
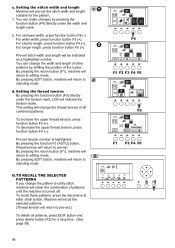
... button, machine will return to editing mode. For longer length, press function button F5 (+). d. For shorter length, press function button F4 (-). Setting the stitch width and length Machine will change the width and length of all patterns, press EDIT button and press delete button (F2) for the pattern. 1. This setting will pre-set tension number is turned off. You can change the thread tension of other patterns by pressing the function button (F4) directly under the tension...
... button, machine will return to editing mode. For longer length, press function button F5 (+). d. For shorter length, press function button F4 (-). Setting the stitch width and length Machine will change the width and length of all patterns, press EDIT button and press delete button (F2) for the pattern. 1. This setting will pre-set tension number is turned off. You can change the thread tension of other patterns by pressing the function button (F4) directly under the tension...

Instruction Manual
Page 104
... lever. 68 * Buttonhole foot is hitting the presser foot. Thread tension too tight. loops Tension not adjusted properly. Needle inserted incorrectly. Raise the feed dogs 22 not feed properly Stitch length not suitable for the pattern. Clean the feed dog area. 100 Needle breaks Fabric pulled while sewing. Do not pull fabric. 36 Select correct foot and pattern. 50- bobbin holder and clean the hook race and feed dog. Push spindle to the right. Attach correct foot. 50- Bent needle. Raise the needle. 20 Re-insert needle. 16 Insert new needle. 16 Machine...
... lever. 68 * Buttonhole foot is hitting the presser foot. Thread tension too tight. loops Tension not adjusted properly. Needle inserted incorrectly. Raise the feed dogs 22 not feed properly Stitch length not suitable for the pattern. Clean the feed dog area. 100 Needle breaks Fabric pulled while sewing. Do not pull fabric. 36 Select correct foot and pattern. 50- bobbin holder and clean the hook race and feed dog. Push spindle to the right. Attach correct foot. 50- Bent needle. Raise the needle. 20 Re-insert needle. 16 Insert new needle. 16 Machine...


