Instruction Manual
Page 2
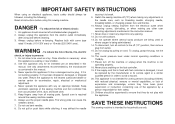
... outdoors. 13. Do not use bent needles. 8. Do not unplug by or near children. 2. DANGER - WARNING - Always unplug sewing machine from outlet. 15. If the supply cord that they have been given supervision or instruction concerning use as threading needle, changing needle, ... operating properly. 18. Please turn all moving parts. An appliance should be used as contained in . 2. Always unplug before cleaning. 3. Return the appliance to the off ("O") when making any air openings blocked. Switch the sewing machine off ("O") position, then remove plug from the...
... outdoors. 13. Do not use bent needles. 8. Do not unplug by or near children. 2. DANGER - WARNING - Always unplug sewing machine from outlet. 15. If the supply cord that they have been given supervision or instruction concerning use as threading needle, changing needle, ... operating properly. 18. Please turn all moving parts. An appliance should be used as contained in . 2. Always unplug before cleaning. 3. Return the appliance to the off ("O") when making any air openings blocked. Switch the sewing machine off ("O") position, then remove plug from the...
Instruction Manual
Page 4
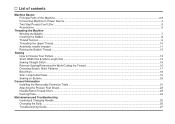
List of contents Machine Basics Principle Parts of the Machine...2/3 Connecting Machine to Power Source ...4 Two Step Presser Foot Lifter...5 Accessories ...6 Threading the Machine Winding the Bobbin ...7 Inserting the Bobbin ...8 Thread Tension ...9 Threading the Upper Thread ...10 Automatic needle threader ...11 Raising the Bobbin Thread...12 Sewing How to Choose Your Pattern...13 Stitch Width Dial & Stitch...
List of contents Machine Basics Principle Parts of the Machine...2/3 Connecting Machine to Power Source ...4 Two Step Presser Foot Lifter...5 Accessories ...6 Threading the Machine Winding the Bobbin ...7 Inserting the Bobbin ...8 Thread Tension ...9 Threading the Upper Thread ...10 Automatic needle threader ...11 Raising the Bobbin Thread...12 Sewing How to Choose Your Pattern...13 Stitch Width Dial & Stitch...
Instruction Manual
Page 5
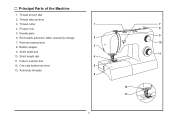
Thread cutter 4. Removable extension table/ accessory storage 7. Thread tension dial 2. Thread take-up lever 3. Stitch width dial 10. Pattern selector dial 12. Automatic threader 1 7 8 2 9 10 3 PUSH 4 11 5 6 12 PUSH 13 2 Bobbin stopper 9. One step buttonhole lever 13. Needle plate 6. Presser foot 5. Reverse sewing lever 8. Principal Parts of the Machine 1. Stitch length dial 11.
Thread cutter 4. Removable extension table/ accessory storage 7. Thread tension dial 2. Thread take-up lever 3. Stitch width dial 10. Pattern selector dial 12. Automatic threader 1 7 8 2 9 10 3 PUSH 4 11 5 6 12 PUSH 13 2 Bobbin stopper 9. One step buttonhole lever 13. Needle plate 6. Presser foot 5. Reverse sewing lever 8. Principal Parts of the Machine 1. Stitch length dial 11.
Instruction Manual
Page 21
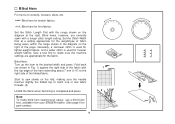
... weight fabrics. Blind Hem: Turn up the hem to the desired width and press. Sew a test first to make blind hem sewing even easier, use a blind hem foot, available from your SINGER retailer. (See page 6 for part number) 18 Fold back (as shown in the diagram on the fold, making sure... used for lighter weight fabrics, and a wider stitch is completed and press. 2 Note: To make sure the machine settings are normally sewn with a longer stitch length setting. Start to sew slowly on the right of the folded fabric. Set the Stitch Width Dial at the right. Generally, a narrower ...
... weight fabrics. Blind Hem: Turn up the hem to the desired width and press. Sew a test first to make blind hem sewing even easier, use a blind hem foot, available from your SINGER retailer. (See page 6 for part number) 18 Fold back (as shown in the diagram on the fold, making sure... used for lighter weight fabrics, and a wider stitch is completed and press. 2 Note: To make sure the machine settings are normally sewn with a longer stitch length setting. Start to sew slowly on the right of the folded fabric. Set the Stitch Width Dial at the right. Generally, a narrower ...


