Singer 2273 Esteem II Support Question
Singer 2273 Esteem II Support Question
Find answers below for this question about Singer 2273 Esteem II.Need a Singer 2273 Esteem II manual? We have 2 online manuals for this item!
Question posted by salmonlg on December 8th, 2013
2 Needle Sewing
How do I sew with two needles on the 2273 Esteem ii
Current Answers
Related Singer 2273 Esteem II Manual Pages
Instruction Manual 2 - Page 1
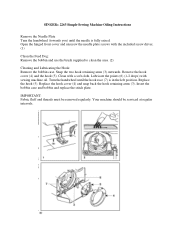
... be serviced at regular intervals. Insert the bobbin case and bobbin and replace the stitch plate.
Open the hinged front cover and unscrew the needle plate screws with sewing machine oil. Snap the two hook retaining arms (3) outwards. Lubricate the points (6) (1-2 drops) with the included screw driver. (1)
Clean the Feed Dog: Remove the...
Instruction Manual - Page 2
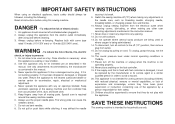
... burns, fire, electric
shock, or injury to the nearest authorized dealer or service center for household use only. Switch the sewing machine off the machine or unplug when the machine is required around the sewing machine needle. 6. The sound pressure level under normal operating conditions is 75dB(A). 17. Never drop or insert any other user servicing adjustments...
Instruction Manual - Page 3

... the many features and the ease of this instruction book, step by step, seated
at your machine, you will know you are sewing on one
of a new Singer sewing machine, you are always provided with the most modern sewing capabilities, the manufacturer reserves the right to begin an exciting adventure in creativity. To ensure that...
Instruction Manual - Page 4
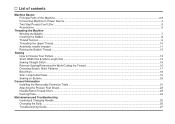
... Presser Foot Lifter...5 Accessories ...6
Threading the Machine Winding the Bobbin ...7 Inserting the Bobbin ...8 Thread Tension ...9 Threading the Upper Thread ...10 Automatic needle threader ...11 Raising the Bobbin Thread...12
Sewing How to Choose Your Pattern...13 Stitch Width Dial & Stitch Length Dial ...14 Sewing Straight Stitch ...15 Reverse Sewing/Removing the Work/Cutting the Thread...
Instruction Manual - Page 5
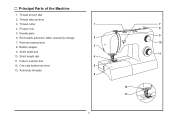
... 3. Stitch length dial 11. Pattern selector dial 12. Principal Parts of the Machine
1. Automatic threader
1
7
8
2
9
10 3
PUSH
4
11
5
6
12
PUSH
13
2 Stitch width dial 10. One step buttonhole lever 13. Presser foot 5. Bobbin stopper 9. Thread cutter 4. Needle plate 6. Thread tension dial 2. Reverse sewing lever 8. Removable extension table/ accessory storage 7.
Instruction Manual - Page 7
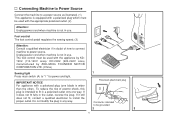
... intended to install the proper outlet. To reduce the risk of how to connect machine to power source. The foot control must be used with the appliance by KD1902 ...ZHEJIANG FOUNDER MOTOR CORPORATION LTD. (China)
Sewing light Press main switch (A) to " l " for power and light.
Foot control The foot control pedal regulates the sewing speed. (3)
Attention: Consult a qualified electrician...
Instruction Manual - Page 9
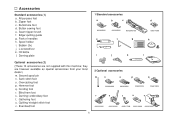
Buttonhole foot d. Button sewing foot e. Pack of needles h. Satin stitch foot o. Overcasting foot p. Hemmer foot q. Evenfeed foot
2 Optional accessories
m
n
o
p
q
006804008
006803008
006800008
006810008
r
s
t
u
v
006812008
006016008 006917008 006916008 006815008
6 Seam ripper/ brush f. Bobbin (3x) j. ...
Instruction Manual - Page 10
...).
7
7
3
5
6
8
9
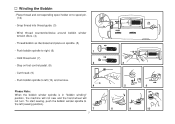
10 Push bobbin spindle to the left (10) and remove.
4
Please Note: When the bobbin winder spindle is in "bobbin winding" position, the machine will not sew and the hand wheel will not turn. Wind thread counterclockwise around bobbin winder tension discs. (4)
- Place thread and corresponding spool holder on spindle. (5)
- Thread bobbin...
Instruction Manual - Page 13
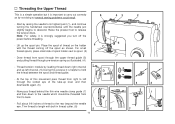
...thread between the spool and thread guide.
- Thread tension module by leading thread down to the needle which should be threaded from spool through the upper thread guide (3) and pulling thread through the ...to spool. (2)
- Start by not doing so several sewing problems could result.
- Now pass thread behind the thin wire needle clamp guide (7) and then down right channel and up left...
Instruction Manual - Page 16
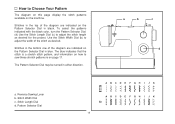
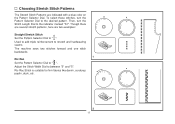
... turned in blue. Stitch Length Dial d.
The blue indicates that the stitch is a stretch stitch pattern, and information on how to sew these stretch patterns is on the machine. Reverse Sewing Lever b.
How to Choose Your Pattern
The diagram on this page display the stitch patterns available on page 17. Stitch Width Dial...
Instruction Manual - Page 17
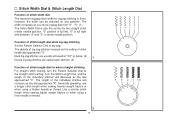
... increase as the dial approaches "4". "5". (1) The Stitch Width Dial is also the control for zigzag stitching is center needle position. Use a shorter stitch length when sewing lighter weight fabrics or when using a thicker needle or thread. The density of the individual stitches will increase as the setting of stitch length dial while zig...
Instruction Manual - Page 18
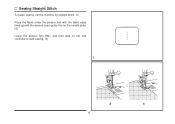
Sewing Straight Stitch
To begin sewing, set the machine for straight stitch. (1) Place the fabric under the presser foot with the fabric edge lined up with the desired seam guide line on the needle plate. (2) Lower the presser foot lifter, and then step on the foot controller to start sewing. (3)
1
2
3
15
Instruction Manual - Page 19
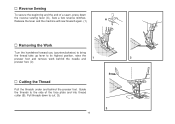
Guide the threads to its highest position, raise the
presser foot and remove work behind the needle and
1
2
presser foot. (2)
Cutting the Thread
Pull the threads under and behind the presser foot. Release the lever and the machine will sew forward again. (1)
A
Removing the Work
Turn the handwheel toward you (counterclockwise) to bring
the...
Instruction Manual - Page 20
Adjust the Stitch Width Dial to " ". Used to add triple reinforcement to stretch and hardwearing seams. The machine sews two stitches forward and one stitch backwards.
1 Ric Rac Set the Pattern Selector Dial to between "3" and "5". Ric Rac Stitch is suitable for firm fabrics ...
Instruction Manual - Page 21
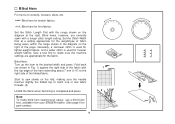
... stitch is completed and press.
2
Note: To make sure the machine settings are normally sewn with the range shown on curtains, trousers, skirts, etc.
Start to make blind hem sewing even easier, use a blind hem foot, available from your SINGER ...within the range shown in the diagram on the fold, making sure the needle touches slightly the folded top to the desired width and press.
Instruction Manual - Page 22
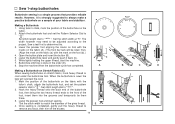
...foot.
However, it back (C). 6. Lower the presser foot and start the machine. 7. Set stitch length dial to " ".
2. Open the button plate ...
b
A
PUSH
B
C
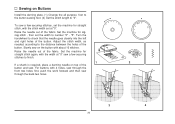
Making a Buttonhole on Stretch Fabrics (E)
When sewing buttonholes on the
fabric. 2.
E
4. Sew 1-step buttonholes
Buttonhole sewing is completed, gently pull the heavy thread to
remove any slack, then trim...
Instruction Manual - Page 23
... buttons with the width at "0". Raise the needle out of the fabric. Raise the needle out of the fabric. Sewing on top of the
button and sew.
Set the machine for zigzag stitch , then set at "0" sew a few securing stitches, set the machine for straight stitch again, with 4 holes, sew through the
front two holes first, push the...
Instruction Manual - Page 26
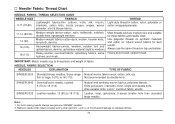
..., elastic.
quilted fabrics, denims, upholstery material (light to thread size and weight of fabric. Not recommended for these fabrics and needle sizes. Natural and synthetic woven fabrics, polyester blends. For best sewing results always use the same thread on natural woven fabrics for best
Heavyweight fabrics-canvas, woolens, outdoor tent and results...
Instruction Manual - Page 28
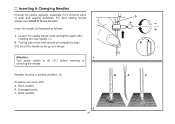
... be in perfect condition. (2)
Problems can occur with: A.
The flat side of wear and causing problems. For best sewing results always use SINGER® Brand Needles.
Attention:
1
Turn power switch to off ("O") before inserting or
removing the needle. Bent needles B. Blunt needles
2
25
D A
B C
B
A
C Loosen the needle clamp screw and tighten again after inserting the new...
Instruction Manual - Page 30
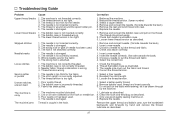
...Remove the reel and wind thread onto reel. 6. Remove and reinsert needle. (flat side towards the back) 5. Insert the needle correctly. (flat side towards the back) 3. Only use good quality sewing machine oil. 4. The needle is not inserted correctly. 2. Wrong needle size for the needle. 4. Lubricate as described. 2. The bobbin case is not inserted correctly...
Similar Questions

How To Thread Singer Fashionmate Sewing Machine Twin Needle?
How to thread the singer fashionmate sewing machine with twin needle without inertwining the threads...
How to thread the singer fashionmate sewing machine with twin needle without inertwining the threads...
(Posted by sindssly 9 years ago)


Singer Esteem 2273. The Needle Is Not Centered Over The Base Plate.
(Posted by marshase2 9 years ago)
Why Doesn't It Say Heirloom Sewing Only On Singer #2040 Machine Needles?
I mistakenly bought these needles because they listed 90/14 as the size. upon examining them the nee...
I mistakenly bought these needles because they listed 90/14 as the size. upon examining them the nee...
(Posted by rpcarp 11 years ago)