Singer 2273 Esteem II Support Question
Singer 2273 Esteem II Support Question
Find answers below for this question about Singer 2273 Esteem II.Need a Singer 2273 Esteem II manual? We have 2 online manuals for this item!
Question posted by marshase2 on June 30th, 2014
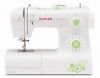
Singer Esteem 2273. The Needle Is Not Centered Over The Base Plate.
The person who posted this question about this Singer product did not include a detailed explanation. Please use the "Request More Information" button to the right if more details would help you to answer this question.
Current Answers
Answer #1: Posted by TechSupport101 on July 1st, 2014 1:03 AM
TechSupport101

Member since:
May 24th, 2013 Points: 12,171,325

Member since:
May 24th, 2013 Points: 12,171,325
Hi. The Instructions Manual here
http://www.helpowl.com/manuals/Singer/2273EsteemII/179398
should be able to assists with Needle adjustment.
Related Singer 2273 Esteem II Manual Pages
Instruction Manual 2 - Page 1
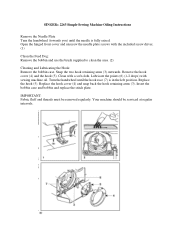
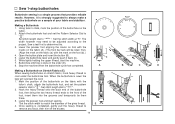
... intervals. Snap the two hook retaining arms (3) outwards. Replace the hook (5). SINGER® 2263 Simple Sewing Machine Oiling Instructions
Remove the Needle Plate Turn the handwheel (towards you) until the hook race (7) is fully raised. Open the hinged front cover and unscrew the needle plate screws with the included screw driver. (1)
Clean the Feed Dog: Remove the...
Instruction Manual - Page 2
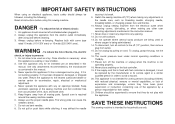
...Switch the sewing machine off ("O") when making any other user servicing adjustments mentioned in this
manual. Never drop or insert any opening. 12. Do not use the proper needle plate. Do not... cleaning. 3. Do not allow to persons: 1. The wrong plate can cause the needle to the nearest authorized dealer or service center for its service agent or a similar qualified person in this ...
Instruction Manual - Page 3

... Limited or its affiliates. © 2008 The Singer Company Limited or its affiliates.
SINGER is a registered trademark of a new Singer sewing machine, you are always provided with the most modern sewing capabilities, the manufacturer reserves the right to change the appearance, design or accessories of the easiest to use sewing machines ever made. From the moment you first...
Instruction Manual - Page 4
... Presser Foot Lifter...5 Accessories ...6
Threading the Machine Winding the Bobbin ...7 Inserting the Bobbin ...8 Thread Tension ...9 Threading the Upper Thread ...10 Automatic needle threader ...11 Raising the Bobbin Thread...12
Sewing How to Choose Your Pattern...13 Stitch Width Dial & Stitch Length Dial ...14 Sewing Straight Stitch ...15 Reverse Sewing/Removing the Work/Cutting the Thread...
Instruction Manual - Page 5
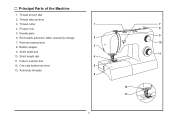
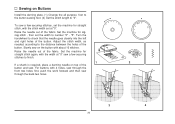
Thread tension dial 2. Removable extension table/ accessory storage 7. Stitch length dial 11. Needle plate 6. Reverse sewing lever 8. Thread take-up lever 3. Stitch width dial 10. Pattern selector dial 12. One step buttonhole lever 13. Principal Parts of the Machine
1. Bobbin stopper 9. Thread cutter 4. Presser foot 5. Automatic threader
1
7
8
2
9
10 3
PUSH
4
11
5
6...
Instruction Manual - Page 9
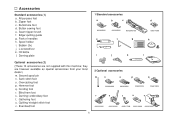
...holder i. Satin stitch foot o. they are not supplied with this machine; Cording foot r. Zipper foot c. Bobbin (3x) j. Overcasting foot p. Blind hem foot s. Button sewing foot e. Hemmer foot q. Second spool pin n. Darning plate
1 Standard accessories
a
b
c
006806008
006905008
006Q6A0150
e
f
g
d
006914008
h
i
j
k
l
Optional accessories (2)
(These 10...
Instruction Manual - Page 13
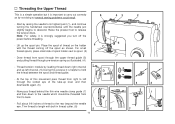
... take-up the spool pin. Thread tension module by leading thread down to the needle which should be threaded from right to left channel. (5) During this movement pass ...
4
6
7
8 Lift up lever and then
1
downwards again. (6)
- Start by not doing so several sewing problems could result.
- Note: For safety, it is helpful to hold the thread between the spool and thread ...
Instruction Manual - Page 15
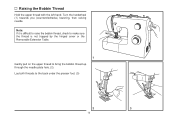
... not trapped by the hinged cover or the Removable Extension Table.
1 Gently pull on the upper thread to bring the bobbin thread up through the needle plate hole. (2) Lay both threads to the back under the presser foot. (3)
2
3
12 Turn the handwheel (1) towards you (counterclockwise) lowering, then raising...
Instruction Manual - Page 17
... speaking, use a longer stitch length when sewing heavier weight fabrics or when using a finer needle or thread.
2
14
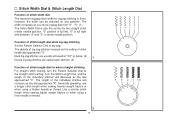
4 3 2 1 0.5 Use a shorter stitch length when sewing lighter weight fabrics or when using a thicker needle or thread. however, the width can be reduced on any patterns. "5". (1) The Stitch Width Dial is center needle position. Neat zig-zag stitches are...
Instruction Manual - Page 18
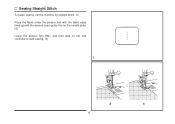
Sewing Straight Stitch
To begin sewing, set the machine for straight stitch. (1) Place the fabric under the presser foot with the fabric edge lined up with the desired seam guide line on the needle plate. (2) Lower the presser foot lifter, and then step on the foot controller to start sewing. (3)
1
2
3
15
Instruction Manual - Page 19
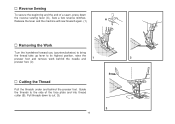
... of a seam, press down to its highest position, raise the
presser foot and remove work behind the needle and
1
2
presser foot. (2)
Cutting the Thread
Pull the threads under and behind the presser foot. Reverse Sewing
To secure the beginning and the end of the face plate and into thread cutter (B). Sew a few reverse stitches.
Instruction Manual - Page 21
... from your SINGER retailer. (See page 6 for part number)
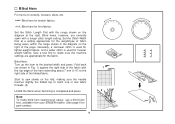
18 Set the Stitch Length Dial with the range shown on the right of the fabric with a longer stitch length setting. Start to sew slowly on curtains, trousers, skirts, etc. Blind Hem
For hems on the fold, making sure the needle touches slightly the...
Instruction Manual - Page 22
..., insert them into the grooves and temporarily tie them
there.
3. Stop the machine when the buttonhole cycle has completed. E
4. Open the button plate and insert the button (B). 5. When the buttonhole is sewn the
legs will be adjusted according to the
project, Sew a test first to " ". Buttonhole stitching is a simple process that provides reliable...
Instruction Manual - Page 23
... of the fabric. For buttons with about 10 stitches. Sewing on Buttons
Install the darning plate. (1) Change the all purpose foot to the button sewing foot. (2) Set the stitch length to number "3" - Raise the needle out of the button. "5". To sew a few securing stitches, set at "0" sew a few securing stitches to finish.
1
2
If a shank is required...
Instruction Manual - Page 26
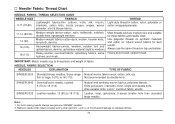
...NEEDLE, FABRIC, THREAD SELECTION GUIDE
NEEDLE... (110). SINGER 2045 Semi-ball point needle, scarfed. 9 (70) to...thread. IMPORTANT: Match needle size to 18 ...for these fabrics and needle sizes. leathers and vinyls.
SINGER 2032 Leather needles. 12 (80) ...SINGER® needles. 2.
NEEDLE, FABRIC SELECTION
NEEDLES
EXPLANATION
TYPE OF FABRIC
SINGER 2020 Standard sharp needles...
Instruction Manual - Page 27
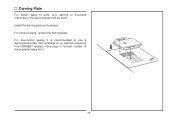
... recommended to use a darning/embroidery foot, available as illustrated. For normal sewing, remove the darning plate. darning or free-hand embroidery), the darning plate must be used. Install the darning plate as an optional accessory from SINGER® retailers. (See page 6 for part number of work, (e.g. Darning Plate
For certain types of darning/embroidery foot )
24
Instruction Manual - Page 28
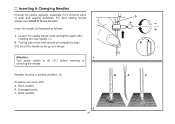
... should be in perfect condition. (2)
Problems can occur with: A. Loosen the needle clamp screw and tighten again after inserting the new needle. (1)
B. The flat side of wear and causing problems. For best sewing results always use SINGER® Brand Needles. Blunt needles
2
25
D A
B C
B
A
C C/D.Insert the needle as far up as follows:
A.
Attention:
1
Turn power switch to off...
Instruction Manual - Page 29
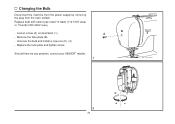
...SINGER® retailer. 1
B
PUSH
C
2
26 Unscrew the bulb and install a new one (C). (2)
- Replace bulb with same type rated 10 watts (110-120V area) or 15 watts (220-240V area).
- Changing the Bulb
Disconnect the machine... from the power supply by removing the plug from the main socket! Remove the face plate (B).
- Replace the face plate and tighten screw.
Instruction Manual - Page 30
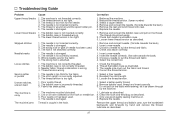
... reel and wind thread onto reel. 6. Choose a needle to suit the thread and fabric. 4. Choose a needle to suit the thread and fabric. 4. Thread the bobbin case as described. 2. Do not pull on the fabric while sewing, let it be lubricated. 2. Only use good quality sewing machine oil. 4. The machine is not correctly threaded. 2. The thread is...
Instruction Manual - Page 31
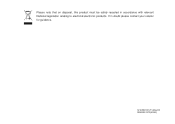
If in accordance with relevant National legislation relating to electrical/electronic products. Please note that on disposal, this product must be safely recycled in doubt please contact your retailer for guidance.
021K5B0101( ) May/08 SINGER 2273(K50B)
Similar Questions

Needle Hitting The Plate
Hi, please l have singer 3221 and it's giving me problems off late. The needle keeps hitting the pla...
Hi, please l have singer 3221 and it's giving me problems off late. The needle keeps hitting the pla...
(Posted by thessyobeng80 1 year ago)

I Get E7 Error Message On My Singer Model 7258 Sewing Machine. There Is No Refe
Error message E7 is up on my Singer Stylist model 7258 sewing machine. It is not working at all. I t...
Error message E7 is up on my Singer Stylist model 7258 sewing machine. It is not working at all. I t...
(Posted by ebellamybellamy9 5 years ago)

How Do I Thread My Singer Esteem Ii 2273. I Can't Find The Manual
(Posted by Jkmeenan14 9 years ago)


Waking Foot
I would like to know what walking foot would fit on my singer sewing machine model 2273 esteem ii?
I would like to know what walking foot would fit on my singer sewing machine model 2273 esteem ii?
(Posted by eddiemelanson 11 years ago)