Singer 2273 Esteem II Support Question
Singer 2273 Esteem II Support Question
Find answers below for this question about Singer 2273 Esteem II.Need a Singer 2273 Esteem II manual? We have 2 online manuals for this item!
Question posted by eddiemelanson on February 21st, 2013
Waking Foot
I would like to know what walking foot would fit on my singer sewing machine model 2273 esteem ii?
Current Answers
Related Singer 2273 Esteem II Manual Pages
Instruction Manual 2 - Page 1
... (3). IMPORTANT: Fabric fluff and threads must be serviced at regular intervals.
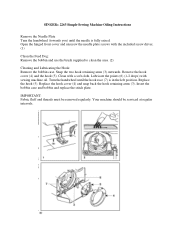
SINGER® 2263 Simple Sewing Machine Oiling Instructions
Remove the Needle Plate Turn the handwheel (towards you) until...left position. Insert the bobbin case and bobbin and replace the stitch plate. Your machine should be removed regularly. Replace the hook (5). Open the hinged front cover and ...
Instruction Manual - Page 1
PUSH
2273 Instruction Manual
Instruction Manual - Page 2
... off ("O") when making any opening. 12. The sound pressure level under normal operating conditions is required around the sewing machine needle. 6. Always unplug sewing machine from accumulation of the sewing machine and foot controller free from the electrical outlet when removing covers, lubricating, or when making any air openings blocked.
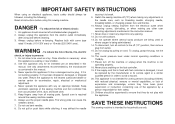
IMPORTANT SAFETY INSTRUCTIONS
When...
Instruction Manual - Page 3

... the owner of a new Singer sewing machine, you are about to use sewing machines ever made. To ensure that , before you start to begin an exciting adventure in creativity.
SINGER is a registered trademark of this instruction book, step by step, seated
at your machine. From the moment you first use your machine, you will know you are always provided...
Instruction Manual - Page 4
... Basics Principle Parts of the Machine...2/3 Connecting Machine to Power Source ...4 Two Step Presser Foot Lifter...5 Accessories ...6
Threading the Machine Winding the Bobbin ...7 Inserting the Bobbin ...8 Thread Tension ...9 Threading the Upper Thread ...10 Automatic needle threader ...11 Raising the Bobbin Thread...12
Sewing How to Choose Your Pattern...13 Stitch Width Dial & Stitch Length...
Instruction Manual - Page 5
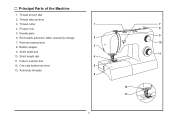
... 3. Bobbin stopper 9. Presser foot 5. Reverse sewing lever 8. Stitch width dial 10. One step buttonhole lever 13. Automatic threader
1
7
8
2
9
10 3
PUSH
4
11
5
6
12
PUSH
13
2 Removable extension table/ accessory storage 7. Pattern selector dial 12. Thread tension dial 2. Needle plate 6. Stitch length dial 11. Thread cutter 4. Principal Parts of the Machine
1.
Instruction Manual - Page 6
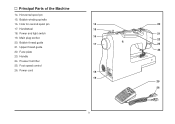
... and light switch
21
19. Upper thread guide
24 22. Handle
24. Presser foot lifter
25. Hole for second spool pin
14
20
17. Foot speed control
26. Horizontal spool pin
15. Face plate
23. Principal Parts of the Machine
14. Power cord
18
19 25
26
3 Main plug socket
16
22
20...
Instruction Manual - Page 7
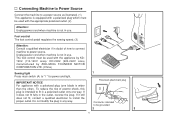
... Power Source
Connect the machine to a power source as illustrated. (1) This appliance is equipped with a polarized plug which must be grounded
2
4
A 3 Foot control The foot control pedal regulates the sewing speed. (3)
Attention: Consult a qualified electrician if in doubt of electric shock, this plug is intended to fit in any way.
1
Polarized attachment plug
Conductor intended...
Instruction Manual - Page 8
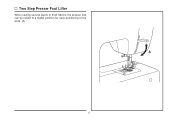
Two Step Presser Foot Lifter
When sewing several layers or thick fabrics, the presser foot can be raised to a higher position for easy positioning of the work. (A)
A
5
Instruction Manual - Page 9
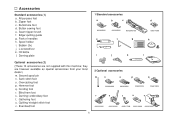
... supplied with this machine; Overcasting foot p. Hemmer foot q. Quilting/ straight stitch foot v. Evenfeed foot
2 Optional accessories
...foot u. Second spool pin n. Blind hem foot s. Button sewing foot e. Satin stitch foot o. All purpose foot b. L-screwdriver k. Oil bottle l. Accessories
Standard accessories (1) a. Zipper foot c. Cording foot r. Buttonhole foot...
Instruction Manual - Page 10
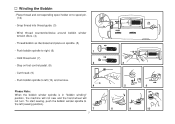
... thread end. (7) 2
- Push bobbin spindle to the left (10) and remove.
4
Please Note: When the bobbin winder spindle is in "bobbin winding" position, the machine will not sew and the hand wheel will not turn. Wind thread counterclockwise around bobbin winder tension discs. (4)
- Step on spindle. (5)
- Cut thread. (9)
- Thread bobbin as illustrated...
Instruction Manual - Page 13
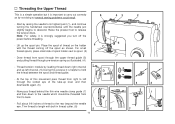
... the thin wire needle clamp guide (7) and then down right channel and up the spool pin. Raise the presser foot to descend. At the top of the take-up lever and then
1
downwards again. (6)
- Note: For ... place small side of thread to carry out correctly as by not doing so several sewing problems could result.
- Lift up left
through pre-tension spring as shown. Pull about...
Instruction Manual - Page 16
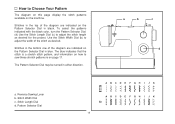
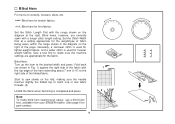
... bottom row of the diagram are indicated on the Pattern Selector Dial in blue.
Reverse Sewing Lever b. Use the Stitch Width Dial (b) to adjust the width of the diagram are... indicates that the stitch is a stretch stitch pattern, and information on how to sew these stretch patterns is on the machine.
Stitch Width Dial c. How to Choose Your Pattern
The diagram on this page display...
Instruction Manual - Page 18
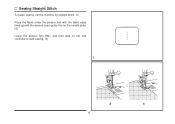
Sewing Straight Stitch
To begin sewing, set the machine for straight stitch. (1) Place the fabric under the presser foot with the fabric edge lined up with the desired seam guide line on the needle plate. (2) Lower the presser foot lifter, and then step on the foot controller to start sewing. (3)
1
2
3
15
Instruction Manual - Page 19
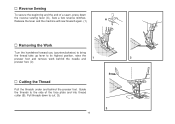
... the side of a seam, press down to its highest position, raise the
presser foot and remove work behind the needle and
1
2
presser foot. (2)
Cutting the Thread
Pull the threads under and behind the presser foot. Release the lever and the machine will sew forward again. (1)
A
Removing the Work
Turn the handwheel toward you (counterclockwise) to...
Instruction Manual - Page 20
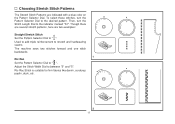
... Pattern Selector Dial to the indicator marked "S1". Adjust the Stitch Width Dial to " ". Used to add triple reinforcement to stretch and hardwearing seams. The machine sews two stitches forward and one stitch backwards.
1 Ric Rac Set the Pattern Selector Dial to between "3" and "5". Ric Rac Stitch is suitable for firm fabrics...
Instruction Manual - Page 21
... completed and press.
2
Note: To make sure the machine settings are normally sewn with
1
the top edge of the hem extending about 7 mm (1/4") to sew slowly on curtains, trousers, skirts, etc.
Start to ... fabric. Blind Hem:
Turn up the hem to make blind hem sewing even easier, use a blind hem foot, available from your SINGER retailer. (See page 6 for part number)
18 Fold back
(...
Instruction Manual - Page 22
....
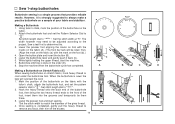
1. Buttonhole stitching is sewn the
legs will be adjusted according to the
project, Sew a test first to " ". a
b
A
PUSH
B
C
Making a Buttonhole on Stretch Fabrics (E)
When sewing buttonholes on the foot (b).) 4.
Lower the presser foot and start the machine. 7. Attach the buttonhole foot and set the pattern
selector dial to determine this. 3. While lightly holding the...
Instruction Manual - Page 23
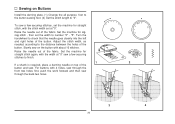
... the holes of the button. Set the machine for zigzag stitch , then set at "0" sew a few securing stitches, set the machine for straight stitch, with the stitch width ...sew through the
front two holes first, push the work forward and then sew
through the back two holes.
3
4
20 Slowly sew on Buttons
Install the darning plate. (1) Change the all purpose foot to the button sewing foot...
Instruction Manual - Page 30
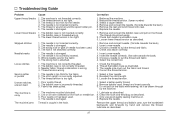
...3. Remove bobbin case, thread and insert correctly. 3. Only use good quality sewing machine oil. 4. The thread tension is too tight.
1. The lower thread tension is too tight. 3. Wrong needle...the stitch length. 3. The wrong size or type of needle has been used . 4. The wrong foot is not inserted correctly. 5. Thread tension wrong. 1. Poor quality thread. 2. Fabric has been ...
Similar Questions

Is A Special Foot Required To Free Form Stitch On Singer Sewing Machine Model 55
(Posted by kopitkin 8 years ago)

How Do I Thread My Singer Esteem Ii 2273. I Can't Find The Manual
(Posted by Jkmeenan14 9 years ago)


Singer Esteem 2273. The Needle Is Not Centered Over The Base Plate.
(Posted by marshase2 9 years ago)

Can I Hook Up A Singer Machine Model 5400 Into A Sewing Table?
Can a singer machine model 5400 go into a regular sewing machine table?
Can a singer machine model 5400 go into a regular sewing machine table?
(Posted by Rosa316 9 years ago)