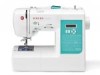
Singer 7258 Stylist Support Question
Singer 7258 Stylist Support Question
Find answers below for this question about Singer 7258 Stylist.Need a Singer 7258 Stylist manual? We have 1 online manual for this item!
Question posted by kopitkin on April 28th, 2015
Is A Special Foot Required To Free Form Stitch On Singer Sewing Machine Model 55
The person who posted this question about this Singer product did not include a detailed explanation. Please use the "Request More Information" button to the right if more details would help you to answer this question.
Current Answers

Related Singer 7258 Stylist Manual Pages
Instruction Manual - Page 3
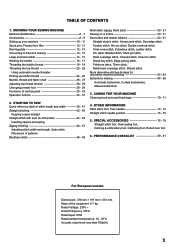
... FOR YOUR MACHINE Cleaning hook area and feed dogs 70 - 71
4. SPECIAL ACCESSORIES 76 - 79 Straight stitch foot, Overcasting foot, Darning & embroidery foot, Gathering foot, Rolled hem foot
6. PERFORMANCE CHECKLIST 80 - 81
For European version
Dimensions: 376 mm × 197 mm × 301 mm Mass of patterns Blindhem stitch 48 - 49
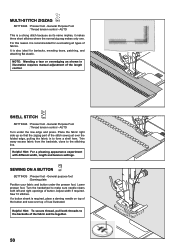
Multi-stitch zigzag, Shell stitch 50 - 51 Sewing on...
Instruction Manual - Page 6
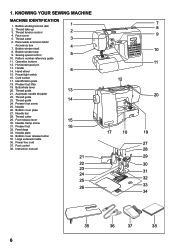
...
13
21. Removable extension table/
Accessory box
4
7. Hand wheel
6
15. Presser foot
16
32. Large extension table
36. Thread tension control
2
4. Face cover 5. Thread take-up 3. Power/light switch
16. Cord socket
17. Thread guide
14
24. KNOWING YOUR SEWING MACHINE
MACHINE IDENTIFICATION
1. Automatic needle threader
22. Instruction manual
21
22 23 24 25...
Instruction Manual - Page 8
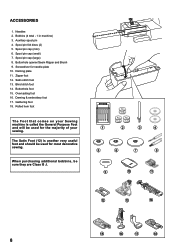
...) 6. When purchasing additional bobbins, be sure they are Class I5 J.
1
2
3
4
5
6
7
8
9
10
11
12
13
14
15
16
17
18
8 Screwdriver for the majority of your sewing. Darning plate 11. Blind stitch foot 14. Darning & embroidery foot 17. Buttonhole opener/Seam Ripper and Brush 9. ACCESSORIES
1. Satin stitch foot 13. Bobbins (4 total - 1 in machine) 3.
Instruction Manual - Page 12
... used. Raise the lifter to the middle position to insert or remove fabric, and to sew.
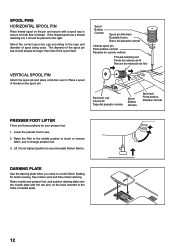
2. Lift it . Raise needle and presser foot, and position darning plate onto the needle plate with a spool cap to the holes of... carrete
Spool Bobine Carrete
Spool pin Porte-bobine Pasador carrete
PRESSER FOOT LIFTER
There are three positions for button sewing, free motion work and free motion darning.
Instruction Manual - Page 24

...straight stitch selected, touch and release the reverse switch.
NOTE: A quick way to its highest position. Always stopping with the needle "fully up bobbin thread,
3
which will perform one of the features of the machine under the presser foot, ...thread, and pick up " is , with your computer sewing machine.
3. PICKING UP BOBBIN THREAD
1. Raise the presser foot lifter.
1
2.
Instruction Manual - Page 26
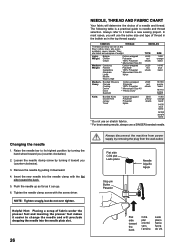
... lowering the presser foot makes it easier to its highest position by turning it downward. 4. Raise the needle bar to change the needle and will use a SINGER branded needle.
They are listed as it before a new sewing project. Insert the new needle into the needle plate slot.
26
Always disconnect the machine from power...
Instruction Manual - Page 28
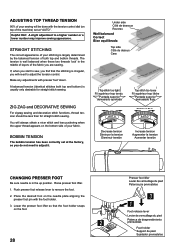
.... 3. ADJUSTING TOP THREAD TENSION
90% of your sewing will be less than for straight stitch sewing. A balanced tension (identical stitches both top and bottom) is largely determined by the balanced tension of both top and bobbin threads. Place the desired foot on top of the machine) set at "AUTO" . Under side Côté de dessous Reverso...
Instruction Manual - Page 30
...
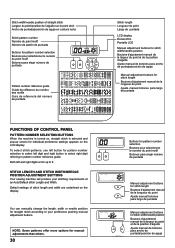
FUNCTIONS OF CONTROL PANEL
PATTERN NUMBER SELECTION BUTTONS
When the machine is turned on, straight stitch is selected and pop-up screen for pattern number selection to select left and right digits scroll up to 9. STITCH LENGTH AND STITCH WIDTH/NEEDLE POSITION ADJUSTMENT BUTTONS
Your sewing machine will produce your preference pushing manual adjustment buttons. NOTE...
Instruction Manual - Page 34
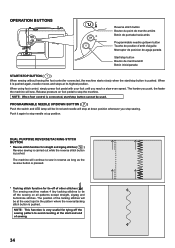
... when the start and end of the tacking stitches will sew. The harder you push, the faster the machine will be lit red and needle will continue to sew in the pattern where the reverse/tacking stitch button is pressed.
* Tacking stitch function for tying off the sewing on foot pedal to avoid raveling at the exact spot...
Instruction Manual - Page 42
...foot and lower the
3
presser foot lifter.
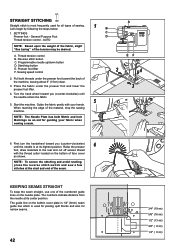
4. First turn the handwheel toward you (counter-clockwise) until the needle enters the fabric.
5
5. Start/stop the sewing machine...keep the seam straight, use one of the numbered guide lines on the bottom of sewing. A.
STRAIGHT STITCHING
A
Straight stitch is most frequently used for piecing quilt blocks and also for narrow seams.
42
...
Instruction Manual - Page 46
...
46
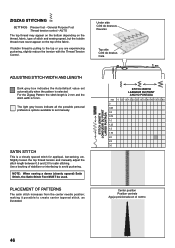
If bobbin thread is a closely spaced stitch for satin stitching. PLACEMENT OF PATTERNS
The satin stitch increases from the center needle position; General Purpose Foot :Thread tension control - AUTO
The top thread may appear on the bottom depending on the thread, fabric, type of stitch and sewing speed, but the bobbin thread must never appear...
Instruction Manual - Page 50
...
Turn under the presser foot. Adjust width if required. General Purpose Foot :Thread tension control - Sew 10 stitches. SEWING ON A BUTTON
SETTINGS :Presser foot - Helpful Hint: For a pleasing appearance experiment with different width, length and tension settings. General Purpose Foot :Thread tension control - Trim away excess fabric from the backside, close to form a shell hem. Lower...
Instruction Manual - Page 52
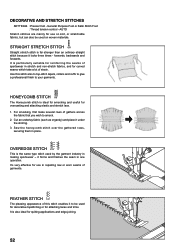
... foot - General Purpose Foot or Satin Stitch Foot :Thread tension control - It is the same type stitch used for decorative topstitching or for attaching laces and trims. It is ideal for smocking and useful for curved seams which take a lot of garments.
Sew the honeycomb stitch over the gathered rows,
securing them in making sportswear - AUTO
Stretch stitches...
Instruction Manual - Page 68
Spur Saliente Tige
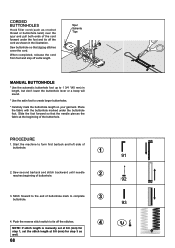
MANUAL BUTTONHOLE
* Use the automatic buttonhole foot up to 1 3/4 "(45 mm) in the illustration. Start the machine to tie off the stitches.
4
NOTE: If stitch length is manually set at 0.8 (mm) for step 1, set the stitch length at the beginning of the buttonhole. Sew buttonhole so that the needle pierces the fabric at 0.8 (mm...
Instruction Manual - Page 70
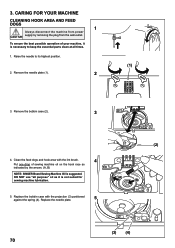
... needle to keep the essential parts clean at all purpose" oil as
indicated by removing the plug from power CAUTION supply by the arrows. (A, B)
NOTE: SINGER Brand Sewing Machine Oil is necessary to its highest position. 2. Clean the feed dogs and hook area with the projection (3) positioned against the spring (4). 3.
DO NOT use...
Instruction Manual - Page 72
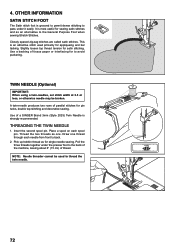
... top stitching and decorative sewing. THREADING THE TWIN NEEDLE
1. OTHER INFORMATION
SATIN STITCH FOOT
The Satin stitch foot is strongly recommended. Draw one . Closely spaced zig-zag stitches are called satin stitches. 4. Use a backing of a SINGER Brand 3mm (Style 2025) Twin Needle is grooved to permit dense stitching to pass under the presser foot to the back of the machine, leaving...
Instruction Manual - Page 76
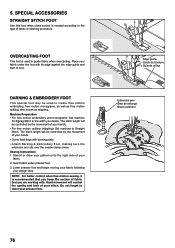
... movement of your fabric under presser foot. 3. Sewing Instructions 1. Stencil or draw your pattern onto the right side of your hands. • For free motion quilting (stippling): Set machine to sew. NOTE: For better control when free motion sewing, it is used to guide fabric when overcasting. Place your fabric. 2. The stitch length will be controlled by the...
Instruction Manual - Page 78
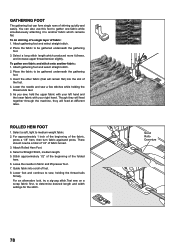
... the fabric to be gathered underneath the gathering
foot. 3. Lower foot and continue to sew, holding the
thread ends taut. 5. Leave the needle in fabric and lift presser foot. 7. For an alternative look, try a zig-zag stitch.Test sew on a scrap fabric first, to medium weight fabric. 2. You can form single rows of the fabric,
press a 1/8" hem...
Instruction Manual - Page 80
.... * Bobbin winder is turned off.- Machine jams/knocks. * Thread is not correct for sheer or soft fabric. - Lower presser foot. * Stitch length is not lowered when sewing buttonhole.
-
Draw both threads back under presser foot about 6 inches (10 cm) and hold until a few stitches are not drawn back under presser
foot before starting seam. - Replace needle (see...
Instruction Manual - Page 84
... has a polarized plug (one way. If it to break." 14.
SINGER is required around the sewing machine needle." 11.
Replace bulb with EEC Directive 2004/108/EC covering the electromagnetic compatibility. "Use this manual." 3. Use only attachments recommended by pulling on disposal, this sewing machine." Special care is a registered trademark of
injury,
switch
off ("0") when...
Similar Questions


I Get E7 Error Message On My Singer Model 7258 Sewing Machine. There Is No Refe
Error message E7 is up on my Singer Stylist model 7258 sewing machine. It is not working at all. I t...
Error message E7 is up on my Singer Stylist model 7258 sewing machine. It is not working at all. I t...
(Posted by ebellamybellamy9 5 years ago)

Can Free Form Stitching Be Done On Model 5523 With The Regular Presser Foot?
(Posted by kopitkin 9 years ago)

I Have A Heavy Duty Singer Sewing Machine (model 4432)
stopped sewing after bobbin replacement?
stopped sewing after bobbin replacement?
(Posted by sueisforme 9 years ago)

I Need An Extnesion Table For My Sewing Machine Singer 7258 Stylist
(Posted by loucksd 10 years ago)