Instruction Manual 2
Page 1
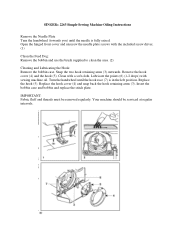
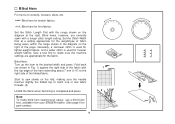
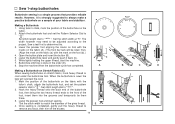
...Feed Dog: Remove the bobbin and use the brush supplied to clean the area. (2) Cleaning and Lubricating the Hook: Remove the bobbin case. SINGER® 2263 Simple Sewing Machine Oiling Instructions Remove the Needle Plate Turn the handwheel (towards you) until the hook race (7) is fully raised. Snap the two hook retaining ...Fabric fluff and threads must be serviced at regular intervals. Remove the hook cover (4) and the hook (5). Replace the hook (5). Lubricate the points (6) (1-2 drops) with sewing machine oil. Replace the hook cover (4) and snap back the hook retaining arms (3).
...Feed Dog: Remove the bobbin and use the brush supplied to clean the area. (2) Cleaning and Lubricating the Hook: Remove the bobbin case. SINGER® 2263 Simple Sewing Machine Oiling Instructions Remove the Needle Plate Turn the handwheel (towards you) until the hook race (7) is fully raised. Snap the two hook retaining ...Fabric fluff and threads must be serviced at regular intervals. Remove the hook cover (4) and the hook (5). Replace the hook (5). Lubricate the points (6) (1-2 drops) with sewing machine oil. Replace the hook cover (4) and snap back the hook retaining arms (3).
Instruction Manual
Page 2
..., or dropped into any opening. 12. Special care is not working properly, if it is required around the sewing machine needle. 6. Switch the sewing machine off ("O") when making any object into water. Do not unplug by persons (including children) with foot controller is...servicing adjustments mentioned in this appliance is damaged, it to break. 7. Never place anything on cord. SAVE THESE INSTRUCTIONS This sewing machine is 75dB(A). 17. Always unplug before cleaning. 3. Use only attachments recommended by a person responsible for household use as described ...
..., or dropped into any opening. 12. Special care is not working properly, if it is required around the sewing machine needle. 6. Switch the sewing machine off ("O") when making any object into water. Do not unplug by persons (including children) with foot controller is...servicing adjustments mentioned in this appliance is damaged, it to break. 7. Never place anything on cord. SAVE THESE INSTRUCTIONS This sewing machine is 75dB(A). 17. Always unplug before cleaning. 3. Use only attachments recommended by a person responsible for household use as described ...

Instruction Manual
Page 3
...design or accessories of this instruction book, step by step, seated at your sewing machine, you are about to use sewing machines ever made. SINGER is a registered trademark of the easiest to use your machine. May we recommend that you start to begin an exciting adventure in creativity....As the owner of a new Singer sewing machine, you discover the many features and the ease of operation by going through this sewing machine when considered necessary. From the moment you first use your machine, you will know you are sewing on one of The Singer Company Limited or its affiliates....
...design or accessories of this instruction book, step by step, seated at your sewing machine, you are about to use sewing machines ever made. SINGER is a registered trademark of the easiest to use your machine. May we recommend that you start to begin an exciting adventure in creativity....As the owner of a new Singer sewing machine, you discover the many features and the ease of operation by going through this sewing machine when considered necessary. From the moment you first use your machine, you will know you are sewing on one of The Singer Company Limited or its affiliates....
Instruction Manual
Page 4
List of contents Machine Basics Principle Parts of the Machine...2/3 Connecting Machine to Power Source ...4 Two Step Presser Foot Lifter...5 Accessories ...6 Threading the Machine Winding the Bobbin ...7 Inserting the Bobbin ...8 Thread Tension ...9 Threading the Upper Thread ...10 Automatic needle threader ...11 Raising the Bobbin Thread...12 Sewing How to Choose Your Pattern...13 Stitch Width Dial...
List of contents Machine Basics Principle Parts of the Machine...2/3 Connecting Machine to Power Source ...4 Two Step Presser Foot Lifter...5 Accessories ...6 Threading the Machine Winding the Bobbin ...7 Inserting the Bobbin ...8 Thread Tension ...9 Threading the Upper Thread ...10 Automatic needle threader ...11 Raising the Bobbin Thread...12 Sewing How to Choose Your Pattern...13 Stitch Width Dial...
Instruction Manual
Page 5
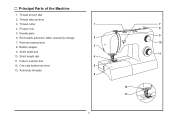
Thread tension dial 2. Reverse sewing lever 8. Bobbin stopper 9. Thread take-up lever 3. Thread cutter 4. Presser foot 5. Stitch width dial 10. Automatic threader 1 7 8 2 9 10 3 PUSH 4 11 5 6 12 PUSH 13 2 Pattern selector dial 12. Removable extension table/ accessory storage 7. One step buttonhole lever 13. Stitch length dial 11. Principal Parts of the Machine 1. Needle plate 6.
Thread tension dial 2. Reverse sewing lever 8. Bobbin stopper 9. Thread take-up lever 3. Thread cutter 4. Presser foot 5. Stitch width dial 10. Automatic threader 1 7 8 2 9 10 3 PUSH 4 11 5 6 12 PUSH 13 2 Pattern selector dial 12. Removable extension table/ accessory storage 7. One step buttonhole lever 13. Stitch length dial 11. Principal Parts of the Machine 1. Needle plate 6.
Instruction Manual
Page 7
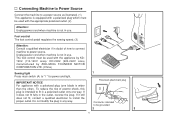
... wider than the other). Foot control The foot control pedal regulates the sewing speed. (3) Attention: Consult a qualified electrician if in the outlet, reverse the plug. Connecting Machine to Power Source Connect the machine to a power source as illustrated. (1) This appliance is equipped with a polarized plug... KD-2902 (220-240V area) manufactured by ZHEJIANG FOUNDER MOTOR CORPORATION LTD. (China) Sewing light Press main switch (A) to " l " for power and light. To reduce the risk of how to connect machine to install the proper outlet. The foot control must be grounded 2 4 A 3 ...
... wider than the other). Foot control The foot control pedal regulates the sewing speed. (3) Attention: Consult a qualified electrician if in the outlet, reverse the plug. Connecting Machine to Power Source Connect the machine to a power source as illustrated. (1) This appliance is equipped with a polarized plug... KD-2902 (220-240V area) manufactured by ZHEJIANG FOUNDER MOTOR CORPORATION LTD. (China) Sewing light Press main switch (A) to " l " for power and light. To reduce the risk of how to connect machine to install the proper outlet. The foot control must be grounded 2 4 A 3 ...
Instruction Manual
Page 9
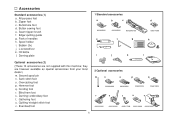
... are however available as special accessories from your local dealer.) m. they are not supplied with this machine; Gathering foot u. Evenfeed foot 2 Optional accessories m n o p q 006804008 006803008 006800008 006810008 r s t u v 006812008 006016008 006917008 006916008 006815008 6 Zipper foot c. Button sewing foot e. L-screwdriver k. Second spool pin n. Hemmer foot q. Quilting/ straight stitch foot v. Overcasting foot p. Blind hem foot...
... are however available as special accessories from your local dealer.) m. they are not supplied with this machine; Gathering foot u. Evenfeed foot 2 Optional accessories m n o p q 006804008 006803008 006800008 006810008 r s t u v 006812008 006016008 006917008 006916008 006815008 6 Zipper foot c. Button sewing foot e. L-screwdriver k. Second spool pin n. Hemmer foot q. Quilting/ straight stitch foot v. Overcasting foot p. Blind hem foot...
Instruction Manual
Page 10
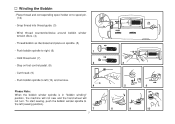
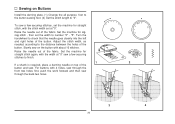
... thread end. (7) 2 - Push bobbin spindle to the left (10) and remove. 4 Please Note: When the bobbin winder spindle is in "bobbin winding" position, the machine will not sew and the hand wheel will not turn. Cut thread. (9) - Winding the Bobbin - Snap thread into thread guide. (3) - Push bobbin spindle to spool pin. (1/2) - To...
... thread end. (7) 2 - Push bobbin spindle to the left (10) and remove. 4 Please Note: When the bobbin winder spindle is in "bobbin winding" position, the machine will not sew and the hand wheel will not turn. Cut thread. (9) - Winding the Bobbin - Snap thread into thread guide. (3) - Push bobbin spindle to spool pin. (1/2) - To...
Instruction Manual
Page 16
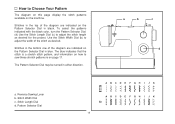
... stitch patterns available on the Pattern Selector Dial in blue. Stitches in the top of the stitch as desired for the project. Reverse Sewing Lever b. Pattern Selector Dial ABCDE FGH I JK ABCDE FGH I JK S1 13 a b c d a. Stitch Length Dial d. ...indicated on page 17. The blue indicates that the stitch is a stretch stitch pattern, and information on how to sew these stretch patterns is on the Pattern Selector Dial in either direction. Use the Stitch Width Dial (b) to adjust the... the Stitch Length Dial (c) to adjust the width of the diagram are indicated on the machine.
... stitch patterns available on the Pattern Selector Dial in blue. Stitches in the top of the stitch as desired for the project. Reverse Sewing Lever b. Pattern Selector Dial ABCDE FGH I JK ABCDE FGH I JK S1 13 a b c d a. Stitch Length Dial d. ...indicated on page 17. The blue indicates that the stitch is a stretch stitch pattern, and information on how to sew these stretch patterns is on the Pattern Selector Dial in either direction. Use the Stitch Width Dial (b) to adjust the... the Stitch Length Dial (c) to adjust the width of the diagram are indicated on the machine.
Instruction Manual
Page 18
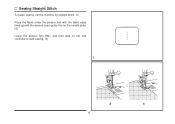
Sewing Straight Stitch To begin sewing, set the machine for straight stitch. (1) Place the fabric under the presser foot with the fabric edge lined up with the desired seam guide line on the needle plate. (2) Lower the presser foot lifter, and then step on the foot controller to start sewing. (3) 1 2 3 15
Sewing Straight Stitch To begin sewing, set the machine for straight stitch. (1) Place the fabric under the presser foot with the fabric edge lined up with the desired seam guide line on the needle plate. (2) Lower the presser foot lifter, and then step on the foot controller to start sewing. (3) 1 2 3 15
Instruction Manual
Page 19
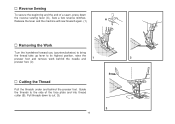
... secure the beginning and the end of the face plate and into thread cutter (B). Release the lever and the machine will sew forward again. (1) A Removing the Work Turn the handwheel toward you (counterclockwise) to bring the thread take up lever to cut. (3) B PUSH 3 16 Guide the threads ... remove work behind the needle and 1 2 presser foot. (2) Cutting the Thread Pull the threads under and behind the presser foot. Pull threads down the reverse sewing lever (A). Sew a few reverse stitches.
... secure the beginning and the end of the face plate and into thread cutter (B). Release the lever and the machine will sew forward again. (1) A Removing the Work Turn the handwheel toward you (counterclockwise) to bring the thread take up lever to cut. (3) B PUSH 3 16 Guide the threads ... remove work behind the needle and 1 2 presser foot. (2) Cutting the Thread Pull the threads under and behind the presser foot. Pull threads down the reverse sewing lever (A). Sew a few reverse stitches.
Instruction Manual
Page 20
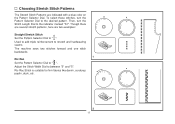
Then, turn the Pattern Selector Dial to " ". Used to add triple reinforcement to stretch and hardwearing seams. The machine sews two stitches forward and one stitch backwards. 1 Ric Rac Set the Pattern Selector Dial to the indicator marked "S1". To select these stitches, turn the ...
Then, turn the Pattern Selector Dial to " ". Used to add triple reinforcement to stretch and hardwearing seams. The machine sews two stitches forward and one stitch backwards. 1 Ric Rac Set the Pattern Selector Dial to the indicator marked "S1". To select these stitches, turn the ...
Instruction Manual
Page 21
... fabric threads. (2) Unfold the fabric when hemming is used for lighter weight fabrics, and a wider stitch is completed and press. 2 Note: To make sure the machine settings are normally sewn with 1 the top edge of the hem extending about 7 mm (1/4") to the right side of the folded fabric. Blind hem for... firm fabrics. Blind Hem: Turn up the hem to make blind hem sewing even easier, use a blind hem foot, available from your SINGER retailer. (See page 6 for part number) 18 Blind hem for stretch fabrics.
... fabric threads. (2) Unfold the fabric when hemming is used for lighter weight fabrics, and a wider stitch is completed and press. 2 Note: To make sure the machine settings are normally sewn with 1 the top edge of the hem extending about 7 mm (1/4") to the right side of the folded fabric. Blind hem for... firm fabrics. Blind Hem: Turn up the hem to make blind hem sewing even easier, use a blind hem foot, available from your SINGER retailer. (See page 6 for part number) 18 Blind hem for stretch fabrics.
Instruction Manual
Page 22
...to " ". Lower the presser foot and start the machine. 7. Using tailor's chalk, mark the position of the foot, insert them into the grooves and temporarily tie them there. 3. a b A PUSH B C Making a Buttonhole on Stretch Fabrics (E) When sewing buttonholes on a sample of the gimp thread. Mark the... position of the buttonhole on the fabric with the mark on the fabric. 2. E 4. While lightly holding the upper thread, start sewing. *Set the stitch width to remove any slack, then trim off the excess. 19 3 4 2 1 D When the buttonhole is done in the...
...to " ". Lower the presser foot and start the machine. 7. Using tailor's chalk, mark the position of the foot, insert them into the grooves and temporarily tie them there. 3. a b A PUSH B C Making a Buttonhole on Stretch Fabrics (E) When sewing buttonholes on a sample of the gimp thread. Mark the... position of the buttonhole on the fabric with the mark on the fabric. 2. E 4. While lightly holding the upper thread, start sewing. *Set the stitch width to remove any slack, then trim off the excess. 19 3 4 2 1 D When the buttonhole is done in the...
Instruction Manual
Page 23
... that the needle goes cleanly into the left and right holes of the fabric. Slowly sew on top of the button and sew. Raise the needle out of the button. Set the machine for straight stitch, with 4 holes, sew through the front two holes first, push the work forward and then... sew through the back two holes. 3 4 20 Set the machine for straight stitch again, with the width at "0" sew a few securing stitches, set the machine for zigzag stitch , then set at "0". Sewing on Buttons Install the darning plate. (1) Change the all ...
... that the needle goes cleanly into the left and right holes of the fabric. Slowly sew on top of the button and sew. Raise the needle out of the button. Set the machine for straight stitch, with 4 holes, sew through the front two holes first, push the work forward and then... sew through the back two holes. 3 4 20 Set the machine for straight stitch again, with the width at "0" sew a few securing stitches, set the machine for zigzag stitch , then set at "0". Sewing on Buttons Install the darning plate. (1) Change the all ...
Instruction Manual
Page 30
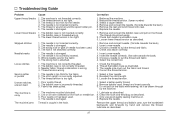
... thread and fabric. 4. Check and attach correctly. 1. Select a finer needle. 2. Do not pull on the fabric while sewing, let it be lubricated. 2. Only use good quality sewing machine oil. 4. Thread tension wrong. 1. Poor quality thread. 2. The machine must suit the fabric and thread. 4. Correction 1. Select a larger needle. 4. Insert a new needle. 3. Check the threading. 2. Loosen...
... thread and fabric. 4. Check and attach correctly. 1. Select a finer needle. 2. Do not pull on the fabric while sewing, let it be lubricated. 2. Only use good quality sewing machine oil. 4. Thread tension wrong. 1. Poor quality thread. 2. The machine must suit the fabric and thread. 4. Correction 1. Select a larger needle. 4. Insert a new needle. 3. Check the threading. 2. Loosen...


