Instruction Manual 2
Page 1
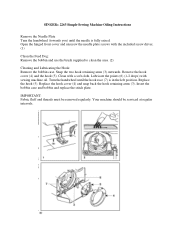
... clean the area. (2) Cleaning and Lubricating the Hook: Remove the bobbin case. IMPORTANT: Fabric fluff and threads must be serviced at regular intervals. SINGER® 2263 Simple Sewing Machine Oiling Instructions Remove the Needle Plate Turn the handwheel (towards you) until the hook race (7) is fully raised. Replace the hook cover (4) and... the hook retaining arms (3). Replace the hook (5). Your machine should be removed regularly. Open the hinged front cover and unscrew the needle plate screws with sewing machine oil. Clean with a soft cloth.
... clean the area. (2) Cleaning and Lubricating the Hook: Remove the bobbin case. IMPORTANT: Fabric fluff and threads must be serviced at regular intervals. SINGER® 2263 Simple Sewing Machine Oiling Instructions Remove the Needle Plate Turn the handwheel (towards you) until the hook race (7) is fully raised. Replace the hook cover (4) and... the hook retaining arms (3). Replace the hook (5). Your machine should be removed regularly. Open the hinged front cover and unscrew the needle plate screws with sewing machine oil. Clean with a soft cloth.
Instruction Manual
Page 2
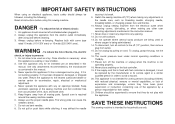
... before using an electrical appliance, basic safety should always be supervised to persons: 1. Replace bulb with the appliance. WARNING - Use this sewing machine. Never operate the appliance with any adjustments in order to break. 7. Special care is 75dB(A). 17. Do not use bent needles... in this appliance is used or where oxygen is damaged, it must be used as contained in . 2. SAVE THESE INSTRUCTIONS This sewing machine is not intended for examination, repair, electrical or mechanical adjustment. 4. IMPORTANT SAFETY INSTRUCTIONS When using this appliance only for its...
... before using an electrical appliance, basic safety should always be supervised to persons: 1. Replace bulb with the appliance. WARNING - Use this sewing machine. Never operate the appliance with any adjustments in order to break. 7. Special care is 75dB(A). 17. Do not use bent needles... in this appliance is used or where oxygen is damaged, it must be used as contained in . 2. SAVE THESE INSTRUCTIONS This sewing machine is not intended for examination, repair, electrical or mechanical adjustment. 4. IMPORTANT SAFETY INSTRUCTIONS When using this appliance only for its...

Instruction Manual
Page 3
Congratulations As the owner of a new Singer sewing machine, you are always provided with the most modern sewing capabilities, the manufacturer reserves the right to change the appearance, design or accessories of this instruction book, step by step, seated at your ... you will know you discover the many features and the ease of The Singer Company Limited or its affiliates. © 2008 The Singer Company Limited or its affiliates. SINGER is a registered trademark of operation by going through this sewing machine when considered necessary. All rights reserved. From the moment you first use...
Congratulations As the owner of a new Singer sewing machine, you are always provided with the most modern sewing capabilities, the manufacturer reserves the right to change the appearance, design or accessories of this instruction book, step by step, seated at your ... you will know you discover the many features and the ease of The Singer Company Limited or its affiliates. © 2008 The Singer Company Limited or its affiliates. SINGER is a registered trademark of operation by going through this sewing machine when considered necessary. All rights reserved. From the moment you first use...
Instruction Manual
Page 4
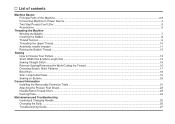
... Upper Thread ...10 Automatic needle threader ...11 Raising the Bobbin Thread...12 Sewing How to Choose Your Pattern...13 Stitch Width Dial & Stitch Length Dial ...14 Sewing Straight Stitch ...15 Reverse Sewing/Removing the Work/Cutting the Thread...16 Choosing Stretch Stitch Patterns ...17 Blind... Hem...18 Sew 1-step buttonholes...19 Sewing on Buttons ...20 General Information Installing the Removable Extension Table...
... Upper Thread ...10 Automatic needle threader ...11 Raising the Bobbin Thread...12 Sewing How to Choose Your Pattern...13 Stitch Width Dial & Stitch Length Dial ...14 Sewing Straight Stitch ...15 Reverse Sewing/Removing the Work/Cutting the Thread...16 Choosing Stretch Stitch Patterns ...17 Blind... Hem...18 Sew 1-step buttonholes...19 Sewing on Buttons ...20 General Information Installing the Removable Extension Table...
Instruction Manual
Page 5
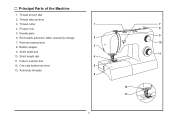
Thread cutter 4. Reverse sewing lever 8. Pattern selector dial 12. Presser foot 5. Bobbin stopper 9. Thread take-up lever 3. One step buttonhole lever 13. Removable extension table/ accessory storage 7. Stitch width dial 10. Principal Parts of the Machine 1. Needle plate 6. Automatic threader 1 7 8 2 9 10 3 PUSH 4 11 5 6 12 PUSH 13 2 Stitch length dial 11. Thread tension dial 2.
Thread cutter 4. Reverse sewing lever 8. Pattern selector dial 12. Presser foot 5. Bobbin stopper 9. Thread take-up lever 3. One step buttonhole lever 13. Removable extension table/ accessory storage 7. Stitch width dial 10. Principal Parts of the Machine 1. Needle plate 6. Automatic threader 1 7 8 2 9 10 3 PUSH 4 11 5 6 12 PUSH 13 2 Stitch length dial 11. Thread tension dial 2.
Instruction Manual
Page 7
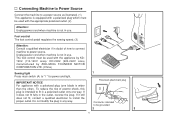
...used with the appliance by KD1902 (110-120V area)/ KD-2902 (220-240V area) manufactured by ZHEJIANG FOUNDER MOTOR CORPORATION LTD. (China) Sewing light Press main switch (A) to be used with the appropriate polarized outlet. (2) Attention: Unplug power cord when machine is not in a ... to fit in use . If it still does not fit, contact a qualified electrician to power source. Foot control The foot control pedal regulates the sewing speed. (3) Attention: Consult a qualified electrician if in any way. 1 Polarized attachment plug Conductor intended to " l " for power and light. ...
...used with the appliance by KD1902 (110-120V area)/ KD-2902 (220-240V area) manufactured by ZHEJIANG FOUNDER MOTOR CORPORATION LTD. (China) Sewing light Press main switch (A) to be used with the appropriate polarized outlet. (2) Attention: Unplug power cord when machine is not in a ... to fit in use . If it still does not fit, contact a qualified electrician to power source. Foot control The foot control pedal regulates the sewing speed. (3) Attention: Consult a qualified electrician if in any way. 1 Polarized attachment plug Conductor intended to " l " for power and light. ...
Instruction Manual
Page 8
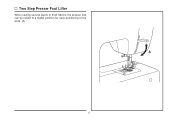
Two Step Presser Foot Lifter When sewing several layers or thick fabrics, the presser foot can be raised to a higher position for easy positioning of the work. (A) A 5
Two Step Presser Foot Lifter When sewing several layers or thick fabrics, the presser foot can be raised to a higher position for easy positioning of the work. (A) A 5
Instruction Manual
Page 9
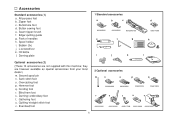
... local dealer.) m. Overcasting foot p. Cording foot r. Blind hem foot s. they are not supplied with this machine; Second spool pin n. Satin stitch foot o. Gathering foot u. Button sewing foot e. Edge/ quilting guide g. Evenfeed foot 2 Optional accessories m n o p q 006804008 006803008 006800008 006810008 r s t u v 006812008 006016008 006917008 006916008 006815008 6 Seam ripper/ brush f. L-screwdriver k. Oil bottle l. Buttonhole foot...
... local dealer.) m. Overcasting foot p. Cording foot r. Blind hem foot s. they are not supplied with this machine; Second spool pin n. Satin stitch foot o. Gathering foot u. Button sewing foot e. Edge/ quilting guide g. Evenfeed foot 2 Optional accessories m n o p q 006804008 006803008 006800008 006810008 r s t u v 006812008 006016008 006917008 006916008 006815008 6 Seam ripper/ brush f. L-screwdriver k. Oil bottle l. Buttonhole foot...
Instruction Manual
Page 10
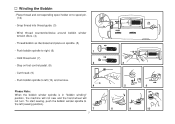
... remove. 4 Please Note: When the bobbin winder spindle is in "bobbin winding" position, the machine will not sew and the hand wheel will not turn. To start sewing, push the bobbin winder spindle to left (sewing position). 7 7 3 5 6 8 9 10 Winding the Bobbin - Snap thread into thread guide. (3) - Cut thread. (9) - Hold thread end. (7) 2 - Wind thread...
... remove. 4 Please Note: When the bobbin winder spindle is in "bobbin winding" position, the machine will not sew and the hand wheel will not turn. To start sewing, push the bobbin winder spindle to left (sewing position). 7 7 3 5 6 8 9 10 Winding the Bobbin - Snap thread into thread guide. (3) - Cut thread. (9) - Hold thread end. (7) 2 - Wind thread...
Instruction Manual
Page 12
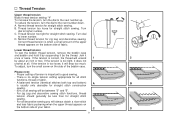
... will drop too much. Jerk it by suspending it once or twice. Proper setting of tension is no single tension setting appropriate for straight stitch sewing. - A. B. D. If the tension is when a small amount of the upper thread appears on the bottom side of fabric. There is ...too loose, it does not unwind at all stitch functions, thread or fabric. - Thread tension too loose for zig zag and decorative sewing. For all sewing will always obtain a nicer stitch and less fabric puckering when the upper thread appears on the bottom side of your fabric. Turn dial ...
... will drop too much. Jerk it by suspending it once or twice. Proper setting of tension is no single tension setting appropriate for straight stitch sewing. - A. B. D. If the tension is when a small amount of the upper thread appears on the bottom side of fabric. There is ...too loose, it does not unwind at all stitch functions, thread or fabric. - Thread tension too loose for zig zag and decorative sewing. For all sewing will always obtain a nicer stitch and less fabric puckering when the upper thread appears on the bottom side of your fabric. Turn dial ...
Instruction Manual
Page 13
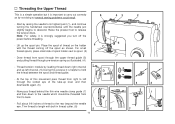
... through the upper thread guide (3) and pulling thread through the slotted eye of the take-up the spool pin. Start by not doing so several sewing problems could result. - Place the spool of thread to the rear beyond the needle eye. Pull about 6-8 inches of thread on the holder with built...
... through the upper thread guide (3) and pulling thread through the slotted eye of the take-up the spool pin. Start by not doing so several sewing problems could result. - Place the spool of thread to the rear beyond the needle eye. Pull about 6-8 inches of thread on the holder with built...
Instruction Manual
Page 16
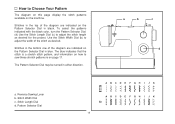
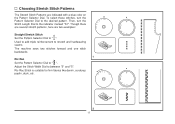
...for the project. The Pattern Selector Dial may be turned in black. Pattern Selector Dial ABCDE FGH I JK ABCDE FGH I JK S1 13 Reverse Sewing Lever b. Stitch Width Dial c. Stitches in the top of the diagram are indicated on the Pattern Selector Dial in blue. To select the patterns ...indicated with the black color, turn the Pattern Selector Dial. (d) Use the Stitch Length Dial (c) to sew these stretch patterns is a stretch stitch pattern, and information on how to adjust the stitch length as desired. The blue indicates that the stitch is...
...for the project. The Pattern Selector Dial may be turned in black. Pattern Selector Dial ABCDE FGH I JK ABCDE FGH I JK S1 13 Reverse Sewing Lever b. Stitch Width Dial c. Stitches in the top of the diagram are indicated on the Pattern Selector Dial in blue. To select the patterns ...indicated with the black color, turn the Pattern Selector Dial. (d) Use the Stitch Length Dial (c) to sew these stretch patterns is a stretch stitch pattern, and information on how to adjust the stitch length as desired. The blue indicates that the stitch is...
Instruction Manual
Page 17
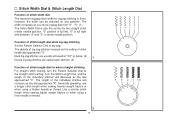
... Length Dial, and the length of zig-zag stitches increase as you move zigzag dial from "0" - Use a shorter stitch length when sewing lighter weight fabrics or when using a thicker needle or thread. The length of stitch length dial for the straight stitch infinite needle position.... stitches are called satin stitches. (2) Function of the individual stitches will decrease as the dial approaches "4". Generally speaking, use a longer stitch length when sewing heavier weight fabrics or when using a finer needle or thread. 2 14 4 3 2 1 0.5 however, the width can be reduced on any ...
... Length Dial, and the length of zig-zag stitches increase as you move zigzag dial from "0" - Use a shorter stitch length when sewing lighter weight fabrics or when using a thicker needle or thread. The length of stitch length dial for the straight stitch infinite needle position.... stitches are called satin stitches. (2) Function of the individual stitches will decrease as the dial approaches "4". Generally speaking, use a longer stitch length when sewing heavier weight fabrics or when using a finer needle or thread. 2 14 4 3 2 1 0.5 however, the width can be reduced on any ...
Instruction Manual
Page 18
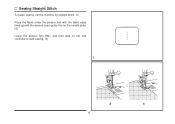
Sewing Straight Stitch To begin sewing, set the machine for straight stitch. (1) Place the fabric under the presser foot with the fabric edge lined up with the desired seam guide line on the needle plate. (2) Lower the presser foot lifter, and then step on the foot controller to start sewing. (3) 1 2 3 15
Sewing Straight Stitch To begin sewing, set the machine for straight stitch. (1) Place the fabric under the presser foot with the fabric edge lined up with the desired seam guide line on the needle plate. (2) Lower the presser foot lifter, and then step on the foot controller to start sewing. (3) 1 2 3 15
Instruction Manual
Page 19
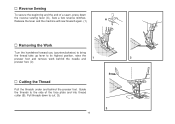
... remove work behind the needle and 1 2 presser foot. (2) Cutting the Thread Pull the threads under and behind the presser foot. Pull threads down the reverse sewing lever (A). Reverse Sewing To secure the beginning and the end of the face plate and into thread cutter (B). Release the lever and the machine will...
... remove work behind the needle and 1 2 presser foot. (2) Cutting the Thread Pull the threads under and behind the presser foot. Pull threads down the reverse sewing lever (A). Reverse Sewing To secure the beginning and the end of the face plate and into thread cutter (B). Release the lever and the machine will...
Instruction Manual
Page 20
Used to add triple reinforcement to stretch and hardwearing seams. The machine sews two stitches forward and one stitch backwards. 1 Ric Rac Set the Pattern Selector Dial to " ". Though there are several stretch patterns, here are indicated with a ...
Used to add triple reinforcement to stretch and hardwearing seams. The machine sews two stitches forward and one stitch backwards. 1 Ric Rac Set the Pattern Selector Dial to " ". Though there are several stretch patterns, here are indicated with a ...
Instruction Manual
Page 21
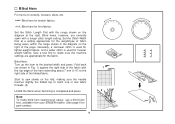
...sure the machine settings are normally sewn with the range shown on the right of the folded fabric. Blind hem for firm fabrics. Start to sew slowly on curtains, trousers, skirts, etc. Blind Hem For hems on the fold, making sure the needle touches slightly the folded top to ...make blind hem sewing even easier, use a blind hem foot, available from your SINGER retailer. (See page 6 for heavier weight fabrics. Blind hem for stretch fabrics. Set the Stitch Length Dial with a ...
...sure the machine settings are normally sewn with the range shown on the right of the folded fabric. Blind hem for firm fabrics. Start to sew slowly on curtains, trousers, skirts, etc. Blind Hem For hems on the fold, making sure the needle touches slightly the folded top to ...make blind hem sewing even easier, use a blind hem foot, available from your SINGER retailer. (See page 6 for heavier weight fabrics. Blind hem for stretch fabrics. Set the Stitch Length Dial with a ...
Instruction Manual
Page 22
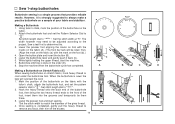
... dial to " ". Stop the machine when the buttonhole cycle has completed. a b A PUSH B C Making a Buttonhole on Stretch Fabrics (E) When sewing buttonholes on the foot (b).) 4. Lower the presser foot and start the machine. 7. Attach the buttonhole foot and set the pattern selector dial to match ...will overcast the cord. 1. E 4. While lightly holding the upper thread, start sewing. *Set the stitch width to " ". Once sewing is sewn the legs will be adjusted according to the project, Sew a test first to " ". Lower the presser foot aligning the marks on foot...
... dial to " ". Stop the machine when the buttonhole cycle has completed. a b A PUSH B C Making a Buttonhole on Stretch Fabrics (E) When sewing buttonholes on the foot (b).) 4. Lower the presser foot and start the machine. 7. Attach the buttonhole foot and set the pattern selector dial to match ...will overcast the cord. 1. E 4. While lightly holding the upper thread, start sewing. *Set the stitch width to " ". Once sewing is sewn the legs will be adjusted according to the project, Sew a test first to " ". Lower the presser foot aligning the marks on foot...
Instruction Manual
Page 23
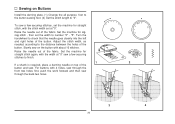
... the needle goes cleanly into the left and right holes of the button and sew. Slowly sew on top of the button. Sewing on Buttons Install the darning plate. (1) Change the all purpose foot to the button sewing foot. (2) Set the stitch length to number "3" - Set the machine for... width at "0". Raise the needle out of the fabric. "5". Set the machine for zigzag stitch , then set the width to "0". To sew a few securing stitches, set at "0" sew a few securing stitches to finish. 1 2 If a shank is required, place a darning needle on the button with about 10 stitches. ...
... the needle goes cleanly into the left and right holes of the button and sew. Slowly sew on top of the button. Sewing on Buttons Install the darning plate. (1) Change the all purpose foot to the button sewing foot. (2) Set the stitch length to number "3" - Set the machine for... width at "0". Raise the needle out of the fabric. "5". Set the machine for zigzag stitch , then set the width to "0". To sew a few securing stitches, set at "0" sew a few securing stitches to finish. 1 2 If a shank is required, place a darning needle on the button with about 10 stitches. ...
Instruction Manual
Page 26
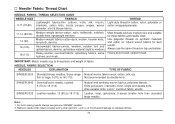
...2. leathers and vinyls. For best sewing results always use the same thread on natural woven fabrics for double knits. Replace needle often (approximately every other garment ) and/ or at first thread breakage or skipped stitches. 23 SINGER 2045 Semi-ball point needle, scarfed... sailcloth, Most threads sold are medium size and suitable double knits, lightweight woolens. NEEDLE, FABRIC SELECTION NEEDLES EXPLANATION TYPE OF FABRIC SINGER 2020 Standard sharp needles. Sizes range Natural woven fabrics-wool, cotton, silk, etc. Leather, vinyl, upholstery. (Leaves smaller hole ...
...2. leathers and vinyls. For best sewing results always use the same thread on natural woven fabrics for double knits. Replace needle often (approximately every other garment ) and/ or at first thread breakage or skipped stitches. 23 SINGER 2045 Semi-ball point needle, scarfed... sailcloth, Most threads sold are medium size and suitable double knits, lightweight woolens. NEEDLE, FABRIC SELECTION NEEDLES EXPLANATION TYPE OF FABRIC SINGER 2020 Standard sharp needles. Sizes range Natural woven fabrics-wool, cotton, silk, etc. Leather, vinyl, upholstery. (Leaves smaller hole ...


