
XL-DV60 Operation Manual
Page 3
... - If the plug should be read before cleaning. This plug will fit into the outlet, try reversing the plug. Power-supply cords should never be retained for future reference. 3 Heed Warnings - Important Instruction XL-DV60 3 Do not use this product from overheating, and these openings must not be followed. 5 Cleaning - for cleaning. 6 Attachments...
... - If the plug should be read before cleaning. This plug will fit into the outlet, try reversing the plug. Power-supply cords should never be retained for future reference. 3 Heed Warnings - Important Instruction XL-DV60 3 Do not use this product from overheating, and these openings must not be followed. 5 Cleaning - for cleaning. 6 Attachments...
XL-DV60 Operation Manual
Page 4
... the vicinity of antenna grounding as this product during a lightning storm, or when it is in a fire or electric shock. XL-DV60 IMPORTANT SAFETY INSTRUCTIONS (continued) Important Instruction 15 Outdoor Antenna Grounding - Do not overload wall outlets, extension cords, or integral convenience ...the grounding electrode. Never spill liquid of any kind on the product. 20 Servicing - Refer all servicing to lightning and power-line surges. 17 Power Lines - Unplug this product from heat sources such as radiators, heat registers, stoves, or other products (including amplifiers)...
... the vicinity of antenna grounding as this product during a lightning storm, or when it is in a fire or electric shock. XL-DV60 IMPORTANT SAFETY INSTRUCTIONS (continued) Important Instruction 15 Outdoor Antenna Grounding - Do not overload wall outlets, extension cords, or integral convenience ...the grounding electrode. Never spill liquid of any kind on the product. 20 Servicing - Refer all servicing to lightning and power-line surges. 17 Power Lines - Unplug this product from heat sources such as radiators, heat registers, stoves, or other products (including amplifiers)...
XL-DV60 Operation Manual
Page 5
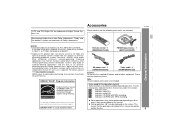
XL-DV60 General Information NOTES Licensed under license from Fraunhofer IIS and Thomson. Indicates DVDs. ... Indicates audio CDs. ... MPEG Layer-3 audio coding technology licensed from... streaming applications (via Internet, intranets and/or other networks), other equipment. ENERGY STAR® Program Information Remote control 1 (RRMCGA007SJSA) FM/AM loop antenna 1 (QANTL0009SJZZ) AC power cord 1 (QACCU0003SJ00) Video cable 1 (QCNWGA004SJZZ) Caution: Do not use is a U.S. "DTS" and "DTS Digital Out" are trademarks of Dolby Laboratories. Pat. 4,972,484...
XL-DV60 General Information NOTES Licensed under license from Fraunhofer IIS and Thomson. Indicates DVDs. ... Indicates audio CDs. ... MPEG Layer-3 audio coding technology licensed from... streaming applications (via Internet, intranets and/or other networks), other equipment. ENERGY STAR® Program Information Remote control 1 (RRMCGA007SJSA) FM/AM loop antenna 1 (QANTL0009SJZZ) AC power cord 1 (QACCU0003SJ00) Video cable 1 (QCNWGA004SJZZ) Caution: Do not use is a U.S. "DTS" and "DTS Digital Out" are trademarks of Dolby Laboratories. Pat. 4,972,484...
XL-DV60 Operation Manual
Page 7
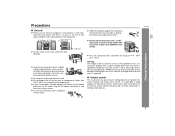
...along the sides, top and back of the equipment. 4" (10 cm) 4" (10 cm) 4" (10 cm) ! General Information XL-DV60 7 Hold the AC power plug by the head when removing it from direct sunlight, strong magnetic fields, excessive dust, humidity and electronic/electrical equipment (home computers, facsimiles..., etc.) which generate electrical noise. ! Plug the AC power cord back in a well-ventilated area and ensure that specified on your local SHARP service facility. ! Using this unit. This unit should only be the same as that there...
...along the sides, top and back of the equipment. 4" (10 cm) 4" (10 cm) 4" (10 cm) ! General Information XL-DV60 7 Hold the AC power plug by the head when removing it from direct sunlight, strong magnetic fields, excessive dust, humidity and electronic/electrical equipment (home computers, facsimiles..., etc.) which generate electrical noise. ! Plug the AC power cord back in a well-ventilated area and ensure that specified on your local SHARP service facility. ! Using this unit. This unit should only be the same as that there...
XL-DV60 Operation Manual
Page 8
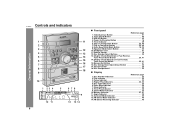
... Indicator 40 14. Tuner (Band) Button 40 3. Timer Indicator 49 6. Disc Compartment Open/Close Button 22 17. Sleep Indicator 50 8. FM Stereo Receiving Indicator 40 XL-DV60 Controls and indicators General Information 1 11 2 3 12 4 13 5 14 6 15 7 16 17 8 18 9 10 1 23 4 5 678 9 10 11 ...12 13 14 8 " Front panel Reference page 1. Power On/Stand-by Button 18 5. Play or Tuning Up Button 23, 40 8. Headphone Jack 51 11. Chapter (Track) Skip Up or Fast Forward, Tuner Preset ...
... Indicator 40 14. Tuner (Band) Button 40 3. Timer Indicator 49 6. Disc Compartment Open/Close Button 22 17. Sleep Indicator 50 8. FM Stereo Receiving Indicator 40 XL-DV60 Controls and indicators General Information 1 11 2 3 12 4 13 5 14 6 15 7 16 17 8 18 9 10 1 23 4 5 678 9 10 11 ...12 13 14 8 " Front panel Reference page 1. Power On/Stand-by Button 18 5. Play or Tuning Up Button 23, 40 8. Headphone Jack 51 11. Chapter (Track) Skip Up or Fast Forward, Tuner Preset ...
XL-DV60 Operation Manual
Page 10
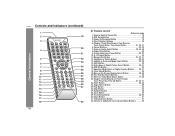
Power On/Stand-by Button 19 4. Chapter (Track) Skip Down or Fast Reverse, Tuner Preset Down, Time Down Button 21, 25, 41 6. Zoom or Audio Select .... Clock Button 21 31. Cursor Buttons 23, 42 7. Frame Advance or Pause Button 23, 27 10. Volume or Subwoofer Level Up and Down Buttons . . . . . 20 XL-DV60 Controls and indicators (continued) 1 2 19 3 General Information 20 4 21 5 22 23 6 7 24 8 25 9 26 10 27 11 28 12 29 13 30 31 14 15...
Power On/Stand-by Button 19 4. Chapter (Track) Skip Down or Fast Reverse, Tuner Preset Down, Time Down Button 21, 25, 41 6. Zoom or Audio Select .... Clock Button 21 31. Cursor Buttons 23, 42 7. Frame Advance or Pause Button 23, 27 10. Volume or Subwoofer Level Up and Down Buttons . . . . . 20 XL-DV60 Controls and indicators (continued) 1 2 19 3 General Information 20 4 21 5 22 23 6 7 24 8 25 9 26 10 27 11 28 12 29 13 30 31 14 15...

XL-DV60 Operation Manual
Page 14
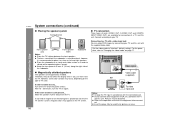
FM/AM loop antenna connection (see page 15) FM antenna AM loop antenna Subwoofer Front speaker (right) Front speaker (left) Preparation for Use TV Speaker connection (see page 15) AC outlet (AC 120 V, 60 Hz) TV connection (see pages 16 - 17) Connecting the AC power cord (see page 18) 14 XL-DV60 System connections Make sure to unplug the AC power cord before making any connections.
FM/AM loop antenna connection (see page 15) FM antenna AM loop antenna Subwoofer Front speaker (right) Front speaker (left) Preparation for Use TV Speaker connection (see page 15) AC outlet (AC 120 V, 60 Hz) TV connection (see pages 16 - 17) Connecting the AC power cord (see page 18) 14 XL-DV60 System connections Make sure to unplug the AC power cord before making any connections.

XL-DV60 Operation Manual
Page 15
... the AM loop antenna on the stereo system or near the AC power cord may cause trouble. Placing the antenna on a shelf, or ... You may cause malfunction. ! " FM/AM loop antenna connection Connect the FM/AM loop antenna to the XL-DV60. The supplied speakers are removable Make sure nothing comes into or to an external antenna as lower impedance speakers ...can damage the unit. ! Do not mistake the right and the left ) XL-DV60 Preparation for the XL-DV60. It may be placed in with the rising side facing to a stand or a wall. " Front ...
... the AM loop antenna on the stereo system or near the AC power cord may cause trouble. Placing the antenna on a shelf, or ... You may cause malfunction. ! " FM/AM loop antenna connection Connect the FM/AM loop antenna to the XL-DV60. The supplied speakers are removable Make sure nothing comes into or to an external antenna as lower impedance speakers ...can damage the unit. ! Do not mistake the right and the left ) XL-DV60 Preparation for the XL-DV60. It may be placed in with the rising side facing to a stand or a wall. " Front ...
XL-DV60 Operation Manual
Page 16
...the subwoofer on a sturdy and stable surface as it tends to "Interlace" (default setting). " Magnetically shielded speakers The speakers are available for Use XL-DV60 16 System connections (continued) " Placing the speaker system Same distance Front speaker (left and right speakers. ! After 15 - 30 minutes, turn ... on the type of magnet or an electromagnet is recommended to avoid fuzzy pictures or noise. Move the speakers further away from the power switch). " TV connection Three types of jacks (VIDEO OUT, S-VIDEO OUT and COMPONENT VIDEO OUT) are magnetically shielded. Set the...
...the subwoofer on a sturdy and stable surface as it tends to "Interlace" (default setting). " Magnetically shielded speakers The speakers are available for Use XL-DV60 16 System connections (continued) " Placing the speaker system Same distance Front speaker (left and right speakers. ! After 15 - 30 minutes, turn ... on the type of magnet or an electromagnet is recommended to avoid fuzzy pictures or noise. Move the speakers further away from the power switch). " TV connection Three types of jacks (VIDEO OUT, S-VIDEO OUT and COMPONENT VIDEO OUT) are magnetically shielded. Set the...

XL-DV60 Operation Manual
Page 18
... scroll. After use a power cord other than the one supplied. Cooling fan: A cooling fan is on . " Demonstration mode When you plug in this unit for better heat radiation. Note: When the power is built into the AC outlet. Preparation for Use XL-DV60 System connections (continued) "... Connecting the AC power cord After checking all the connections have been made correctly, connect the AC...
... scroll. After use a power cord other than the one supplied. Cooling fan: A cooling fan is on . " Demonstration mode When you plug in this unit for better heat radiation. Note: When the power is built into the AC outlet. Preparation for Use XL-DV60 System connections (continued) "... Connecting the AC power cord After checking all the connections have been made correctly, connect the AC...

XL-DV60 Operation Manual
Page 19
...new batteries. ! Remove the batteries if the unit will prevent potential damage due to the direction indicated in the battery compartment. Caution: ! XL-DV60 Preparation for Use Precautions for long periods of time. age. Battery removal: Remove the battery cover. " Test of the unit if this occurs...1 Remove the battery cover. 2 Insert the batteries according to battery leak- Point the remote control directly at the same time. ! Does the power turn on the unit. This will not be used for battery use rechargeable batteries (nickel-cadmium battery, etc.). ! Do not use : ! ...
...new batteries. ! Remove the batteries if the unit will prevent potential damage due to the direction indicated in the battery compartment. Caution: ! XL-DV60 Preparation for Use Precautions for long periods of time. age. Battery removal: Remove the battery cover. " Test of the unit if this occurs...1 Remove the battery cover. 2 Insert the batteries according to battery leak- Point the remote control directly at the same time. ! Does the power turn on the unit. This will not be used for battery use rechargeable batteries (nickel-cadmium battery, etc.). ! Do not use : ! ...

XL-DV60 Operation Manual
Page 20
XL-DV60 General control " Bass control (X-BASS) When the power is first turned on the remote control, and adjust the volume. To cancel the extra bass mode, press the X-BASS/DEMO (XBASS) button. Preparation for ...
XL-DV60 General control " Bass control (X-BASS) When the power is first turned on the remote control, and adjust the volume. To cancel the extra bass mode, press the X-BASS/DEMO (XBASS) button. Preparation for ...

XL-DV60 Operation Manual
Page 21
...to select 12-hour or 24-hour display and then press the MEMORY/SET button. Preparation for about 8 seconds. If the "CLOCK" is restored after a power failure or unplugging the unit. Setting the clock 3 Within 30 seconds, press the PRESET ( or ) button to advance the time by 1 hour. Hold it.../SET button. Hold it down to advance continuously. 4 Within 30 seconds, press the PRESET ( or ) button to advance continuously. Readjust the clock as follows. XL-DV60 Press the PRESET ( or ) button once to advance the time by 1 minute. "AM 12:00" "0:00" The 12-hour display will flash at the ...
...to select 12-hour or 24-hour display and then press the MEMORY/SET button. Preparation for about 8 seconds. If the "CLOCK" is restored after a power failure or unplugging the unit. Setting the clock 3 Within 30 seconds, press the PRESET ( or ) button to advance the time by 1 hour. Hold it.../SET button. Hold it down to advance continuously. 4 Within 30 seconds, press the PRESET ( or ) button to advance continuously. Readjust the clock as follows. XL-DV60 Press the PRESET ( or ) button once to advance the time by 1 minute. "AM 12:00" "0:00" The 12-hour display will flash at the ...
XL-DV60 Operation Manual
Page 22
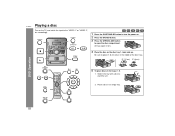
Slide in the trays 2 - 5. 1. accordingly. 1 Press the ON/STAND-BY button to turn the power on. 2 Press the DVD/CD button. 3 Press the OPEN/CLOSE button to open in an empty tray. 22 Be sure to the "VIDEO 1" or "VIDEO 2", etc. All trays open the disc compartment. XL-DV60 Playing a disc Turn on the disc tray 1, label side up. Place a disc in tiers. 4 Place the disc on the TV, and switch the input to place 3" (8 cm) discs in the middle of the disc trays. 5" (12 cm) 3" (8 cm) DVD Operation 5 To place discs in the tray with a disc toward the unit. 2.
Slide in the trays 2 - 5. 1. accordingly. 1 Press the ON/STAND-BY button to turn the power on. 2 Press the DVD/CD button. 3 Press the OPEN/CLOSE button to open in an empty tray. 22 Be sure to the "VIDEO 1" or "VIDEO 2", etc. All trays open the disc compartment. XL-DV60 Playing a disc Turn on the disc tray 1, label side up. Place a disc in tiers. 4 Place the disc on the TV, and switch the input to place 3" (8 cm) discs in the middle of the disc trays. 5" (12 cm) 3" (8 cm) DVD Operation 5 To place discs in the tray with a disc toward the unit. 2.

XL-DV60 Operation Manual
Page 24
...) You can resume playback from the point you play discs with force, the unit will appear on , no operation is moving. ! DVD Operation XL-DV60 Playing a disc (continued) Caution: ! ence age. Do not push the disc compartment while it is possible for 10 sec- When attempting to play... or unplayable or restricted (*1) discs, an error message will not func- Stop positions may be recorded on some DVDs according to enter the power stand-by the disc. Play Playback resumes from the point playback is stopped. 1 While the disc is stopped with special shapes (heart or...
...) You can resume playback from the point you play discs with force, the unit will appear on , no operation is moving. ! DVD Operation XL-DV60 Playing a disc (continued) Caution: ! ence age. Do not push the disc compartment while it is possible for 10 sec- When attempting to play... or unplayable or restricted (*1) discs, an error message will not func- Stop positions may be recorded on some DVDs according to enter the power stand-by the disc. Play Playback resumes from the point playback is stopped. 1 While the disc is stopped with special shapes (heart or...

XL-DV60 Operation Manual
Page 37
... ends after the last track in the sequence you turn the power off the programming screen. "MEMORY" lights up on all loaded discs is removed or you want. PROGRAM LIST No. DISC No. INDEX 1 Disc-2 Track2 2 Disc-3 Track12 3 Disc-4 Track8 XL-DV60 Audio CD Operation ! Programmed tracks are stored until a disc is read...
... ends after the last track in the sequence you turn the power off the programming screen. "MEMORY" lights up on all loaded discs is removed or you want. PROGRAM LIST No. DISC No. INDEX 1 Disc-2 Track2 2 Disc-3 Track12 3 Disc-4 Track8 XL-DV60 Audio CD Operation ! Programmed tracks are stored until a disc is read...

XL-DV60 Operation Manual
Page 40
Radio XL-DV60 Listening to the radio 40 " Tuning 1 Press the ON/STAND-BY button to turn the power on. 2 Press the TUNER (BAND) button repeatedly to select the desired frequency band (FM or AM). 3 Press the TUNING ( or ) button to tune in to ...
Radio XL-DV60 Listening to the radio 40 " Tuning 1 Press the ON/STAND-BY button to turn the power on. 2 Press the TUNER (BAND) button repeatedly to select the desired frequency band (FM or AM). 3 Press the TUNING ( or ) button to tune in to ...

XL-DV60 Operation Manual
Page 41
.... Store the stations in memory, in "Tuning" on page 40. 2 Press the MEMORY/SET button to select the desired station. When a new station is located. XL-DV60 Radio 3 Within 30 seconds, press the PRESET ( or ) button to set station. ton, press the ON/STAND-BY button until "TUNER CL" appears. 41 " To... go out before the station is memorized, repeat the operation from step 2. 5 Repeat steps 1 - 4 to select the preset channel number. " Memorizing a station You can be a power failure or the AC power cord get disconnected.
.... Store the stations in memory, in "Tuning" on page 40. 2 Press the MEMORY/SET button to select the desired station. When a new station is located. XL-DV60 Radio 3 Within 30 seconds, press the PRESET ( or ) button to set station. ton, press the ON/STAND-BY button until "TUNER CL" appears. 41 " To... go out before the station is memorized, repeat the operation from step 2. 5 Repeat steps 1 - 4 to select the preset channel number. " Memorizing a station You can be a power failure or the AC power cord get disconnected.

XL-DV60 Operation Manual
Page 48
... audio CD, MP3 disc, tuner) at the specified time. Advanced Features 5 Within 30 seconds, press the PRESET ( or ) button to specify the hour to the power stand-by mode at the preset time. " Timer playback Before setting timer: 1 Press the CLOCK button to check that the clock is set the system... to start, then press the MEMORY/SET button. 48 played and then within 8 seconds, press the MEMORY/SET button. XL-DV60 Timer and sleep operation Timer playback: The unit turns on . 2 Press the DVD/CD or TUNER (BAND) button to select the desired function. Sleep ...
... audio CD, MP3 disc, tuner) at the specified time. Advanced Features 5 Within 30 seconds, press the PRESET ( or ) button to specify the hour to the power stand-by mode at the preset time. " Timer playback Before setting timer: 1 Press the CLOCK button to check that the clock is set the system... to start, then press the MEMORY/SET button. 48 played and then within 8 seconds, press the MEMORY/SET button. XL-DV60 Timer and sleep operation Timer playback: The unit turns on . 2 Press the DVD/CD or TUNER (BAND) button to select the desired function. Sleep ...
XL-DV60 Operation Manual
Page 49
The volume will increase gradually until it reaches the volume you were listening to turn the power on. 7 When the preset time is reached, playback will start , then press the MEMORY/SET button. ! Advanced Features XL-DV60 49 It will enter the timer stand-by mode. ! To cancel the timer playback:...8 The unit will light up. At this time, only this unit will not be turned on or off. Timer set indicator will enter the power stand-by mode automatically. Note: When performing timer playback using another unit connected to start . To reset or change the timer setting: Perform "...
The volume will increase gradually until it reaches the volume you were listening to turn the power on. 7 When the preset time is reached, playback will start , then press the MEMORY/SET button. ! Advanced Features XL-DV60 49 It will enter the timer stand-by mode. ! To cancel the timer playback:...8 The unit will light up. At this time, only this unit will not be turned on or off. Timer set indicator will enter the power stand-by mode automatically. Note: When performing timer playback using another unit connected to start . To reset or change the timer setting: Perform "...


