
XL-DV60 Operation Manual
Page 1
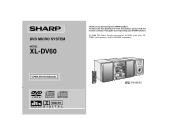
XL-DV60 DVD Micro System consisting of XL-DV60 (main unit), CPDV60F (front speakers) and CP-DV60SW (subwoofer). DVD MICRO SYSTEM MODEL XL-DV60 OPERATION MANUAL Thank you in operating your SHARP product. It will guide you for purchasing this manual carefully. To obtain the best performance from this product, please read this SHARP product.
XL-DV60 DVD Micro System consisting of XL-DV60 (main unit), CPDV60F (front speakers) and CP-DV60SW (subwoofer). DVD MICRO SYSTEM MODEL XL-DV60 OPERATION MANUAL Thank you in operating your SHARP product. It will guide you for purchasing this manual carefully. To obtain the best performance from this product, please read this SHARP product.

XL-DV60 Operation Manual
Page 2
... this unit in a residential installation. These limits are located on a circuit different from that to which are designed to the presence of purchase Important Instruction XL-DV60 SPECIAL NOTES CAUTION: TO REDUCE THE RISK OF ELECTRIC SHOCK, DO NOT REMOVE COVER (OR BACK). The exclamation point within an equilateral triangle is intended...
... this unit in a residential installation. These limits are located on a circuit different from that to which are designed to the presence of purchase Important Instruction XL-DV60 SPECIAL NOTES CAUTION: TO REDUCE THE RISK OF ELECTRIC SHOCK, DO NOT REMOVE COVER (OR BACK). The exclamation point within an equilateral triangle is intended...
XL-DV60 Operation Manual
Page 3
... fully into the power outlet only one blade wider than the other similar surface. If you are unable to replace your obsolete outlet. Important Instruction XL-DV60 3 Unplug this product near water - Slots and openings in the operating instructions should not be blocked by the manufacturer, or sold with care. If you...
... fully into the power outlet only one blade wider than the other similar surface. If you are unable to replace your obsolete outlet. Important Instruction XL-DV60 3 Unplug this product near water - Slots and openings in the operating instructions should not be blocked by the manufacturer, or sold with care. If you...
XL-DV60 Operation Manual
Page 4
... touching such power lines or circuits as per National Electrical Code, ANSI/NFPA 70 ANTENNA LEAD IN WIRE GROUND CLAMP ELECTRIC SERV ICE EQUIPMENT NEC - XL-DV60 IMPORTANT SAFETY INSTRUCTIONS (continued) Important Instruction 15 Outdoor Antenna Grounding -
... touching such power lines or circuits as per National Electrical Code, ANSI/NFPA 70 ANTENNA LEAD IN WIRE GROUND CLAMP ELECTRIC SERV ICE EQUIPMENT NEC - XL-DV60 IMPORTANT SAFETY INSTRUCTIONS (continued) Important Instruction 15 Outdoor Antenna Grounding -
XL-DV60 Operation Manual
Page 5
"Dolby" and the double-D symbol are trademarks of Digital Theater Systems, Inc. XL-DV60 General Information NOTES Licensed under license from Fraunhofer IIS and Thomson. Pat. 4,972,484, 5,214,678, 5,323,396, 5,530,655, 5,539,829, 5,544,247, 5,606,...
"Dolby" and the double-D symbol are trademarks of Digital Theater Systems, Inc. XL-DV60 General Information NOTES Licensed under license from Fraunhofer IIS and Thomson. Pat. 4,972,484, 5,214,678, 5,323,396, 5,530,655, 5,539,829, 5,544,247, 5,606,...
XL-DV60 Operation Manual
Page 6
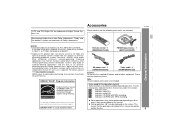
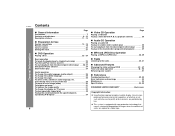
... " MP3 and JPEG Disc Operation Playing an MP3 and JPEG disc 38, 39 " Radio Listening to a video tape. This system is equipped with P. B. General Information XL-DV60 6 Contents Page " General Information Precautions 7 Controls and indicators 8 - 10 Description of discs 11 - 13 " Preparation for profit) of disc contents are copied to the radio...
... " MP3 and JPEG Disc Operation Playing an MP3 and JPEG disc 38, 39 " Radio Listening to a video tape. This system is equipped with P. B. General Information XL-DV60 6 Contents Page " General Information Precautions 7 Controls and indicators 8 - 10 Description of discs 11 - 13 " Preparation for profit) of disc contents are copied to the radio...
XL-DV60 Operation Manual
Page 7
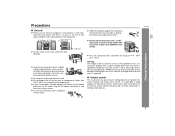
...other than that which generate electrical noise. ! It is advisable to avoid exposure to extremely low temperatures. ! Use the unit on your local SHARP service facility. ! Do not remove the outer cover, as that which occurs while turning the unit on this product with the volume control ...high, or while continually listening at least 4" (10 cm) of free space along the sides, top and back of the unit. ! General Information XL-DV60 7 Do not expose the unit to moisture, to temperatures higher than that specified on with a higher voltage other than 140°F (60°C)...
...other than that which generate electrical noise. ! It is advisable to avoid exposure to extremely low temperatures. ! Use the unit on your local SHARP service facility. ! Do not remove the outer cover, as that which occurs while turning the unit on this product with the volume control ...high, or while continually listening at least 4" (10 cm) of free space along the sides, top and back of the unit. ! General Information XL-DV60 7 Do not expose the unit to moisture, to temperatures higher than that specified on with a higher voltage other than 140°F (60°C)...
XL-DV60 Operation Manual
Page 8
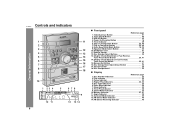
... 41 16. Play Indicator 23 3. Power On/Stand-by Button 18 5. Play or Tuning Up Button 23, 40 8. Pause Indicator 23 4. Extra Bass Indicator 20 7. XL-DV60 Controls and indicators General Information 1 11 2 3 12 4 13 5 14 6 15 7 16 17 8 18 9 10 1 23 4 5 678 9 10 11 12 13 14 8 " Front panel Reference page...
... 41 16. Play Indicator 23 3. Power On/Stand-by Button 18 5. Play or Tuning Up Button 23, 40 8. Pause Indicator 23 4. Extra Bass Indicator 20 7. XL-DV60 Controls and indicators General Information 1 11 2 3 12 4 13 5 14 6 15 7 16 17 8 18 9 10 1 23 4 5 678 9 10 11 12 13 14 8 " Front panel Reference page...
XL-DV60 Operation Manual
Page 10
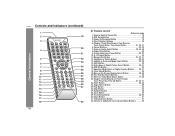
... Button 17, 26 22. Chapter (Track) Skip Up or Fast Forward, Tuner Preset Up, Time Up Button 21, 25, 41 23. Clock Button 21 31. XL-DV60 Controls and indicators (continued) 1 2 19 3 General Information 20 4 21 5 22 23 6 7 24 8 25 9 26 10 27 11 28 12 29 13 30 31 14 15...
... Button 17, 26 22. Chapter (Track) Skip Up or Fast Forward, Tuner Preset Up, Time Up Button 21, 25, 41 23. Clock Button 21 31. XL-DV60 Controls and indicators (continued) 1 2 19 3 General Information 20 4 21 5 22 23 6 7 24 8 25 9 26 10 27 11 28 12 29 13 30 31 14 15...

XL-DV60 Operation Manual
Page 11
... CD Or CDV (*2) CD-R/CD-RW (*3) Audio 5" (12 cm) 3" (8 cm) Audio and picture CD-R/CD-RW recorded in MP3 format (*4), JPEG format (*5) 5" (12 cm) 3" (8 cm) XL-DV60 (*1): Discs including DVD-R/DVD-RW/DVD+R/DVD+RW may not be played back due to properties and scratches on the disc, dirty optical pickup lens...
... CD Or CDV (*2) CD-R/CD-RW (*3) Audio 5" (12 cm) 3" (8 cm) Audio and picture CD-R/CD-RW recorded in MP3 format (*4), JPEG format (*5) 5" (12 cm) 3" (8 cm) XL-DV60 (*1): Discs including DVD-R/DVD-RW/DVD+R/DVD+RW may not be played back due to properties and scratches on the disc, dirty optical pickup lens...

XL-DV60 Operation Manual
Page 12
.... Track 1 Track 2 Track 3 Track 4 " MP3/JPEG format on it, each movie is audio data compressed in the JPEG (Joint Photographic Experts Group) format. General Information XL-DV60 Description of discs (continued) " DVD-Video A popular type of DVD disc of "folders" and "files".
.... Track 1 Track 2 Track 3 Track 4 " MP3/JPEG format on it, each movie is audio data compressed in the JPEG (Joint Photographic Experts Group) format. General Information XL-DV60 Description of discs (continued) " DVD-Video A popular type of DVD disc of "folders" and "files".

XL-DV60 Operation Manual
Page 13
...-Audio ! Photo CD ! Discs recorded in the ital 2 ch) DVD's manual. Faulty playback may not play illegally produced discs. ! You cannot play properly. General Information XL-DV60 13 Type of camera angles 2 Recorded subtitle languages. German Number of subtitles recorded Example: 2 1. The number of audio tracks and au- DVD. Example: ! Notes: ! Refer...
...-Audio ! Photo CD ! Discs recorded in the ital 2 ch) DVD's manual. Faulty playback may not play illegally produced discs. ! You cannot play properly. General Information XL-DV60 13 Type of camera angles 2 Recorded subtitle languages. German Number of subtitles recorded Example: 2 1. The number of audio tracks and au- DVD. Example: ! Notes: ! Refer...

XL-DV60 Operation Manual
Page 14
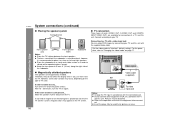
FM/AM loop antenna connection (see page 15) FM antenna AM loop antenna Subwoofer Front speaker (right) Front speaker (left) Preparation for Use TV Speaker connection (see page 15) AC outlet (AC 120 V, 60 Hz) TV connection (see pages 16 - 17) Connecting the AC power cord (see page 18) 14 XL-DV60 System connections Make sure to unplug the AC power cord before making any connections.
FM/AM loop antenna connection (see page 15) FM antenna AM loop antenna Subwoofer Front speaker (right) Front speaker (left) Preparation for Use TV Speaker connection (see page 15) AC outlet (AC 120 V, 60 Hz) TV connection (see pages 16 - 17) Connecting the AC power cord (see page 18) 14 XL-DV60 System connections Make sure to unplug the AC power cord before making any connections.

XL-DV60 Operation Manual
Page 15
...the SUBWOOFER terminal. Place the antenna away from the stereo system for optimum reception. Do not mistake the right and the left ) XL-DV60 Preparation for the XL-DV60. Placing the antenna on the right side when you remove the speaker grilles. 15 Black Red Caution: ! The supplied speakers are removable... not connect other speakers to the ANTENNA jack. " FM/AM loop antenna connection Connect the FM/AM loop antenna to the XL-DV60. Use speakers with an impedance of the speakers. ! Position the FM antenna wire and rotate the AM loop antenna for better reception. !
...the SUBWOOFER terminal. Place the antenna away from the stereo system for optimum reception. Do not mistake the right and the left ) XL-DV60 Preparation for the XL-DV60. Placing the antenna on the right side when you remove the speaker grilles. 15 Black Red Caution: ! The supplied speakers are removable... not connect other speakers to the ANTENNA jack. " FM/AM loop antenna connection Connect the FM/AM loop antenna to the XL-DV60. Use speakers with an impedance of the speakers. ! Position the FM antenna wire and rotate the AM loop antenna for better reception. !
XL-DV60 Operation Manual
Page 16
" Magnetically shielded speakers The speakers are available for Use XL-DV60 16 System connections (continued) " Placing the speaker system Same distance Front speaker (left and right speakers. ! If color variation occurs... Connect according to place it ...
" Magnetically shielded speakers The speakers are available for Use XL-DV60 16 System connections (continued) " Placing the speaker system Same distance Front speaker (left and right speakers. ! If color variation occurs... Connect according to place it ...

XL-DV60 Operation Manual
Page 17
...'s video input jack, and this unit to enjoy higher quality images. Progressive Select this for the following order: (Y, B-Y and P-Y), connect jacks with its matching color. ! XL-DV60 Preparation for the component video inputs VIDEO MODE button on your TV. Do not connect this unit's video output jack and video mode. For a progressive...
...'s video input jack, and this unit to enjoy higher quality images. Progressive Select this for the following order: (Y, B-Y and P-Y), connect jacks with its matching color. ! XL-DV60 Preparation for the component video inputs VIDEO MODE button on your TV. Do not connect this unit's video output jack and video mode. For a progressive...

XL-DV60 Operation Manual
Page 18
... to enter the power stand-by mode, press the X-BASS/ DEMO button again. After use a power cord other than the one supplied. Preparation for Use XL-DV60 System connections (continued) " Connecting the AC power cord After checking all the connections have been made correctly, connect the AC power cord to the AC...
... to enter the power stand-by mode, press the X-BASS/ DEMO button again. After use a power cord other than the one supplied. Preparation for Use XL-DV60 System connections (continued) " Connecting the AC power cord After checking all the connections have been made correctly, connect the AC power cord to the AC...

XL-DV60 Operation Manual
Page 19
... control Check the remote control after checking all old batteries with new ones at the remote sensor on ? Does the power turn on the unit. XL-DV60 Preparation for Use Precautions for long periods of time. Do not use rechargeable batteries (nickel-cadmium battery, etc.). ! Batteries are not included. 1 Remove the battery...
... control Check the remote control after checking all old batteries with new ones at the remote sensor on ? Does the power turn on the unit. XL-DV60 Preparation for Use Precautions for long periods of time. Do not use rechargeable batteries (nickel-cadmium battery, etc.). ! Batteries are not included. 1 Remove the battery...

XL-DV60 Operation Manual
Page 20
... volume will be displayed. To change to increase or decrease the volume. FLAT The sound is not available. 0 ..... 29 30 (MAXIMUM) 20 JAZZ For jazz. XL-DV60 General control " Bass control (X-BASS) When the power is first turned on, the unit will enter the extra bass mode which emphasizes the bass frequencies...
... volume will be displayed. To change to increase or decrease the volume. FLAT The sound is not available. 0 ..... 29 30 (MAXIMUM) 20 JAZZ For jazz. XL-DV60 General control " Bass control (X-BASS) When the power is first turned on, the unit will enter the extra bass mode which emphasizes the bass frequencies...

XL-DV60 Operation Manual
Page 21
... "Setting the clock" from step 1. Hold it down to advance continuously. 4 Within 30 seconds, press the PRESET ( or ) button to advance the time by 1 hour. XL-DV60 Press the PRESET ( or ) button once to adjust the hour and then press the MEMORY/SET button. To readjust the clock: Perform "Setting the clock...
... "Setting the clock" from step 1. Hold it down to advance continuously. 4 Within 30 seconds, press the PRESET ( or ) button to advance the time by 1 hour. XL-DV60 Press the PRESET ( or ) button once to adjust the hour and then press the MEMORY/SET button. To readjust the clock: Perform "Setting the clock...