

XL-DV60 Operation Manual
Page 2
... record below the model number and serial number which the receiver is connected. ● Consult the dealer or an experienced radio/TV technician for a Class B digital device, pursuant to radio communications. CAUTION: THIS PRODUCT IS A CLASS 1 LASER PRODUCT. REFER SERVICING TO QUALIFIED PERSONNEL ONLY. 2 Note to CATV system installer: This reminder is intended to alert the user to the presence of...
... record below the model number and serial number which the receiver is connected. ● Consult the dealer or an experienced radio/TV technician for a Class B digital device, pursuant to radio communications. CAUTION: THIS PRODUCT IS A CLASS 1 LASER PRODUCT. REFER SERVICING TO QUALIFIED PERSONNEL ONLY. 2 Note to CATV system installer: This reminder is intended to alert the user to the presence of...
XL-DV60 Operation Manual
Page 3
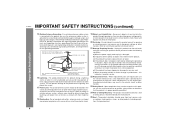
... of power source indicated on or pinched by the manufacturer that has the same overload protection as a bookcase or rack unless proper ventilation is a safety feature. If you are not sure of the type of the plug is a safety feature. Important Instruction XL-DV60 3 Do not place this product near water - If replacement of power supply to cords at plugs, convenience...
... of power source indicated on or pinched by the manufacturer that has the same overload protection as a bookcase or rack unless proper ventilation is a safety feature. If you are not sure of the type of the plug is a safety feature. Important Instruction XL-DV60 3 Do not place this product near water - If replacement of power supply to cords at plugs, convenience...
XL-DV60 Operation Manual
Page 4
... of time, unplug it can result in a risk of the National Electrical Code, ANSI/ NFPA 70, provides information with them might be mounted to qualified service personnel under the following the operating instructions. Unplug this can fall into such power lines or circuits. When installing an outside antenna system, extreme care should be fatal. 18 Overloading - Adjust only those controls...
... of time, unplug it can result in a risk of the National Electrical Code, ANSI/ NFPA 70, provides information with them might be mounted to qualified service personnel under the following the operating instructions. Unplug this can fall into such power lines or circuits. When installing an outside antenna system, extreme care should be fatal. 18 Overloading - Adjust only those controls...
XL-DV60 Operation Manual
Page 5
... cancel the demonstration mode, as described on the screen. Indicates DVDs. ... During operation, " " may result. This means that can be displayed on page 18. "DTS" and "DTS Digital Out" are trademarks of Dolby Laboratories. XL-DV60 General Information NOTES Licensed under license from Fraunhofer IIS and Thomson. Icons used in revenuegenerating broadcast systems (terrestrial, satellite, cable and/or other distribution channels), revenue-generating streaming...
... cancel the demonstration mode, as described on the screen. Indicates DVDs. ... During operation, " " may result. This means that can be displayed on page 18. "DTS" and "DTS Digital Out" are trademarks of Dolby Laboratories. XL-DV60 General Information NOTES Licensed under license from Fraunhofer IIS and Thomson. Icons used in revenuegenerating broadcast systems (terrestrial, satellite, cable and/or other distribution channels), revenue-generating streaming...
XL-DV60 Operation Manual
Page 6
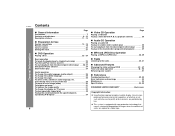
C. (playback control 35 " Audio CD Operation Playing an audio CD To play in the desired order (programmed playback 37 " MP3 and JPEG Disc Operation Playing an MP3 and JPEG disc 38, 39 " Radio Listening to a video tape. Unauthorized copying, broadcast, public display, transmission, public performance and rental (regardless of whether or not such activities are for Use System connections 14 - 18 Remote control 19 General control 20 Setting the clock 21 " DVD Operation Playing a disc 22...
C. (playback control 35 " Audio CD Operation Playing an audio CD To play in the desired order (programmed playback 37 " MP3 and JPEG Disc Operation Playing an MP3 and JPEG disc 38, 39 " Radio Listening to a video tape. Unauthorized copying, broadcast, public display, transmission, public performance and rental (regardless of whether or not such activities are for Use System connections 14 - 18 Remote control 19 General control 20 Setting the clock 21 " DVD Operation Playing a disc 22...
XL-DV60 Operation Manual
Page 8
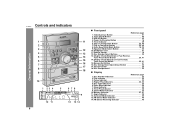
... Play Indicators 33, 34 5. Timer Play Indicator 48 9. Play or Tuning Up Button 23, 40 8. Headphone Jack 51 11. Chapter (Track) Skip Down or Fast Reverse, Tuner Preset Down Button 25, 41 14. Memory/Set Button 41 16. Play Indicator 23 3. Memory Indicator 37, 41 11. Disc Compartment 22 " Display Reference page 1. Extra Bass Indicator 20 7. Sleep Indicator 50 8. FM Stereo Receiving Indicator 40 Disc Type Indicators 23 6. XL-DV60 Controls...
... Play Indicators 33, 34 5. Timer Play Indicator 48 9. Play or Tuning Up Button 23, 40 8. Headphone Jack 51 11. Chapter (Track) Skip Down or Fast Reverse, Tuner Preset Down Button 25, 41 14. Memory/Set Button 41 16. Play Indicator 23 3. Memory Indicator 37, 41 11. Disc Compartment 22 " Display Reference page 1. Extra Bass Indicator 20 7. Sleep Indicator 50 8. FM Stereo Receiving Indicator 40 Disc Type Indicators 23 6. XL-DV60 Controls...
XL-DV60 Operation Manual
Page 10
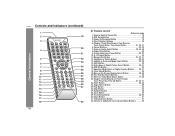
..., 50 30. A - Menu or On Screen Display Select Button 29, 32 20. Video/Auxiliary Button 51 32. Memory/Set Button 21, 37, 41 12. Tuner (Band) Button 40 19. Disc Number Select Buttons 23 21. Stop Button 23 27. Clock Button 21 31. Direct Number Buttons 26 5. DVD/CD Button 22 17. B Repeat Button 34 11. Shift Button 20 15. DVD Setup Button 42 3. Subtitle or Surround Mode Select Button 20, 29 14. Volume or Subwoofer Level Up and Down Buttons . . . . . 20 Repeat Play Button 33 9. Frame...
..., 50 30. A - Menu or On Screen Display Select Button 29, 32 20. Video/Auxiliary Button 51 32. Memory/Set Button 21, 37, 41 12. Tuner (Band) Button 40 19. Disc Number Select Buttons 23 21. Stop Button 23 27. Clock Button 21 31. Direct Number Buttons 26 5. DVD/CD Button 22 17. B Repeat Button 34 11. Shift Button 20 15. DVD Setup Button 42 3. Subtitle or Surround Mode Select Button 20, 29 14. Volume or Subwoofer Level Up and Down Buttons . . . . . 20 Repeat Play Button 33 9. Frame...

XL-DV60 Operation Manual
Page 14
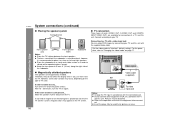
FM/AM loop antenna connection (see page 15) FM antenna AM loop antenna Subwoofer Front speaker (right) Front speaker (left) Preparation for Use TV Speaker connection (see page 15) AC outlet (AC 120 V, 60 Hz) TV connection (see pages 16 - 17) Connecting the AC power cord (see page 18) 14 XL-DV60 System connections Make sure to unplug the AC power cord before making any connections.
FM/AM loop antenna connection (see page 15) FM antenna AM loop antenna Subwoofer Front speaker (right) Front speaker (left) Preparation for Use TV Speaker connection (see page 15) AC outlet (AC 120 V, 60 Hz) TV connection (see pages 16 - 17) Connecting the AC power cord (see page 18) 14 XL-DV60 System connections Make sure to unplug the AC power cord before making any connections.
XL-DV60 Operation Manual
Page 16
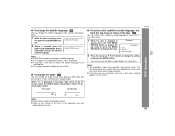
.... ! Video signal Video cable (supplied) TV To video input jack Notes: ! Insert the plugs fully to your TV and this unit. The bass sound from the subwoofer is omni-directional, however, it is still present... Move the speakers further away from the power switch). Connect according to avoid fuzzy pictures or noise. Set the video mode to "Changing the video mode" on the type of the subwoofer. For the procedure, refer to "Interlace" (default setting...
.... ! Video signal Video cable (supplied) TV To video input jack Notes: ! Insert the plugs fully to your TV and this unit. The bass sound from the subwoofer is omni-directional, however, it is still present... Move the speakers further away from the power switch). Connect according to avoid fuzzy pictures or noise. Set the video mode to "Changing the video mode" on the type of the subwoofer. For the procedure, refer to "Interlace" (default setting...

XL-DV60 Operation Manual
Page 17
... button and DIRECT/ Notes: ! Do not connect this for a progressive scan TV What is equipped with an S-video cable (not supplied). Some component video jacks designed for a non-progressive scan TV. ages do not appear properly. 17 For a progressive scan TV, set the video mode to "Interlace" (default setting). XL-DV60 Preparation for the following order: (Y, B-Y and P-Y), connect jacks with DVD. for Use Video signal S-video cable TV (commercially available) To S-video input jack To component video input jacks TV Video signal...
... button and DIRECT/ Notes: ! Do not connect this for a progressive scan TV What is equipped with an S-video cable (not supplied). Some component video jacks designed for a non-progressive scan TV. ages do not appear properly. 17 For a progressive scan TV, set the video mode to "Interlace" (default setting). XL-DV60 Preparation for the following order: (Y, B-Y and P-Y), connect jacks with DVD. for Use Video signal S-video cable TV (commercially available) To S-video input jack To component video input jacks TV Video signal...

XL-DV60 Operation Manual
Page 18
... unit will not be used to the AC power input jack, then plug the AC power cord of time. You will enter the demonstration mode. Cooling fan: A cooling fan is in for Use XL-DV60 System connections (continued) " Connecting the AC power cord After checking all the connections have been made correctly, connect the AC power cord to select the extra bass mode. The unit will enter the low power consumption mode. Do not cover the...
... unit will not be used to the AC power input jack, then plug the AC power cord of time. You will enter the demonstration mode. Cooling fan: A cooling fan is in for Use XL-DV60 System connections (continued) " Connecting the AC power cord After checking all the connections have been made correctly, connect the AC power cord to select the extra bass mode. The unit will enter the low power consumption mode. Do not cover the...

XL-DV60 Operation Manual
Page 20
... adjust the volume. To cancel the extra bass mode, press the X-BASS/DEMO (XBASS) button. XL-DV60 General control " Bass control (X-BASS) When the power is first turned on, the unit will enter the extra bass mode which emphasizes the bass frequencies, and "X-BASS" will be displayed. " Volume control Main unit operation: When the VOLUME control is turned counterclockwise, the volume will increase. FLAT The sound is not available. 0 ..... 29 30 (MAXIMUM) 20 Note: When the input source is "TUNER" or "AUX", the surround mode...
... adjust the volume. To cancel the extra bass mode, press the X-BASS/DEMO (XBASS) button. XL-DV60 General control " Bass control (X-BASS) When the power is first turned on, the unit will enter the extra bass mode which emphasizes the bass frequencies, and "X-BASS" will be displayed. " Volume control Main unit operation: When the VOLUME control is turned counterclockwise, the volume will increase. FLAT The sound is not available. 0 ..... 29 30 (MAXIMUM) 20 Note: When the input source is "TUNER" or "AUX", the surround mode...

XL-DV60 Operation Manual
Page 28
... the sound, change the audio language. (Example: Dolby Digital 5.1-channel, Dolby Digital 2-channel, etc.) However, only the 2.1-channel sound can change the audio language (audio output). 1 While a disc is not heard from the speakers. To keep your preferred languages, set this unit, sound is playing, press the SHIFT button, and then Audio language information press the ZOOM/AUDIO but- ton. The audio language on this unit to select the desired audio number. Alternatively, connect to the manual of the disc. ! XL-DV60 Useful operation...
... the sound, change the audio language. (Example: Dolby Digital 5.1-channel, Dolby Digital 2-channel, etc.) However, only the 2.1-channel sound can change the audio language (audio output). 1 While a disc is not heard from the speakers. To keep your preferred languages, set this unit, sound is playing, press the SHIFT button, and then Audio language information press the ZOOM/AUDIO but- ton. The audio language on this unit to select the desired audio number. Alternatively, connect to the manual of the disc. ! XL-DV60 Useful operation...
XL-DV60 Operation Manual
Page 29
... some discs. Some DVDs prohibit changing the subtitle language. ! Subtitle 3. Refer to the manual of the disc as the operation may take a little time to switch the subtitle language to the selected one. ! When " " is playing, press the SUB TITLE/SURROUND button. If the disc you are using . See the disc jacket for some DVDs. Subtitle 01/09: English 2 Within 3 seconds, press the SUB TITLE/SURROUND button repeatedly to change the setting...
... some discs. Some DVDs prohibit changing the subtitle language. ! Subtitle 3. Refer to the manual of the disc as the operation may take a little time to switch the subtitle language to the selected one. ! When " " is playing, press the SUB TITLE/SURROUND button. If the disc you are using . See the disc jacket for some DVDs. Subtitle 01/09: English 2 Within 3 seconds, press the SUB TITLE/SURROUND button repeatedly to change the setting...

XL-DV60 Operation Manual
Page 41
... operation from step 2. 5 Repeat steps 1 - 4 to set station. " To erase entire preset memory 1 Press the ON/STAND-BY button to select the preset channel number. XL-DV60 Radio 3 Within 30 seconds, press the PRESET ( or ) button to enter the stand-by mode. 2 While pressing down the TUNER(BAND) button and the 2 but- " Memorizing a station You can be a power failure or the AC power cord get disconnected. " To recall a memorized station Press the PRESET...
... operation from step 2. 5 Repeat steps 1 - 4 to set station. " To erase entire preset memory 1 Press the ON/STAND-BY button to select the preset channel number. XL-DV60 Radio 3 Within 30 seconds, press the PRESET ( or ) button to enter the stand-by mode. 2 While pressing down the TUNER(BAND) button and the 2 but- " Memorizing a station You can be a power failure or the AC power cord get disconnected. " To recall a memorized station Press the PRESET...

XL-DV60 Operation Manual
Page 43
...PCM sound signals recorded in playback volume. 43 Surround: 2 channel (video CD/audio CD) or 5.1 channel (DVD) sound are converted to 2.1 channel sound (virtual speaker surround sound). 2.1ch: 2 channel (video CD/audio CD) or 5.1 channel (DVD) sound are converted to the speaker. Off: The range of signal levels is produced as recorded on the TV screen. P. 46 Selects the disc menu language. Select a type of signal sent from the digital audio output jack. Set to on to play. P. 46 Selects the subtitle displayed on the disc. XL-DV60 Advanced Features Setting...
...PCM sound signals recorded in playback volume. 43 Surround: 2 channel (video CD/audio CD) or 5.1 channel (DVD) sound are converted to 2.1 channel sound (virtual speaker surround sound). 2.1ch: 2 channel (video CD/audio CD) or 5.1 channel (DVD) sound are converted to the speaker. Off: The range of signal levels is produced as recorded on the TV screen. P. 46 Selects the disc menu language. Select a type of signal sent from the digital audio output jack. Set to on to play. P. 46 Selects the subtitle displayed on the disc. XL-DV60 Advanced Features Setting...
XL-DV60 Operation Manual
Page 44
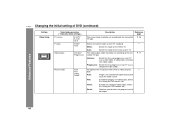
... TV (use a component video cable). Smart: Optimize special effects for a progressive scan TV (use a video cable, S-video cable, or component video cable). Select this setting for DVD karaoke, etc. XL-DV60 Changing the initial setting of DVD (continued) Advanced Features Setting Video Setup Selectable parameters (* indicates initial settings.) TV screen 4:3 PS* 4:3 LB 16:9 TV type NTSC* Auto Video output Interlace* Progressive Picture mode Auto Film Video Smart* Description Reference page The screen mode should be set according to the connected TV type...
... TV (use a component video cable). Smart: Optimize special effects for a progressive scan TV (use a video cable, S-video cable, or component video cable). Select this setting for DVD karaoke, etc. XL-DV60 Changing the initial setting of DVD (continued) Advanced Features Setting Video Setup Selectable parameters (* indicates initial settings.) TV screen 4:3 PS* 4:3 LB 16:9 TV type NTSC* Auto Video output Interlace* Progressive Picture mode Auto Film Video Smart* Description Reference page The screen mode should be set according to the connected TV type...

XL-DV60 Operation Manual
Page 51
...Selecting a sound signal type When connecting other equipment to a Dolby Digital/DTS (5.1ch) surround amplifier. Before plugging in Dolby Digital, the output converts to turn the power on. 3 Press the VIDEO/AUX button. 4 Play the connected equipment. LPCM Choose this unit and the video output to a television. 2 Press the ON/STAND-BY button to 2 channel PCM. Adjust the volume using video equipment, connect the audio output to the playback sounds from the television. BitStream Choose this when connecting the unit to the digital audio output, adjust the audio output setting...
...Selecting a sound signal type When connecting other equipment to a Dolby Digital/DTS (5.1ch) surround amplifier. Before plugging in Dolby Digital, the output converts to turn the power on. 3 Press the VIDEO/AUX button. 4 Play the connected equipment. LPCM Choose this unit and the video output to a television. 2 Press the ON/STAND-BY button to 2 channel PCM. Adjust the volume using video equipment, connect the audio output to the playback sounds from the television. BitStream Choose this when connecting the unit to the digital audio output, adjust the audio output setting...
XL-DV60 Operation Manual
Page 52
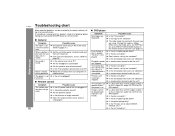
References XL-DV60 52 Troubleshooting chart Many potential problems can be played back. (Sound is pressed, the unit does not respond. " General Symptom The clock is not turned on . ! The power is not set to "0"? ! Set the unit to the correct time. Are the headphones connected? ! Are the speaker wires disconnected? ! Does the remote control sensor receive strong light? The control buttons do not function. Pictures and sound are using. Does the disc satisfy the...
References XL-DV60 52 Troubleshooting chart Many potential problems can be played back. (Sound is pressed, the unit does not respond. " General Symptom The clock is not turned on . ! The power is not set to "0"? ! Set the unit to the correct time. Are the headphones connected? ! Are the speaker wires disconnected? ! Does the remote control sensor receive strong light? The control buttons do not function. Pictures and sound are using. Does the disc satisfy the...
XL-DV60 Operation Manual
Page 54
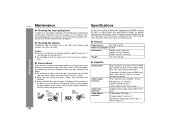
....3 lbs. (5.6 kg) " Amplifier Output power Audio output terminals Audio input terminals Video output terminals Front speakers: 37.5 watts minimum RMS per channel into 6 ohms from 100 Hz to 20 kHz, 10% total harmonic distortion Subwoofer: 45 watts minimum RMS into 6 ohms from the center, along the radius. Contact your disc collection and player. ! References XL-DV60 Maintenance " Cleaning the laser pickup lens In order to ensure proper operation of the DVD player, preventative maintenance...
....3 lbs. (5.6 kg) " Amplifier Output power Audio output terminals Audio input terminals Video output terminals Front speakers: 37.5 watts minimum RMS per channel into 6 ohms from 100 Hz to 20 kHz, 10% total harmonic distortion Subwoofer: 45 watts minimum RMS into 6 ohms from the center, along the radius. Contact your disc collection and player. ! References XL-DV60 Maintenance " Cleaning the laser pickup lens In order to ensure proper operation of the DVD player, preventative maintenance...


