

Owners Manual
Page 2
... provided plug does not fit fully into such power lines or circuits. Heed all instructions. 5. Only use this apparatus during lightning storms or when unused for your outlet, consult an electrician for proper grounding and, in wire to an antenna discharge unit, size of grounding conductors, location of the building, as vases, shall be fatal. NO USER-SERVICEABLE PARTS INSIDE...
... provided plug does not fit fully into such power lines or circuits. Heed all instructions. 5. Only use this apparatus during lightning storms or when unused for your outlet, consult an electrician for proper grounding and, in wire to an antenna discharge unit, size of grounding conductors, location of the building, as vases, shall be fatal. NO USER-SERVICEABLE PARTS INSIDE...
Owners Manual
Page 3
... B digital device, pursuant to Part 15 of the following measures: - This Class B digital apparatus complies with the instructions, may void the user's authority to operate the unit. Need help . Increase the separation between the equipment and receiver. - safety standards against harmful interference in a particular installation. U.S. This equipment generates, uses and can be determined by turning the equipment off and on, the user is Listed...
... B digital device, pursuant to Part 15 of the following measures: - This Class B digital apparatus complies with the instructions, may void the user's authority to operate the unit. Need help . Increase the separation between the equipment and receiver. - safety standards against harmful interference in a particular installation. U.S. This equipment generates, uses and can be determined by turning the equipment off and on, the user is Listed...
Owners Manual
Page 4
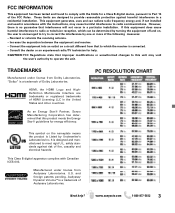
... Channel Search 10 Channel Scan Memory 10 Input Setting 10 Video2 Setting 11 Setup 11 Menu Language 11 Digital Caption 11 Energy Saver 11 Clock Timer 12 HDMI Linking 12 Light Sensor 13 Motion Sync 13 V-Chip 14 Picture 15 Manual Picture Settings 15 Sound 16 aaManual Sound Settings 16 PC CONNECTIONS 17 PC MENU OPERATION 17 PHOTO VIEWER 18 WARRANTY 19 SPECIFICATIONS Power Requirement: Source: AC 120V, 60Hz AC Power Consumption: DP52440 225 watts Weight: 69.4 lbs. (w/base) Dimensions: MODEL WIDTH HEIGHT DEPTH DP52440 w/o stand...
... Channel Search 10 Channel Scan Memory 10 Input Setting 10 Video2 Setting 11 Setup 11 Menu Language 11 Digital Caption 11 Energy Saver 11 Clock Timer 12 HDMI Linking 12 Light Sensor 13 Motion Sync 13 V-Chip 14 Picture 15 Manual Picture Settings 15 Sound 16 aaManual Sound Settings 16 PC CONNECTIONS 17 PC MENU OPERATION 17 PHOTO VIEWER 18 WARRANTY 19 SPECIFICATIONS Power Requirement: Source: AC 120V, 60Hz AC Power Consumption: DP52440 225 watts Weight: 69.4 lbs. (w/base) Dimensions: MODEL WIDTH HEIGHT DEPTH DP52440 w/o stand...
Owners Manual
Page 5
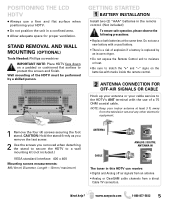
... THE LCD HDTV • Always use a firm and flat surface when positioning your indoor antenna at the same time. ANTENNA CONNECTION FOR OFF-AIR SIGNALS OR CABLE Hook up your antenna or your cable service to a wall mounting kit (not included.) VESA standard interface: 400 x 400 Mounting screws measurements: M6 (6mm) Diameter, Length-12mm (maximum) ANTENNA CABLE ANALOG / DIGITAL ANTENNA IN The tuner in this HDTV can receive: • Digital and Analog off air signals from an antenna • Analog or ClearQAM cable channels...
... THE LCD HDTV • Always use a firm and flat surface when positioning your indoor antenna at the same time. ANTENNA CONNECTION FOR OFF-AIR SIGNALS OR CABLE Hook up your antenna or your cable service to a wall mounting kit (not included.) VESA standard interface: 400 x 400 Mounting screws measurements: M6 (6mm) Diameter, Length-12mm (maximum) ANTENNA CABLE ANALOG / DIGITAL ANTENNA IN The tuner in this HDTV can receive: • Digital and Analog off air signals from an antenna • Analog or ClearQAM cable channels...
Owners Manual
Page 6
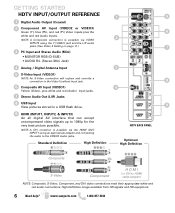
... from HD signals and HD equipment. 6 Need help? GETTING STARTED HDTV INPUT/OUTPUT REFERENCE 1 5 1 Digital Audio Output (Coaxial) 2 Component AV Input (VIDEO2 or VIDEO3) Green (Y), blue (Pb), and red (Pr) Video inputs plus the 6 white and red Audio inputs. 2 NOTE: A Composite connection is possible via VIDEO INPUT2 using an appropriate adapter and connecting the audio to 1080p for the very best picture possible. Standard Definition High Definition HDTV BACK PANEL Optimum High Definition Composite S-Video Component H D M I (or DVI to HDMI cable/adapter) NOTE: Composite...
... from HD signals and HD equipment. 6 Need help? GETTING STARTED HDTV INPUT/OUTPUT REFERENCE 1 5 1 Digital Audio Output (Coaxial) 2 Component AV Input (VIDEO2 or VIDEO3) Green (Y), blue (Pb), and red (Pr) Video inputs plus the 6 white and red Audio inputs. 2 NOTE: A Composite connection is possible via VIDEO INPUT2 using an appropriate adapter and connecting the audio to 1080p for the very best picture possible. Standard Definition High Definition HDTV BACK PANEL Optimum High Definition Composite S-Video Component H D M I (or DVI to HDMI cable/adapter) NOTE: Composite...

Owners Manual
Page 7
COMPONENT connections will accept SDTV, EDTV and HDTV video signals. MULTICHANNEL RECEIVER DVD PLAYER (or similar device) DVI SATELLITE RECEIVER (or similar device) Use HDMI INPUT1, 2 & 3 to hookup HD digital devices such as a Blu-ray player, HD Cable Box, HD Satellite Receiver or Video-game System. USB FLASH DRIVE USB input jack is used to connect a USB mass storage device to watch digital images (JPEG only.) HDMI (DVI) INPUT1 can replace the yellow Video connection for enhanced video. Use them for details. COMPOSITE...
COMPONENT connections will accept SDTV, EDTV and HDTV video signals. MULTICHANNEL RECEIVER DVD PLAYER (or similar device) DVI SATELLITE RECEIVER (or similar device) Use HDMI INPUT1, 2 & 3 to hookup HD digital devices such as a Blu-ray player, HD Cable Box, HD Satellite Receiver or Video-game System. USB FLASH DRIVE USB input jack is used to connect a USB mass storage device to watch digital images (JPEG only.) HDMI (DVI) INPUT1 can replace the yellow Video connection for enhanced video. Use them for details. COMPOSITE...
Owners Manual
Page 8
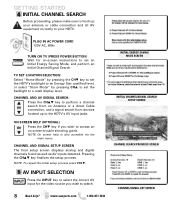
... a channel search from an Antenna or a direct Cable connection, and a signal search from devices hooked up your antenna or cable connection and all AV equipment correctly to your HDTV. ON SCREEN HELP (OPTIONAL) Press the CHM key if you wish to watch. 8 Need help is also accesible via the main menu. CHANNEL AND SIGNAL SETUP SCREEN The final setup screen displays analog and digital channels found as well as AV inputs detected. TV SET LOCATION SELECTION: Select "Home Mode...
... a channel search from an Antenna or a direct Cable connection, and a signal search from devices hooked up your antenna or cable connection and all AV equipment correctly to your HDTV. ON SCREEN HELP (OPTIONAL) Press the CHM key if you wish to watch. 8 Need help is also accesible via the main menu. CHANNEL AND SIGNAL SETUP SCREEN The final setup screen displays analog and digital channels found as well as AV inputs detected. TV SET LOCATION SELECTION: Select "Home Mode...
Owners Manual
Page 9
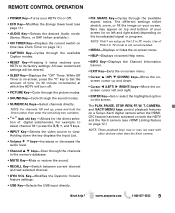
... of Pix6-7 in the memory database. • MUTE Key-Mute or restore the sound. • RECALL Key-Switch between current channel and last selected channel. • DYN VOL Key-Modifies the Dyanmic Volume feature settings. • USB Key-Selects the USB input directly. • PIX SHAPE Key-Cycles through the channels in TV mode is on the screen. Use of digital subchannels. REMOTE CONTROL OPERATION • POWER Key-Turns your screen.
... of Pix6-7 in the memory database. • MUTE Key-Mute or restore the sound. • RECALL Key-Switch between current channel and last selected channel. • DYN VOL Key-Modifies the Dyanmic Volume feature settings. • USB Key-Selects the USB input directly. • PIX SHAPE Key-Cycles through the channels in TV mode is on the screen. Use of digital subchannels. REMOTE CONTROL OPERATION • POWER Key-Turns your screen.
Owners Manual
Page 10
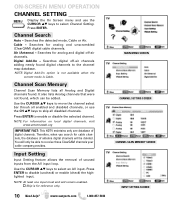
... added. Cable - Air (Antenna) - Searches digital off -air channels. Use the CURSOR LM keys to disable (uncheck) or enable (check) the highlighted input. Press ENTER to select an AV input. ON-SCREEN MENU OPERATION CHANNEL SETTING ___________ Display the On Screen menu and use the CH LM keys to skip all Analog and Digital channels found. Searches the detected mode, Cable or Air. www.sanyoctv.com 1-800-877-5032 MAIN MENU SCREEN CHANNEL SETTING SCREEN CHANNEL SCAN MEMORY SCREEN INPUT SETTING SCREEN NOTE...
... added. Cable - Air (Antenna) - Searches digital off -air channels. Use the CURSOR LM keys to disable (uncheck) or enable (check) the highlighted input. Press ENTER to select an AV input. ON-SCREEN MENU OPERATION CHANNEL SETTING ___________ Display the On Screen menu and use the CH LM keys to skip all Analog and Digital channels found. Searches the detected mode, Cable or Air. www.sanyoctv.com 1-800-877-5032 MAIN MENU SCREEN CHANNEL SETTING SCREEN CHANNEL SCAN MEMORY SCREEN INPUT SETTING SCREEN NOTE...
Owners Manual
Page 11
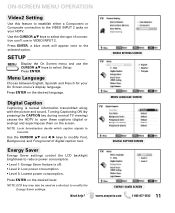
... picture and sound. SETUP Display the On Screen menu and use in VIDEO INPUT 2. Menu Language Choose between English, Spanish and French for your HDTV. Energy Saver Energy Saver settings control the LCD backlight brightness to select Setup. VIDEO2 SETTING SCREEN MENU LANGUAGE SCREEN DIGITAL CAPTION SCREEN ENERGY SAVER SCREEN www.sanyoctv.com 1-800-877-5032 11 Press ENTER on the desired level. Turning Captioning ON (by pressing the CAPTION key during normal TV viewing) causes the HDTV...
... picture and sound. SETUP Display the On Screen menu and use in VIDEO INPUT 2. Menu Language Choose between English, Spanish and French for your HDTV. Energy Saver Energy Saver settings control the LCD backlight brightness to select Setup. VIDEO2 SETTING SCREEN MENU LANGUAGE SCREEN DIGITAL CAPTION SCREEN ENERGY SAVER SCREEN www.sanyoctv.com 1-800-877-5032 11 Press ENTER on the desired level. Turning Captioning ON (by pressing the CAPTION key during normal TV viewing) causes the HDTV...
Owners Manual
Page 12
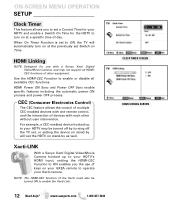
...-enabled devices with one remote control, and the interaction of day. ON-SCREEN MENU OPERATION SETUP Clock Timer This feature allows you the use with each other equipment. For example, a CEC-enabled device hooked up to your HDTV's HDMI input, setting the HDMI-CEC Function to ON enables you to turn on at a specific time of devices with a Sanyo Xacti Digital VIdeo/Movie Camera, and may be turned ON to ON...
...-enabled devices with one remote control, and the interaction of day. ON-SCREEN MENU OPERATION SETUP Clock Timer This feature allows you the use with each other equipment. For example, a CEC-enabled device hooked up to your HDTV's HDMI input, setting the HDMI-CEC Function to ON enables you to turn on at a specific time of devices with a Sanyo Xacti Digital VIdeo/Movie Camera, and may be turned ON to ON...
Owners Manual
Page 13
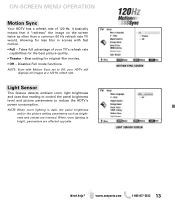
... refresh rate TV would, allowing for the best picture quality. • Theater - ON-SCREEN MENU OPERATION Motion Sync Your HDTV has a refresh rate of your TV's refresh rate capabilities for less blur in scenes with Motion Sync set to reduce the HDTV's power consumption. Best setting for original film movies. • Off - NOTE: Even with fast motion. • Full - Disables Full mode functions. MOTION SYNC SCREEN LIGHT SENSOR SCREEN Need help?
... refresh rate TV would, allowing for the best picture quality. • Theater - ON-SCREEN MENU OPERATION Motion Sync Your HDTV has a refresh rate of your TV's refresh rate capabilities for less blur in scenes with Motion Sync set to reduce the HDTV's power consumption. Best setting for original film movies. • Off - NOTE: Even with fast motion. • Full - Disables Full mode functions. MOTION SYNC SCREEN LIGHT SENSOR SCREEN Need help?
Owners Manual
Page 14
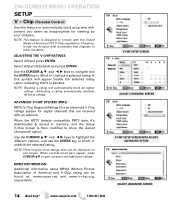
... Picture Association of America's FCC V-Chip regulations. www.sanyoctv.com 1-800-877-5032 V-CHIP SETUP SCREEN ADJUST (STANDARD) SCREEN V-CHIP SETUP SCREEN WITH ADJUST (ADVANCED) OPTION ADJUST (ADVANCED) SCREEN NOTE: This feature is designed to automatically block programs with content you deem as inappropriate for digital channels that it is blocked. Select Adjust (Standard) and press ENTER. ON-SCREEN MENU OPERATION SETUP V - Therefore, it 's downloaded & stored in other countries. Use...
... Picture Association of America's FCC V-Chip regulations. www.sanyoctv.com 1-800-877-5032 V-CHIP SETUP SCREEN ADJUST (STANDARD) SCREEN V-CHIP SETUP SCREEN WITH ADJUST (ADVANCED) OPTION ADJUST (ADVANCED) SCREEN NOTE: This feature is designed to automatically block programs with content you deem as inappropriate for digital channels that it is blocked. Select Adjust (Standard) and press ENTER. ON-SCREEN MENU OPERATION SETUP V - Therefore, it 's downloaded & stored in other countries. Use...
Owners Manual
Page 15
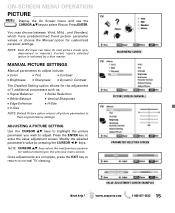
... as: • Signal Balancer • Noise Reduction • White Balance • Vertical Sharpness • Edge Enhancer • H-Size • V-Size NOTE: Default Picture option returns all picture parameters to their original factory settings. MAIN MENU SCREEN PICTURE SCREEN (MANUAL) PARAMETER SELECTION SCREEN Need help? Modify the selected parameter's value by a blue marker. ON-SCREEN MENU OPERATION PICTURE Display the On Screen menu and use the CURSOR LM keys to enter the value adjustment screen. VALUE ADJUSTMENT SCREEN EXAMPLES www...
... as: • Signal Balancer • Noise Reduction • White Balance • Vertical Sharpness • Edge Enhancer • H-Size • V-Size NOTE: Default Picture option returns all picture parameters to their original factory settings. MAIN MENU SCREEN PICTURE SCREEN (MANUAL) PARAMETER SELECTION SCREEN Need help? Modify the selected parameter's value by a blue marker. ON-SCREEN MENU OPERATION PICTURE Display the On Screen menu and use the CURSOR LM keys to enter the value adjustment screen. VALUE ADJUSTMENT SCREEN EXAMPLES www...
Owners Manual
Page 16
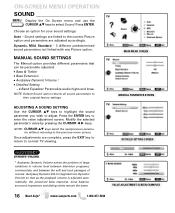
... value adjustment screen. VALUE ADJUSTMENT SCREEN EXAMPLES 16 Need help? Press the ENTER key to adjust. NOTE: Default Sound option returns all sound parameters to normal TV viewing. Sound settings are linked to the current Picture option and parameters are complete, press the EXIT key to return to their original factory settings. MAIN MENU SCREEN MANUAL PARAMETER SCREEN DETAILED SETTING SCREEN 1 Audyssey Dynamic Volume solves the problem of large variations in volume level between television programs, commercials...
... value adjustment screen. VALUE ADJUSTMENT SCREEN EXAMPLES 16 Need help? Press the ENTER key to adjust. NOTE: Default Sound option returns all sound parameters to normal TV viewing. Sound settings are linked to the current Picture option and parameters are complete, press the EXIT key to return to their original factory settings. MAIN MENU SCREEN MANUAL PARAMETER SCREEN DETAILED SETTING SCREEN 1 Audyssey Dynamic Volume solves the problem of large variations in volume level between television programs, commercials...
Owners Manual
Page 17
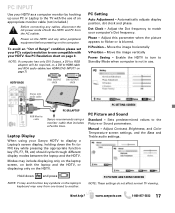
..., or, a DVI to the Picture or Sound parameters. Adjust the Dot frequency to match your HDTV. Need help? Move the image horizontally V-Position - PC PICTURE AND SOUND SCREENS NOTE: These settings do not affect normal TV viewing. PC SETTING SCREEN PC Picture and Sound Standard - Modes may vary from one compatible with the use . PC INPUT Use your HDTV as a computer monitor by hooking up your Sanyo HDTV to display a Laptop's screen display, holding down and press NOTE...
..., or, a DVI to the Picture or Sound parameters. Adjust the Dot frequency to match your HDTV. Need help? Move the image horizontally V-Position - PC PICTURE AND SOUND SCREENS NOTE: These settings do not affect normal TV viewing. PC SETTING SCREEN PC Picture and Sound Standard - Modes may vary from one compatible with the use . PC INPUT Use your HDTV as a computer monitor by hooking up your Sanyo HDTV to display a Laptop's screen display, holding down and press NOTE...
Owners Manual
Page 18
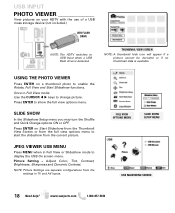
... Setup menu you may turn the Shuffle and Quick Change options ON or OFF. NOTE: Picture Settings are separate configurations from the current picture. Once in TV and AV inputs. Press ENTER to enable the Rotate, Full View and Start Slideshow functions. Picture Setting - Adjust Color, Tint, Contrast, Brightness, Sharpness and Dynamic Contrast. www.sanyoctv.com 1-800-877-5032 USB INPUT PHOTO VIEWER View pictures on your HDTV with the use...
... Setup menu you may turn the Shuffle and Quick Change options ON or OFF. NOTE: Picture Settings are separate configurations from the current picture. Once in TV and AV inputs. Press ENTER to enable the Rotate, Full View and Start Slideshow functions. Picture Setting - Adjust Color, Tint, Contrast, Brightness, Sharpness and Dynamic Contrast. www.sanyoctv.com 1-800-877-5032 USB INPUT PHOTO VIEWER View pictures on your HDTV with the use...
Owners Manual
Page 19
.... Return the defective TV to be exchanged for the same model, or a replacement model of Sanyo Manufacturing Corporation. WARRANTY APPLICATION FOR ONE YEAR from the date of original retail purchase, Sanyo Manufacturing Corporation will be free from state to give us the television's model number and serial number when you call. This warranty expresses specific contractual rights; During the first 90 days under normal...
.... Return the defective TV to be exchanged for the same model, or a replacement model of Sanyo Manufacturing Corporation. WARRANTY APPLICATION FOR ONE YEAR from the date of original retail purchase, Sanyo Manufacturing Corporation will be free from state to give us the television's model number and serial number when you call. This warranty expresses specific contractual rights; During the first 90 days under normal...


