
User Manual
Page 2
... connected to keep from the apparatus. 11. An outside antenna system, extreme care should be taken to the television equipment, be sure the antenna system is grounded so as power-supply cord or plug is damaged, liquid has been spilled or objects have fallen into your safety. Unplug this apparatus near any heat sources such as practical." 17. Servicing is used , use...
... connected to keep from the apparatus. 11. An outside antenna system, extreme care should be taken to the television equipment, be sure the antenna system is grounded so as power-supply cord or plug is damaged, liquid has been spilled or objects have fallen into your safety. Unplug this apparatus near any heat sources such as practical." 17. Servicing is used , use...
User Manual
Page 3
... occur in a residential installation. These limits are trademarks or registered trademarks of Audyssey Laboratories. Reorient or relocate the receiving antenna. - Connect the equipment into an outlet on , the user is a trademark of HDMI Licensing LLC in accordance with the instructions, may void the user's authority to Part 15 of the following measures: - This equipment generates, uses and can be determined...
... occur in a residential installation. These limits are trademarks or registered trademarks of Audyssey Laboratories. Reorient or relocate the receiving antenna. - Connect the equipment into an outlet on , the user is a trademark of HDMI Licensing LLC in accordance with the instructions, may void the user's authority to Part 15 of the following measures: - This equipment generates, uses and can be determined...
User Manual
Page 4
... 10 Channel Scan Memory 10 Input Setting 10 Video2 Setting 11 Setup 11 Menu Language 11 Digital Caption 11 Energy Saver 11 Clock Timer 12 Light Sensor 12 V-Chip 13 Picture 14 Manual Picture Settings 14 Sound 15 aaManual Sound Settings 15 PC CONNECTIONS 16 PC MENU OPERATION 16 PHOTO VIEWER 17 WARRANTY 18 "The Amercian Academy of age" SPECIFICATIONS Power Requirement: Source: AC 120V, 60Hz AC Power Consumption: 122 watts Weight: 21.8 lbs Dimensions: MODEL WIDTH HEIGHT DEPTH DP32640 31.5 22 9.5 w/o stand...
... 10 Channel Scan Memory 10 Input Setting 10 Video2 Setting 11 Setup 11 Menu Language 11 Digital Caption 11 Energy Saver 11 Clock Timer 12 Light Sensor 12 V-Chip 13 Picture 14 Manual Picture Settings 14 Sound 15 aaManual Sound Settings 15 PC CONNECTIONS 16 PC MENU OPERATION 16 PHOTO VIEWER 17 WARRANTY 18 "The Amercian Academy of age" SPECIFICATIONS Power Requirement: Source: AC 120V, 60Hz AC Power Consumption: 122 watts Weight: 21.8 lbs Dimensions: MODEL WIDTH HEIGHT DEPTH DP32640 31.5 22 9.5 w/o stand...
User Manual
Page 5
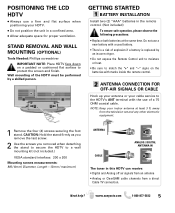
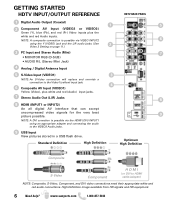
... a wall mounting kit (not included.) VESA standard interface: 200 x 200 Mounting screws measurements: M6 (6mm) Diameter, Length-12mm (maximum) ANTENNA CABLE ANALOG / DIGITAL ANTENNA IN The tuner in this HDTV can receive: • Digital and Analog off air signals from an antenna • Analog or ClearQAM cable channels from the television set and any other electronic equipment. 1 Remove the four (4) screws securing the foot stand. away from a direct Cable TV connection. POSITIONING THE LCD HDTV • Always use a firm and flat...
... a wall mounting kit (not included.) VESA standard interface: 200 x 200 Mounting screws measurements: M6 (6mm) Diameter, Length-12mm (maximum) ANTENNA CABLE ANALOG / DIGITAL ANTENNA IN The tuner in this HDTV can receive: • Digital and Analog off air signals from an antenna • Analog or ClearQAM cable channels from the television set and any other electronic equipment. 1 Remove the four (4) screws securing the foot stand. away from a direct Cable TV connection. POSITIONING THE LCD HDTV • Always use a firm and flat...
User Manual
Page 6
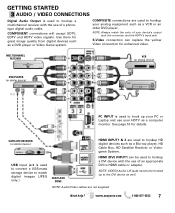
... HDTV BACK PANEL 1 Digital Audio Output (Coaxial) 1 5 2 Component AV Input (VIDEO2 or VIDEO3) Green (Y), blue (Pb), and red (Pr) Video inputs plus white and red (Audio) input jacks. 7 Stereo Audio Out (L/R) Jacks 8 8 HDMI (INPUT1 or INPUT2) An all digital AV interface that can accept uncompressed video signals for the very best picture possible. 9 NOTE: A DVI conection is possible via the HDMI (DVI) INPUT1 using an appropriate adapter and connecting the audio to the VIDEO3 Audio jacks. 9 USB Input View pictures stored in a USB flash...
... HDTV BACK PANEL 1 Digital Audio Output (Coaxial) 1 5 2 Component AV Input (VIDEO2 or VIDEO3) Green (Y), blue (Pb), and red (Pr) Video inputs plus white and red (Audio) input jacks. 7 Stereo Audio Out (L/R) Jacks 8 8 HDMI (INPUT1 or INPUT2) An all digital AV interface that can accept uncompressed video signals for the very best picture possible. 9 NOTE: A DVI conection is possible via the HDMI (DVI) INPUT1 using an appropriate adapter and connecting the audio to the VIDEO3 Audio jacks. 9 USB Input View pictures stored in a USB flash...
User Manual
Page 7
... as a DVD player or Video Game system. COMPONENT connections will accept SDTV, EDTV and HDTV video signals. USB FLASH DRIVE NOTE: VIDEO3 Audio L/R jacks need to be used to hookup a DVI device with the use of your device's output jack, the connector and the HDTV's input jack. COMPOSITE connections are not supplied Need help? S-Video connection can be hooked up your PC or Laptop and use of an appropriate DVI to HDMI cable or adapter. GETTING STARTED AUDIO / VIDEO CONNECTIONS Digital Audio Output is used to...
... as a DVD player or Video Game system. COMPONENT connections will accept SDTV, EDTV and HDTV video signals. USB FLASH DRIVE NOTE: VIDEO3 Audio L/R jacks need to be used to hookup a DVI device with the use of your device's output jack, the connector and the HDTV's input jack. COMPOSITE connections are not supplied Need help? S-Video connection can be hooked up your PC or Laptop and use of an appropriate DVI to HDMI cable or adapter. GETTING STARTED AUDIO / VIDEO CONNECTIONS Digital Audio Output is used to...
User Manual
Page 8
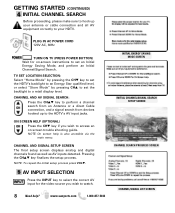
... menu. CHANNEL AND SIGNAL SETUP SCREEN The final setup screen displays analog and digital channels found as well as AV inputs detected. PLUG IN AC POWER CORD 120V AC, 60Hz TURN ON TV (PRESS POWER BUTTON) Wait for the video source you wish to access an on -screen instructions to set the backlight to a retail display level. Pressing the CHLM key finalizes the setup process. www.sanyoctv.com 1-800-877-5032 INITIAL ENERGY SAVING MODE SCREEN INITIAL CHANNEL/SIGNAL SEARCH SETUP SCREEN CHANNEL...
... menu. CHANNEL AND SIGNAL SETUP SCREEN The final setup screen displays analog and digital channels found as well as AV inputs detected. PLUG IN AC POWER CORD 120V AC, 60Hz TURN ON TV (PRESS POWER BUTTON) Wait for the video source you wish to access an on -screen instructions to set the backlight to a retail display level. Pressing the CHLM key finalizes the setup process. www.sanyoctv.com 1-800-877-5032 INITIAL ENERGY SAVING MODE SCREEN INITIAL CHANNEL/SIGNAL SEARCH SETUP SCREEN CHANNEL...
User Manual
Page 9
... ratios. Use of Pix6-7 in TV mode is on your HDTV On or Off. • INPUT Key-Selects the video source to Set the amount of time (in 30 minute increments) at which the HDTV will be cleared. • SLEEP Key-Displays the "Off" Timer. REMOTE CONTROL OPERATION • POWER Key-Turns your screen. Bars may appear on page 12.) • CAPTION Key-Cycles through the channels in PC mode. Stereo...
... ratios. Use of Pix6-7 in TV mode is on your HDTV On or Off. • INPUT Key-Selects the video source to Set the amount of time (in 30 minute increments) at which the HDTV will be cleared. • SLEEP Key-Displays the "Off" Timer. REMOTE CONTROL OPERATION • POWER Key-Turns your screen. Bars may appear on page 12.) • CAPTION Key-Cycles through the channels in PC mode. Stereo...

User Manual
Page 10
...-SCREEN MENU OPERATION CHANNEL SETTING ___________ Display the On Screen menu and use the CH LM keys to select Channel Setting. rent mode is not available when the cur- Searches the detected mode, Cable or Air. Air (Antenna) - It also lists Analog channels that were not found . Use the CURSOR LM keys to move the channel select bar throuh all Analog and Digital channels found , which can be able to receive those ClearQAM channels your cable...
...-SCREEN MENU OPERATION CHANNEL SETTING ___________ Display the On Screen menu and use the CH LM keys to select Channel Setting. rent mode is not available when the cur- Searches the detected mode, Cable or Air. Air (Antenna) - It also lists Analog channels that were not found . Use the CURSOR LM keys to move the channel select bar throuh all Analog and Digital channels found , which can be able to receive those ClearQAM channels your cable...
User Manual
Page 11
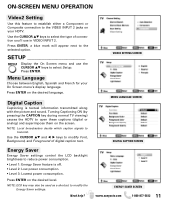
...-SCREEN MENU OPERATION Video2 Setting Use this feature to establish either a Component or Composite connection to the VIDEO INPUT 2 jacks on the desired language. Turning Captioning ON (by pressing the CAPTION key during normal TV viewing) causes the HDTV to open these captions (digital or analog) and superimpose them on the desired level. Press ENTER on the screen. NOTE: Local broadcasters decide which caption signals to the selected option. SETUP Display the...
...-SCREEN MENU OPERATION Video2 Setting Use this feature to establish either a Component or Composite connection to the VIDEO INPUT 2 jacks on the desired language. Turning Captioning ON (by pressing the CAPTION key during normal TV viewing) causes the HDTV to open these captions (digital or analog) and superimpose them on the desired level. Press ENTER on the screen. NOTE: Local broadcasters decide which caption signals to the selected option. SETUP Display the...

User Manual
Page 12
... HDTV's power consumption. When room lighting is dark, the panel brightness and/or the picture setting parameters such as brightness and cotrast are affected opposite. CLOCK TIMER SCREEN LIGHT SENSOR SCREEN 12 Need help? www.sanyoctv.com 1-800-877-5032 When On Timer Function is set Switch on Time. ON-SCREEN MENU OPERATION SETUP Clock Timer This feature allows you to set a Current Time for your HDTV and enable a Switch On Time for the HDTV to turn on at a specific time...
... HDTV's power consumption. When room lighting is dark, the panel brightness and/or the picture setting parameters such as brightness and cotrast are affected opposite. CLOCK TIMER SCREEN LIGHT SENSOR SCREEN 12 Need help? www.sanyoctv.com 1-800-877-5032 When On Timer Function is set Switch on Time. ON-SCREEN MENU OPERATION SETUP Clock Timer This feature allows you to set a Current Time for your HDTV and enable a Switch On Time for the HDTV to turn on at a specific time...

User Manual
Page 13
... can be displayed on one screen. Chip (Parental Control) Use this feature to automatically block programs with content you deem as inappropriate for digital channels that originate in memory, and the Setup V-Chip screen is designed to comply with an antenna. www.sanyoctv.com 1-800-877-5032 13 NOTE: This feature is then modified to the additional ratings. Select Adjust (Standard) and...
... can be displayed on one screen. Chip (Parental Control) Use this feature to automatically block programs with content you deem as inappropriate for digital channels that originate in memory, and the Setup V-Chip screen is designed to comply with an antenna. www.sanyoctv.com 1-800-877-5032 13 NOTE: This feature is then modified to the additional ratings. Select Adjust (Standard) and...
User Manual
Page 14
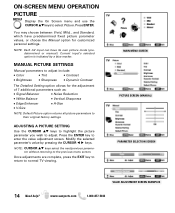
...-SCREEN MENU OPERATION PICTURE Display the On Screen menu and use the CURSOR LM keys to the previous menu screen. Press ENTER. NOTE: Each AV input can have predetermined fixed picture parameter values, or choose the Manual option for the adjustment of 7 additional parameters such as: • Signal Balancer • Noise Reduction • White Balance • Vertical Sharpness • Edge Enhancer • H-Size • V-Size NOTE: Default Picture option returns all picture...
...-SCREEN MENU OPERATION PICTURE Display the On Screen menu and use the CURSOR LM keys to the previous menu screen. Press ENTER. NOTE: Each AV input can have predetermined fixed picture parameter values, or choose the Manual option for the adjustment of 7 additional parameters such as: • Signal Balancer • Noise Reduction • White Balance • Vertical Sharpness • Edge Enhancer • H-Size • V-Size NOTE: Default Picture option returns all picture...
User Manual
Page 15
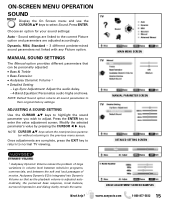
... SCREEN DETAILED SETTING SCREEN 1 Audyssey Dynamic Volume solves the problem of large variations in volume level between television programs, commercials, and between the soft and loud passages of movies. Press the ENTER key to adjust. Press ENTER. Sound settings are linked to the current Picture option and parameters are complete, press the EXIT key to return to select Sound. Need help? ON-SCREEN MENU OPERATION SOUND Display the On Screen menu and use...
... SCREEN DETAILED SETTING SCREEN 1 Audyssey Dynamic Volume solves the problem of large variations in volume level between television programs, commercials, and between the soft and loud passages of movies. Press the ENTER key to adjust. Press ENTER. Sound settings are linked to the current Picture option and parameters are complete, press the EXIT key to return to select Sound. Need help? ON-SCREEN MENU OPERATION SOUND Display the On Screen menu and use...
User Manual
Page 16
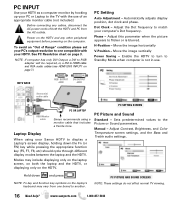
... monitor cable (not included.) Before connecting any other peripheral equipment before powering on the HDTV. Adjust this parameter when the picture appears to HDMI cable and RCA audio cables (see HDMI (DVI) INPUT1 on page 3. Move the image horizontally V-Position - Move the image vertically Power Saving - Enable the HDTV to turn to the Picture or Sound parameters. Modes may vary from the AC outlets. PC SETTING SCREEN PC Picture and Sound Standard - Adjust...
... monitor cable (not included.) Before connecting any other peripheral equipment before powering on the HDTV. Adjust this parameter when the picture appears to HDMI cable and RCA audio cables (see HDMI (DVI) INPUT1 on page 3. Move the image horizontally V-Position - Move the image vertically Power Saving - Enable the HDTV to turn to the Picture or Sound parameters. Modes may vary from the AC outlets. PC SETTING SCREEN PC Picture and Sound Standard - Adjust...
User Manual
Page 17
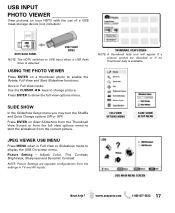
... In the Slideshow Setup menu you may turn the Shuffle and Quick Change options ON or OFF. Adjust Color, Tint, Contrast, Brightness, Sharpness and Dynamic Contrast. USB INPUT PHOTO VIEWER View pictures on your HDTV with the use of a USB mass storage device (not included.) HDTV BACK PANEL USB FLASH DRIVE NOTE: The HDTV switches to USB Input when a USB flash drive is available. NOTE: Picture Settings are separate configurations from the current picture. Picture Setting - USING THE PHOTO VIEWER...
... In the Slideshow Setup menu you may turn the Shuffle and Quick Change options ON or OFF. Adjust Color, Tint, Contrast, Brightness, Sharpness and Dynamic Contrast. USB INPUT PHOTO VIEWER View pictures on your HDTV with the use of a USB mass storage device (not included.) HDTV BACK PANEL USB FLASH DRIVE NOTE: The HDTV switches to USB Input when a USB flash drive is available. NOTE: Picture Settings are separate configurations from the current picture. Picture Setting - USING THE PHOTO VIEWER...

User Manual
Page 18
... TV to the back of Purchase Serial No Located on a label attached to the retailer along with the receipt and the included accessories, such as the remote control. HOW TO MAKE A CLAIM UNDER THIS WARRANTY Please call toll free 1-800-877-5032. The defective TV will replace any manufacturing defect or malfunction Sanyo Manufacturing Corporation will be contingent...
... TV to the back of Purchase Serial No Located on a label attached to the retailer along with the receipt and the included accessories, such as the remote control. HOW TO MAKE A CLAIM UNDER THIS WARRANTY Please call toll free 1-800-877-5032. The defective TV will replace any manufacturing defect or malfunction Sanyo Manufacturing Corporation will be contingent...


