
Owners Manual
Page 2
... readily operable. 2 Need help? Read these instructions. 3. If an outside antenna is connected to the point of time. 14. EXAMPLE OF ANTENNA GROUNDING ACCORDING TO NATIONAL ELECTRICAL CODE, ANSI/NFPA 70 10. A polarized plug has two blades with the cart, stand, tripod, bracket, or table specified by the manufacturer. 12. IMPORTANT SAFETY INSTRUCTIONS 1. The wide blade or the third prong are provided for replacement of...
... readily operable. 2 Need help? Read these instructions. 3. If an outside antenna is connected to the point of time. 14. EXAMPLE OF ANTENNA GROUNDING ACCORDING TO NATIONAL ELECTRICAL CODE, ANSI/NFPA 70 10. A polarized plug has two blades with the cart, stand, tripod, bracket, or table specified by the manufacturer. 12. IMPORTANT SAFETY INSTRUCTIONS 1. The wide blade or the third prong are provided for replacement of...
Owners Manual
Page 3
... license from Dolby Laboratories. Need help . Reorient or relocate the receiving antenna. - CAUTION: FCC Regulations state that to which can radiate radio frequency energy and, if not installed and used in the United States and other countries. "Dolby" is a trademark of HDMI Licensing LLC in accordance with the instructions, may void the user's authority to operate the unit. This Class...
... license from Dolby Laboratories. Need help . Reorient or relocate the receiving antenna. - CAUTION: FCC Regulations state that to which can radiate radio frequency energy and, if not installed and used in the United States and other countries. "Dolby" is a trademark of HDMI Licensing LLC in accordance with the instructions, may void the user's authority to operate the unit. This Class...

Owners Manual
Page 4
...3 CONTENTS 4 SPECIFICATIONS 4 PROTECTING THE LCD SCREEN 4 HANDLING PRECAUTIONS 4 STAND REMOVAL / WALL MOUNTING 5 GETTING STARTED- Remote Control Battery Installation 5 Antenna Connections for children younger than two years of age" SPECIFICATIONS Power Requirement: Source: AC 120V, 60Hz AC Power Consumption: 95 watts Weight: 19 lbs. excessive pressure can be damaged if it is not covered under warranty. 4 Need help? Dimensions: MODEL WIDTH DP26640 26.1 w/o stand HEIGHT 19.1 17.4 DEPTH 9.5 4.5 NOTE: Dimensions are in inches Please read before operating your HDTV! HANDLING...
...3 CONTENTS 4 SPECIFICATIONS 4 PROTECTING THE LCD SCREEN 4 HANDLING PRECAUTIONS 4 STAND REMOVAL / WALL MOUNTING 5 GETTING STARTED- Remote Control Battery Installation 5 Antenna Connections for children younger than two years of age" SPECIFICATIONS Power Requirement: Source: AC 120V, 60Hz AC Power Consumption: 95 watts Weight: 19 lbs. excessive pressure can be damaged if it is not covered under warranty. 4 Need help? Dimensions: MODEL WIDTH DP26640 26.1 w/o stand HEIGHT 19.1 17.4 DEPTH 9.5 4.5 NOTE: Dimensions are in inches Please read before operating your HDTV! HANDLING...
Owners Manual
Page 5
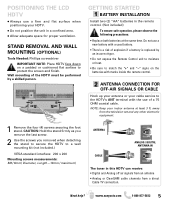
... and flat surface when positioning your cable service to protect the screen and finish. CAUTION: Hold the stand firmly as you remove the last screw. 2 Use the screws you removed when detaching the stand to secure the HDTV to a wall mounting kit (not included.) VESA standard interface: 200 x 200 Mounting screws measurements: M6 (6mm) Diameter, Length-12mm (maximum) ANTENNA CABLE ANALOG / DIGITAL ANTENNA IN The tuner in the remote control. (Not included) To ensure safe operation...
... and flat surface when positioning your cable service to protect the screen and finish. CAUTION: Hold the stand firmly as you remove the last screw. 2 Use the screws you removed when detaching the stand to secure the HDTV to a wall mounting kit (not included.) VESA standard interface: 200 x 200 Mounting screws measurements: M6 (6mm) Diameter, Length-12mm (maximum) ANTENNA CABLE ANALOG / DIGITAL ANTENNA IN The tuner in the remote control. (Not included) To ensure safe operation...
Owners Manual
Page 6
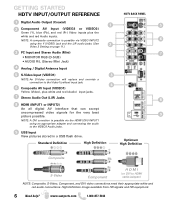
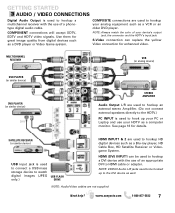
... STARTED HDTV INPUT/OUTPUT REFERENCE HDTV BACK PANEL 1 Digital Audio Output (Coaxial) 1 5 2 Component AV Input (VIDEO2 or VIDEO3) Green (Y), blue (Pb), and red (Pr) Video inputs plus white and red (Audio) input jacks. 7 Stereo Audio Out (L/R) Jacks 8 8 HDMI (INPUT1 or INPUT2) An all digital AV interface that can accept uncompressed video signals for the very best picture possible. 9 NOTE: A DVI conection is possible via VIDEO INPUT2 6 using an appropriate adapter and connecting the audio to the VIDEO3 Audio jacks. 9 USB Input View pictures stored in a USB flash...
... STARTED HDTV INPUT/OUTPUT REFERENCE HDTV BACK PANEL 1 Digital Audio Output (Coaxial) 1 5 2 Component AV Input (VIDEO2 or VIDEO3) Green (Y), blue (Pb), and red (Pr) Video inputs plus white and red (Audio) input jacks. 7 Stereo Audio Out (L/R) Jacks 8 8 HDMI (INPUT1 or INPUT2) An all digital AV interface that can accept uncompressed video signals for the very best picture possible. 9 NOTE: A DVI conection is possible via VIDEO INPUT2 6 using an appropriate adapter and connecting the audio to the VIDEO3 Audio jacks. 9 USB Input View pictures stored in a USB flash...
Owners Manual
Page 7
COMPONENT connections will accept SDTV, EDTV and HDTV video signals. S-Video connection can be hooked up your analog equipment such as a VCR or an older DVD player. SATELLITE RECEIVER (or similar device) USB input jack is used to connect a USB mass storage device to watch digital images (JPEG only.) USB FLASH DRIVE HDMI INPUT1 & 2 are not supplied Need help? HDMI (DVI) INPUT1 can replace the yellow Video connection for enhanced video. NOTE: Audio/Video cables are used to hookup HD digital devices such as a computer...
COMPONENT connections will accept SDTV, EDTV and HDTV video signals. S-Video connection can be hooked up your analog equipment such as a VCR or an older DVD player. SATELLITE RECEIVER (or similar device) USB input jack is used to connect a USB mass storage device to watch digital images (JPEG only.) USB FLASH DRIVE HDMI INPUT1 & 2 are not supplied Need help? HDMI (DVI) INPUT1 can replace the yellow Video connection for enhanced video. NOTE: Audio/Video cables are used to hookup HD digital devices such as a computer...
Owners Manual
Page 8
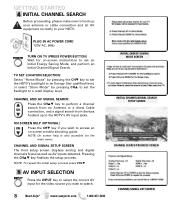
... AV input for on-screen instructions to access an on screen trouble shooting guide. GETTING STARTED INITIAL CHANNEL SEARCH Before proceeding, please make sure to hook up to your antenna or cable connection and all AV equipment correctly to the HDTV's AV input jacks. CHANNEL AND SIGNAL SETUP SCREEN The final setup screen displays analog and digital channels found as well as AV inputs detected. Pressing the CHLM key finalizes the setup process. CHANNEL AND AV SIGNAL SEARCH...
... AV input for on-screen instructions to access an on screen trouble shooting guide. GETTING STARTED INITIAL CHANNEL SEARCH Before proceeding, please make sure to hook up to your antenna or cable connection and all AV equipment correctly to the HDTV's AV input jacks. CHANNEL AND SIGNAL SETUP SCREEN The final setup screen displays analog and digital channels found as well as AV inputs detected. Pressing the CHLM key finalizes the setup process. CHANNEL AND AV SIGNAL SEARCH...
Owners Manual
Page 9
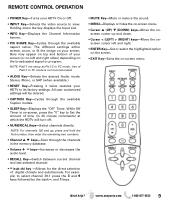
... of digital chanels and subchannels. Use of time (in PC mode. Need help? Bars may appear on the broadcasted signal or program. REMOTE CONTROL OPERATION • POWER Key-Turns your HDTV On or Off. • INPUT Key-Selects the video source to its factory settings. While Off Timer is not recommended. • AUDIO Key-Selects the desired Audio mode. keys-Increases or decreases the audio level. • RECALL Key-Switch between current channel and last selected channel. •...
... of digital chanels and subchannels. Use of time (in PC mode. Need help? Bars may appear on the broadcasted signal or program. REMOTE CONTROL OPERATION • POWER Key-Turns your HDTV On or Off. • INPUT Key-Selects the video source to its factory settings. While Off Timer is not recommended. • AUDIO Key-Selects the desired Audio mode. keys-Increases or decreases the audio level. • RECALL Key-Switch between current channel and last selected channel. •...
Owners Manual
Page 10
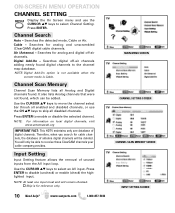
... highlighted input. Therefore, when you search for reference only. 10 Need help? Cable - It also lists Analog channels that were not found, which can be deleted. You will remain checked. :Skip is Cable. ON-SCREEN MENU OPERATION CHANNEL SETTING ___________ Display the On Screen menu and use the CH LM keys to skip all disabled channels. NOTE: Digital Add-On option is not available when the current mode is for cable channels, the...
... highlighted input. Therefore, when you search for reference only. 10 Need help? Cable - It also lists Analog channels that were not found, which can be deleted. You will remain checked. :Skip is Cable. ON-SCREEN MENU OPERATION CHANNEL SETTING ___________ Display the On Screen menu and use the CH LM keys to skip all disabled channels. NOTE: Digital Add-On option is not available when the current mode is for cable channels, the...
Owners Manual
Page 11
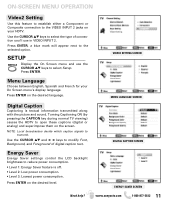
... Saver settings control the LCD backlight brightness to reduce power consumption. • Level 1: Energy Saver feature is textual information transmitted along with the picture and sound. Turning Captioning ON (by pressing the CAPTION key during normal TV viewing) causes the HDTV to open these captions (digital or analog) and superimpose them on the desired level. Need help? Press ENTER. NOTE: Local broadcasters decide which caption signals to transmit. Use...
... Saver settings control the LCD backlight brightness to reduce power consumption. • Level 1: Energy Saver feature is textual information transmitted along with the picture and sound. Turning Captioning ON (by pressing the CAPTION key during normal TV viewing) causes the HDTV to open these captions (digital or analog) and superimpose them on the desired level. Need help? Press ENTER. NOTE: Local broadcasters decide which caption signals to transmit. Use...
Owners Manual
Page 12
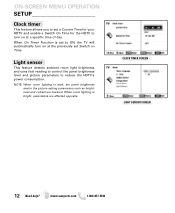
... are affected opposite. CLOCK TIMER SCREEN LIGHT SENSOR SCREEN 12 Need help? ON-SCREEN MENU OPERATION SETUP Clock timer This feature allows you to set Switch on at the previously set a Current Time for your HDTV and enable a Switch On Time for the HDTV to turn on at a specific time of day. Light sensor This feature detects ambient room light brightness and uses that reading to control the panel brightness level and picture parameters to reduce the HDTV's power consumption. www.sanyoctv...
... are affected opposite. CLOCK TIMER SCREEN LIGHT SENSOR SCREEN 12 Need help? ON-SCREEN MENU OPERATION SETUP Clock timer This feature allows you to set Switch on at the previously set a Current Time for your HDTV and enable a Switch On Time for the HDTV to turn on at a specific time of day. Light sensor This feature detects ambient room light brightness and uses that reading to control the panel brightness level and picture parameters to reduce the HDTV's power consumption. www.sanyoctv...
Owners Manual
Page 13
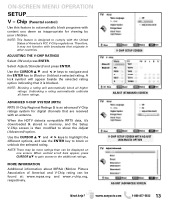
... feature is then modified to comply with an antenna. When vertical scroll bars appear, press CURSOR LM to gain access to automatically block programs with content you deem as inappropriate for digital channels that originate in memory, and the Setup V-Chip screen is designed to show the Adjust (Advanced) option. ON-SCREEN MENU OPERATION SETUP V - Chip (Parental control) Use this feature to the additional ratings.
... feature is then modified to comply with an antenna. When vertical scroll bars appear, press CURSOR LM to gain access to automatically block programs with content you deem as inappropriate for digital channels that originate in memory, and the Setup V-Chip screen is designed to show the Adjust (Advanced) option. ON-SCREEN MENU OPERATION SETUP V - Chip (Parental control) Use this feature to the additional ratings.
Owners Manual
Page 14
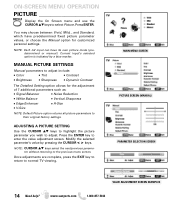
... AV input can have predetermined fixed picture parameter values, or choose the Manual option for the adjustment of 7 additional parameters such as: • Signal Balancer • Noise Reduction • White Balance • Vertical Sharpness • Edge Enhancer • H-Size • V-Size NOTE: Default Picture option returns all picture parameters to their original factory settings. MANUAL PICTURE SETTINGS Manual parameters to normal TV viewing. ON-SCREEN MENU OPERATION PICTURE Display the On Screen menu and use the CURSOR...
... AV input can have predetermined fixed picture parameter values, or choose the Manual option for the adjustment of 7 additional parameters such as: • Signal Balancer • Noise Reduction • White Balance • Vertical Sharpness • Edge Enhancer • H-Size • V-Size NOTE: Default Picture option returns all picture parameters to their original factory settings. MANUAL PICTURE SETTINGS Manual parameters to normal TV viewing. ON-SCREEN MENU OPERATION PICTURE Display the On Screen menu and use the CURSOR...
Owners Manual
Page 15
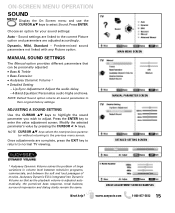
... Dynamic Volume 1 • Detailed Setting - MAIN MENU SCREEN MANUAL PARAMETER SCREEN DETAILED SETTING SCREEN 1 Audyssey Dynamic Volume solves the problem of large variations in volume level between television programs, commercials, and between the soft and loud passages of movies. ON-SCREEN MENU OPERATION SOUND Display the On Screen menu and use the CURSOR LM keys to the previous menu screen. ADJUSTING A SOUND SETTING Use the CURSOR LM keys to highlight the sound parameter you wish to normal TV viewing.
... Dynamic Volume 1 • Detailed Setting - MAIN MENU SCREEN MANUAL PARAMETER SCREEN DETAILED SETTING SCREEN 1 Audyssey Dynamic Volume solves the problem of large variations in volume level between television programs, commercials, and between the soft and loud passages of movies. ON-SCREEN MENU OPERATION SOUND Display the On Screen menu and use the CURSOR LM keys to the previous menu screen. ADJUSTING A SOUND SETTING Use the CURSOR LM keys to highlight the sound parameter you wish to normal TV viewing.
Owners Manual
Page 16
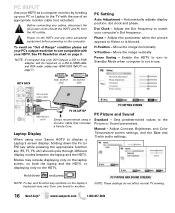
.... HDTV BACK RGB OUTPUT JACK DVI OUTPUT JACK Stereo mini audio cable PC SETTING SCREEN PC OR LAPTOP RGB Monitor cable Sanyo recommends using your Sanyo HDTV to display a Laptop's screen display, holding down and press NOTE: Fn key and function key symbols on page 7.) PC Setting Auto Adjustment - PC Picture and Sound Standard - Enable the HDTV to turn to Standby Mode when computer is blurred. Laptop Display When using a monitor cable that includes a Ferrite Core. Manual - See PC Resolution chart...
.... HDTV BACK RGB OUTPUT JACK DVI OUTPUT JACK Stereo mini audio cable PC SETTING SCREEN PC OR LAPTOP RGB Monitor cable Sanyo recommends using your Sanyo HDTV to display a Laptop's screen display, holding down and press NOTE: Fn key and function key symbols on page 7.) PC Setting Auto Adjustment - PC Picture and Sound Standard - Enable the HDTV to turn to Standby Mode when computer is blurred. Laptop Display When using a monitor cable that includes a Ferrite Core. Manual - See PC Resolution chart...
Owners Manual
Page 17
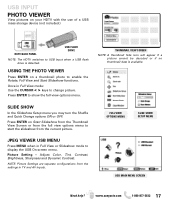
... and AV inputs. USB INPUT PHOTO VIEWER View pictures on your HDTV with the use of a USB mass storage device (not included.) HDTV BACK PANEL USB FLASH DRIVE NOTE: The HDTV switches to USB Input when a USB flash drive is available. Picture Setting - FULL VIEW OPTIONS MENU SLIDE SHOW SETUP MENU JPEG VIEWER USB MENU Press MENU when in Full View or Slideshow mode to display the USB On screen menu. SLIDE SHOW In the Slideshow Setup menu you may turn the Shuffle and Quick Change options ON...
... and AV inputs. USB INPUT PHOTO VIEWER View pictures on your HDTV with the use of a USB mass storage device (not included.) HDTV BACK PANEL USB FLASH DRIVE NOTE: The HDTV switches to USB Input when a USB flash drive is available. Picture Setting - FULL VIEW OPTIONS MENU SLIDE SHOW SETUP MENU JPEG VIEWER USB MENU Press MENU when in Full View or Slideshow mode to display the USB On screen menu. SLIDE SHOW In the Slideshow Setup menu you may turn the Shuffle and Quick Change options ON...

Owners Manual
Page 18
... IN LIEU OF ALL OTHER WARRANTIES OF MERCHANTABILITY OR FITNESS FOR A PARTICULAR PURPOSE. Model No Date of Purchase Serial No Located on a label attached to state. (EFFECTIVE: March 1, 2007) Your Sanyo HDTV is registered at the retailer. ONE-YEAR LIMITED PARTS AND LABOR WARRANTY THIS LIMITED PARTS AND LABOR WARRANTY IS VALID ONLY ON SANYO TELEVISIONS PURCHASED AND USED IN THE UNITED STATES...
... IN LIEU OF ALL OTHER WARRANTIES OF MERCHANTABILITY OR FITNESS FOR A PARTICULAR PURPOSE. Model No Date of Purchase Serial No Located on a label attached to state. (EFFECTIVE: March 1, 2007) Your Sanyo HDTV is registered at the retailer. ONE-YEAR LIMITED PARTS AND LABOR WARRANTY THIS LIMITED PARTS AND LABOR WARRANTY IS VALID ONLY ON SANYO TELEVISIONS PURCHASED AND USED IN THE UNITED STATES...


