User Manual Ver.1.0 (English)
Page 2
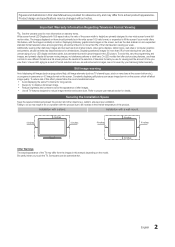
... design and specifications may be in the wide screen 16:9 ratio format, or expanded to fill the screen if your model offers this User Manual are provided for reference only and may differ from the images in this manual, depending on the screen, such as described above for long periods. • Always try to display a full screen image. • Reduce brightness and contrast to view different...
... design and specifications may be in the wide screen 16:9 ratio format, or expanded to fill the screen if your model offers this User Manual are provided for reference only and may differ from the images in this manual, depending on the screen, such as described above for long periods. • Always try to display a full screen image. • Reduce brightness and contrast to view different...
User Manual Ver.1.0 (English)
Page 3
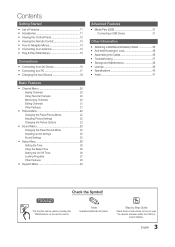
... yy Sound Menu 25 Changing the Preset Sound Mode 25 Adjusting sound settings 25 Sound Settings 25 yy Setup Menu 26 Setting the Time 26 Using the Sleep Timer 26 Setting the On/Off Timer 26 Locking Programs 27 Other Features 28 yy Support Menu 30 Advanced Features yy Media Play (USB 31 Connecting a USB Device 31 Other Information yy Attaching a Wall Mount/Desktop Stand 35 yy Anti-theft Kensington Lock 36 yy Assembling the Cables 36 yy Troubleshooting...
... yy Sound Menu 25 Changing the Preset Sound Mode 25 Adjusting sound settings 25 Sound Settings 25 yy Setup Menu 26 Setting the Time 26 Using the Sleep Timer 26 Setting the On/Off Timer 26 Locking Programs 27 Other Features 28 yy Support Menu 30 Advanced Features yy Media Play (USB 31 Connecting a USB Device 31 Other Information yy Attaching a Wall Mount/Desktop Stand 35 yy Anti-theft Kensington Lock 36 yy Assembling the Cables 36 yy Troubleshooting...

User Manual Ver.1.0 (English)
Page 4
... using a damaged power cord or plug or a loose power outlet. Avoid plugging in firmly. Make sure to connect the power cord to a grounded wall outlet (for your reference and may result in electric shock or fire due to a damaged power cord. 4 English CAUTION RISK OF ELECTRIC SHOCK DO NOT OPEN CAUTION: TO REDUCE THE RISK OF ELECTRIC SHOCK, DO NOT REMOVE COVER (OR BACK). THERE ARE NO USER SERVICEABLE PARTS...
... using a damaged power cord or plug or a loose power outlet. Avoid plugging in firmly. Make sure to connect the power cord to a grounded wall outlet (for your reference and may result in electric shock or fire due to a damaged power cord. 4 English CAUTION RISK OF ELECTRIC SHOCK DO NOT OPEN CAUTION: TO REDUCE THE RISK OF ELECTRIC SHOCK, DO NOT REMOVE COVER (OR BACK). THERE ARE NO USER SERVICEABLE PARTS...
User Manual Ver.1.0 (English)
Page 7
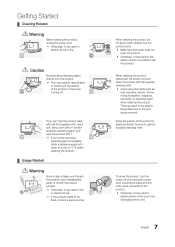
.... Getting Started ¦ Cleaning Related Warning Before cleaning the product, unplug the power cord. y This may result in discoloration or cracking of the exterior of the product or the panel coming off and unplug the power cord, the antenna cable and any other wires connected to be sure to the damaged power cord. 7 English cleansing agent is easily scratched, be fixed, contact a service center. This...
.... Getting Started ¦ Cleaning Related Warning Before cleaning the product, unplug the power cord. y This may result in discoloration or cracking of the exterior of the product or the panel coming off and unplug the power cord, the antenna cable and any other wires connected to be sure to the damaged power cord. 7 English cleansing agent is easily scratched, be fixed, contact a service center. This...
User Manual Ver.1.0 (English)
Page 9
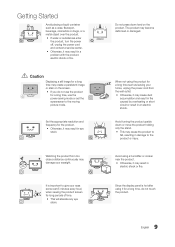
...not touch the product. 9 English y Otherwise, it may cause the product to fall, resulting in a problem with the product, electric shock or fire. It is hot after using a humidifier or cooker near the product. Getting Started ...stand. Caution Displaying a still image for the product. power-saving mode or set the ! Since the display panel is important to give your eyes some rest (5 minutes every hour) when viewing the product screen for a long time, use the ! strain. y If water or substances enter the product, turn the power off, unplug the power cord and contact a service...
...not touch the product. 9 English y Otherwise, it may cause the product to fall, resulting in a problem with the product, electric shock or fire. It is hot after using a humidifier or cooker near the product. Getting Started ...stand. Caution Displaying a still image for the product. power-saving mode or set the ! Since the display panel is important to give your eyes some rest (5 minutes every hour) when viewing the product screen for a long time, use the ! strain. y If water or substances enter the product, turn the power off, unplug the power cord and contact a service...
User Manual Ver.1.0 (English)
Page 11
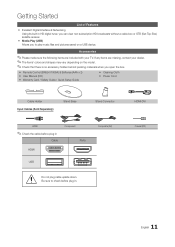
...) satellite receiver. yy Remote Control (BN59-01006A) & Batteries (AAA x 2) yy User Manual (CD) yy Warranty Card / Safety Guide / Quick Setup Guide yy Cleaning Cloth yy Power Cord Cable Holder Input Cables (Sold Separately) Stand Base Stand Connector HDMI ✎✎Check the cable before plug-in Cable Component Ports HDMI USB Composite (AV) Do not plug cable upside down. HDMI-DVI Coaxial (RF) 11 English Accessories ✎✎Please make sure the following items are missing, contact your TV. Getting Started List of Features...
...) satellite receiver. yy Remote Control (BN59-01006A) & Batteries (AAA x 2) yy User Manual (CD) yy Warranty Card / Safety Guide / Quick Setup Guide yy Cleaning Cloth yy Power Cord Cable Holder Input Cables (Sold Separately) Stand Base Stand Connector HDMI ✎✎Check the cable before plug-in Cable Component Ports HDMI USB Composite (AV) Do not plug cable upside down. HDMI-DVI Coaxial (RF) 11 English Accessories ✎✎Please make sure the following items are missing, contact your TV. Getting Started List of Features...
User Manual Ver.1.0 (English)
Page 15
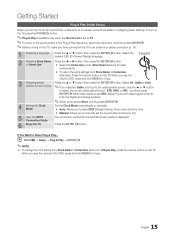
... step in the Plug & Play sequence, select the red button, and then press ENTERE. ✎✎Before turning on the TV, make you turn on the TV. Most cable systems use STD. When you see the volume in the OSD, press and hold MENU for the best HD screen quality is set the current date and time (p. 27). 5 View the HDTV Connection Guide The connection method for 5 sec...
... step in the Plug & Play sequence, select the red button, and then press ENTERE. ✎✎Before turning on the TV, make you turn on the TV. Most cable systems use STD. When you see the volume in the OSD, press and hold MENU for the best HD screen quality is set the current date and time (p. 27). 5 View the HDTV Connection Guide The connection method for 5 sec...
User Manual Ver.1.0 (English)
Page 16
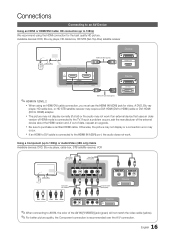
... all) or the audio may require a DVI-HDMI (DVI to HDMI) cable or DVI-HDMI (DVI to HDMI) adapter. xx Be sure to purchase a certified HDMI cable. Otherwise, the picture may not display or a connection error may occur. xx If an HDMI to DVI cable is connected to the HDMI IN 1(DVI) port, the audio does not work if an external device that uses an older version of HDMI mode is recommended over the A/V connection. 16 English If such a problem occurs, ask...
... all) or the audio may require a DVI-HDMI (DVI to HDMI) cable or DVI-HDMI (DVI to HDMI) adapter. xx Be sure to purchase a certified HDMI cable. Otherwise, the picture may not display or a connection error may occur. xx If an HDMI to DVI cable is connected to the HDMI IN 1(DVI) port, the audio does not work if an external device that uses an older version of HDMI mode is recommended over the A/V connection. 16 English If such a problem occurs, ask...
User Manual Ver.1.0 (English)
Page 17
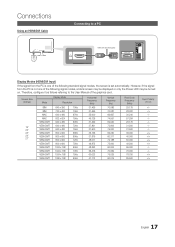
Connections Using an HDMI/DVI Cable Connecting to a PC HDMI to the User Manual of the following signal modes, a blank screen may be displayed or only the Power LED may be turned on. Screen Size (Inches) 19" 22" 23" 24" 27" Mode IBM IBM MAC MAC VESA DMT VESA DMT VESA DMT VESA DMT VESA DMT VESA DMT VESA DMT VESA DMT VESA DMT VESA DMT VESA DMT Display Mode Resolution 640 x 350 720 x 400 640 x 480 832 x 624 640 x 480 640 x 480 640 x 480 800 x 600...
Connections Using an HDMI/DVI Cable Connecting to a PC HDMI to the User Manual of the following signal modes, a blank screen may be displayed or only the Power LED may be turned on. Screen Size (Inches) 19" 22" 23" 24" 27" Mode IBM IBM MAC MAC VESA DMT VESA DMT VESA DMT VESA DMT VESA DMT VESA DMT VESA DMT VESA DMT VESA DMT VESA DMT VESA DMT Display Mode Resolution 640 x 350 720 x 400 640 x 480 832 x 624 640 x 480 640 x 480 640 x 480 800 x 600...

User Manual Ver.1.0 (English)
Page 18
SOG(Sync On Green) is not supported. ✎✎If there is no power cut-off switch, the power consumption is "0" only when the power cord is disconnected. ✎✎DPM(Display Power Management) Function does not work . Connections Screen Size (Inches) 22" 23" 24" 27" Display Mode Mode Resolution MAC VESA DMT VESA DMT VESA DMT VESA DMT VESA DMT VESA DMT VESA DMT VESA DMT VESA DMT 1152 x 870 1152 x 864 1280 x 800 1280 x 960 1280 x 1024 1280...
SOG(Sync On Green) is not supported. ✎✎If there is no power cut-off switch, the power consumption is "0" only when the power cord is disconnected. ✎✎DPM(Display Power Management) Function does not work . Connections Screen Size (Inches) 22" 23" 24" 27" Display Mode Mode Resolution MAC VESA DMT VESA DMT VESA DMT VESA DMT VESA DMT VESA DMT VESA DMT VESA DMT VESA DMT 1152 x 870 1152 x 864 1280 x 800 1280 x 960 1280 x 1024 1280...
User Manual Ver.1.0 (English)
Page 23
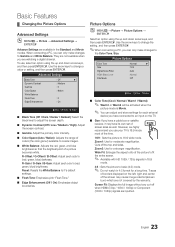
...) signals are inputted. 23 English To use your TV's 16:9 mode most of a picture becomes white. R-Offset / G-Offset / B-Offset: Adjust each color's (red, green, blue) brightness. Traces of the screen may cause image retention(screen burn) which are not covered by the warranty. Use the arrow keys to an input on the left, right and center of borders displayed on the TV. ■■ Size: If you are watching a digital channel. Zoom2: Use...
...) signals are inputted. 23 English To use your TV's 16:9 mode most of a picture becomes white. R-Offset / G-Offset / B-Offset: Adjust each color's (red, green, blue) brightness. Traces of the screen may cause image retention(screen burn) which are not covered by the warranty. Use the arrow keys to an input on the left, right and center of borders displayed on the TV. ■■ Size: If you are watching a digital channel. Zoom2: Use...
User Manual Ver.1.0 (English)
Page 24
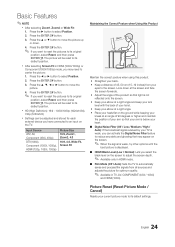
... (1920x1080), 720p (1280x720) xx Settings can activate the Digital Noise Filter feature to its default position. Input Source ATV, AV, Component (480i, 480p) DTV(1080i), Component (1080i, 1080p), HDMI (720p, 1080i, 1080p) Picture Size 16:9, Zoom1, Zoom2, 4:3 16:9, 4:3, Wide Fit, Screen Fit Maintaining the Correct Posture when Using this Product Maintain the correct posture when using this product. yy Keep a distance of your arm...
... (1920x1080), 720p (1280x720) xx Settings can activate the Digital Noise Filter feature to its default position. Input Source ATV, AV, Component (480i, 480p) DTV(1080i), Component (1080i, 1080p), HDMI (720p, 1080i, 1080p) Picture Size 16:9, Zoom1, Zoom2, 4:3 16:9, 4:3, Wide Fit, Screen Fit Maintaining the Correct Posture when Using this Product Maintain the correct posture when using this product. yy Keep a distance of your arm...
User Manual Ver.1.0 (English)
Page 25
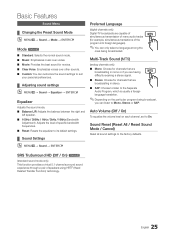
...; Equalizer → ENTERE Equalizer Adjusts the sound mode. ■■ Balance L/R: Adjusts the balance between the right and left speaker. ■■ 100Hz / 300Hz / 1kHz / 3kHz / 10kHz (Bandwidth Adjustment): Adjusts the level of specific bandwidth frequencies. ■■ Reset: Resets the equalizer to its default settings. ¦¦ Sound Settings OO MENUm → Sound → ENTERE Preferred Language (digital channels only) Digital-TV broadcasts are having difficulty receiving a stereo signal.
...; Equalizer → ENTERE Equalizer Adjusts the sound mode. ■■ Balance L/R: Adjusts the balance between the right and left speaker. ■■ 100Hz / 300Hz / 1kHz / 3kHz / 10kHz (Bandwidth Adjustment): Adjusts the level of specific bandwidth frequencies. ■■ Reset: Resets the equalizer to its default settings. ¦¦ Sound Settings OO MENUm → Sound → ENTERE Preferred Language (digital channels only) Digital-TV broadcasts are having difficulty receiving a stereo signal.
User Manual Ver.1.0 (English)
Page 26
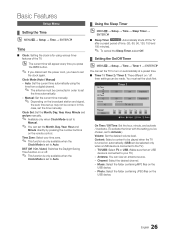
...; If you disconnect the power cord, you 've chosen, set the Month, Day, Year, Hour and Minute directly by pressing the number buttons on the USB device. 26 English Content: Select a content to your time zone. ✎✎ This function is only available when the Clock Mode is connected to be played when the TV is set the time manually. Clock Mode (Auto / Manual) --
...; If you disconnect the power cord, you 've chosen, set the Month, Day, Year, Hour and Minute directly by pressing the number buttons on the USB device. 26 English Content: Select a content to your time zone. ✎✎ This function is only available when the Clock Mode is connected to be played when the TV is set the time manually. Clock Mode (Auto / Manual) --
User Manual Ver.1.0 (English)
Page 28
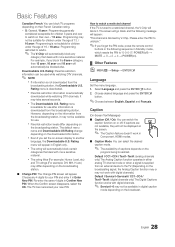
... material. Rating menu is automatically downloaded while watching DTV channels. xx Parental restriction information is deactivated. xx Even if you forget the PIN code, press the remote control buttons in English only. Rating menu will automatically be displayed on the screen. ✎✎ The Caption feature doesn't work with digital channels.) Default / Service1~Service6 / CC1~CC4 / Text1~Text4: (digital channels only) The Digital Captions function works with digital channels...
... material. Rating menu is automatically downloaded while watching DTV channels. xx Parental restriction information is deactivated. xx Even if you forget the PIN code, press the remote control buttons in English only. Rating menu will automatically be displayed on the screen. ✎✎ The Caption feature doesn't work with digital channels.) Default / Service1~Service6 / CC1~CC4 / Text1~Text4: (digital channels only) The Digital Captions function works with digital channels...

User Manual Ver.1.0 (English)
Page 29
...; Digital Caption Options: (digital channels only) Size: Options include Default, Small, Standard and Large. You can change the color of the TV in the setup menu. -- If you may notice reduced picture quality. Foreground Color: Options include Default, White, Black, Red, Green, Blue, Yellow, Magenta and Cyan. xx Game Mode is not available when the input source is set to Movie. -- Unfortunately, you display the TV menu in Caption Mode. xx If Game Mode...
...; Digital Caption Options: (digital channels only) Size: Options include Default, Small, Standard and Large. You can change the color of the TV in the setup menu. -- If you may notice reduced picture quality. Foreground Color: Options include Default, White, Black, Red, Green, Blue, Yellow, Magenta and Cyan. xx Game Mode is not available when the input source is set to Movie. -- Unfortunately, you display the TV menu in Caption Mode. xx If Game Mode...
User Manual Ver.1.0 (English)
Page 30
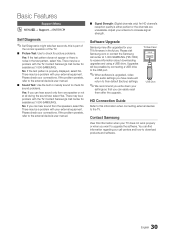
... test pattern is upgraded, video and audio settings you have made will be possible by connecting a USB drive to the USB port. ✎✎When software is properly displayed, select No. Please check your connections. TV Rear Panel USB Drive HD Connection Guide Refer to this information when connecting external devices to check for sound problems. Yes: If you want to check for assistance (1-800-SAMSUNG). Please check your connections. If the problem persists, refer...
... test pattern is upgraded, video and audio settings you have made will be possible by connecting a USB drive to the USB port. ✎✎When software is properly displayed, select No. Please check your connections. TV Rear Panel USB Drive HD Connection Guide Refer to this information when connecting external devices to check for sound problems. Yes: If you want to check for assistance (1-800-SAMSUNG). Please check your connections. If the problem persists, refer...
User Manual Ver.1.0 (English)
Page 32
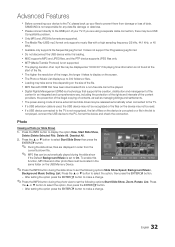
... folders or files. xx Available only supports the Sequential jpeg format. Press the ▲ or ▼ button to select Start Slide Show then press the ENTERE button. ✎✎ During the slide show to set to On. SAMSUNG is not supported. xx Do not disconnect the USB device while it takes to make a change . 2 / 31 01-The Way.mp3 00...
... folders or files. xx Available only supports the Sequential jpeg format. Press the ▲ or ▼ button to select Start Slide Show then press the ENTERE button. ✎✎ During the slide show to set to On. SAMSUNG is not supported. xx Do not disconnect the USB device while it takes to make a change . 2 / 31 01-The Way.mp3 00...
User Manual Ver.1.0 (English)
Page 37
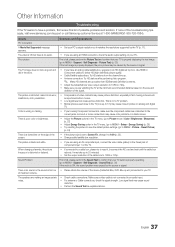
... 're using Component connection, make sure the component cables are using an HDMI connection, check the audio output setting on the size and definition of the screen. Setup - The picture is black and white. • If the picture size is properly operating. (go to the correct jacks. When changing channels, the picture freezes or is distorted: macro block error, small block, dots, pixelization. Sound Problem • If connected to a cable box, please try to an audio input. •...
... 're using Component connection, make sure the component cables are using an HDMI connection, check the audio output setting on the size and definition of the screen. Setup - The picture is black and white. • If the picture size is properly operating. (go to the correct jacks. When changing channels, the picture freezes or is distorted: macro block error, small block, dots, pixelization. Sound Problem • If connected to a cable box, please try to an audio input. •...
User Manual Ver.1.0 (English)
Page 38
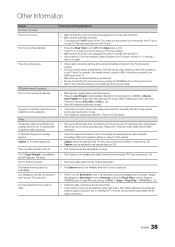
... resolution accordingly. Go to Home Use mode in the menu. Others Purple/green rolling horizontal bars and buzzing noise from the TV speakers with digital channels from an Antenna / RF/Coax connection (p. 30). • Remove the base stand from the set -top-box has a grounding issue. The TV is tilted to make sure the correct Cable TV signal type is set in the Plug & Play procedure. Refer to the resolution settings...
... resolution accordingly. Go to Home Use mode in the menu. Others Purple/green rolling horizontal bars and buzzing noise from the TV speakers with digital channels from an Antenna / RF/Coax connection (p. 30). • Remove the base stand from the set -top-box has a grounding issue. The TV is tilted to make sure the correct Cable TV signal type is set in the Plug & Play procedure. Refer to the resolution settings...


