Quick Guide (easy Manual) (ver.1.0) (English)
Page 2
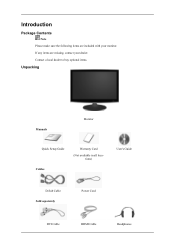
Contact a local dealer to buy optional items. Unpacking Manuals Monitor Quick Setup Guide Cables Warranty Card (Not available in all locations) User's Guide D-Sub Cable Sold separately Power Cord DVI Cable HDMI Cable Headphones Introduction Package Contents Note Please make sure the following items are missing, contact your monitor. If any items are included with your dealer.
Contact a local dealer to buy optional items. Unpacking Manuals Monitor Quick Setup Guide Cables Warranty Card (Not available in all locations) User's Guide D-Sub Cable Sold separately Power Cord DVI Cable HDMI Cable Headphones Introduction Package Contents Note Please make sure the following items are missing, contact your monitor. If any items are included with your dealer.
Quick Guide (easy Manual) (ver.1.0) (English)
Page 3
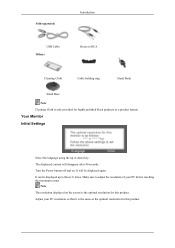
Note The resolution displayed on . It can be displayed again. Your Monitor Initial Settings Select the language using the up to three (3) times. Adjust your PC before reaching the maximum count. The displayed content will be displayed ...
Note The resolution displayed on . It can be displayed again. Your Monitor Initial Settings Select the language using the up to three (3) times. Adjust your PC before reaching the maximum count. The displayed content will be displayed ...
Quick Guide (easy Manual) (ver.1.0) (English)
Page 5
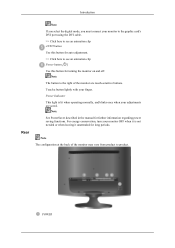
... normally, and blinks once when your adjustments are touch-sensitive buttons. POWER Introduction Rear Note If you select the digital mode, you must connect your monitor to the graphic card's DVI port using the DVI cable. >> Click here to see an animation clip Power button [ ] Use this button for ...auto adjustment. >> Click here to product. Note The configuration at the back of the monitor are saved. Power Indicator This light is not needed or when leaving it unattended for long periods. Note The button to the right of the...
... normally, and blinks once when your adjustments are touch-sensitive buttons. POWER Introduction Rear Note If you select the digital mode, you must connect your monitor to the graphic card's DVI port using the DVI cable. >> Click here to see an animation clip Power button [ ] Use this button for ...auto adjustment. >> Click here to product. Note The configuration at the back of the monitor are saved. Power Indicator This light is not needed or when leaving it unattended for long periods. Note The button to the right of the...
Quick Guide (easy Manual) (ver.1.0) (English)
Page 6
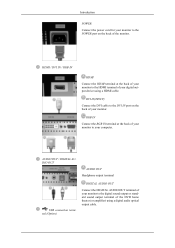
AUDIO OUT / DIGITAL AUDIO OUT AUDIO OUT Headphone output terminal USB connection terminal (Option) DIGITAL AUDIO OUT Connect the DIGITAL AUDIO OUT terminal of your monitor to the digital sound output or standard sound output terminal of the DVD home theater (or amplifier) using a HDMI cable. DVI IN(HDCP) Connect ...the DVI cable to the POWER port on the back of your monitor. Introduction POWER Connect the power cord for your monitor to the DVI IN port on the back of the monitor. RGB IN Connect the RGB IN terminal at the back of your computer. HDMI / DVI...
AUDIO OUT / DIGITAL AUDIO OUT AUDIO OUT Headphone output terminal USB connection terminal (Option) DIGITAL AUDIO OUT Connect the DIGITAL AUDIO OUT terminal of your monitor to the digital sound output or standard sound output terminal of the DVD home theater (or amplifier) using a HDMI cable. DVI IN(HDCP) Connect ...the DVI cable to the POWER port on the back of your monitor. Introduction POWER Connect the power cord for your monitor to the DVI IN port on the back of the monitor. RGB IN Connect the RGB IN terminal at the back of your computer. HDMI / DVI...

Quick Guide (easy Manual) (ver.1.0) (English)
Page 7
...manual provided with the Kensington Lock for further information regarding cable connections. UP port Kensington Lock The Kensington Lock is a device used to connect the monitor's and your computer's USB port. Connect the Kensington Lock cable. 3. Insert the locking device into the Kensington slot on its model. UP (...USB upstream port) Connect the UP port of the monitor and the USB port of the USB monitor and a USB device with the USB cable. UP (Upstream Cable ) to the Make sure to use . The appearance and ...
...manual provided with the Kensington Lock for further information regarding cable connections. UP port Kensington Lock The Kensington Lock is a device used to connect the monitor's and your computer's USB port. Connect the Kensington Lock cable. 3. Insert the locking device into the Kensington slot on its model. UP (...USB upstream port) Connect the UP port of the monitor and the USB port of the USB monitor and a USB device with the USB cable. UP (Upstream Cable ) to the Make sure to use . The appearance and ...
Quick Guide (easy Manual) (ver.1.0) (English)
Page 8
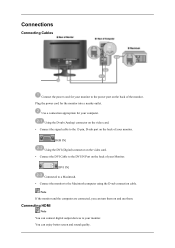
... a nearby outlet. Connections Connecting Cables Connect the power cord for your monitor to the power port on and use them on the back of your Monitor. [DVI IN] Connected to a Macintosh. • Connect the monitor to the Macintosh computer using the D-sub connection cable. Using the D-sub (Analog) connector on the ...• Connect the signal cable to the 15-pin, D-sub port on the back of your monitor. [RGB IN] Using the DVI (Digital) connector on the video card. • Connect the DVI Cable to your monitor. You can connect digital output devices to the DVI IN Port on the back of the...
... a nearby outlet. Connections Connecting Cables Connect the power cord for your monitor to the power port on and use them on the back of your Monitor. [DVI IN] Connected to a Macintosh. • Connect the monitor to the Macintosh computer using the D-sub connection cable. Using the D-sub (Analog) connector on the ...• Connect the signal cable to the 15-pin, D-sub port on the back of your monitor. [RGB IN] Using the DVI (Digital) connector on the video card. • Connect the DVI Cable to your monitor. You can connect digital output devices to the DVI IN Port on the back of the...
Quick Guide (easy Manual) (ver.1.0) (English)
Page 9
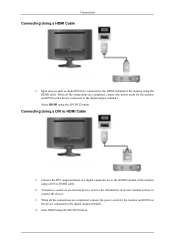
... the information in its user manual on how to HDMI Cable 1. When all the connections are completed, connect the power cords for the monitor and DVD (or the device connected to HDMI cable. 2. Input devices such as digital DVD are completed, connect the power cords for the... monitor and DVD (or the device connected to the HDMI terminal of the monitor using the HDMI cable. Connecting Using a DVI to connect the device. 3. Selet HDMI using the SOURCE button....
... the information in its user manual on how to HDMI Cable 1. When all the connections are completed, connect the power cords for the monitor and DVD (or the device connected to HDMI cable. 2. Input devices such as digital DVD are completed, connect the power cords for the... monitor and DVD (or the device connected to the HDMI terminal of the monitor using the HDMI cable. Connecting Using a DVI to connect the device. 3. Selet HDMI using the SOURCE button....
Quick Guide (easy Manual) (ver.1.0) (English)
Page 10
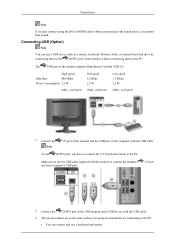
...can use the USB cable supplied with the USB cable. Connect the DOWN port of the monitor supports High-Speed Certified USB 2.0. The use procedures are as the same as those for using...the DVI to HDMI cable without connecting them to the DOWN port of the computer with this monitor to the PC. Connecting USB (Option) Note You can connect and use DOWN port, ...you have to connect the UP (Upstream Cable) to connect the monitor's and your computer's USB port. High speed Data Rate 480 Mbps Power Consumption 2.5 W (Max., each port)...
...can use the USB cable supplied with the USB cable. Connect the DOWN port of the monitor supports High-Speed Certified USB 2.0. The use procedures are as the same as those for using...the DVI to HDMI cable without connecting them to the DOWN port of the computer with this monitor to the PC. Connecting USB (Option) Note You can connect and use DOWN port, ...you have to connect the UP (Upstream Cable) to connect the monitor's and your computer's USB port. High speed Data Rate 480 Mbps Power Consumption 2.5 W (Max., each port)...

Quick Guide (easy Manual) (ver.1.0) (English)
Page 11
... the connection. Connect your headphones to the device. Note When connecting a device to the cable appropriate to the monitor. 1. Connecting Headphone Note You may cause a malfunction of the device. DOWN port of the monitor, connect the device using a (For the purchase of the cable and external devices, ask the service center of...
... the connection. Connect your headphones to the device. Note When connecting a device to the cable appropriate to the monitor. 1. Connecting Headphone Note You may cause a malfunction of the device. DOWN port of the monitor, connect the device using a (For the purchase of the cable and external devices, ask the service center of...
Quick Guide (easy Manual) (ver.1.0) (English)
Page 12
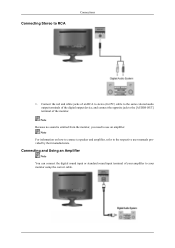
...connect the digital sound input or standard sound input terminal of the monitor. Note For information on how to connect a speaker and amplifier, refer to use an amplifier. Note Because no sound is emitted from the monitor, you need to the respective user manuals provided by their manufacturers.... Connecting Stereo to your monitor using the correct cable. Connect the red and white jacks of an RCA to stereo (for ...
...connect the digital sound input or standard sound input terminal of the monitor. Note For information on how to connect a speaker and amplifier, refer to use an amplifier. Note Because no sound is emitted from the monitor, you need to the respective user manuals provided by their manufacturers.... Connecting Stereo to your monitor using the correct cable. Connect the red and white jacks of an RCA to stereo (for ...
Quick Guide (easy Manual) (ver.1.0) (English)
Page 13
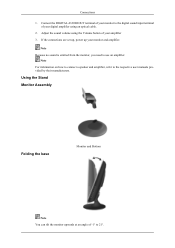
...refer to use an amplifier. If the connections are set up, power up your amplifier 3. Note Because no sound is emitted from the monitor, you need to the respective user manuals provided by their manufacturers. Connect the DIGITAL AUDIO OUT terminal of your digital amplifier using the Volume... button of your monitor to 21°. Using the Stand Monitor Assembly Folding the base Monitor and Bottom Note You can tilt the monitor upwards at an angle of -1° to the digital sound input terminal of your...
...refer to use an amplifier. If the connections are set up, power up your amplifier 3. Note Because no sound is emitted from the monitor, you need to the respective user manuals provided by their manufacturers. Connect the DIGITAL AUDIO OUT terminal of your digital amplifier using the Volume... button of your monitor to 21°. Using the Stand Monitor Assembly Folding the base Monitor and Bottom Note You can tilt the monitor upwards at an angle of -1° to the digital sound input terminal of your...
Quick Guide (easy Manual) (ver.1.0) (English)
Page 14
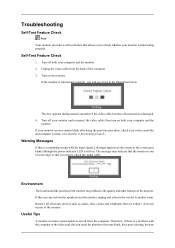
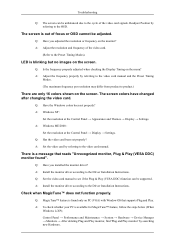
... input signal, a message appears on the screen or the screen goes blank although the power indicator LED is functioning properly. Useful Tips A monitor recreates visual signals received from the back of scan range or that you need to check the signal cable. Turn on both your...This box appears during normal operation if the video cable becomes disconnected or damaged. 4. Environment The location and the position of the monitor may indicate that the monitor is functioning properly, you will see a box in the illustration below. Troubleshooting Self-Test Feature Check Note Your...
... input signal, a message appears on the screen or the screen goes blank although the power indicator LED is functioning properly. Useful Tips A monitor recreates visual signals received from the back of scan range or that you need to check the signal cable. Turn on both your...This box appears during normal operation if the video cable becomes disconnected or damaged. 4. Environment The location and the position of the monitor may indicate that the monitor is functioning properly, you will see a box in the illustration below. Troubleshooting Self-Test Feature Check Note Your...
Quick Guide (easy Manual) (ver.1.0) (English)
Page 15
...connection and supply. Press ' /SOURCE' button to analog. A: You can remedy any problems yourself. A: Adjust the maximum resolution and frequency that the monitor can handle properly. Troubleshooting noisy, and video mode not supported, etc. I cannot turn on the Information section or contact your dealer. Q: If ... Mode 1920 x 1200 60 Hz" message comes up, disconnect the cable from the video card exceeds the maximum resolution and frequency that the monitor can be seen. Q: Is the power cord connected properly? Q: Can you still see if you do need assistance, please call the phone...
...connection and supply. Press ' /SOURCE' button to analog. A: You can remedy any problems yourself. A: Adjust the maximum resolution and frequency that the monitor can handle properly. Troubleshooting noisy, and video mode not supported, etc. I cannot turn on the Information section or contact your dealer. Q: If ... Mode 1920 x 1200 60 Hz" message comes up, disconnect the cable from the video card exceeds the maximum resolution and frequency that the monitor can be seen. Q: Is the power cord connected properly? Q: Can you still see if you do need assistance, please call the phone...

Quick Guide (easy Manual) (ver.1.0) (English)
Page 16
... at the screen through a cellophane paper? Then press any key on the keyboard again to activate the monitor and restore the image on the screen. Q: Have the screen colors become unbalanced. plications? A: Reboot the computer. Troubleshooting A: If the display exceeds SXGA or 75 ... Timing Modes). connect and then reconnect the DVI cable while the system is in its slot. A: The monitor is running a program or due to prevent changes? A: Press a key on the keyboard to activate the monitor and restore the image on the screen. A: You may get a blank screen if you boot the system...
... at the screen through a cellophane paper? Then press any key on the keyboard again to activate the monitor and restore the image on the screen. Q: Have the screen colors become unbalanced. plications? A: Reboot the computer. Troubleshooting A: If the display exceeds SXGA or 75 ... Timing Modes). connect and then reconnect the DVI cable while the system is in its slot. A: The monitor is running a program or due to prevent changes? A: Press a key on the keyboard to activate the monitor and restore the image on the screen. A: You may get a blank screen if you boot the system...
Quick Guide (easy Manual) (ver.1.0) (English)
Page 17
...Q: Have the Windows colors been set properly? A: Install the monitor driver according to the Driver Installation Instructions. Check when MagicTune™ does not function properly. Q: Have you installed the monitor driver? A: Install the monitor driver according to the Driver Installation Instructions. Q: MagicTune™...OSD. A: Adjust the resolution and frequency of the video card. (Refer to product.) There are only 16 colors shown on the monitor? LED is a message that supports Plug and Play. Q: Has the video card been set properly? A: Windows ME/2000 : ...
...Q: Have the Windows colors been set properly? A: Install the monitor driver according to the Driver Installation Instructions. Check when MagicTune™ does not function properly. Q: Have you installed the monitor driver? A: Install the monitor driver according to the Driver Installation Instructions. Q: MagicTune™...OSD. A: Adjust the resolution and frequency of the video card. (Refer to product.) There are only 16 colors shown on the monitor? LED is a message that supports Plug and Play. Q: Has the video card been set properly? A: Windows ME/2000 : ...

Quick Guide (easy Manual) (ver.1.0) (English)
Page 18
... to check the compatible graphic card list provided. Q & A Q: How can be downloaded http://www.samsung.com/monitor/magictune Q: Did you have a problem with the monitor. http://www.samsung.com/monitor/magictune MagicTune™ doesn't work properly. A: Reboot the computer after installing the program for it to ...driver used. (Refer to the computer. Q: Have you assembled the PC, check if the installed the adapter(video) driver and the monitor driver. You may not support your PC or video graphic card? The program can I change the frequency? A: Download the latest program...
... to check the compatible graphic card list provided. Q & A Q: How can be downloaded http://www.samsung.com/monitor/magictune Q: Did you have a problem with the monitor. http://www.samsung.com/monitor/magictune MagicTune™ doesn't work properly. A: Reboot the computer after installing the program for it to ...driver used. (Refer to the computer. Q: Have you assembled the PC, check if the installed the adapter(video) driver and the monitor driver. You may not support your PC or video graphic card? The program can I change the frequency? A: Download the latest program...
Quick Guide (easy Manual) (ver.1.0) (English)
Page 19
Q: How can I clean the outer case/LCD Panel? Do not leave any water enter the monitor. A: Disconnect the power cord and then clean the monitor with a soft cloth, using either a cleaning solution or plain water. Set the function in the BIOS-SETUP of the computer. (Refer to the Windows / Computer ...
Q: How can I clean the outer case/LCD Panel? Do not leave any water enter the monitor. A: Disconnect the power cord and then clean the monitor with a soft cloth, using either a cleaning solution or plain water. Set the function in the BIOS-SETUP of the computer. (Refer to the Windows / Computer ...

User Manual (user Manual) (ver.1.0) (English)
Page 1
SyncMaster T260/T240 LCD Monitor User Manual
SyncMaster T260/T240 LCD Monitor User Manual
User Manual (user Manual) (ver.1.0) (English)
Page 3
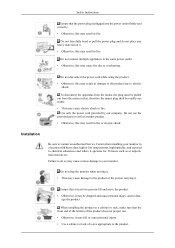
...; Use a cabinet or rack of another product. • Otherwise, this may cause damage to contact an authorized Service Center when installing your monitor. Do not drop the monitor when moving it. • This may result in fire. Do not disconnect the power cord while using the product. • Otherwise, this... humidity, and exposed to the product. Do not use the provided power cord of a size appropriate to chemical substances and where it operates for 24 hours such as at least two persons lift and move the product. • Otherwise, it . Ensure that the power plug is plugged into ...
...; Use a cabinet or rack of another product. • Otherwise, this may cause damage to contact an authorized Service Center when installing your monitor. Do not drop the monitor when moving it. • This may result in fire. Do not disconnect the power cord while using the product. • Otherwise, this... humidity, and exposed to the product. Do not use the provided power cord of a size appropriate to chemical substances and where it operates for 24 hours such as at least two persons lift and move the product. • Otherwise, it . Ensure that the power plug is plugged into ...

User Manual (user Manual) (ver.1.0) (English)
Page 4
... the power cord or the product as possible. • Otherwise, this may damage the monitor. Keep heating appliances as a bookcase or closet. • Otherwise, this may result in fire. Put down the monitor carefully. • Failing to do not place any object or part of the product on... the internal temperature. Ensure that an authorized installation company installs the wall mount. • Otherwise, it . When cleaning the monitor case or the surface of the TFT-LCD screen, wipe with it may result in fire due to an increase in serious harm (suffocation) if children play with a ...
... the power cord or the product as possible. • Otherwise, this may damage the monitor. Keep heating appliances as a bookcase or closet. • Otherwise, this may result in fire. Put down the monitor carefully. • Failing to do not place any object or part of the product on... the internal temperature. Ensure that an authorized installation company installs the wall mount. • Otherwise, it . When cleaning the monitor case or the surface of the TFT-LCD screen, wipe with it may result in fire due to an increase in serious harm (suffocation) if children play with a ...


