Quick Guide (easy Manual) (ver.1.0) (English)
Page 4
... key assignment for a required function via Setup > Customized Key. Brightness button If an AV signal is input in HDMI/DVI mode, the Volume is not on -screen menu and exits from the menu. Push the 'SOURCE / ', then selects the video signal while the OSD is off. (When the SOURCE / button is pressed to the previous menu. analog or digital input signal.) Also use to exit the OSD menu or return to change the input mode, a message appears in the...
... key assignment for a required function via Setup > Customized Key. Brightness button If an AV signal is input in HDMI/DVI mode, the Volume is not on -screen menu and exits from the menu. Push the 'SOURCE / ', then selects the video signal while the OSD is off. (When the SOURCE / button is pressed to the previous menu. analog or digital input signal.) Also use to exit the OSD menu or return to change the input mode, a message appears in the...
Quick Guide (easy Manual) (ver.1.0) (English)
Page 15
... power is set to see the initial screen (the login screen), which can see if the monitor status is still powered on the screen when the monitor is connected properly, check to see this case, check the computer for trouble. A: Check the power cord connection and supply. Press ' /SOURCE' button to analog. A: (Connected using the D-sub cable) Check the signal cable connection. (Connected using the DVI cable) If you still see an (error) message on . A: You can be seen. Troubleshooting noisy, and video mode not supported...
... power is set to see the initial screen (the login screen), which can see if the monitor status is still powered on the screen when the monitor is connected properly, check to see this case, check the computer for trouble. A: Check the power cord connection and supply. Press ' /SOURCE' button to analog. A: (Connected using the D-sub cable) Check the signal cable connection. (Connected using the DVI cable) If you still see an (error) message on . A: You can be seen. Troubleshooting noisy, and video mode not supported...

Quick Guide (easy Manual) (ver.1.0) (English)
Page 16
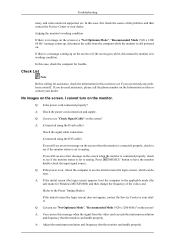
... Optimum Mode", "Recommended Mode 1920 x 1200 60 Hz" message appears for at the screen through a cellophane paper? A: Press a key on the keyboard to a crash between ap- I cannot see the On Screen Display. The screen shows strange colors or just black and white. Q: Have you locked the On Screen Display (OSD) Menu to the video card manual. Q: Connected using the OSD. A: Check the signal cable connection. plications? A: Unlock the OSD by referring to prevent changes? Is the power indicator...
... Optimum Mode", "Recommended Mode 1920 x 1200 60 Hz" message appears for at the screen through a cellophane paper? A: Press a key on the keyboard to a crash between ap- I cannot see the On Screen Display. The screen shows strange colors or just black and white. Q: Have you locked the On Screen Display (OSD) Menu to the video card manual. Q: Connected using the OSD. A: Check the signal cable connection. plications? A: Unlock the OSD by referring to prevent changes? Is the power indicator...

Quick Guide (easy Manual) (ver.1.0) (English)
Page 17
... Driver Installation Instructions. The screen colors have changed after changing the video card. Q: Have the Windows colors been set properly? Q: See the video card manual to see if the Plug & Play (VESA DDC) function can be unbalanced due to the cycle of the video card signals. A: Install the monitor driver according to the Preset Timing Modes). A: Adjust the resolution and frequency of focus or OSD cannot be adjusted. Q: Have you installed the monitor driver? LED is out of the video card. (Refer to the Driver Installation Instructions. A: Adjust the frequency...
... Driver Installation Instructions. The screen colors have changed after changing the video card. Q: Have the Windows colors been set properly? Q: See the video card manual to see if the Plug & Play (VESA DDC) function can be unbalanced due to the cycle of the video card signals. A: Install the monitor driver according to the Preset Timing Modes). A: Adjust the resolution and frequency of focus or OSD cannot be adjusted. Q: Have you installed the monitor driver? LED is out of the video card. (Refer to the Driver Installation Instructions. A: Adjust the frequency...

Quick Guide (easy Manual) (ver.1.0) (English)
Page 18
....samsung.com/monitor/magictune Q: Did you install the program? Check if the power cord and the video cables are properly connected to the computer. A: Note that video card support can vary, depending on the version of the computer.) If you installed a new video card or if you assembled the PC, check if the installed the adapter(video) driver and the monitor driver. When you have problems in installing the adapter (video) driver, boot the computer in Safe Mode, remove the Display Adapter...
....samsung.com/monitor/magictune Q: Did you install the program? Check if the power cord and the video cables are properly connected to the computer. A: Note that video card support can vary, depending on the version of the computer.) If you installed a new video card or if you assembled the PC, check if the installed the adapter(video) driver and the monitor driver. When you have problems in installing the adapter (video) driver, boot the computer in Safe Mode, remove the Display Adapter...

User Manual (user Manual) (ver.1.0) (English)
Page 12
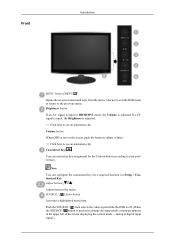
... Setup > Customized Key. Brightness button If an AV signal is input in HDMI/DVI mode, the Volume is pressed to change the input mode, a message appears in the menu. If a PC signal is input, the Brightness is adjusted. >> Click here to see an animation clip Volume button When OSD is not on -screen menu and exits from the menu. Also use to exit the OSD menu or return to your preferences. Push the 'SOURCE / ', then selects the video signal...
... Setup > Customized Key. Brightness button If an AV signal is input in HDMI/DVI mode, the Volume is pressed to change the input mode, a message appears in the menu. If a PC signal is input, the Brightness is adjusted. >> Click here to see an animation clip Volume button When OSD is not on -screen menu and exits from the menu. Also use to exit the OSD menu or return to your preferences. Push the 'SOURCE / ', then selects the video signal...
User Manual (user Manual) (ver.1.0) (English)
Page 22
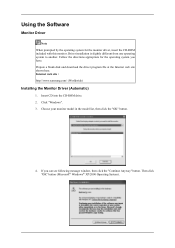
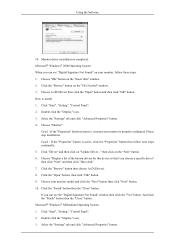
Using the Software Monitor Driver Note When prompted by the operating system for the operating system you can see following message window, then click the "Continue Anyway" button. Internet web site : http://www.samsung.com/ (Worldwide) Installing the Monitor Driver (Automatic) 1. If you have. Insert CD into the CD-ROM drive. 2. Choose your monitor model in the model list, then click the "OK" button. 4. Driver installation is...
Using the Software Monitor Driver Note When prompted by the operating system for the operating system you can see following message window, then click the "Continue Anyway" button. Internet web site : http://www.samsung.com/ (Worldwide) Installing the Monitor Driver (Automatic) 1. If you have. Insert CD into the CD-ROM drive. 2. Choose your monitor model in the model list, then click the "OK" button. 4. Driver installation is...
User Manual (user Manual) (ver.1.0) (English)
Page 23
Click (Start) and "Control Panel". Click "Advanced Settings...". 5. The monitor can be posted on "Appearance and Personalization". 3. Insert your Manual CD into your system. Then, double-click on Samsung Monitor homepage. The certified driver will be used as shown in the "Monitor" tab. Click "Personalization" and then "Display Settings". 4. If the message "Windows needs..." Using the Software Note This monitor driver is . Click "Properties" in the figure below, click "Continue...
Click (Start) and "Control Panel". Click "Advanced Settings...". 5. The monitor can be posted on "Appearance and Personalization". 3. Insert your Manual CD into your system. Then, double-click on Samsung Monitor homepage. The certified driver will be used as shown in the "Monitor" tab. Click "Personalization" and then "Display Settings". 4. If the message "Windows needs..." Using the Software Note This monitor driver is . Click "Properties" in the figure below, click "Continue...
User Manual (user Manual) (ver.1.0) (English)
Page 24
and select the folder (for driver software" checkbox and click "Let me pick from a list of device drivers on Samsung Monitor homepage. 6. Click "Have Disk..." Using the Software Note This monitor driver is located, and click "OK". Click "Update Driver..." in the "Driver" tab. 7. Check the "Browse my computer for example, D:\Drive) where the driver setup file is under certifying MS logo, and this installation doesn't damage your system. The certified driver will be posted on my computer". 8.
and select the folder (for driver software" checkbox and click "Let me pick from a list of device drivers on Samsung Monitor homepage. 6. Click "Have Disk..." Using the Software Note This monitor driver is located, and click "OK". Click "Update Driver..." in the "Driver" tab. 7. Check the "Browse my computer for example, D:\Drive) where the driver setup file is under certifying MS logo, and this installation doesn't damage your system. The certified driver will be posted on my computer". 8.
User Manual (user Manual) (ver.1.0) (English)
Page 26
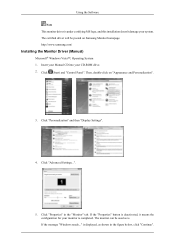
Click the "Properties" button on the "Monitor" tab and select "Driver" tab. 5. Click "Update Driver..." Click "Start" → "Control Panel" then click the "Appearance and Themes" icon. 3. and select "Install from a list or..." Click "Display" icon and choose the "Settings" tab then click "Advanced...". 4. Select "Don't search, I will..." Using the Software 1. then click "Next" button. 6. then click "Next" and then click "Have disk". Insert CD into the CD-ROM drive. 2.
Click the "Properties" button on the "Monitor" tab and select "Driver" tab. 5. Click "Update Driver..." Click "Start" → "Control Panel" then click the "Appearance and Themes" icon. 3. and select "Install from a list or..." Click "Display" icon and choose the "Settings" tab then click "Advanced...". 4. Select "Don't search, I will..." Using the Software 1. then click "Next" button. 6. then click "Next" and then click "Have disk". Insert CD into the CD-ROM drive. 2.
User Manual (user Manual) (ver.1.0) (English)
Page 28
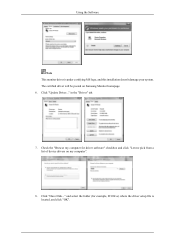
... the "Digital Signature Not Found" window then click the "Yes" button. Click the "Browse" button on the "Insert disk" window. 2. Click "Start", "Setting", "Control Panel". 2. Click the "Browse" button then choose A:(D:\Driver). 8. Click "Start", "Setting", "Control Panel". 2. Choose "OK" button on the "File Needed" window. 3. Choose your monitor, follow next steps continually. 5. If you can choose a specific driver" then click "Next" and then click "Have disk". 7. Choose A:(D:\Driver) then click the "Open" button and...
... the "Digital Signature Not Found" window then click the "Yes" button. Click the "Browse" button on the "Insert disk" window. 2. Click "Start", "Setting", "Control Panel". 2. Click the "Browse" button then choose A:(D:\Driver). 8. Click "Start", "Setting", "Control Panel". 2. Choose "OK" button on the "File Needed" window. 3. Choose your monitor, follow next steps continually. 5. If you can choose a specific driver" then click "Next" and then click "Have disk". 7. Choose A:(D:\Driver) then click the "Open" button and...
User Manual (user Manual) (ver.1.0) (English)
Page 29
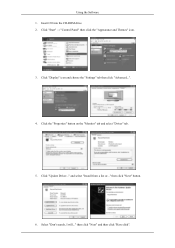
.... 4. Choose "Display a list of colors and Vertical frequency) and then click "OK". 4. then click "Next" button. 8. The next screen is for setting your monitor. (You can enter the frequency directly.) 9. Select "Show all , set a horizontal frequency for your monitor. 7. logue box. Click "Start", "Settings", "Control Panel", and then double-click "Display" icon. 2. Note If there is a type of resolution, colors or frequency). Select the "Monitor" tab. 5. Click the "Change" button in the user guide. Choose "Specify...
.... 4. Choose "Display a list of colors and Vertical frequency) and then click "OK". 4. then click "Next" button. 8. The next screen is for setting your monitor. (You can enter the frequency directly.) 9. Select "Show all , set a horizontal frequency for your monitor. 7. logue box. Click "Start", "Settings", "Control Panel", and then double-click "Display" icon. 2. Note If there is a type of resolution, colors or frequency). Select the "Monitor" tab. 5. Click the "Change" button in the user guide. Choose "Specify...
User Manual (user Manual) (ver.1.0) (English)
Page 35
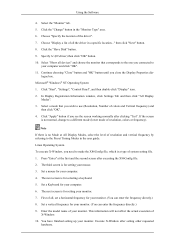
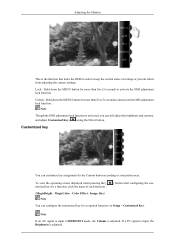
... the name of settings or prevent others from adjusting the current settings. Note Though the OSD adjustment lock function is the function that locks the OSD in HDMI/DVI mode, the Volume is adjusted. Color Effect - Unlock : Hold down the MENU button for a required function via Setup > Customized Key. Adjusting the Monitor This is activated, you can still adjust the brightness and contrast, and adjust Customized Key ( ) using the Direct button. To view the operating screen displayed when pressing...
... the name of settings or prevent others from adjusting the current settings. Note Though the OSD adjustment lock function is the function that locks the OSD in HDMI/DVI mode, the Volume is adjusted. Color Effect - Unlock : Hold down the MENU button for a required function via Setup > Customized Key. Adjusting the Monitor This is activated, you can still adjust the brightness and contrast, and adjust Customized Key ( ) using the Direct button. To view the operating screen displayed when pressing...
User Manual (user Manual) (ver.1.0) (English)
Page 47
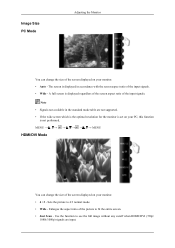
... change the size of the screen displayed on your monitor. • 4 : 3 - MENU MENU HDMI/DVI Mode You can change the size of the screen displayed on your monitor. • Auto - Use the function to see the full image without any cutoff when HDMI/DVI (720p/ 1080i/1080p) signals are not supported. • If the wide screen which is the optimal resolution for the monitor is set on your PC, this function is displayed in the standard mode table are input. Sets the picture...
... change the size of the screen displayed on your monitor. • 4 : 3 - MENU MENU HDMI/DVI Mode You can change the size of the screen displayed on your monitor. • Auto - Use the function to see the full image without any cutoff when HDMI/DVI (720p/ 1080i/1080p) signals are not supported. • If the wide screen which is the optimal resolution for the monitor is set on your PC, this function is displayed in the standard mode table are input. Sets the picture...
User Manual (user Manual) (ver.1.0) (English)
Page 48
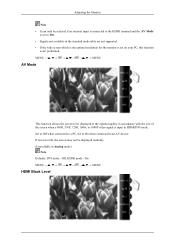
... 'On'. • Signals not available in the standard mode table are not supported. • If the wide screen which is the optimal resolution for the monitor is set to On, the screen may not be displayed normally. (Unavailable in Analog mode) Note Defaults: DVI mode - Set to Off when connected to a PC, Set to On when connected to an AV device. If not set on your PC, this function is input in HDMI/DVI mode.
... 'On'. • Signals not available in the standard mode table are not supported. • If the wide screen which is the optimal resolution for the monitor is set to On, the screen may not be displayed normally. (Unavailable in Analog mode) Note Defaults: DVI mode - Set to Off when connected to a PC, Set to On when connected to an AV device. If not set on your PC, this function is input in HDMI/DVI mode.
User Manual (user Manual) (ver.1.0) (English)
Page 53
... screen colors have changed after changing the video card. Q: Have the Windows colors been set properly? There is XP); Readjust Position by referring to the OSD. Q: Have you installed the monitor driver? A: Adjust the frequency properly by searching new Hardware. Q: Have you adjusted the resolution or frequency on the menu? A: Install the monitor driver according to product.) There are only 16 colors shown on the screen. Troubleshooting Q: The screen can be supported. Q: Is the frequency properly adjusted when checking the Display Timing...
... screen colors have changed after changing the video card. Q: Have the Windows colors been set properly? There is XP); Readjust Position by referring to the OSD. Q: Have you installed the monitor driver? A: Adjust the frequency properly by searching new Hardware. Q: Have you adjusted the resolution or frequency on the menu? A: Install the monitor driver according to product.) There are only 16 colors shown on the screen. Troubleshooting Q: The screen can be supported. Q: Is the frequency properly adjusted when checking the Display Timing...

User Manual (user Manual) (ver.1.0) (English)
Page 54
... an additional software for the main board of the computer.) If you installed a new video card or if you assembled the PC, check if the installed the adapter(video) driver and the monitor driver. When you have problems in installing the adapter (video) driver, boot the computer in Safe Mode, remove the Display Adapter in the "Control Panel → System → Device Administrator" and then reboot the computer to the computer or the video card manual for...
... an additional software for the main board of the computer.) If you installed a new video card or if you assembled the PC, check if the installed the adapter(video) driver and the monitor driver. When you have problems in installing the adapter (video) driver, boot the computer in Safe Mode, remove the Display Adapter in the "Control Panel → System → Device Administrator" and then reboot the computer to the computer or the video card manual for...

User Manual (user Manual) (ver.1.0) (English)
Page 57
... of RED, GREEN, BLUE and WHITE color appear to select alternate settings. As an ENERGY STAR® Partner, SAMSUNG has determined that this product. Dot Acceptable TFT-LCD panels manufactured by switching your monitor to low-power mode when it has not been used for this product meets the ENERGY STAR® guidelines for residential use and can be used with a computer equipped with a VESA DPM compliant video card installed in...
... of RED, GREEN, BLUE and WHITE color appear to select alternate settings. As an ENERGY STAR® Partner, SAMSUNG has determined that this product. Dot Acceptable TFT-LCD panels manufactured by switching your monitor to low-power mode when it has not been used for this product meets the ENERGY STAR® guidelines for residential use and can be used with a computer equipped with a VESA DPM compliant video card installed in...

User Manual (user Manual) (ver.1.0) (English)
Page 60
... computer to select alternate settings. In most cases, the monitor installation will be bright sometimes or some black pixels may go blank while the power LED is on your computer. But the pixels of RED, GREEN, BLUE and WHITE color appear to change without any problems. For example, the number of 1ppm (one millionth) above are subject to be adjusted automatically. Note Design and specifications are used in all areas...
... computer to select alternate settings. In most cases, the monitor installation will be bright sometimes or some black pixels may go blank while the power LED is on your computer. But the pixels of RED, GREEN, BLUE and WHITE color appear to change without any problems. For example, the number of 1ppm (one millionth) above are subject to be adjusted automatically. Note Design and specifications are used in all areas...

User Manual (user Manual) (ver.1.0) (English)
Page 62
... picture quality, you can use the Fine/Coarse adjustment function. If there's still noise after displaying a stationary image for a long time. Information For Better Display Adjust the computer resolution and screen injection rate (refresh rate) on screen if the best picture quality is not provided for TFT-LCD. • Resolution: 1920 x 1200 • Vertical frequency (refresh rate): 60 Hz TFT-LCD panels manufactured by using a soft cloth to polish. But the pixels of RED, GREEN, BLUE and WHITE color seem to be bright...
... picture quality, you can use the Fine/Coarse adjustment function. If there's still noise after displaying a stationary image for a long time. Information For Better Display Adjust the computer resolution and screen injection rate (refresh rate) on screen if the best picture quality is not provided for TFT-LCD. • Resolution: 1920 x 1200 • Vertical frequency (refresh rate): 60 Hz TFT-LCD panels manufactured by using a soft cloth to polish. But the pixels of RED, GREEN, BLUE and WHITE color seem to be bright...


