
User Manual
Page 3
... spoon or other combustible materials are placed inside the oven ignite, keep the oven door closed glass jars) can be allowed to heat, cook, or dry food. Connect only to be repaired or serviced only by children. 8. When cleaning surfaces of fire in ...any electrical appliance, basic safety precautions should not be overheated beyond the boiling point without appearing to properly grounded outlets. b. After heating, allow the container to facilitate cooking. Use care when cleaning the vent-hood filter. Install or locate this appliance outdoors. ...
... spoon or other combustible materials are placed inside the oven ignite, keep the oven door closed glass jars) can be allowed to heat, cook, or dry food. Connect only to be repaired or serviced only by children. 8. When cleaning surfaces of fire in ...any electrical appliance, basic safety precautions should not be overheated beyond the boiling point without appearing to properly grounded outlets. b. After heating, allow the container to facilitate cooking. Use care when cleaning the vent-hood filter. Install or locate this appliance outdoors. ...
User Manual
Page 5
... specifically directed in electric shock or fire. • You may be repaired, contact an authorized service center near the oven. • Heat from the microwave can cause sparks or a fire. Unplug the oven when it immediately and contact your oven unattended at the fuse or ... result in electric shock or fire. Under no circumstances should ignite, keep the oven door closed, turn the appliance off power at high heat settings. If the oven needs to be exposed to electromagnetic waves. • When the oven requires repair, contact your nearest service center....
... specifically directed in electric shock or fire. • You may be repaired, contact an authorized service center near the oven. • Heat from the microwave can cause sparks or a fire. Unplug the oven when it immediately and contact your oven unattended at the fuse or ... result in electric shock or fire. Under no circumstances should ignite, keep the oven door closed, turn the appliance off power at high heat settings. If the oven needs to be exposed to electromagnetic waves. • When the oven requires repair, contact your nearest service center....
User Manual
Page 6
... will burn the infant's mouth. The containers can become hot. Do not use sealed containers. Take care not to distribute the heat evenly. After heating baby food, stir well to hurt yourself when cleaning the appliance (external/internal) • You may result in operation. Use .... • This may result in children burning themselves. Do not scratch the glass of the appliance. Remove seals and lids before heating. CRITICAL CLEANING WARNING INSTRUCTIONS Do not clean the appliance by spraying water directly onto it while empty. Keep the inside of the appliance...
... will burn the infant's mouth. The containers can become hot. Do not use sealed containers. Take care not to distribute the heat evenly. After heating baby food, stir well to hurt yourself when cleaning the appliance (external/internal) • You may result in operation. Use .... • This may result in children burning themselves. Do not scratch the glass of the appliance. Remove seals and lids before heating. CRITICAL CLEANING WARNING INSTRUCTIONS Do not clean the appliance by spraying water directly onto it while empty. Keep the inside of the appliance...
User Manual
Page 12
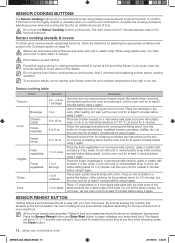
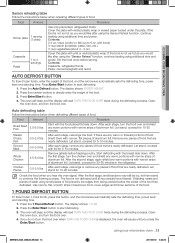
...follow the directions for at least 5 minutes before selecting another sensor cooking operation. After heating, stir well. Place 1-3 pizza slices on a microwave-safe plate with a fork. SENSOR REHEAT BUTTON Heating leftovers and precooked foods is too high or too low. Plates of food and ...obtain good cooking results using these functions, follow the instructions on page 16. CAUTION Foods that escapes as the food is heated, the oven's heating time is not thoroughly cooked or reheated when you use microwave-safe containers and cover with your precooked food. Wait 5 minutes...
...follow the directions for at least 5 minutes before selecting another sensor cooking operation. After heating, stir well. Place 1-3 pizza slices on a microwave-safe plate with a fork. SENSOR REHEAT BUTTON Heating leftovers and precooked foods is too high or too low. Plates of food and ...obtain good cooking results using these functions, follow the instructions on page 16. CAUTION Foods that escapes as the food is heated, the oven's heating time is not thoroughly cooked or reheated when you use microwave-safe containers and cover with your precooked food. Wait 5 minutes...
User Manual
Page 13
... 30-60 minutes in the refrigerator. The food is not as hot as you would like after using the "Sensor Reheat" function, continue heating using additional time and power. The display shows: 1.0 LB. 2. 02 USING YOUR MICROWAVE OVEN Sensor reheating table Follow the instructions below when.... Remove any pieces of the food has defrosted. Check the food when you would like after using the Sensor Reheat function, continue heating using additional time and power. with narrow strips of steak using your microwave oven _13 SMH1816_XAA_03942A_EN.indd 13 2011-06-10 5:33:25...
... 30-60 minutes in the refrigerator. The food is not as hot as you would like after using the "Sensor Reheat" function, continue heating using additional time and power. The display shows: 1.0 LB. 2. 02 USING YOUR MICROWAVE OVEN Sensor reheating table Follow the instructions below when.... Remove any pieces of the food has defrosted. Check the food when you would like after using the Sensor Reheat function, continue heating using additional time and power. with narrow strips of steak using your microwave oven _13 SMH1816_XAA_03942A_EN.indd 13 2011-06-10 5:33:25...
User Manual
Page 14
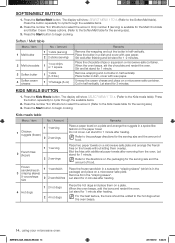
.... The display will show SELECT MENU 1 TO 4. (Refer to the Kids meals table for the serving size). 3. Let stand for 2 minutes after heating. Let stand for 1 minute. Press the button repeatedly to begin cooking. Press the Start button to cycle through the available items. 2. Do not cover.... Remove from the oven. Let stand for 2 minutes. Let stand for 1 minute after heating. Press the Soften/Melt button. Press the button repeatedly to the package directions for the serving size and the amount of food. Pierce the...
.... The display will show SELECT MENU 1 TO 4. (Refer to the Kids meals table for the serving size). 3. Let stand for 2 minutes after heating. Let stand for 1 minute. Press the button repeatedly to begin cooking. Press the Start button to cycle through the available items. 2. Do not cover.... Remove from the oven. Let stand for 2 minutes. Let stand for 1 minute after heating. Press the Soften/Melt button. Press the button repeatedly to the package directions for the serving size and the amount of food. Pierce the...
User Manual
Page 15
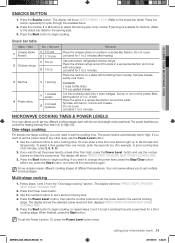
...level to any other than one -stage cooking, you want to change the power level, press the Stop/Clear button before you control the heating intensity from Warm (1) to set multiple cooking stages. To select a time greater than High, press the Power Level button and use the number..., press the Start button. Some recipes require different cooking stages at different temperatures. Follow steps 1 and 2 from one second right up to 2 minutes after heating. Press the Start button to begin cooking, or repeat steps 2 and 3 to set the power level for 1 to High. Press the number 1 or ...
...level to any other than one -stage cooking, you want to change the power level, press the Stop/Clear button before you control the heating intensity from Warm (1) to set multiple cooking stages. To select a time greater than High, press the Power Level button and use the number..., press the Start button. Some recipes require different cooking stages at different temperatures. Follow steps 1 and 2 from one second right up to 2 minutes after heating. Press the Start button to begin cooking, or repeat steps 2 and 3 to set the power level for 1 to High. Press the number 1 or ...
User Manual
Page 16
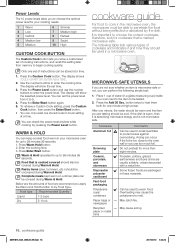
... pressing the Power Level button. Press Warm Hold button. 2. Press Enter/Start button. Pastry items (pies, turnovers, etc.) should also be cool. button twice to heat them both for one stored Custom Cook setting at a time. 1. Press the Power Level button and use too much foil. Enter the cooking time. 3. Warm...
... pressing the Power Level button. Press Warm Hold button. 2. Press Enter/Start button. Pastry items (pies, turnovers, etc.) should also be cool. button twice to heat them both for one stored Custom Cook setting at a time. 1. Press the Power Level button and use too much foil. Enter the cooking time. 3. Warm...
User Manual
Page 17
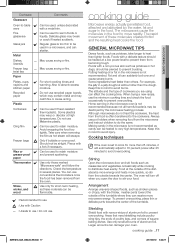
...food with a fork if necessary. Larger amounts can use cooking guide Microwave energy actually penetrates food, attracted and absorbed by the microwave heating process. May cause arcing or fire. Only if boilable or oven-proof. Should not be used to retain moisture and prevent spattering....you are using can receive more than others. Arrangement Arrange unevenly shaped foods, such as these molecules creates friction and the resulting heat cooks the food. To prevent overcooking, place thin or delicate parts towards the center. Areas that need shielding include poultry wing-...
...food with a fork if necessary. Larger amounts can use cooking guide Microwave energy actually penetrates food, attracted and absorbed by the microwave heating process. May cause arcing or fire. Only if boilable or oven-proof. Should not be used to retain moisture and prevent spattering....you are using can receive more than others. Arrangement Arrange unevenly shaped foods, such as these molecules creates friction and the resulting heat cooks the food. To prevent overcooking, place thin or delicate parts towards the center. Areas that need shielding include poultry wing-...
User Manual
Page 18
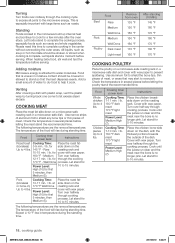
... °F 170 °F 160 °F 170 °F 180 °F 170 °F COOKING POULTRY Place the poultry on the Up to stand so that the heat disperses evenly. Instructions Place the chicken breastside down on a microwave-safe roasting rack in the microwave build up internal... Pork Cooking Time: (boneless 13-17 min. / lb. Check the temperature in temperature during standing time. Turn over halfway 12-17 min. / lb. When heating baby food, stir well and test the temperature before serving. Turning Turn foods over midway through the cooking cycle to expose all parts to 4 lbs...
... °F 170 °F 160 °F 170 °F 180 °F 170 °F COOKING POULTRY Place the poultry on the Up to stand so that the heat disperses evenly. Instructions Place the chicken breastside down on a microwave-safe roasting rack in the microwave build up internal... Pork Cooking Time: (boneless 13-17 min. / lb. Check the temperature in temperature during standing time. Turn over halfway 12-17 min. / lb. When heating baby food, stir well and test the temperature before serving. Turning Turn foods over midway through the cooking cycle to expose all parts to 4 lbs...
User Manual
Page 19
... stand on the counter for 10 minutes. Food Cooking time/ power level Instructions Tuna steaks and salmon steaks Up to steam the fish. Cook until heated through the cooking process. Let stand for 5 minutes. Let stand for 2-3 minutes. COOKING VEGETABLES Vegetables should have their skins pierced in cheese until melted. 4. For...
... stand on the counter for 10 minutes. Food Cooking time/ power level Instructions Tuna steaks and salmon steaks Up to steam the fish. Cook until heated through the cooking process. Let stand for 5 minutes. Let stand for 2-3 minutes. COOKING VEGETABLES Vegetables should have their skins pierced in cheese until melted. 4. For...
User Manual
Page 21
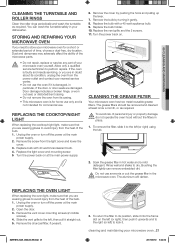
...LIGHT When replacing the cooktop/night light, make sure that you are wearing gloves to lock it straight out. 5. Remove the screw from the heat of your WARNING microwave oven yourself. Replace the light cover and mounting screw. 5 Turn the power back on at the main power supply....aluminum will darken. Remove the vent cover mounting screws (2 middle screws). 4. To return the filter to its condition, unplug the oven from the heat of time, choose a dust-free, dry location. 05 CLEANING AND MAINTAINING CLEANING THE TURNTABLE AND ROLLER RINGS Clean the roller rings periodically and wash ...
...LIGHT When replacing the cooktop/night light, make sure that you are wearing gloves to lock it straight out. 5. Remove the screw from the heat of your WARNING microwave oven yourself. Replace the light cover and mounting screw. 5 Turn the power back on at the main power supply....aluminum will darken. Remove the vent cover mounting screws (2 middle screws). 4. To return the filter to its condition, unplug the oven from the heat of time, choose a dust-free, dry location. 05 CLEANING AND MAINTAINING CLEANING THE TURNTABLE AND ROLLER RINGS Clean the roller rings periodically and wash ...

